Your Jeep doesn’t just tackle trails—it wages a daily war against rust. Every mud puddle, salted winter highway, and coastal breeze deposits corrosive enemies onto your frame, rockers, and undercarriage. While Jeep builds their vehicles tough, the factory undercoating is often just a starting point, not a finish line. Whether you’re restoring a classic CJ or protecting a brand-new Wrangler, choosing the right undercoating kit can mean the difference between a rig that lasts decades and one that dissolves into iron oxide.
This comprehensive guide dives deep into everything you need to know about Jeep undercoating kits—no brand bias, no sponsored recommendations, just pure technical expertise. We’ll explore the science behind rust prevention, break down every type of coating system, and walk you through application techniques that professionals use. By the end, you’ll know exactly what to look for in a complete kit and how to execute a bulletproof undercoating job in your own garage.
Top 10 Undercoating Kits For Jeeps
Detailed Product Reviews
1. U-POL Raptor Black Urethane Spray-On Truck Bed Liner Kit, Protective Paint with Spray Gun, for Tailgates & Trucks, Vehicle Undercoating, 4 Quart Kit

Overview: The U-POL Raptor Black kit delivers professional-grade truck bed protection in a convenient DIY package. This 2K urethane system creates a durable, flexible barrier that withstands heavy cargo while reducing road noise and vibration. Designed for 6-8 foot truck beds, it provides comprehensive coverage for typical pickup applications.
What Makes It Stand Out: The included spray gun sets this apart from roll-on alternatives, providing a textured OEM-style finish that looks factory-applied. Its UV-resistant formula prevents fading even under intense sun exposure, while the rapid-drying chemistry allows multiple coats within an hour. The coating bonds directly to OEM paint or self-etching primer, eliminating compatibility concerns and ensuring superior adhesion.
Value for Money: At $142.98 for four quarts, it costs significantly less than professional Rhino or Linex applications ($400+). The kit includes everything needed—base, hardener, and applicator—making it a complete solution without hidden costs. Coverage for a full truck bed makes it competitively priced against premium alternatives.
Strengths and Weaknesses: Strengths include exceptional durability against scratches, chemicals, and extreme temperatures, impressive flexibility that won’t crack under stress, and straightforward application that yields professional results. The coating genuinely reduces road noise and prevents rust formation. Weaknesses: requires a substantial compressor delivering 8 CFM @ 50-60 PSI, demands meticulous surface preparation for proper adhesion, and the initial investment exceeds basic roll-on products.
Bottom Line: For truck owners seeking professional results without the professional price tag, this Raptor kit is an outstanding choice. It balances performance, ease of use, and long-term durability, making it ideal for both bed liners and undercoating applications where maximum protection matters.
2. Barrier Bond - Rubberized Undercoating Sound Deadener Kit, 28oz 4-Pack, Black Spray, Vehicle Undercoating, with Spray Gun
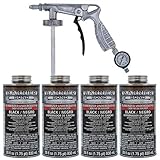
Overview: The Barrier Bond kit offers a rubberized undercoating solution focused on sound deadening and corrosion protection. This four-pack provides 112 ounces of ready-to-spray material designed primarily for underbody applications rather than heavy-duty bed liner duty.
What Makes It Stand Out: Its 50-state VOC compliance ensures legal use nationwide, a critical advantage over restricted products. The paintable formula allows top-coat customization, while the fast-drying chemistry accelerates project completion. The included spray gun and four-can pack offer convenience for multiple vehicles or extensive undercarriage coverage.
Value for Money: At $114.99 for 112 ounces (3.5 quarts), it’s priced lower than urethane alternatives but provides less coverage per dollar for bed applications. For undercoating purposes, it’s reasonably priced, though frequent reapplications may be needed compared to more durable options.
Strengths and Weaknesses: Strengths include excellent sound deadening properties, environmental compliance across all states, paintability for custom finishes, and rapid drying time. The ready-to-spray format eliminates mixing errors. Weaknesses: rubberized formula lacks the extreme impact resistance of urethane bed liners, making it unsuitable for heavy cargo abuse. It’s better suited for underbody protection than bed applications, and durability claims are less robust than premium competitors.
Bottom Line: This kit excels as an undercoating and sound deadener for daily drivers in emissions-strict states. However, it’s not a true bed liner replacement. Choose it for underbody rust prevention and noise reduction, but select a urethane system like Raptor for truck bed protection that must withstand heavy loads and constant abrasion.
3. Raptor Tintable Urethane Spray-On Truck Bed Liner Kit, Protective Paint With Spray Gun, For Tailgates & Trucks, Vehicle Undercoating, 4 Quart Kit

Overview: This tintable version of the popular Raptor kit offers identical performance to the black formula while allowing custom color matching. The 2K urethane system provides the same durable, flexible protection against stains, scratches, and rust for truck beds and beyond.
What Makes It Stand Out: The ability to tint the coating to match or complement your vehicle’s factory paint is the defining feature. This customization doesn’t compromise the UV-resistant properties or durability. The same professional-grade spray gun and rapid-dry formula enable quick, multiple coats, while the versatile application methods accommodate various project needs.
Value for Money: At $144.99, it’s only $2 more than the black version—a minimal premium for color flexibility. This represents excellent value for those wanting a cohesive aesthetic, costing far less than custom-colored professional liners while delivering comparable protection.
Strengths and Weaknesses: Strengths mirror the black kit: exceptional durability, noise reduction, chemical resistance, and professional spray finish. The tintable formula opens design possibilities without sacrificing performance. Weaknesses include the need for proper tinting knowledge or professional color matching, slightly higher cost than pre-mixed black, and potential need for additional clear coat depending on desired sheen. The compressor requirement (8 CFM) remains a barrier for some DIYers.
Bottom Line: For enthusiasts wanting bed liner protection without sacrificing aesthetics, this tintable kit is unbeatable. It delivers Raptor’s renowned durability with unlimited color possibilities, making it perfect for custom builds, restorations, or simply matching your truck’s factory finish.
4. Raptor Black Urethane Spray-On Truck Bed Liner Kit, Protective Paint With Spray Gun, For Tailgates & Trucks, Vehicle Undercoating, 8 Quart Kit

Overview: This 8-quart Raptor kit doubles the material of the standard kit for larger projects. It provides the same tough 2K urethane protection in a bulk package ideal for oversized truck beds, multiple vehicles, or comprehensive undercoating jobs.
What Makes It Stand Out: The value proposition shines through its bulk sizing—eight 750ml bottles and two hardeners provide substantial coverage while reducing per-ounce cost. The included spray gun maintains application quality, and the rapid-dry formula ensures efficient workflow even on extensive surfaces. It’s the same professional-grade chemistry as the smaller kit, just more of it.
Value for Money: At $277.99 ($1.03 per ounce), it’s significantly cheaper than buying two 4-quart kits ($285+). For anyone with a long-bed truck, multiple vehicles, or planning undercoating work, the savings are compelling. The bulk purchase eliminates mid-project reordering concerns.
Strengths and Weaknesses: Strengths include superior per-ounce value, ample material for large projects, and the same durability, flexibility, and UV resistance that define the Raptor line. The kit prevents coverage anxiety on oversized beds. Weaknesses: the higher upfront cost may deter casual users, and storage of leftover material requires careful sealing. Like its smaller sibling, it demands a robust compressor and thorough prep work.
Bottom Line: If you have a long-bed truck, multiple vehicles, or substantial undercoating needs, this 8-quart kit is the smartest financial choice. It delivers identical professional results with better economics, making it ideal for serious DIYers or small shop operations.
5. Tekton44 Undercoating for Vehicles, Automotive Black Undercoating Kit (8 Liter Cans + 1 Spray Gun + 1 Spray Wand)

Overview: The Tekton44 kit positions itself as a budget-conscious undercoating solution with impressive volume. Eight liters of black coating, a spray gun, and a specialized wand for hard-to-reach areas make this a comprehensive package for underbody protection.
What Makes It Stand Out: The spray wand attachment enables precise application to frame rails, wheel wells, and crevices without crawling underneath. The permanently tacky formulation maintains flexibility in extreme cold, preventing cracking. At 8 liters, it offers more volume than most competitors at a compelling price point.
Value for Money: At $199 ($0.74 per ounce), it’s the most economical option here, significantly undercutting urethane kits. For pure undercoating purposes on multiple vehicles, the value is exceptional. The included wand adds utility that competitors charge extra for.
Strengths and Weaknesses: Strengths include outstanding price-per-volume ratio, corrosion resistance, crack-proof flexibility, and the practical spray wand. The non-drip formula simplifies application. Weaknesses: the “permanently tacky” surface may attract dirt and debris, creating a grimy texture over time. As a rubberized undercoating, it lacks the heavy-impact resistance of 2K urethane systems for truck bed duty. Brand recognition trails industry leaders like Raptor.
Bottom Line: Choose Tekton44 for comprehensive underbody rust protection on a budget. It’s ideal for northern climate vehicles needing flexible, corrosion-resistant coating. However, for truck beds that haul heavy, abrasive loads, invest in a urethane kit like Raptor for superior durability and impact resistance.
6. Raptor Tintable Urethane Spray-On Truck Bed Liner Kit, Protective Paint With Spray Gun, For Tailgates & Trucks, Vehicle Undercoating, 8 Quart Kit

Overview: The Raptor Tintable Urethane Spray-On Truck Bed Liner Kit offers professional-grade protection for truck beds and beyond. This 8-quart system uses a 2K urethane formula that cures to form a durable, flexible barrier against stains, scratches, and environmental damage. The kit includes everything needed for application: eight 750ml bottles of tintable base, two liters of hardener, a spray gun, and clear instructions.
What Makes It Stand Out: The tintable formula sets this kit apart, allowing custom color matching to your vehicle’s paint scheme. The UV-resistant urethane maintains flexibility while reducing road noise and vibration—a premium feature rarely found in DIY kits. The rapid-drying formula enables multiple coats within an hour, accelerating project completion.
Value for Money: At $282.99 ($1.05 per ounce), this kit costs significantly less than professional spray-on liners ($400-$800). The 8-quart capacity covers most truck beds with material to spare for touch-ups or additional projects like trailer floors or boat interiors, maximizing return on investment.
Strengths and Weaknesses: Strengths include exceptional durability, professional finish quality, versatile application methods (spray, roll, or brush), and excellent adhesion to OEM paint. The comprehensive kit eliminates guesswork. Weaknesses include the need for a capable air compressor (8 CFM @ 50-60 PSI), substantial upfront cost, and the two-component mixing process that demands careful measurement and cleanup.
Bottom Line: Ideal for DIY enthusiasts seeking professional results with custom color options. The Raptor kit delivers exceptional durability and finish quality that justifies its premium price, outlasting cheaper alternatives by years.
7. Chemicar Undercoating Spray Gun + Spray Wand Kit, RA1T+RA1SWK

Overview: The Chemicar Undercoating Spray Gun + Wand Kit is a specialized application tool designed for precision rustproofing and undercoating work. Unlike all-in-one kits, this professional-grade spray system focuses on delivering coating material to hard-to-reach areas with surgical accuracy, making it essential for comprehensive vehicle protection.
What Makes It Stand Out: The dual-wand system provides unmatched versatility—the 32-inch rustproofing wand penetrates hollow beams and door cavities, while the 24-inch undercoating wand navigates around exhaust components. The adjustable nozzle and lightweight aluminum construction offer superior control compared to disposable wands, ensuring even coverage in confined spaces.
Value for Money: At $104.49, this tool represents solid value for serious DIYers or small shops. However, it requires purchasing coating material separately, making the total investment higher than all-in-one kits. The durable construction ensures years of service, offsetting initial cost through repeated use across multiple vehicles.
Strengths and Weaknesses: Strengths include exceptional reach, adjustable spray pattern, solvent-resistant components, and professional-grade build quality. The 1-liter tank provides adequate capacity for section-by-section work without excessive weight. Weaknesses include limited tank size for large jobs, potential need for product thinning (adding complexity), and lack of included coating material. Users must ensure their compressor delivers 40-80 PSI consistently for optimal atomization.
Bottom Line: An excellent investment for those who already own coating materials or prefer product flexibility. This specialized tool excels at reaching inaccessible areas but isn’t a standalone solution.
8. Raptor Black Urethane Spray-On Truck Bed Liner Kit, Protective Paint With Spray Gun, For Tailgates & Trucks, Vehicle Undercoating, 6 Quart Kit

Overview: The Raptor Black Urethane Spray-On Truck Bed Liner Kit delivers the same professional-grade protection as its tintable sibling in a convenient pre-mixed black formula. This 6-quart kit provides a streamlined solution for those seeking the classic black bed liner look without color-matching complexity. The 2K urethane chemistry creates a flexible, impact-resistant barrier that withstands heavy-duty use.
What Makes It Stand Out: The ready-to-use black formulation eliminates tinting variables while maintaining Raptor’s signature 2K urethane durability. The kit includes six 750ml bottles of black base and two liters of hardener, ensuring proper mixing ratios. The UV-resistant finish won’t fade, crack, or peel under harsh conditions, while the flexible coating reduces road noise and vibration—features typically reserved for professional applications.
Value for Money: At $219.99, this kit offers significant savings over the tintable version while delivering identical performance characteristics. The 6-quart capacity suits mid-size trucks or full-size beds with conservative application. Cost per ounce remains competitive with professional installations costing $400-$800, making it an attractive DIY alternative that doesn’t compromise quality.
Strengths and Weaknesses: Strengths include the same exceptional durability, noise reduction, and flexibility as the tintable version, simplified application without tinting, and lower price point. The rapid-dry formula allows quick recoating. Weaknesses include limited color options (black only), smaller coverage area than the 8-quart kit, and the same compressor requirements (8 CFM @ 50-60 PSI) and two-component mixing complexity as other 2K systems.
Bottom Line: Perfect for DIYers wanting professional black bed liner results without premium pricing. This kit balances performance, convenience, and value exceptionally well, making it the go-to choice for standard black applications.
9. Rust Bullet - Black Undercoating Undercarriage Truck Kit - 192 oz.

Overview: The Rust Bullet Black Undercoating Undercarriage Truck Kit positions itself as a premium rust-fighting solution with patented technology. This 192-ounce kit focuses specifically on undercarriage protection rather than bed liner aesthetics, targeting corrosion prevention as its primary mission. The system combines rubberized undercoating with anti-rust properties for comprehensive protection.
What Makes It Stand Out: Two US patents support its claims of superior metal protection, distinguishing it from commodity undercoatings. The formula applies directly over rust, converting and sealing existing corrosion without extensive prep work—a significant time-saver. The rubberized finish provides flexible, UV-resistant protection that won’t crack or fade even under extreme conditions, making it ideal for harsh climates and daily drivers alike.
Value for Money: At $359.99, this is the most expensive option reviewed. The “per unit” pricing is ambiguous, but the kit provides substantial material for complete undercarriage coverage. For rust-prone vehicles in harsh climates, the investment may prevent costly repairs, though cheaper alternatives exist for cosmetic undercoating. The patented technology commands a premium that may be justified for serious rust issues.
Strengths and Weaknesses: Strengths include patented technology, ability to apply over rust, comprehensive rust conversion properties, and UV resistance. The brush, roll, or spray application offers flexibility. Weaknesses include premium pricing, vague product descriptions, potential need for laser rust removal on severe cases, and unclear coverage rates. The kit may require additional thinning agents for optimal application through spray equipment.
Bottom Line: Best suited for restoration projects or vehicles in rust-belt regions where corrosion prevention trumps all other concerns. For bed liner applications, consider dedicated products like Raptor kits.
Why Your Jeep Needs Undercoating More Than Most Vehicles
Jeeps occupy a unique space in the automotive world—they’re daily drivers that moonlight as extreme off-road machines. This dual personality creates a perfect storm for corrosion that few other vehicles face.
The Unique Vulnerabilities of Jeep Frames
Most modern Jeeps use fully boxed frames with internal cavities that trap moisture and debris. When you’re fording streams or blasting through mud bogs, water doesn’t just splash on the outside—it gets forced into frame rails through vent holes and drainage channels. Once inside, it can linger for weeks, slowly eating away at the metal from the inside out. The problem compounds in northern climates where road salt mixes with this trapped moisture, creating an electrolyte solution that accelerates galvanic corrosion at weld points and seams.
Salt, Mud, and Moisture: The Holy Trinity of Jeep Corrosion
Off-road mud isn’t just dirt—it’s often acidic, containing organic compounds and minerals that promote rust. When this mud cakes onto your undercarriage and dries, it holds moisture against the metal like a sponge. Combine this with magnesium chloride road treatments used in winter, and you’ve got a corrosive cocktail that can penetrate factory coatings in a single season. Coastal Jeep owners face additional challenges from salt air, which can cause surface rust even on vehicles that never see a trail.
Understanding Undercoating: What It Is and How It Works
Undercoating isn’t just spray paint for your chassis. It’s a specialized protective system designed to create multiple lines of defense against corrosion.
The Science Behind Rust Prevention
Rust requires three elements: iron, oxygen, and water. Eliminate any one, and corrosion stops. Quality undercoatings work through several mechanisms: they create a physical barrier that blocks water and oxygen, they contain corrosion inhibitors that chemically neutralize rust at the molecular level, and some even use self-healing properties to seal minor scratches. The best systems employ sacrificial compounds that oxidize themselves before the underlying metal can.
Penetration vs. Barrier Protection
Two philosophies dominate undercoating design. Penetrating oils seep into seams and crevices, displacing moisture and leaving behind a protective film. They’re excellent for existing rust prevention but wash off relatively quickly. Barrier coatings, conversely, form a thick, durable shell that physically blocks contaminants. The most effective complete kits combine both approaches—using a penetrating rust encapsulator as a base layer with a thick barrier coating on top.
Types of Undercoating Materials
Not all undercoatings are created equal. Each chemistry has distinct advantages and trade-offs that matter for specific Jeep applications.
rubberized undercoatings
These asphalt-based formulas mixed with rubber polymers create a flexible, sound-deadening layer that excels at deflecting rock chips. They typically dry to a textured black finish and offer excellent impact resistance. However, they can crack over time if applied too thickly and may trap moisture if applied over unprepared rust. For Jeep owners who prioritize noise reduction and chip protection, rubberized coatings are a solid choice, especially on high-impact areas like rocker panels and lower frame sections.
Asphalt-Based Undercoatings
The traditional choice for OEM applications, pure asphalt undercoatings provide maximum thickness and affordability. They create a rock-hard barrier that’s incredibly durable but lacks flexibility. This rigidity becomes problematic on Jeeps with significant frame flex during articulation. Modern formulations have improved, but these products still work best on older, stiffer chassis or as a supplemental coating over more flexible base layers.
Wax and Paraffin-Based Coatings
Derived from petroleum distillates, these coatings offer exceptional creep and self-healing properties. They never fully harden, allowing them to slowly flow into new scratches and seams. This makes them ideal for internal frame coatings where access is limited. The downside? They attract dirt and dust, creating a grimy appearance, and require more frequent reapplication—typically every 12-18 months for active off-road Jeeps.
Polyurethane and Polyurea Coatings
The premium option for serious off-roaders, these two-part catalyzed coatings form a near-impenetrable, flexible membrane. They resist chemicals, abrasion, and extreme temperatures while maintaining elasticity. A quality polyurea kit can last 5-10 years even under harsh conditions. The trade-off is cost and complexity—these require precise mixing, specialized spray equipment, and proper safety gear due to isocyanate content.
Oil-Based Rust Inhibitors (Drip/Dripless)
Popular in regions with heavy road salt, these products come in “drip” and “dripless” formulations. Drip versions remain fluid, slowly coating undercarriage components over time as they weep out of application holes. Dripless versions thicken after application, staying put while still creeping into crevices. They’re outstanding for annual maintenance but don’t provide the impact resistance needed for hardcore trail use.
Complete Kits vs. Individual Components
Walking into the decision between a pre-packaged kit and a custom component selection depends on your specific Jeep, climate, and mechanical comfort level.
What’s Typically Included in a Complete Kit
A quality complete kit should contain: a rust encapsulator or converter primer, the main undercoating material (typically 1-2 gallons), a specialized spray gun or applicator wand, frame plugs, masking tape and paper, cleaning solvent, protective gloves and respirator, and detailed instructions. Premium kits might also include cavity wax, extension wands for internal frame access, and surface prep tools. The advantage is convenience—everything is chemically compatible and quantity-matched for a typical Jeep application.
When to Buy Components Separately
Experienced restorers often mix and match products to address specific problem areas. You might choose a penetrating oil for inside the frame rails, a rubberized coating for the exterior, and a cavity wax for boxed sections. This approach makes sense if you’re dealing with a Jeep that has existing rust in some areas but clean metal in others, or if you want to build a custom system that addresses your particular wheeling environment. The downside is the research required to ensure chemical compatibility and the risk of buying insufficient quantities.
Key Features to Look for in a Quality Kit
Cutting through marketing hype requires focusing on measurable performance characteristics that impact real-world results.
Coverage Area and Mil Thickness
Manufacturers list coverage in square feet, but this is meaningless without knowing the recommended mil thickness (thousandths of an inch). A quality Jeep undercoating needs 6-15 mils dry film thickness for adequate protection. Calculate your Jeep’s undercarriage area—typically 150-200 square feet for a Wrangler—and ensure the kit provides enough material for two coats at the specified thickness. Undersized kits force you to stretch the product thin, defeating the purpose.
Drying and Curing Times
Fast-dry formulas might seem convenient, but rapid solvent evaporation can cause shrinkage and poor adhesion. Look for kits with tack-free times of 2-6 hours and full cure within 48-72 hours. This indicates a properly formulated product that balances workability with durability. Pay attention to temperature requirements—some premium coatings won’t cure properly below 60°F, making them unsuitable for winter garage projects.
VOC Compliance and Environmental Considerations
Volatile Organic Compounds (VOCs) affect both environmental impact and your health. Many states have strict VOC limits (typically 450 g/L or less). Low-VOC formulas are less odorous and safer to apply in enclosed spaces but may sacrifice some performance. If you’re spraying in a residential area or attached garage, prioritize low-VOC kits. For rural shops with excellent ventilation, traditional formulas offer maximum protection.
Sound Deadening Properties
A side benefit of undercoating is reduced road noise. Rubberized and asphalt-based products excel here, often decreasing cabin noise by 3-6 decibels. If you daily-drive your Jeep on highways, look for kits that specifically advertise acoustic dampening. Polyurea coatings, while durable, offer minimal sound reduction. Consider your priorities: trail rig silence isn’t a concern, but daily commuters will appreciate the hushed ride.
Flexibility and Impact Resistance
Your Jeep’s frame flexes—sometimes significantly—during articulation. A coating that cracks under this stress becomes a moisture trap, accelerating rust. Look for products with elongation ratings of 200% or higher and ASTM D-522 mandrel bend test compliance. These specifications indicate a coating that moves with your Jeep rather than fighting against it.
Application Methods Explained
The tool you use is as important as the coating itself. Each method has a learning curve and ideal use case.
Spray Gun Application
Most complete kits include a siphon-feed or HVLP spray gun. HVLP (High Volume Low Pressure) guns transfer more product to the surface with less overspray, crucial for garage applications. The key is proper thinning—most undercoatings require 10-15% reduction with manufacturer-specified solvent for optimal flow. Practice on cardboard first to dial in your pattern and avoid the dreaded orange-peel texture that reduces protection.
Aerosol Cans for Touch-Ups
Even with a full kit, aerosol cans of matching coating are invaluable for touch-ups after trail damage. The propellant and nozzle design create a different texture than gun-sprayed material, so use them sparingly on visible areas. They shine for spot-treating inside frame holes, between body mounts, and other areas where setting up a spray gun is overkill. Pro tip: warm the cans in hot water before use to improve flow and reduce spattering.
Brush and Roller Techniques
For the first primer coat, brushing often achieves better penetration into rust pits and seams than spraying. Use cheap, disposable chip brushes to work rust encapsulator into problem areas. Rollers work well for flat sections like skid plates and crossmembers, creating an exceptionally thick, uniform coat. The downside is time—brushing a full Jeep undercarriage might take 4-6 hours versus 1-2 hours for spraying.
Professional-Grade Equipment Considerations
If you’re serious about coating multiple Jeeps or want commercial results, consider renting or buying an airless sprayer. These machines can apply polyurea coatings at 3000+ PSI, creating a dense, uniform film in a single pass. They require a significant air compressor (minimum 15 CFM at 90 PSI) and thorough cleaning to prevent clogging. For most DIYers, the included spray gun in quality kits is perfectly adequate.
Preparing Your Jeep for Undercoating
Application day success is determined 90% by preparation. Skipping steps here guarantees failure, no matter how premium your coating kit is.
The Critical Importance of Surface Prep
Undercoating doesn’t stick to dirt—it sticks to clean, sound metal. Every square inch must be free of loose rust, scale, grease, and previous failing coatings. This is non-negotiable. A single greasy fingerprint can create a bubble that peels off in sheets. Plan for 6-10 hours of prep work on a moderately rusty Jeep, or 2-3 hours on a clean, new vehicle.
Cleaning: Degreasing and Power Washing
Start with a thorough power wash, focusing on inside frame rails. Use a degreaser or citrus-based cleaner on oily areas—differential housings, steering components, and anywhere road grime accumulates. After washing, wipe down with wax-and-grease remover using lint-free cloths. This final step removes the invisible film of contaminants that water alone can’t eliminate. Don’t use brake cleaner for this—it leaves a residue.
Rust Removal: Mechanical vs. Chemical Methods
For light surface rust, a wire wheel on an angle grinder or drill is effective. For heavier scale, consider a needle scaler or media blasting. Chemical rust converters work well in inaccessible areas, converting iron oxide into a stable, paintable surface. However, they don’t remove the rust—just stabilizes it. On a Jeep with significant frame rust, mechanical removal is superior. Always wear a respirator; rust dust is toxic.
Masking and Taping Strategies
Use high-quality automotive masking tape (3M Fine Line or similar) to protect brake lines, rubber bushings, and drivetrain components. Double-mask exhaust systems—the heat will burn off overspray, but thick buildup can cause hot spots. Remove skid plates and coat them separately for complete coverage. Don’t forget to mask the inside of wheel wells where overspray can drift onto painted bodywork.
Step-by-Step Application Process
Follow a logical sequence to ensure complete coverage without trapping yourself in a corner—literally and figuratively.
First Layer: Primer and Rust Converter
Apply your rust encapsulator or conversion primer first, working from the center outward. Start inside the frame rails using an extension wand, then move to the main frame sections. This layer should be thin—just enough to seal the metal and provide a bonding surface for the topcoat. Allow it to become tacky (usually 30-60 minutes) before proceeding.
Building Coats for Maximum Protection
Apply the main undercoating in 3-4 thin passes rather than one heavy coat. Heavy application leads to solvent entrapment, causing bubbling and poor adhesion. Each pass should be 3-5 mils wet, building to your target thickness. Work in a grid pattern, overlapping each pass by 50%. Pay special attention to weld seams and sharp edges—they’re corrosion hotspots and coating thin spots.
Hard-to-Reach Areas: Tips and Tricks
Inside boxed frame sections, use a cavity wax wand with a 360-degree spray tip. For body mounts and between frame and body, spray until you see material seeping out—that’s how you know it’s filled. Remove rear brake light housings to access the inner corners of the tub. A borescope camera (a cheap smartphone attachment works) lets you inspect interior frame coating coverage without cutting inspection holes.
Curing and Drying Best Practices
After final application, don’t move the Jeep for at least 24 hours. Even if the surface feels dry, the underlying layers are still curing. Avoid water exposure for 72 hours minimum. If you’re in a dusty environment, cover the Jeep with a breathable car cover—plastic tarps can trap solvents and cause blush. Ideal curing happens at 70-80°F with moderate humidity (40-60%).
Common Application Mistakes to Avoid
Even experienced DIYers fall into these traps. Learning from others’ errors saves you from stripping and starting over.
Inadequate Surface Preparation
The number one failure mode is applying coating over unsound rust or grease. If you can flake rust off with a screwdriver, your coating will flake off with it. Take the time to achieve a solid, clean substrate. When in doubt, do the tape test—press masking tape onto the surface and rip it off. If it pulls up rust or leaves a greasy residue, you’re not ready to coat.
Applying Too Thick or Too Thin
Too thin and you have no protection; too thick and you get cracking, bubbling, and wasted material. Use a wet film thickness gauge (a cheap plastic comb tool) to verify each pass. Aim for the middle of the manufacturer’s recommended range. Remember, two thin coats always outperform one thick coat.
Ignoring Temperature and Humidity
Applying in cold weather prevents proper flow and adhesion; too hot and the solvent flashes off before the coating levels. Never apply below 50°F or above 90°F. High humidity can cause blushing in some formulations, while low humidity makes overspray worse. Check the technical data sheet—reputable manufacturers specify exact application conditions.
Maintenance and Inspection Schedule
Undercoating isn’t a “set it and forget it” solution. Active maintenance dramatically extends service life.
Annual Check-Ups
Every spring, put your Jeep on jack stands and inspect the undercoating. Look for chips from rocks, cracks from frame flex, and areas where the coating has worn thin. Pay special attention to skid plates and areas behind wheels where debris impacts are heaviest. A quick 30-minute inspection catches problems while they’re small.
Touch-Up Strategies
Carry a small aerosol can of matching coating on trail rides. When you notice a fresh chip, clean the area with a rag and brake cleaner, then spray a light coat. For garage touch-ups, use a brush to apply rust encapsulator to any bare metal, then spray the topcoat. Feather the edges to blend with the existing coating. Touch-ups are normal and expected—don’t view them as failure.
When to Reapply Completely
Even the best coating has a lifespan. Plan on a full reapplication every 5-7 years for daily-driven Jeeps, 3-5 years for hardcore trail rigs. Signs you need a full redo: widespread cracking, delamination over large areas, or the coating becoming brittle and shattering when tapped with a screwdriver. Don’t layer new coating over failing old coating—it just traps problems underneath.
Cost Analysis: Budgeting for Your Undercoating Project
Understanding the true cost helps you avoid budget kits that ultimately cost more in premature failure.
DIY vs. Professional Application Costs
A quality DIY kit runs $150-$300, plus $50-$100 in ancillary supplies (tape, cleaners, safety gear). Professional application ranges from $800-$2,500 depending on prep work needed. The DIY route saves money but costs time—plan for a full weekend. Professionals offer warranties and have equipment for perfect prep, but may use bulk products that aren’t as premium as what you’d choose yourself.
Long-Term Value Calculations
A $200 DIY job that lasts 5 years costs $40/year. A $1,500 professional job that lasts 10 years costs $150/year. Factor in your Jeep’s value and your plans. For a $40,000 new Wrangler, premium protection makes financial sense. For a $5,000 trail beater, a basic DIY approach might be smarter. Also consider resale—documented undercoating maintenance adds value in rust-prone regions.
Warranty and Legal Considerations
Protect yourself by understanding the fine print before you buy and apply.
Manufacturer Warranties on Kits
Read the warranty terms carefully. Most manufacturers guarantee the product against defects, not against improper application or existing rust progression. Some offer “rust-through” warranties that pay for repair if rust penetrates after proper application—usually requiring annual inspection documentation. Keep your receipt and photograph each step of your application process as proof.
Impact on Vehicle Warranty
The Magnuson-Moss Warranty Act prevents manufacturers from voiding your warranty simply because you applied aftermarket undercoating. However, if the coating is applied so thickly that it interferes with drain holes or traps moisture, causing frame rust, Jeep could deny a claim. Stick to recommended thicknesses and never plug factory drain holes. Document everything.
Seasonal Timing for Application
When you apply is almost as important as what you apply.
Best Times of Year to Undercoat
Late spring or early fall offer ideal temperatures and moderate humidity. Avoid summer’s heat and winter’s cold. Spring application gives you maximum protection before winter salt season. Fall application ensures the coating is fully cured before harsh weather hits. Never apply within 48 hours of rain—moisture during curing ruins adhesion.
Climate-Specific Recommendations
Desert Jeepers should prioritize UV resistance and flexibility for extreme temperature swings. Coastal owners need maximum salt resistance and should consider annual topcoats of oil-based inhibitor. Northern salt-belt Jeeps benefit from thick, barrier-style coatings applied in late spring, with mid-winter touch-ups of fluid film in critical areas. Southern mud riders need excellent chip resistance and the ability to wash off acidic mud without degrading the coating.
Troubleshooting Common Issues
Even perfect applications can develop problems. Knowing how to fix them prevents small issues from becoming big ones.
Peeling and Flapping
If coating peels in sheets, the problem is almost always contamination underneath or applying over unsound rust. The only fix is removal. Use a heat gun and scraper to soften the coating, then peel it off. Sand the underlying metal to bright finish, re-prep, and reapply. Never just spray over peeling areas—it won’t bond.
Bubbling and Trapped Moisture
Bubbles indicate solvent trapped underneath or moisture vapor escaping from porous metal. Small bubbles can be slit with a razor blade, pressed flat, and touched up. Large bubbles require removal, drying the area with a heat gun, and reapplication. If bubbling is widespread, your coating was applied too thick or the metal wasn’t dry enough.
Uneven Coverage
Thin, uneven coats provide poor protection. If you notice light spots after the first coat, don’t try to cover them with a heavy second coat. Instead, apply a second thin, even coat over the entire area. For extreme unevenness, block sand the high spots with 220-grit paper before recoating to level the surface.
Frequently Asked Questions
How much undercoating do I need for a Jeep Wrangler JK/JL? A typical Wrangler requires 1.5-2 gallons of coating material for two complete coats, plus primer. Most complete kits include 2 gallons, which is sufficient if you avoid wasteful over-application. Always buy 10-15% more than you think you need—running out mid-project is frustrating.
Can I undercoat a Jeep with existing rust? Yes, but preparation is critical. Light surface rust can be converted with rust encapsulator primers. Heavy, flaking rust must be mechanically removed. Never coat over scale rust—it will continue growing underneath and push the coating off. Be realistic: undercoating stops rust progression but doesn’t reverse structural damage.
How long does a DIY undercoating job take? Plan for 8-12 hours total: 4-6 hours for thorough cleaning and prep, 2-3 hours for application, and 2-3 hours for masking and cleanup. Add 24-72 hours of curing time before driving. Don’t rush the process—most DIY failures come from trying to complete everything in one afternoon.
Will undercoating affect my Jeep’s ground clearance? Properly applied undercoating adds approximately 1/16 to 1/8 inch of thickness, which is negligible for clearance. However, avoid building up thick layers on bolt heads and skid plate mounting surfaces—this can make removal difficult. Coat these areas thinly or mask them off.
Can I apply undercoating over factory undercoating? Only if the factory coating is perfectly intact. Test by pressing masking tape onto it—if it adheres firmly and pulls off clean, you can scuff and coat over it. If the factory coating is flaky, cracked, or peeling, remove it completely. Layering over failing coating just buries the problem.
How soon can I go off-roading after applying undercoating? Wait a minimum of 7 days before serious off-road use. While the surface may feel hard after 72 hours, full chemical curing takes longer. Premature exposure to water, mud, and abrasion can cause premature failure. Plan your application around your wheeling schedule.
Is undercoating worth it on a brand-new Jeep? Absolutely. Applying undercoating to a new, clean chassis is the best time—no rust removal needed, and you’re preventing problems before they start. New Jeeps still have weld splatter and bare metal spots from the factory. A preventive undercoating job on a new vehicle can last 10+ years.
What’s the difference between undercoating and bedliner? Bedliners are typically thicker (up to 1/4 inch) and designed for impact resistance in truck beds. While some use bedliner on Jeeps, it’s often too rigid and can crack under frame flex. Purpose-built undercoatings are formulated for automotive chassis with better flexibility and corrosion inhibitors.
Can I use undercoating inside the frame rails? Yes, but use the right product. Standard thick undercoatings won’t penetrate deep enough. Use a thin, penetrating cavity wax or oil-based inhibitor with a long wand applicator. Some complete kits include both exterior coating and internal cavity wax—this is ideal for comprehensive protection.
How do I remove undercoating if I need to weld or repair the frame? Use a heat gun to soften the coating, then scrape it off with a putty knife. For thick areas, a pneumatic needle scaler works wonders. Avoid grinding unless necessary—it’s easy to remove healthy metal along with the coating. Always re-coat repaired areas immediately after welding to prevent flash rusting.