There’s nothing more frustrating than stepping back to admire your freshly detailed ride only to notice your windshield still looks like it’s been through a sandstorm. Those stubborn water spots, wiper blade streaks, and micro-scratches don’t just ruin your car’s appearance—they compromise visibility and safety. While professional glass restoration can cost hundreds of dollars, glass polishing drill attachments have revolutionized DIY car care, putting professional-grade results within reach of any enthusiast with a power drill and patience.
These specialized tools transform your ordinary drill into a precision glass polishing machine, capable of removing years of contamination and minor defects from automotive glass. But not all attachments are created equal, and using them incorrectly can lead to disastrous results. This comprehensive guide cuts through the marketing hype to give you the expert knowledge you need to select, use, and maintain glass polishing drill attachments like a seasoned pro—ensuring your vehicle’s glass achieves that elusive showroom clarity without the professional price tag.
Top 10 glass polishing drill attachment
Detailed Product Reviews
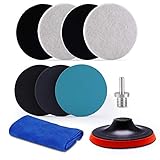
1. IPELY 6 Pcs 6 Inch Wool Polishing Buffing Pad Polishing Buffing Wheel for Drill Buffer Attachment with M14 Drill Adapter

Overview: The IPELY 6-piece kit delivers a complete drill-mounted polishing solution for automotive and household applications. This set includes four 6-inch wool pads, an adhesive backer pad, and M14 drill adapter, creating a versatile system compatible with angle grinders, power buffers, and standard drills. Designed for users seeking professional results without specialized equipment, the kit transitions seamlessly from compounding to final finishing.
What Makes It Stand Out: The thick, high-quality wool construction prevents surface damage while delivering effective cutting and polishing action. The hook-and-loop backing enables tool-free pad changes in seconds, significantly improving workflow efficiency. Unlike many competitors, IPELY explicitly designs these pads for dual automotive and home use, making them suitable for shower glass, granite countertops, and furniture restoration. The included M14 adapter broadens compatibility beyond typical drill-mounted systems.
Value for Money: At $14.99 for six components, this kit offers exceptional affordability at approximately $2.50 per piece. The washable, reusable wool construction extends lifespan far beyond single-use alternatives, while the multi-surface versatility eliminates the need for separate specialized pads. Comparable individual wool pads retail for $5-8 each, making this bundle particularly economical for DIY enthusiasts.
Strengths and Weaknesses: Strengths include versatile compatibility, quick-change design, thick protective wool, and impressive quantity for the price. The pads handle both heavy correction and fine finishing effectively. Weaknesses involve potential wool shedding during initial uses, the 6-inch diameter proving cumbersome for tight contours, and performance being limited by consumer drill power and speed capabilities. Users with low-torque drills may experience stalling.
Bottom Line: This kit represents outstanding value for DIY detailers and homeowners tackling periodic polishing projects. While professional detailers might prefer specialized tools, the IPELY set provides everything needed for excellent results on cars and household surfaces, making it a highly recommended starter package.
2. Glass Polish 3 inch (75mm) Hook & Loop Backing Pad for Drill with Universal Drill Attachment - GP12003

Overview: The Glass Polish GP12003 is a compact, precision-engineered backing pad designed for detail-oriented polishing and sanding tasks. Measuring just 3 inches, this spindle pad targets spot repairs, intricate contours, and controlled material removal. The package includes a universal 1/4-inch drill attachment, making it immediately compatible with virtually any drill without requiring additional adapters.
What Makes It Stand Out: Its semi-flexible 3/8-inch foam construction conforms to curved, uneven, and flat surfaces with equal effectiveness, preventing the flat-spotting common with rigid pads. The 2500rpm maximum speed rating optimizes performance for low-speed polishing applications, reducing the risk of heat buildup and paint damage. The hook-and-loop interface ensures secure attachment of abrasive discs and polishing pads while enabling rapid tool-free changes.
Value for Money: Priced at $9.95, this backing pad occupies the entry-level segment, offering focused functionality without unnecessary frills. However, buyers must purchase polishing pads separately, potentially doubling the initial investment. For users already owning compatible pads, it provides an affordable entry point into drill-based detailing. Compared to multi-piece kits, its single-component nature limits out-of-the-box utility.
Strengths and Weaknesses: Strengths include universal drill compatibility, contour-adapting flexibility, compact size for precision work, and heat-conscious speed rating. The medium-density foam provides excellent feedback and control. Weaknesses are the lack of included polishing pads, limited coverage area for large panels, foam durability concerns under heavy pressure, and absence of size options for different tasks.
Bottom Line: This backing pad excels for users needing targeted spot repair capabilities or working with complex geometries. It’s an affordable, specialized tool that delivers professional-grade control. However, those seeking comprehensive polishing solutions should consider full kits. Purchase only if you already own or plan to buy compatible 3-inch polishing pads.
3. 133 PCS Sanding Disc Drill Polishing Kit Sanding Attachment, 3 Inch Wet Dry Headlight Restoration Kit, Hook and Loop Sandpaper Buffing Pads with Rotary Tools for Car Wood Metal Glass Resin Expoxy

Overview: This comprehensive 133-piece kit provides a complete sanding-to-polishing workflow for demanding DIYers and professionals. The set includes an extraordinary grit range from aggressive 60-grit to ultra-fine 10,000-grit discs, interface foam pads, an imitation wool buffing pad, and dual shank backing pads for both 1/4-inch and 1/8-inch rotary tools. It addresses everything from heavy material removal to mirror finishing.
What Makes It Stand Out: The unparalleled grit progression enables true full-cycle restoration without purchasing supplementary materials. Silicon carbide abrasive construction ensures durability for wet and dry applications, while clearly marked grit sizes prevent workflow errors. The vibration-reducing interface pad enhances comfort during extended use, and the upgraded hook-and-loop system maintains adhesion even under wet sanding conditions.
Value for Money: At $21.99, the per-piece cost drops to approximately $0.17, delivering extraordinary value. Comparable individual sanding discs retail for $0.50-$1.00 each, making this kit economically advantageous for high-volume users. The inclusion of both backing pad sizes and the wool buffer eliminates additional purchases, creating a self-contained restoration system that pays for itself on the first major project.
Strengths and Weaknesses: Strengths include the massive grit selection, wet/dry versatility, dual shank compatibility, cost-effectiveness, and professional-grade materials. The washable wool pad adds sustainability. Weaknesses involve potential quality inconsistency across such a large quantity, storage organization challenges, and overwhelming options for casual users who may only need basic grits. The 3-inch size limits coverage speed on large panels.
Bottom Line: This kit is unmatched for dedicated enthusiasts tackling diverse restoration projects. The extensive grit range justifies every penny for headlight restoration, paint correction, and surface refinishing. Casual users may find it excessive, but for serious DIYers, it’s a one-stop investment that eliminates repeated supply runs and delivers professional results across multiple materials.
4. Hiqalty 4 Inch Wool Felt Polishing Pad Buffing Wheel Kit for Drill,Fine Polishing of Metal Glass Stone (7)

Overview: Hiqalty’s 7-piece kit features compressed wool felt pads engineered for fine finishing applications on hard surfaces. Designed for drill or angle grinder mounting, these 4-inch wheels target metal, glass, stone, stainless steel, and marble projects requiring precision surface refinement rather than aggressive material removal. The compressed felt construction provides a dense, uniform polishing surface.
What Makes It Stand Out: The environmental-friendly compressed wool felt offers superior durability and wear resistance compared to standard woven wool pads. This density produces exceptionally smooth, bright finishes when paired with polishing compounds, making it ideal for precision instrument restoration and die/mold finishing. The kit’s specialization for fine polishing distinguishes it from general-purpose buffing sets, catering to craftsmen requiring superior surface quality.
Value for Money: Priced at $11.69 for seven pads, the cost per piece is approximately $1.67, positioning it in the mid-range segment. While more expensive than basic wool pads, the compressed felt’s extended service life and specialized performance justify the premium for appropriate applications. Users focused on fine finishing will recover value through reduced material costs and professional results; however, those needing heavy cutting capability should look elsewhere.
Strengths and Weaknesses: Strengths include dense compressed felt for mirror finishes, multi-material compatibility, environmental sustainability, and excellent durability. The pads work effectively with standard polishing compounds and maintain their shape under pressure. Weaknesses involve the 4-inch diameter limiting coverage area, the requirement for polishing compounds (not included), unsuitability for heavy correction work, and limited pad quantity compared to larger kits.
Bottom Line: This kit serves craftsmen and serious DIYers specializing in fine finishing of hard materials. For general automotive paint correction, it’s not the optimal choice. However, for jewelry, cutlery, stone, or glass polishing, the compressed felt construction delivers superior results that justify the modest investment. Purchase with specific fine-polishing applications in mind.
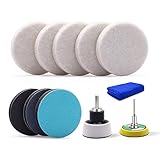
5. ZFE 5Inch Glass polishing Pads, 10Pcs Wool Felt Disc Glass Polishing Kit Buffing Pads Sanding Discs with Backing Pad and M14 Drill Adapter for Rotary Tools Polish Glass and Metal
Overview: ZFE’s 10-piece kit delivers a mid-sized wool felt solution specifically targeting glass and metal polishing applications. The set includes multiple felt discs, a backing pad, and M14 drill adapter, creating a ready-to-use system for rotary tools. Designed to work with polishing compounds, these pads excel at removing burrs, rust, oxidation, and coatings while producing high-gloss finishes on glass, plastic, metal, and stone surfaces.
What Makes It Stand Out: The 5-inch diameter hits a sweet spot between coverage efficiency and contour accessibility, larger than precision pads but more manageable than 6-inch versions on curved surfaces. The included M14 adapter ensures compatibility with angle grinders and polishers beyond standard drills, expanding utility. The kit’s explicit focus on burr removal and oxide layer elimination addresses specific metalworking needs often overlooked by automotive-centric kits.
Value for Money: At $19.99 for ten components, the per-piece cost is approximately $2.00, positioning it as a premium option. While the washable, reusable wool construction extends lifespan, comparable kits offer similar quantities at lower price points. The value proposition hinges on the M14 adapter inclusion and specialized metal/glass performance; general-purpose users may find better economy elsewhere.
Strengths and Weaknesses: Strengths include the versatile 5-inch size, durable wool felt construction, included M14 adapter, effective burr removal capability, and multi-surface compatibility. The ten-pad quantity supports project completion without immediate resupply. Weaknesses involve premium pricing, wool’s requirement for proper maintenance, limited suitability for heavy paint correction, and potential adapter compatibility issues with some drill chucks.
Bottom Line: This kit suits metalworkers and fabricators needing dedicated glass and metal polishing capabilities. Automotive detailers should consider more paint-focused alternatives. While the quality is solid, the price premium doesn’t dramatically outperform budget competitors. Recommended for users specifically prioritizing metal/glass applications who will utilize the M14 adapter; otherwise, more economical options exist.
6. 2Inch Car Felt Polishing Buffing Pad, 8pcs Polishing Sanding Discs, Felt Polishing Wheel with Towel, 3mm Shank Backing Pad for Rotary Tools to Polish Glass and Metal (2 Inch Sets)
Overview: This compact 2-inch felt polishing kit delivers specialized performance for precision work on glass and metal surfaces. The eight-piece set includes felt discs, a polishing wheel with towel, and a 3mm shank backing pad designed specifically for rotary tool compatibility. Unlike universal kits, this collection targets detailed applications where control and finesse matter more than broad coverage, making it ideal for jewelry, small automotive components, and delicate metal finishes.
What Makes It Stand Out: The dedicated felt composition sets this apart from foam-dominant kits, offering superior heat dissipation and cutting action on hard surfaces. The inclusion of both discs and a wheel with towel provides versatility within the same material family. The 3mm shank ensures secure mounting on Dremel-style rotary tools rather than standard drills, targeting a specific niche of precision craftsmen who need professional results in tight spaces where larger buffers cannot reach.
Value for Money: At $16.99, this kit occupies a middle ground between budget foam sets and professional-grade equipment. The material quality justifies the price for those specifically working with glass and metal, though the limited versatility compared to multi-material kits may reduce value for general users. For jewelers or metalworkers, the specialized nature represents solid investment value versus purchasing individual components.
Strengths and Weaknesses: Strengths include excellent heat management on metal surfaces, precision sizing for detailed work, and rotary tool specificity. Weaknesses involve limited application range (poor for automotive clear coat), sparse product documentation, and lack of color-coding for grit identification. The kit assumes user expertise without providing guidance.
Bottom Line: Best suited for experienced craftsmen focused on metal and glass projects. General automotive detailers should look elsewhere, but jewelry makers and metalworkers will appreciate the specialized design and reliable performance.
7. Kshineni 3 Inch Drill Buffing Pad, 11 Pcs Car Foam Polishing Pads Kit, Drill Buffer Polisher Attachment Buffing Kit for Car Polishing, Waxing, Sealing Glaze
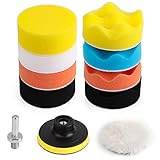
Overview: This comprehensive 11-piece kit transforms any standard drill into a capable polishing system for automotive care. The collection includes eight color-coded foam pads, one woolen buffer, a drill adapter, and suction cup, creating a complete solution for polishing, waxing, and sealing glaze applications. Designed for DIY enthusiasts, the system addresses multiple paint correction stages without requiring expensive dedicated polishers.
What Makes It Stand Out: The color-coded foam system eliminates guesswork, with each hue representing a specific softness level for different correction needs. The self-adhesive design enables lightning-fast pad changes, while the increased thickness extends service life significantly. The inclusion of both foam and wool provides cutting and finishing capabilities rarely seen in sub-$10 kits, making professional-grade results accessible to beginners.
Value for Money: At $9.49, this represents exceptional value. Comparable kits often cost twice as much while offering fewer pads. The washable, reusable construction ensures multiple uses, driving the per-application cost below $1. While not matching professional polisher performance, it delivers 80% of the capability at 10% of the equipment cost, making it ideal for occasional detailers.
Strengths and Weaknesses: Strengths include intuitive color-coding, drill compatibility, generous pad count, and adhesive convenience. Weaknesses involve potential durability concerns under heavy use, limited size options (only 3-inch), and foam density that may not satisfy professional detailers. The suction cup’s long-term adhesion could degrade.
Bottom Line: An unbeatable entry-level kit for weekend warriors. If you own a drill and want professional-looking results without breaking the bank, this is your best starting point.
8. Tworider 6 pcs Buffing Wheel for Drill,Buffing Pad Polishing Wheel Kits,Wheel Shaped Polishing Tool for Metal Aluminum,Stainless Steel,Chrome,Jewelry,Wood,Plastic,Ceramic,Glass,etc
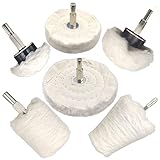
Overview: This six-piece buffing wheel kit emphasizes shape diversity over quantity, offering specialized forms for accessing contours and details that standard flat pads cannot reach. The collection includes mushroom, cylindrical, conical, and circular profiles in varying diameters from 1.57 to 4 inches. Sewn from premium cotton wool, these wheels prioritize surface safety across an impressive material range from jewelry to automotive chrome.
What Makes It Stand Out: The shape variety enables users to match the tool to the task precisely—mushroom heads for concave surfaces, cones for tight corners, and cylinders for edges. This thoughtful engineering eliminates the compromise inherent in one-shape-fits-all kits. The cotton wool construction provides aggressive cutting action while maintaining a scratch-free promise, bridging the gap between effectiveness and surface protection that many synthetic materials fail to achieve.
Value for Money: Priced at $13.99, the kit offers moderate value. While fewer pieces than foam-dominant sets, the specialized shapes justify the cost for users working with complex geometries. For flat-panel automotive work, value is limited. For metal fabricators and jewelers, the ability to purchase purpose-built shapes in one package represents savings over individual specialty wheel purchases.
Strengths and Weaknesses: Strengths include unmatched profile variety, safe cotton wool construction, wide material compatibility, and excellent for detail work. Weaknesses involve lack of foam pads for finishing, no color-coding system, and limited suitability for large flat surfaces. The kit requires user knowledge to select appropriate shapes.
Bottom Line: Ideal for metalworkers and jewelers needing shape-specific solutions. Automotive detailers focused on paint correction should supplement with foam pads, but anyone working with varied geometries will find this indispensable.
9. Quadafy 7 Piece 3 Inch Wool Buffing Pad, Drill Buffer Connecting M10 Drill Adapter, Buffing Pads, for Car Polishing and Waxing, Painting Tabletops, Old Leather Sofas, Tile Polishing

Overview: This wool-focused seven-piece kit targets users seeking pure cutting and finishing performance without foam intermediates. The set includes five wool pads, an adhesive backing plate, and M10 drill adapter, emphasizing simplicity and material-specific excellence. Designed for both automotive paintwork and household surfaces like tabletops and leather sofas, the kit leverages wool’s natural polishing properties for swirl removal and gloss enhancement.
What Makes It Stand Out: The dedicated wool composition provides superior heat resistance and cutting ability compared to synthetic alternatives, making it particularly effective for removing heavy oxidation and deep scratches. The M10 adapter ensures compatibility with European-standard drills, a detail often overlooked in generic kits. The lightweight yet durable construction reduces user fatigue during extended polishing sessions while maintaining aggressive correction capabilities.
Value for Money: At $7.58, this is the most budget-friendly option reviewed. The wool quality exceeds expectations for the price point, offering professional-grade material in a beginner-accessible package. While limited to five pads, the low cost-per-pad and reusability make it economical for periodic use. The trade-off is fewer pads and no foam alternatives, requiring separate purchase for multi-stage correction.
Strengths and Weaknesses: Strengths include exceptional price, genuine wool performance, drill compatibility, and versatility across automotive and household applications. Weaknesses involve limited pad count, absence of foam finishing pads, potential shedding with heavy use, and no grit progression system. The adhesive backing may weaken over time.
Bottom Line: Perfect for budget-conscious users prioritizing wool’s natural polishing action. Buy this as a specialty supplement to foam kits or for dedicated wool applications—it’s too affordable and effective to ignore.
10. Holikme 22Pack Drill Brush Attachments Set,Scrub Pads & Sponge, Buffing Pads,Power Scrubber Brush,Car Polishing Pad Kit,Wax Applicator Pad,Car Cleaning Kit,Masonry Brushes,Cleaning Supplies

Overview: This 22-piece monster kit redefines drill attachment versatility by combining aggressive scrubbing, gentle polishing, and wax application in one comprehensive system. Beyond standard buffing pads, it includes eight nylon scrub brushes, three scouring pads, four sponge polishing pads, three microfiber wax applicators, a wool buffer, gap brush, backer plate, and extension rod. This transforms your drill into a complete cleaning and detailing powerhouse for automotive, kitchen, and bathroom applications.
What Makes It Stand Out: No other kit reviewed offers this breadth of functionality. The eight distinct brush shapes tackle everything from grout lines to upholstery, while the dedicated polishing and waxing components handle automotive finishes. The inclusion of an extension rod provides reach for deep wheel wells and tight spaces. This is essentially five specialized kits merged into one value package, eliminating the need for separate purchases.
Value for Money: At $19.99 ($1.33 per piece), the value proposition is staggering. Purchasing these components separately would exceed $50. The quality remains surprisingly robust across all elements, with nylon bristles that resist scratching and dense foam pads that hold up to multiple uses. For homeowners wanting one kit for entire property maintenance, this is unmatched.
Strengths and Weaknesses: Strengths include incredible versatility, generous component count, quality construction, and true multi-surface capability. Weaknesses involve storage organization challenges, potential underutilization if only polishing is needed, and the 1/4-inch connector requiring drill compatibility verification. Some users may find the sheer variety overwhelming.
Bottom Line: The ultimate all-in-one solution for DIYers wanting maximum utility. If you need more than just car polishing, this is your kit. Verify your drill’s chuck size first, then enjoy professional-level cleaning and detailing across your entire property.
Understanding Glass Polishing Drill Attachments for Automotive Use
The Evolution of DIY Glass Restoration
Car enthusiasts have long battled with compromised glass clarity, but the tools have changed dramatically. Early DIY methods involved tedious hand polishing with cerium oxide powder that required elbow grease and countless hours. Today’s drill attachments represent a quantum leap forward, utilizing engineered abrasives, specialized foam and felt constructions, and precision-machined backing plates that distribute pressure evenly across curved automotive surfaces. These systems are specifically designed to work with the unique challenges of car glass—contoured surfaces, varying glass thickness, and the critical need for optical clarity without distortion.
How Drill Attachments Differ from Professional Machines
Professional glass polishing systems use rotary or dual-action polishers with large-diameter heads and sophisticated cooling systems. Drill attachments, by contrast, are adapters that convert your existing power drill into a capable glass polishing tool. They typically feature smaller diameter pads (2-3 inches) that allow for better maneuverability around mirrors, tight corners, and the complex curves of modern windshields. While they may lack the raw power and cooling capacity of professional units, quality attachments compensate with intelligent design—featuring heat-dissipating backing plates, specialized attachment mechanisms, and pad compositions optimized for the RPM range of consumer drills.
Why Your Car’s Glass Needs Professional-Level Attention
Common Contaminants That Damage Automotive Glass
Your vehicle’s glass faces a constant assault that goes far beyond simple dirt. Hard water minerals etch into the surface, creating those stubborn white spots that won’t wash off. Road grime contains microscopic metal particles that embed themselves in the glass, causing rust stains and rough texture. Wiper blades drag dirt across the surface, creating thousands of micro-scratches that diffuse light and create glare. Even automatic car washes leave behind polymer residues and fine scratches. Over time, these contaminants create a hazy, distorted surface that reduces visibility—especially dangerous during night driving or adverse weather conditions.
The Hidden Cost of Neglected Windshields
Many car owners don’t realize that replacing a modern windshield costs between $300 and $1,500, often with advanced driver-assistance system (ADAS) recalibration adding another $200-$400. Regular polishing maintenance, using quality drill attachments, can extend windshield life by 5-10 years and preserve the factory glass integrity. More importantly, clean, clear glass directly impacts safety. Studies show that polished glass can reduce glare by up to 30% and improve light transmission by 15%, significantly enhancing your ability to spot hazards in low-light conditions. For classic car owners, original glass is irreplaceable—making preservation through polishing even more critical.
The Science Behind Glass Polishing: How Drill Attachments Work
Abrasive Action vs. Chemical Action
Glass polishing drill attachments work through carefully controlled mechanical abrasion, not chemical dissolution. The pads hold microscopic abrasive particles—typically aluminum oxide or cerium oxide—that create millions of tiny, controlled scratches far smaller than the defects they’re removing. As you progress through finer grits, each stage removes the scratches from the previous stage until the surface achieves optical clarity. This is fundamentally different from chemical cleaners that attempt to dissolve contaminants. Quality attachments ensure these abrasives are distributed evenly and work at the correct pressure and speed to prevent creating new, deeper damage.
Heat Generation and Glass Integrity
The biggest risk in glass polishing is thermal shock. Friction generates heat, and glass expands unevenly when heated—creating stress that can lead to cracks or “burns” (permanent hazy spots). Professional-grade drill attachments combat this through several design features: ventilated backing plates that allow air circulation, heat-resistant foam cores that dissipate warmth, and specialized pad compositions that maintain cutting efficiency at lower temperatures. The best attachments are engineered to work within a specific RPM sweet spot—typically 1,200-1,800 RPM—where cutting action is maximized while heat buildup remains minimal and controllable.
Key Components of a Complete Glass Polishing System
Backing Plates and Their Importance
The backing plate is the foundation of your polishing system, yet it’s often overlooked. A quality backing plate for automotive glass must be rigid enough to maintain flat contact with curved surfaces while flexible enough to conform to subtle contours. Look for plates made from glass-filled nylon or aluminum with precision-machined threads that won’t wobble under load. The attachment method matters enormously—hook-and-loop systems offer quick pad changes but can fail under high torque, while bolt-on systems provide security but slow down workflow. The best compromise is a reinforced hook-and-loop with a secondary locking mechanism.
Pad Materials Explained
Automotive glass polishing requires specific pad materials that household glass polishers simply don’t need. Foam pads for glass are closed-cell constructions with very low porosity—this prevents them from absorbing water and polishing compounds, which would reduce cutting efficiency. The foam density is measured in pores per inch (PPI); glass polishing foams typically range from 30-50 PPI for cutting pads to 70-90 PPI for finishing. Felt pads, used for heavy defect removal, should be 100% wool or synthetic fiber with a uniform nap length of 3-5mm. Avoid cheap felt pads that shed fibers—they’ll embed in your glass and cause more scratches.
Types of Glass Polishing Drill Attachments
Foam Pads for Light Correction
Foam pads are your go-to for maintenance polishing and light defect removal on automotive glass. They come in varying firmness levels—color-coded by most manufacturers—with softer foams (typically white or blue) used for final polishing and harder foams (yellow or orange) for light cutting. For car care, you’ll want a graduated set that allows you to start with a medium-cut foam to remove water spots and light wiper marks, then step down to a fine foam for optical clarity. The key is selecting pads specifically marketed for glass; paint polishing foams are too soft and will glaze over without cutting effectively.
Felt Pads for Heavy Defect Removal
When dealing with deep water spot etching, wiper blade damage, or light scratches that you can catch with your fingernail, felt pads become necessary. These dense fiber pads hold more abrasive compound and cut more aggressively than foam. However, they generate significantly more heat and require careful technique. For automotive use, choose felt pads with a tapered edge design that allows you to work close to window seals and cowls without catching. The backing should be reinforced to prevent the pad from deforming under pressure, which would create uneven cutting and potentially dangerous high spots.
Specialized Contour Pads for Curved Glass
Modern vehicles feature increasingly complex glass geometries—deeply curved windshields, swept-back side windows, and rear glass with compound curves. Standard flat pads can’t maintain contact on these surfaces, leading to uneven polishing and holograms. Contour pads feature a domed or cupped profile that matches typical windshield curvature. Some advanced designs use segmented pads with independent floating sections that adapt to surface variations in real-time. For SUVs and trucks with steep windshield angles, these specialized attachments aren’t optional—they’re essential for achieving uniform results without spending hours on hand polishing tricky sections.
Grit Progression Strategy for Automotive Glass
Starting Grit Selection
Choosing your starting grit is the most critical decision in the entire process. For automotive glass, you must be conservative—it’s always better to start too fine and step up than to start too aggressive and create deep scratches. If defects are visible but you can’t feel them with your fingernail, start with a fine foam pad and light-cut cerium oxide. If you can feel the defect, begin with a medium felt pad and medium-grit compound. Never start with anything coarser than 5-micron abrasive on automotive glass unless you’re dealing with severe acid rain etching, and even then, proceed with extreme caution.
When to Step Up to Finer Grits
The transition between grits isn’t about time—it’s about results. You’ll know you’re ready for the next finer grit when the surface looks uniformly hazy with no visible deep scratches remaining from the previous stage. A critical test is the water drop test: spray water on the section you’re polishing. If it sheets evenly without beading on residual scratches, you’re ready to move up. Each grit stage should remove the scratches from the previous stage; jumping too soon leaves deep scratches that become nearly impossible to remove later. Most automotive restoration requires 3-4 stages: heavy cut, medium cut, fine polish, and optical finish.
Choosing the Right Drill for Glass Polishing
Corded vs. Cordless: Which is Better?
For automotive glass work, corded drills provide consistent power delivery and unlimited runtime—crucial when you’re working through multiple grit stages on a large windshield. However, modern high-capacity cordless drills (18V+ platforms) with brushless motors offer comparable performance with greater maneuverability around the vehicle. The key specification isn’t voltage but sustained RPM under load. Cheap drills bog down when pressure is applied, creating inconsistent results. If going cordless, ensure you have at least two batteries, as polishing drains them faster than drilling. For professional results, a corded drill with electronic speed control and a side handle is the gold standard.
RPM Range: The Sweet Spot for Glass Work
Automotive glass polishing requires precise speed control, not raw power. The optimal range is 1,200-1,800 RPM for most cutting and polishing stages. Below 1,000 RPM, pads won’t cut efficiently and you’ll create uneven wear patterns. Above 2,000 RPM, heat builds up exponentially, risking thermal damage and causing compounds to dry out and cake. Your drill must have a variable speed trigger and preferably a speed lock or dial to maintain consistent RPMs. Hammer action must be completely disabled—never use a hammer drill on glass. The drill should feel smooth at low speeds without chattering, which indicates quality bearings essential for vibration-free polishing.
Critical Features That Separate Quality from Junk
Hook-and-Loop vs. Bolt-On Attachments
The attachment mechanism determines both convenience and safety. Hook-and-loop (Velcro) systems dominate the market for good reason—they allow rapid pad changes when stepping through grits. However, cheap hook-and-loop fails under the torque and heat of glass polishing, causing pads to fly off at high speed. Look for industrial-grade hook-and-loop with a rated shear strength of at least 50 psi. Bolt-on systems, while slower, provide absolute security and are preferred by professionals for heavy cutting stages. The best kits offer a hybrid solution: a bolt-on backing plate with an integrated hook-and-loop face, giving you the option to secure pads mechanically when needed.
Heat Resistance and Durability
Automotive glass polishing generates temperatures that can melt standard backing plates and degrade foam pads. Quality attachments use materials rated for continuous operation at 250°F+. The backing plate should have ventilation channels machined into the face to allow airflow between the pad and plate. Foam pads should be closed-cell polyurethane with heat-resistant binders that prevent them from disintegrating after one use. Felt pads need reinforced centers—look for Kevlar or fiberglass reinforcement rings that prevent the pad from tearing at the attachment point. Cheap attachments might save $20 upfront but will fail mid-job, potentially scratching your glass or forcing you to start over.
Safety Protocols for Automotive Glass Polishing
Personal Protective Equipment
Glass polishing creates fine silica dust and slurry that can cause serious respiratory damage and eye irritation. A minimum of N95-rated respirator is required; for frequent use, step up to a P100 half-face respirator. Safety goggles with indirect ventilation prevent slurry splash while resisting fogging. Nitrile gloves protect your skin from abrasive compounds and prevent oils from your hands contaminating the glass. Long sleeves and pants are advisable—glass slurry is surprisingly abrasive and can cause skin irritation. Always work in a well-ventilated area; if polishing indoors, use a shop vacuum with HEPA filtration to capture airborne particles.
Protecting Your Car’s Paint and Trim
The compounds used for glass polishing are far more aggressive than paint polishes and will instantly damage automotive finishes. Before starting, mask off all adjacent paint, rubber seals, and plastic trim with 3M automotive masking tape and plastic sheeting. Pay special attention to windshield cowls, A-pillars, and mirror mounts. Cover the entire hood and fenders with a protective blanket. If slurry drips onto paint, don’t wipe it—flush it immediately with water to prevent scratching. Remove wiper blades completely rather than just taping them up; this gives you better access and prevents accidental damage to the blades themselves.
The Complete Polishing Process: From Prep to Perfection
Inspection and Cleaning Phase
Success begins with meticulous preparation. Wash the glass with a dedicated automotive glass cleaner and a microfiber towel, then inspect under both direct sunlight and a bright LED flashlight held at a low angle. Mark defects with masking tape on the interior side so you can track progress. Clay the glass with a fine-grade clay bar and plenty of lubricant to remove surface contaminants—this step is non-negotiable. Any dirt left on the surface will be ground in by the polisher, creating new scratches. Finally, wipe down with isopropyl alcohol (70% solution) to remove any remaining oils or residues.
The Multi-Stage Polishing Sequence
Start with your most aggressive pad and compound on a small test section (6x6 inches) in an inconspicuous area. Work at 1,400 RPM with light to medium pressure, using overlapping passes in a cross-hatch pattern—horizontal, then vertical, then diagonal. Each section should receive 4-6 passes before moving on. Work in zones no larger than 2x2 feet to maintain control. After each stage, clean the glass thoroughly with water and a microfiber towel, inspect under your light source, and only proceed when the previous grit’s scratches are completely gone. The final optical polish stage uses minimal pressure and a clean foam pad, focusing on achieving perfect clarity rather than removing defects.
Final Cleaning and Coating Application
After your final polish stage, the glass will be microscopically clean and highly prone to water spotting. Immediately clean with a pH-neutral glass cleaner and apply a dedicated glass coating or sealant. These products fill any remaining micro-scratches and create a hydrophobic layer that repels water, dirt, and contaminants. This isn’t just for aesthetics—it extends the life of your polish job by protecting the newly restored surface. For windshields, choose a coating specifically formulated for forward-facing glass that won’t cause wiper chatter or reduce clarity.
Common DIY Mistakes and How to Avoid Them
Overheating the Glass
The number one mistake is creating too much friction in one spot. You’ll know you’re overheating when the compound turns dry and cakey or you see a rainbow-like haze appearing on the glass. Prevent this by keeping the pad moving continuously, never letting it dwell in one spot for more than 2-3 seconds. Use a spray bottle to mist the glass lightly with water every 30-45 seconds—this cools the surface and reactivates the compound. If the glass becomes too hot to touch comfortably, stop immediately and let it cool for 10 minutes. Thermal damage is irreversible and often requires windshield replacement.
Using the Wrong Pressure
Many enthusiasts believe more pressure equals faster cutting, but with automotive glass, excessive pressure creates sub-surface damage and uneven removal. The correct technique uses just enough pressure to keep the pad in full contact with the glass—typically 2-4 pounds of force. You should see the compound spreading evenly without being squeezed out from under the pad. Let the abrasives do the work; your job is to provide movement and light pressure. A good test: if you can see the drill’s RPM dropping significantly under pressure, you’re pushing too hard.
Skipping Grit Steps
Impatience destroys more glass than any tool malfunction. Each grit size creates a specific scratch pattern that must be completely removed by the next finer grit. Skipping from a heavy cut directly to a fine polish leaves deep, visible scratches that are nearly impossible to remove later without starting over. The progression is mathematical: if you start with 5-micron abrasive, your next step should be 3-micron, then 1-micron, then 0.5-micron for the finish. Each stage typically requires 30-50% more time than the previous one because you’re removing less material but achieving finer results.
Maintaining and Cleaning Your Polishing Pads
Proper Pad Cleaning Techniques
Glass polishing pads become saturated with abrasive slurry and glass particles. Clean them after every use to maintain performance and prevent cross-contamination between grits. Foam pads can be rinsed with warm water and a mild detergent, then air-dried completely before storage. For felt pads, use compressed air to blow out embedded particles, then soak in a pad cleaning solution specifically formulated for glass abrasives. Never use the same pad for different grit compounds—dedicate each pad to a specific grit. Store pads in sealed plastic bags to prevent dust contamination, which could cause scratches in your next polishing session.
When to Replace Your Pads
Even with meticulous care, pads wear out. Foam pads lose their firmness and develop compressed areas that don’t cut evenly—replace them when you notice permanent deformation or when the hook-and-loop backing begins separating from the foam core. Felt pads mat down and lose their nap, reducing cutting efficiency. A good rule: if a felt pad looks smooth and shiny rather than fuzzy, it’s time for replacement. For enthusiasts who polish glass 2-3 times per year, expect to replace foam pads every 12-18 months and felt pads every 6-12 months. Professional detailers may need replacement every 1-3 months depending on volume.
Drill Attachments vs. Hand Polishing vs. Professional Equipment
Time and Effort Comparison
Hand polishing a single windshield with cerium oxide powder can take 4-6 hours of intense labor and rarely achieves professional results due to inconsistent pressure and speed. Quality drill attachments reduce this to 1-2 hours with dramatically better outcomes. Professional rotary systems can complete the job in 30-45 minutes but cost $300-$800 plus training. For the average car enthusiast who polishes glass 2-4 times per year, drill attachments offer the optimal balance: 70% of professional speed at 10-15% of the equipment cost. The learning curve is also gentler—mistakes with a drill attachment are more forgiving than with a high-torque rotary polisher.
Results Expectations
Manage your expectations realistically. Drill attachments can remove water spots, light scratches, wiper marks, and mineral etching up to 0.05mm deep. They cannot repair deep scratches you can catch with your fingernail, chips, cracks, or severe pitting from road debris. The results should be a 90-95% improvement in clarity and light transmission—your glass won’t be literally “invisible,” but it should approach factory-new condition. The final appearance should be uniformly clear with no visible defects under normal lighting conditions, though a perfectionist’s inspection light might reveal micro-scratches from the polishing process itself.
Advanced Techniques for Perfect Clarity
Edge Work and Corner Polishing
The edges of automotive glass are where most DIY attempts fail. Standard pads can’t reach within 1-2 inches of the seal without risking damage to trim. Use specialized tapered or cone-shaped attachments for these areas, working by hand at very low speeds. For corners, create a small “polishing pen” by wrapping a microfiber cloth around a pencil eraser and applying compound manually. The technique is to work inward from the edge, never starting directly on the seal. Masking tape should be applied not just on the paint, but also 1/4 inch onto the glass edge to create a buffer zone you can safely polish to.
Handling Tempered vs. Laminated Glass
Your vehicle uses two different glass types: laminated glass (windshield) and tempered glass (side and rear windows). Laminated glass is more forgiving—it has a plastic interlayer that prevents total failure and can withstand more heat. Tempered glass is under immense internal tension and can shatter if overheated or ground too thin. When polishing tempered glass, reduce RPM by 20-30%, increase cooling mist frequency, and never work a single area for more than 30 seconds continuously. The rear window’s defroster lines are particularly vulnerable—use only the finest foam pads and minimal pressure over these areas, and never use felt pads which can grind through the conductive coating.
Cost-Benefit Analysis: Is a Glass Polishing Kit Worth It?
A quality glass polishing attachment kit with multiple pads and compounds typically costs $60-$120. Compare this to professional glass restoration services at $150-$300 per vehicle, or windshield replacement at $300-$1,500. If you detail your car twice yearly and own it for five years, a DIY kit pays for itself after the first use. More importantly, you gain the ability to address problems immediately—spot-treating a new water spot before it etches deeply—rather than waiting until professional intervention is required. For multi-car households or car club members who help friends, the value multiplies. The real cost isn’t monetary; it’s the time investment to learn proper technique and the risk of thermal damage if you rush the process.
Frequently Asked Questions
1. Can I use my regular wood drill for glass polishing, or do I need a special drill?
Any variable-speed drill with a minimum 5-amp motor (corded) or 18V platform (cordless) will work, provided it maintains consistent RPMs under light to medium pressure. The key features are smooth low-speed operation (down to 1,200 RPM) and a side handle for control. Avoid hammer drills or impact drivers entirely.
2. How often should I polish my car’s glass to maintain clarity?
For daily drivers in harsh climates, polish once per year. Garage-kept vehicles or those in mild climates need polishing every 2-3 years. Over-polishing thins the glass over decades, so focus on prevention with regular cleaning and water spot removal rather than aggressive annual polishing.
3. Will polishing remove the factory tint from my side windows?
Factory tint is embedded within the glass itself and cannot be removed by polishing. However, aftermarket window film applied to the interior surface can be damaged if polishing compound seeps under the edges. Always mask film edges thoroughly and avoid polishing the interior surface unless necessary.
4. What’s the difference between cerium oxide and aluminum oxide compounds?
Cerium oxide is the professional standard for glass, offering faster cutting and better optical clarity but at higher cost. Aluminum oxide is more affordable and effective for heavy defect removal but can leave a slightly hazy finish that requires additional polishing stages. Most kits include both for different stages.
5. Can I polish glass in direct sunlight or hot weather?
Avoid polishing in direct sun or when ambient temperatures exceed 85°F. Heat from the sun pre-warms the glass, reducing your safe working window before thermal damage occurs. Work in shade or a garage, and if you must work outdoors, do so during early morning or late evening hours.
6. How do I know if a scratch is too deep to polish out?
Run your fingernail across the scratch. If you can feel it catch, it’s likely too deep for safe removal. Drill attachments can only remove defects shallower than 0.05mm. Deep scratches require professional assessment and may necessitate glass replacement for safety.
7. Is it safe to polish over windshield chips or cracks?
Absolutely not. Polishing creates pressure and heat that can cause chips to spread into cracks and existing cracks to propagate. Repair all chips and cracks first, then polish. If the damage is in the driver’s line of sight, replacement is often the safer option regardless.
8. Why does my glass look worse immediately after polishing?
This is normal and expected. The polishing process creates a uniform haze of micro-scratches that are invisible when wet with compound but appear cloudy when dry. This haze is removed by the subsequent finer grit stages. If haziness remains after your final polish, you may have skipped a grit step or overheated the glass.
9. Can I use paint polishing pads on glass in a pinch?
Never. Paint pads are too soft and will glaze over without cutting glass effectively. They also lack the heat resistance needed for glass work and can melt, leaving permanent residue. Always use pads specifically engineered for glass polishing, which have different foam densities, fiber compositions, and thermal properties.
10. How long should I wait after polishing before applying a glass coating?
Polish must be completely removed and the glass chemically clean before coating. Wait at least 30 minutes after final polishing, then wipe with isopropyl alcohol. Apply the coating immediately afterward while the glass is still in a pristine state. Delaying allows airborne contaminants to settle on the freshly polished surface.