There’s something almost meditative about stepping back to admire a vehicle with a flawless, mirror-like finish—paint that seems to glow from within, water that beads into perfect spheres, and a surface so slick it feels like glass. Achieving that show-car brilliance isn’t about owning expensive tools or spending countless hours; it’s about understanding the synergy between the right products applied in the right sequence. That’s precisely where finishing kits come into play. These curated bundles of wax, sealant, and detailer products promise to demystify the final—and most satisfying—step of automotive care, but not all kits are created equal.
The market is flooded with options that range from budget-friendly starter packs to professional-grade collections, each claiming to deliver unparalleled gloss and protection. How do you separate marketing fluff from genuine performance? What makes one wax superior to another, or a sealant worth its premium price tag? This comprehensive guide cuts through the noise, exploring the chemistry, application techniques, and critical evaluation criteria you need to master before investing in any finishing kit. Whether you’re a weekend warrior looking to elevate your wash routine or a seasoned enthusiast chasing concours-level results, understanding these fundamentals will transform how you protect and enhance your vehicle’s finish.
Top 10 Finishing Kits
Detailed Product Reviews
1. Daich SpreadStone Mineral Select Countertop Finishing Kit (Natural White)

Overview: The Daich SpreadStone Mineral Select Countertop Finishing Kit offers homeowners an innovative solution for transforming worn laminate surfaces without the cost of full replacement. This natural white finish kit is specifically formulated to rejuvenate kitchen and bathroom countertops, tables, and similar surfaces with a stone-like appearance.
What Makes It Stand Out: Unlike standard paint-on solutions, this kit uses a mineral select formula that creates a textured, three-dimensional finish mimicking natural stone. The natural white color provides a clean, modern aesthetic that brightens spaces while hiding imperfections in old countertops. The application process is designed for DIYers, requiring no specialized skills or professional equipment.
Value for Money: At $154.99, the initial cost seems steep, but when calculated against countertop replacement ($2,000+), it delivers exceptional savings. The price per fluid ounce appears high because the kit includes multiple components beyond just the coating—tools, preparation materials, and detailed instructions. Compared to hiring professionals, this represents an 80-90% cost reduction.
Strengths and Weaknesses: Strengths include professional-looking results, durable stone-like finish, comprehensive kit contents, and straightforward application process. The natural white color offers versatile design compatibility. Weaknesses involve the premium upfront cost, time-intensive multi-step application requiring 2-3 days, and limited to laminate surfaces only. The finish may not suit every aesthetic preference.
Bottom Line: This kit is ideal for budget-conscious homeowners seeking a dramatic countertop transformation without renovation mess. While demanding patience and careful prep work, the results rival professional refacing at a fraction of the cost. Perfect for DIYers comfortable with detailed projects.
2. KURUI 700pcs Hardware Nails for Hanging Pictures, Up to 2"-Long Finish Nails Assortment Kit for Wall Art Decor, 640 Frame Nails and 60 Small Finishing Nails for Drywall Wood - Silver Picture Hangers

Overview: This comprehensive nail assortment from KURUI provides 700 pieces of hardware specifically curated for picture hanging and light DIY projects. The kit includes six different nail sizes ranging from 3/4" to 2", organized in a transparent storage box for immediate identification and access.
What Makes It Stand Out: The exceptional organization system sets this apart—each size has its own compartment in a sturdy transparent box, eliminating frustrating searches. The galvanized high-carbon steel construction features multiple protective layers against rust and deformation. With 640 frame nails and 60 finishing nails, it covers everything from delicate artwork to heavier wall decor.
Value for Money: At just $6.99, this kit offers remarkable value. Purchasing these nails individually would cost 2-3 times more, and the included organizer adds significant convenience worth several dollars alone. For DIY enthusiasts and professionals alike, the time saved through organization justifies the entire purchase price.
Strengths and Weaknesses: Strengths include incredible variety, corrosion-resistant material, smart organization, and exceptional affordability. The multiple sizes accommodate virtually any hanging task. Weaknesses are minimal: beginners might be overwhelmed by size choices, and the silver finish may not match all decor styles. Some users might prefer fewer nails in favor of higher quantities of specific sizes.
Bottom Line: An essential addition to any homeowner’s toolkit, this assortment eliminates repeated hardware store trips. Perfect for renters, decorators, and DIYers who value organization and versatility. The quality exceeds expectations for the price point, making it a no-brainer purchase for anyone who hangs wall decor regularly.
3. THINKWORK Drywall Knife Set, 10Pcs Drywall Tools Include Stainless Steel Putty Knife Set, Taping Knives, Painter Scraper, 14" Mud Pan and Scoop, Spackle Tool Kit for Joint Taping, Finishing, Patching
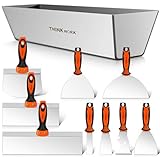
Overview: THINKWORK’s 10-piece drywall tool kit provides a complete solution for joint taping, finishing, and patching projects. The set includes putty knives (1", 2", 4", 6", 8"), a painter’s tool, taping knives (10", 14"), a bucket scoop, and a 14" mud pan—everything needed for professional-quality drywall work.
What Makes It Stand Out: The comprehensive nature of this kit is impressive, covering every blade size a DIYer or professional might need. The stainless steel blades undergo polishing, electroplating, and quenching for superior durability and easy cleaning. The 14" mud pan features spiral arc welding for watertight seams, while the ergonomic PP rubber handles with anti-slip patterns reduce hand fatigue during extended use.
Value for Money: Priced at $39.99, this kit offers substantial savings over purchasing tools individually, which would easily exceed $60-70. The inclusion of both the mud pan and bucket scoop—often sold separately—adds significant value. For homeowners tackling renovation projects, this single purchase eliminates multiple shopping trips.
Strengths and Weaknesses: Strengths include comprehensive size range, quality stainless steel construction, comfortable ergonomic handles, and excellent organization. The watertight mud pan is a standout feature. Weaknesses include the requirement that carbon steel taping knives must be stored dry to prevent coating damage, and the 1" and 2" knives may see less frequent use. The kit lacks a corner tool for inside corners.
Bottom Line: An outstanding value for DIY renovators and professionals alike. This kit provides professional-grade tools at a consumer-friendly price. While requiring proper care of the carbon steel components, the quality and completeness make it an excellent investment for anyone regularly working with drywall.
4. Ekopel 2K Bathtub Refinishing Kit - Pour On Bathtub Paint White Gloss Finish Kit, 1 Coat Odorless Sink and Bath Tub Paint – Long Lasting Never Peel DIY Glaze for Tub, Made in USA – Bright Gloss White

Overview: Ekopel 2K offers a complete pour-on refinishing solution for worn bathtubs and sinks, delivering a bright gloss white finish without professional help. This Made in USA kit includes all necessary tools and materials to restore porcelain, ceramic, fiberglass, and enamel surfaces with a single, thick coat application.
What Makes It Stand Out: The truly odorless formula distinguishes this from toxic traditional refinishing products, making it safe for indoor use without ventilation concerns. The pour-on application method creates a self-leveling, thick coating that eliminates brush marks and orange peel texture. The kit’s strong bonding capability adheres to multiple surface types, and the included video tutorials guide users through each step.
Value for Money: At $169.95, this kit costs significantly less than bathtub replacement ($1,500+) or professional refinishing ($400-600). While pricier than standard paint, the specialized 2K enamel formula and comprehensive tool package justify the cost. The “never peel” promise suggests long-term value if properly applied.
Strengths and Weaknesses: Strengths include odorless application, strong multi-surface adhesion, self-leveling finish, complete tool inclusion, and clear video guidance. The 24-hour set time is reasonable. Weaknesses include temperature sensitivity (requires 72°F), extended cure time before use, and unforgiving application—mistakes are difficult to correct. The single-coat approach leaves no room for error.
Bottom Line: Ideal for confident DIYers seeking a cost-effective bathroom update. The odorless formula and pour-on method simplify a traditionally complex process, but success demands meticulous preparation and ideal conditions. Not for beginners, but delivers professional results when instructions are followed precisely.
5. Birchwood Casey Easy-to-Use Long-Lasting Complete Tru-Oil Stock Finish for Gun Stock Finishing and Maintenance
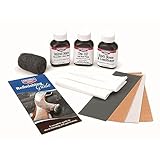
Overview: Birchwood Casey’s Tru-Oil Stock Finish kit provides everything needed to finish or refinish gun stocks, continuing a tradition of quality gun care products since 1948. This comprehensive package includes walnut stain, stock sheen conditioner, Tru-Oil finish, sandpapers, steel wool, cloth, burlap, and detailed instructions.
What Makes It Stand Out: The all-in-one completeness eliminates guesswork for gun enthusiasts. The Tru-Oil formula creates a durable, hand-rubbed satin finish that protects against weather and handling while resisting fingermarks. Birchwood Casey’s 75-year reputation in the shooting community ensures trusted performance. The included multiple grit sandpapers and steel wool enable proper surface preparation and finish refinement.
Value for Money: At $18.99, this specialized kit offers exceptional value. Purchasing components separately would cost significantly more, and the included instructions prevent costly mistakes on valuable gun stocks. For the quality of materials and brand reputation, this represents one of the best values in gun care.
Strengths and Weaknesses: Strengths include complete material inclusion, trusted brand heritage, true walnut stain coloration, protective satin finish, and clear instructions. The nonwoven cloth and burlap provide professional application tools. Weaknesses include small 3-ounce quantities that may be insufficient for multiple stocks, limited to wood stocks only, and the process requires patience across multiple days. Novices may find the hand-rubbing technique challenging.
Bottom Line: An essential kit for gun owners wanting to maintain or restore wood stocks. Birchwood Casey delivers professional-grade materials at an accessible price. While requiring time and care, the results justify the effort. Perfect for both first-time stock finishing and experienced gunsmiths seeking reliable materials.
6. Birchwood Casey Easy-to-Use Deluxe Perma Blue & Tru-Oil Complete Finishing Kit for Gun Blueing and Stock Finishing

Overview: This comprehensive kit from Birchwood Casey provides everything needed to refinish firearm metal and wood components. Designed for gun enthusiasts and hobbyists, the all-in-one package addresses both blueing and stock finishing in a single clam pack solution.
What Makes It Stand Out: The dual-purpose nature sets it apart from single-application products. You get Perma Blue liquid gun blue for restoring worn barrels and receivers, plus Tru-Oil gun stock finish for wood components. The kit includes applicators, cleaners, and finishing materials, eliminating guesswork about compatibility.
Value for Money: At $32.73, this kit offers significant savings compared to purchasing blueing solutions, stock oils, and applicators separately. For occasional gun maintenance, it’s more economical than professional refinishing services that typically start at $100. The quality components justify the mid-range price point.
Strengths and Weaknesses: Strengths include the trusted Birchwood Casey reputation, clear instructions, and complete package convenience. The chemical formulas deliver professional-looking results with proper application. Weaknesses involve the learning curve for beginners—improper blueing can create blotchy results. The chemicals require careful handling, ventilation, and safety precautions. Limited quantities may only handle 1-2 complete firearms.
Bottom Line: An excellent investment for gun owners comfortable with DIY maintenance. It delivers professional results at a fraction of service costs, though beginners should practice on scrap metal first.
7. 8 Pieces Caulk Tool Kit Sealant Finishing Tools Plastic Caulking Tools for Sealant Grout Finishing Sealing Tile Sealing & Grouting Finishing Tools for Tile and Grout Smoothing(Blue)
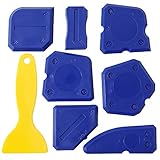
Overview: This eight-piece toolkit provides specialized implements for achieving professional-looking caulk and grout lines. The blue plastic tools come in various profiles to handle different joint sizes and applications throughout your home renovation projects.
What Makes It Stand Out: The variety of shapes and sizes offers unmatched versatility for a budget tool set. Unlike single-profile tools, this kit includes options for corners, edges, and different joint widths. The reusable silicone/plastic construction means easy cleanup with water or solvent between applications.
Value for Money: At just $6.50, this represents exceptional value. Individual caulk finishing tools often retail for $3-5 each, making this set a bargain. For DIY homeowners tackling multiple rooms, the cost-to-utility ratio is outstanding and pays for itself after one project.
Strengths and Weaknesses: Strengths include the comprehensive selection, low price point, and suitability for most sealant types. The tools work well for silicone, latex, and grout applications. Weaknesses involve the plastic durability—professional contractors may find them less robust than metal alternatives. The flexibility can sometimes make it difficult to achieve perfectly consistent pressure on larger joints, requiring practice.
Bottom Line: A must-have for any DIY homeowner’s toolbox. While not professional-grade, these tools deliver clean results for occasional use at an unbeatable price point.
8. Retique It Muli-Purpose Wood Finish Kit - GO Beyond Faux Wood with Paintable Liquid Wood Based Primer and Gel Stain - Graining Tools Included (2X 8oz, Dark Oak)

Overview: Retique It’s innovative kit transforms virtually any hard surface into realistic wood grain using patented liquid wood technology. The two-step system includes a primer containing over 60% recycled wood fibers and gel stain, plus graining tools to create authentic textures.
What Makes It Stand Out: The product contains actual wood fibers rather than just mimicking wood appearance. This creates a genuine wood feel and stain absorption. The versatility is remarkable—apply over painted surfaces, metal, concrete, or plastic without stripping. Zero VOCs and soap-water cleanup make it eco-friendly and user-safe.
Value for Money: At $69.99, this premium kit commands a higher price than traditional stains. However, considering it eliminates sanding, stripping, and priming costs, plus works on multiple surfaces, the value becomes apparent for complex projects. Comparable faux wood systems cost $50-80 without the same authenticity.
Strengths and Weaknesses: Strengths include the revolutionary formula, environmental friendliness, extreme durability for interior/exterior use, and time-saving application. The included graining tools help achieve professional results. Weaknesses include the learning curve for realistic grain patterns and the premium price. Results depend heavily on technique, and some surfaces may require multiple coats for optimal adhesion.
Bottom Line: Ideal for creative DIYers seeking authentic wood aesthetics without replacement costs. Practice on samples first to master the technique and maximize your investment.
9. Stick Fast K575 CA Wood Finish Starter Kit

Overview: This starter kit introduces woodworkers to cyanoacrylate (CA) finishing, a technique using thin super glue to create glass-like, durable coatings. Popular among pen turners and small project enthusiasts, CA finishes provide rapid curing and excellent protection for turned objects and small craft items.
What Makes It Stand Out: CA finishing remains relatively unknown outside turning circles, making this curated kit valuable for beginners. It includes the correct viscosity CA glue, accelerators, and applicators specifically chosen for wood finishing rather than general adhesive use, eliminating guesswork.
Value for Money: At $33.97, the kit offers fair pricing for specialized materials. Individual CA finishing components would cost $40-50 when sourced separately. For those experimenting with this technique, the kit prevents costly mistakes from using wrong formulations and includes enough product for multiple small projects.
Strengths and Weaknesses: Strengths include incredibly fast drying times, exceptional durability, and high-gloss aesthetic appeal. The finish resists water, chemicals, and wear better than many traditional topcoats. Weaknesses involve fumes requiring excellent ventilation, potential skin bonding hazards, and difficulty correcting application errors. The technique demands practice and isn’t suitable for large surface areas due to cost and curing challenges.
Bottom Line: Perfect for woodturners and hobbyists ready to explore advanced finishing techniques. Master the learning curve and you’ll achieve stunning, durable results on small projects that traditional finishes can’t match.
10. Finishing Touch Flawless Salon Nails Kit, Electronic Nail File and Full Manicure and Pedicure Tool

Overview: This rechargeable electronic nail system brings salon-quality manicure and pedicure capabilities to your home. With six interchangeable heads and variable speed control, it handles filing, buffing, shaping, and shining for both fingernails and toenails with professional-style results.
What Makes It Stand Out: The cordless design with LED illumination provides excellent maneuverability and visibility during detailed work. Forward/reverse rotation and dual speed settings offer professional-level control typically found in more expensive devices. The inclusion of six specialized heads covers complete nail care routines from shaping to high-gloss finishing.
Value for Money: At $19.88, this kit costs less than a single professional manicure. For regular users, it pays for itself within two uses. While professional-grade e-files cost $100+, this consumer model provides adequate power for maintenance and light shaping, making it economical for home use.
Strengths and Weaknesses: Strengths include the hygienic at-home use, cordless convenience, and versatile attachment selection. The LED light helps illuminate detail work. Weaknesses include motor power limitations for heavy-duty filing and durability concerns with frequent use. The battery life may diminish over time, and the plastic construction feels less robust than salon equipment. Beginners should use low speeds to avoid nail damage.
Bottom Line: An excellent investment for maintaining nails between salon visits. While not replacing professional equipment, it delivers impressive results for routine care at an accessible price point for most consumers.
Understanding the Trinity: Wax, Sealant, and Detailer
A proper finishing kit centers around three complementary products, each serving a distinct purpose in your vehicle’s protection ecosystem. Think of them as a layered defense system rather than interchangeable options. Wax provides warmth and depth, sealant delivers durable armor, and detailer acts as a maintenance agent that refreshes and extends the performance of both. The magic happens when these three work in harmony, creating a finish that’s greater than the sum of its parts.
The Role of Carnauba Wax
Carnauba wax remains the gold standard for natural gloss enhancement, derived from the leaves of the Brazilian palm tree. Its unique molecular structure creates a crystalline layer that refracts light, producing that coveted warm glow and deep, wet look that enthusiasts prize. In finishing kits, wax typically serves as the final top layer—the cosmetic flourish that makes paintwork appear liquid. The concentration of carnauba, indicated by grades like T1, T3, or T5, directly impacts both the clarity of finish and the price point. Higher-grade carnauba contains fewer impurities, resulting in better clarity on dark colors and a more refined overall appearance.
Synthetic Sealants Explained
Synthetic sealants represent modern polymer chemistry at its finest, offering protection that far outlasts traditional waxes. These products create a semi-permanent molecular bond with your vehicle’s clear coat, forming a rigid, chemical-resistant barrier. Unlike wax, which sits on the surface, quality sealants cross-link and cure, becoming part of the protective landscape. Most finishing kits include either acrylic, polymer, or SiO2-infused sealants, each with varying levels of water repellency, UV resistance, and durability. The key advantage lies in their ability to withstand environmental contaminants, acid rain, and industrial fallout for months rather than weeks.
Quick Detailers: The Finishing Touch
Quick detailers often get dismissed as simple dusters, but within a finishing kit, they serve a far more sophisticated role. These spray-on, wipe-off formulations contain lubricants, gloss enhancers, and maintenance-grade polymers that refresh the underlying protection layer. A quality detailer extends the life of your wax and sealant by depositing trace amounts of protective agents with each use, while its lubricating properties prevent micro-marring during wipe-downs. The best formulas offer impressive dilution ratios, allowing you to customize strength for everything from light dust removal to water spot treatment.
Why Invest in a Finishing Kit?
Purchasing products individually might seem flexible, but curated finishing kits offer advantages that transcend mere convenience. Manufacturers design these bundles to ensure chemical compatibility between layers, preventing adverse reactions that can cause hazing, streaking, or premature failure. The cost savings typically range from 15-30% compared to buying components separately, and kits eliminate the guesswork of product pairing. More importantly, they provide a systematic approach to paint protection—each product formulated to enhance the performance of the others, creating a cohesive system that delivers predictable, repeatable results.
Decoding Product Formulations
The ingredient list on car care products often reads like a chemistry textbook, but understanding a few key components reveals much about performance potential. Volatile Organic Compounds (VOCs) affect both application ease and environmental impact, while the carrier system—whether water or solvent-based—determines how the product behaves on different surfaces. Premium finishing kits increasingly feature low-VOC, water-based formulations that offer safer application without sacrificing performance.
Water vs. Solvent-Based Formulations
Water-based products dominate modern finishing kits for good reason: they’re easier to remove, less prone to staining trim, and more environmentally responsible. They rely on advanced emulsion technology to suspend protective polymers in water, creating a product that spreads thin and wipes off effortlessly. Solvent-based formulations, while still prevalent in some premium waxes, can be trickier to work with, especially in hot climates where they flash too quickly. However, they often deliver slightly higher gloss levels on certain paint types due to their ability to fill minor imperfections more effectively.
The Role of Silicones and Polymers
Not all silicones are created equal, and finishing kits leverage different types strategically. Dimethicone and other water-dispersible silicones create slickness and water-beading without the staining issues associated with industrial-grade silicones. Modern polymer technology, particularly SiO2 (silicon dioxide) integration, bridges the gap between traditional sealants and ceramic coatings, offering increased hardness and hydrophobic properties. The concentration and type of these polymers significantly influence durability, with some advanced formulations providing up to 12 months of protection.
Key Features to Evaluate
When assessing any finishing kit, durability ratings and aesthetic outcomes often compete for priority. A product promising five years of protection might deliver a plastic-like appearance, while a high-gloss wax might need reapplication monthly. The sweet spot lies in finding formulations that balance both attributes while matching your maintenance commitment level. Pay close attention to claimed longevity versus real-world performance in your climate, and consider how the product’s characteristics align with your vehicle’s color and paint type.
Durability Ratings: What They Really Mean
Manufacturers test durability under controlled laboratory conditions—typically on horizontal panels exposed to constant UV and water cycling. Real-world durability depends on your washing habits, storage conditions, and local environment. A kit claiming “12-month protection” might realistically deliver 6-8 months on a daily driver in harsh climates, or exceed a year on a garage-kept weekend car. Look for kits that specify whether their durability claims apply to vertical or horizontal surfaces, as hoods and roofs always degrade protection faster than doors and fenders.
Gloss vs. Protection: Striking the Balance
The age-old debate continues: maximum gloss or maximum protection? Carnauba-dominant formulas deliver unparalleled warmth and depth but sacrifice longevity. Polymer-heavy sealants provide armor-like protection but can appear somewhat sterile on certain colors. The most sophisticated finishing kits solve this dilemma through layering strategies—applying a durable base sealant followed by a cosmetic wax topcoat. This approach gives you the best of both worlds: months of protection with that just-waxed look that makes enthusiasts weak in the knees.
The Application Arsenal: Tools Included
A finishing kit is only as good as the tools you apply it with, which is why premium bundles include purpose-designed applicators and removal towels. The included microfiber towels should specify GSM (grams per square meter) and weave type, as these factors directly influence linting, absorption capacity, and potential for marring. Applicator pads need the right density and porosity to spread product thinly and evenly—too dense, and you waste product; too porous, and you create an uneven layer.
Microfiber Matters: GSM and Weave Types
Quality finishing kits include towels in the 350-450 GSM range for product removal—dense enough to absorb residue without pushing it around, yet plush enough to prevent scratching. The weave pattern matters significantly; twist-loop designs excel at waterless washing and detailer application, while plush terry weaves work best for wax and sealant removal. Avoid kits with generic, unbranded towels below 300 GSM, as these often contribute to micro-scratching and leave lint behind on dark paint.
Foam Applicator Density Explained
Foam applicators typically range from 60 to 90 pores per inch (PPI). Lower density foam (60-70 PPI) works beautifully for spreading waxes and sealants because it holds product in its open cell structure, releasing it gradually. Higher density foam (80-90 PPI) excels for detailers and spray sealants, providing a smoother glide and more even distribution. The best finishing kits include multiple applicator densities, recognizing that each product type demands a specific tool for optimal results.
Wax Deep Dive: What to Look For
Wax formulations within finishing kits reveal much about the overall quality of the bundle. Paste waxes traditionally contain higher concentrations of carnauba and provide longer working times, making them ideal for beginners. Liquid waxes incorporate more polymers and solvents, spreading more thinly and removing with less effort, but they may sacrifice some of that signature carnauba warmth. The inclusion of UV inhibitors and dye-transfer resistance indicates a more advanced formulation designed for real-world durability.
Paste Wax vs. Liquid Wax
Paste waxes in premium kits often contain 30-40% carnauba by volume, creating a harder, more durable layer that enhances metallic flake and deepens single-stage paint. They require more effort to apply and remove but reward you with a finish that seems to emanate from within the paint itself. Liquid waxes, while more convenient, typically contain 15-25% carnauba, relying on synthetic polymers to bolster protection. They’re the practical choice for large vehicles or those new to detailing, offering 80% of the gloss with half the effort.
Carnauba Concentration Grades
The carnauba grading system—T1 being the purest, T5 containing more impurities—directly impacts performance. T1-grade carnauba appears nearly translucent, making it perfect for dark colors where clarity is paramount. T3-grade offers a slightly warmer tone, excellent on reds and yellows. Most finishing kits don’t disclose their carnauba grade, but you can infer it from the product’s color (paler is purer) and the manufacturer’s claims about suitability for dark colors. Kits targeting enthusiasts will almost always specify T1 or T2 grade.
Sealant Deep Dive: What to Look For
Sealant technology has evolved dramatically, with modern formulations offering performance that rivals entry-level ceramic coatings. The active polymer type determines everything from water behavior to chemical resistance. Acrylic sealants create a hard, glass-like layer but can be finicky about application conditions. polymer sealants offer more flexibility, adhering better to complex curves and resisting cracking. SiO2-infused sealants represent the current pinnacle, providing genuine hardness and self-cleaning properties that make maintenance washes almost effortless.
Polymer Technology: Teflon vs. Acrylic vs. SiO2
Teflon-based sealants, while marketed heavily, actually provide minimal protection in automotive applications because the particles are too large to bond effectively with paint. Acrylic polymers create a durable, glossy shell but may yellow over time on white or silver vehicles. SiO2-infused sealants are the current gold standard, forming a semi-permanent, quartz-like layer that’s measurably harder than the clear coat itself. When evaluating a kit, look for sealants that specify “SiO2-enhanced” or “ceramic-infused” for maximum durability and hydrophobic performance.
Layering Sealants for Enhanced Protection
Some advanced finishing kits are designed for intentional layering—applying a base sealant, allowing it to cure fully, then topping with a secondary sealant containing different polymers. This “stacking” creates a hybrid protection system with complementary properties: the base layer provides hardness and chemical resistance, while the top layer adds slickness and water behavior. The key is ensuring the kit’s products are specifically formulated to bond with each other, as incompatible polymers can cause delamination or hazing.
Detailer Deep Dive: What to Look For
The quick detailer in your finishing kit is your daily driver’s best friend, but not all are created equal. Premium detailers contain substantive polymers that actually add protection with each use, rather than simply redistributing existing product. The lubrication package is critical—sufficient slip prevents micro-scratching during dust removal, while too much lubricant leaves a greasy residue. Look for detailers that specify “dust encapsulation technology” and offer dilution flexibility, allowing you to customize strength for different tasks.
Dilutable vs. Ready-to-Use Formulas
Concentrated detailers that offer 1:3 or 1:4 dilution ratios provide exceptional value and versatility. At full strength, they tackle water spots and bird bombs; diluted, they serve as clay lubricants or maintenance sprays. Ready-to-use formulas offer convenience but limit flexibility and increase long-term cost. The best finishing kits include a concentrate with clear dilution guidelines, recognizing that enthusiasts appreciate versatility over simplicity.
Kit Configurations: Finding Your Perfect Match
Finishing kits typically fall into three categories: starter bundles with smaller quantities, enthusiast kits with full-sized products, and professional collections that include specialized variants for different conditions. Starter kits often contain 8-12 oz containers, enough for 2-3 applications on a midsize sedan. Enthusiast kits provide 16-20 oz sizes, offering better per-ounce value and enough product for a full year of regular use. Professional configurations might include multiple wax variants for different colors or seasonal formulations.
Starter Kits vs. Professional Bundles
Starter kits prioritize ease of use and forgiveness, often featuring liquid waxes, spray sealants, and ready-to-use detailers. They’re perfect for learning techniques without wasting expensive product. Professional bundles assume you understand application nuances and include paste waxes, concentrated sealants, and advanced detailers requiring precise dilution. They also typically feature higher-grade raw materials and more sophisticated polymer systems, justifying their premium price through superior performance and longevity.
Size and Quantity Considerations
Calculate coverage rates before committing to a kit. A typical 16 oz wax container covers 8-12 midsize vehicles, while the same amount of sealant might cover 15-20 because it spreads more thinly. Detailers, used more frequently, get consumed faster—plan on 16 oz lasting 3-4 months with weekly use. The best value isn’t always the largest size; product degradation begins the moment you open the container, so buying more than you can use in 18-24 months wastes money.
Surface Preparation: The Non-Negotiable First Step
No finishing kit can compensate for poor preparation. The bond between your paint and protection is only as strong as the surface it adheres to. Decontamination—both chemical and mechanical—is essential for maximizing product performance and longevity. Skipping this step is like painting over rust: you might hide the problem temporarily, but failure is inevitable.
The Decontamination Process
Chemical decontamination involves iron removers and tar dissolvers that break down embedded contaminants without touching the paint. Follow this with a mechanical clay bar or synthetic clay mitt to remove bonded particles that chemicals can’t dissolve. The claying process itself requires proper lubrication—your detailer, diluted appropriately, often serves this purpose beautifully. A properly decontaminated surface feels smooth as glass, allowing wax and sealant to form a uniform, unbroken layer.
When Paint Correction is Necessary
Finishing kits enhance and protect; they don’t correct. If your paint suffers from swirl marks, scratches, or oxidation, no amount of wax will hide these defects—in fact, adding glossy layers can make them more visible. Paint correction through polishing removes a microscopic layer of clear coat, leveling the surface. Most finishing kits perform optimally on paint with at least 85% defect correction. Consider the kit’s price relative to correction costs; sometimes investing in professional polishing yields far better results than buying a more expensive finishing kit.
Application Techniques for Professional Results
The difference between amateur and professional results often comes down to application methodology. Temperature, humidity, and technique dramatically affect how products cure and bond. Professionals apply products in extremely thin layers, understanding that buildup occurs through multiple applications rather than heavy single coats. The environment matters enormously—ideal conditions range from 60-75°F with moderate humidity, allowing products to flash and cure predictably.
Temperature and Humidity Considerations
High temperatures cause solvents to evaporate too quickly, leading to streaking and difficult removal. Cold temperatures prevent proper leveling and extend cure times exponentially. Humidity above 70% can interfere with cross-linking in polymer sealants, while very dry conditions cause premature flashing. The best finishing kits include application guides that specify ideal conditions and offer workarounds for less-than-perfect environments, such as working in smaller sections or adjusting layer thickness.
The Cross-Hatch Method for Even Coverage
Apply wax and sealant using overlapping cross-hatch patterns—vertical strokes followed by horizontal strokes within the same section. This ensures complete, uniform coverage without missed spots or excessive buildup at edges. Use minimal pressure, letting the applicator glide on a micro-layer of product. For sealants, some professionals prefer straight-line applications following body contours, believing it reduces the chance of trapping applicator fibers in the coating. Experiment with both methods using your kit to determine which yields the most uniform finish on your specific vehicle.
Curing and Dwell Times: Patience Pays
Curing is the chemical process where polymers cross-link and form their protective matrix, fundamentally different from simple drying. Most sealants require 12-24 hours to achieve initial cure, with full hardness developing over 7 days. During this window, the coating is vulnerable to water spotting, contamination, and washing. Wax, while appearing to “dry” in minutes, continues to harden and crystallize for several hours, reaching maximum gloss and durability after 2-3 hours of undisturbed curing.
Forced Curing: Can You Speed It Up?
Infrared lamps and controlled heat can accelerate polymer cross-linking, but this technique requires precision. Too much heat causes solvents to flash off before polymers properly align, creating a weak, hazy layer. Some advanced finishing kits specify that gentle warmth (80-90°F surface temperature) improves leveling and cure time, but this must be applied uniformly. For most enthusiasts, patience remains the best approach—allow the product to cure naturally in a clean, controlled environment for optimal results.
Maintenance and Longevity
The longevity of your finishing kit’s protection depends more on maintenance habits than the product’s inherent durability. Aggressive washing techniques, harsh detergents, and automated car washes can reduce a 12-month sealant to 3 months of effective protection. The included detailer becomes your primary maintenance tool, used as a drying aid and between-wash refresher. Establish a maintenance schedule: weekly detailer wipe-downs, monthly sealant toppers, and quarterly wax refreshers on high-impact areas like the hood and front bumper.
Wash Techniques to Preserve Protection
Adopt the two-bucket method with grit guards, using a pH-neutral shampoo that won’t strip protection. Avoid washing in direct sun, and always use your detailer as a drying aid to add lubrication and a fresh layer of polymers. Pressure washers are fine if kept at safe distances (12+ inches) and moderate pressure (1500-2000 PSI), but avoid pointing the spray directly at panel edges where protection is thinnest. The goal is to clean without mechanically or chemically degrading the layers you’ve carefully built.
Topper Products: Friend or Foe?
Many enthusiasts wonder about adding “topper” sprays—quick sealants designed to refresh protection. When using a comprehensive finishing kit, additional toppers are often redundant and can interfere with the kit’s engineered balance. Your detailer is already formulated to top the base sealant and wax. Adding a different polymer system can create compatibility issues or uneven water behavior. Stick with the maintenance products included in your kit unless you’re specifically trying to troubleshoot a performance issue.
Common Mistakes That Ruin Finishes
Even premium finishing kits fail when fundamental mistakes occur. Over-application remains the most common error—thick layers don’t cure properly, create hazing, and waste product. Using contaminated towels introduces micro-scratches that become visible under direct light. Applying products to improperly prepared surfaces leads to premature failure, often blamed on the product rather than the process. Understanding these pitfalls saves frustration and ensures your investment delivers its promised performance.
Over-Application: More Isn’t Better
A pea-sized amount of sealant covers an entire door panel when spread properly. Thick layers cure from the outside in, trapping solvents beneath the surface that eventually outgas, causing hazing and reduced durability. The “thin to win” mantra exists for good reason—multiple thin layers bond better, cure more completely, and yield superior gloss. If you’re seeing heavy residue during removal, you’re using 3-4 times more product than necessary. Quality finishing kits are concentrated; trust the formulation and apply sparingly.
The Dangers of Contaminated Towels
That towel you used to remove wax last month might harbor microscopic wax particles and paint residue that will scratch your clear coat during the next application. Wash all microfiber towels separately from household laundry, using a dedicated microfiber detergent free of fabric softeners and fragrances. Inspect towels before each use, discarding any that feel rough or have visible stains. Many premium finishing kits now include color-coded towels specifically for different tasks—respect this system, as it prevents cross-contamination that ruins finishes.
Storage and Shelf Life Considerations
Car care products degrade over time, with opened containers losing effectiveness faster than sealed ones. Most waxes and sealants maintain peak performance for 12-18 months after opening, while unopened containers can last 3-5 years if stored properly. Heat and freeze cycles are the primary enemies, causing polymer separation and solvent evaporation. Store your finishing kit in a climate-controlled environment, ideally between 50-80°F. Liquid products may separate—gentle shaking usually reincorporates ingredients, but if shaking doesn’t restore a uniform consistency, the product has likely experienced permanent degradation.
Frequently Asked Questions
How long does a typical finishing kit last on the shelf? Unopened, most kits remain viable for 2-3 years when stored in stable, moderate temperatures. Once opened, aim to use waxes and sealants within 12-18 months for optimal performance. Detail concentrates can last up to 24 months if properly sealed. Always check for separation, unusual odors, or texture changes before application—these indicate product degradation.
Can I mix wax and sealant from different brands if they’re not in the same kit? While technically possible, it’s risky. Different brands use incompatible polymer systems, solvents, and silicones that can cause hazing, poor bonding, or reduced durability. Finishing kits are engineered for compatibility. If you must mix brands, test on a small, inconspicuous area and allow full cure before evaluating. Generally, sticking within one brand’s ecosystem prevents expensive mistakes.
What’s the difference between a finishing kit and a ceramic coating kit? Finishing kits use traditional waxes and polymer sealants that bond superficially and last months. Ceramic coating kits contain SiO2 or TiO2 resins that create semi-permanent, chemically resistant layers lasting years. Finishing kits are user-friendly, forgiving, and maintainable at home. Ceramic coatings demand meticulous preparation, controlled application environments, and are less forgiving of mistakes. Choose finishing kits for flexibility and ease; ceramic for maximum durability.
How often should I apply products from my finishing kit? Apply sealant every 4-6 months on daily drivers, 6-12 months on garage-kept vehicles. Wax can be applied monthly for maximum gloss or quarterly for maintenance. Use detailer weekly as a drying aid or dust remover. High-impact areas like hoods and front bumpers may need more frequent attention. Always base reapplication on water behavior—when beading becomes inconsistent, it’s time to refresh.
Can I apply these products in direct sunlight? Avoid direct sunlight whenever possible. High surface temperatures cause premature flashing, making removal difficult and potentially streaky. If you must work in sun, divide the vehicle into 2x2 foot sections, applying and removing product immediately before moving on. Some modern formulations are marketed as “sun-friendly,” but even these perform better in shade. Early morning or late afternoon applications yield superior results.
Are finishing kits safe for matte or satin finishes? Standard finishing kits will add gloss, ruining the intentional flat appearance of matte or satin paints. These finishes require specialized products that protect without adding shine. If your vehicle has matte elements, look for kits specifically labeled “matte safe” or purchase a separate matte-specific sealant. Never apply traditional wax or sealant to matte finishes unless you want to permanently alter their appearance.
Do I need to clay my car before using a finishing kit? Yes, absolutely. Claying removes bonded contaminants that washing leaves behind. Without claying, you’re sealing dirt and pollution into your paint, creating a rough texture and reducing product bonding. Even new cars benefit from claying to remove rail dust and dealership lot contamination. Your finishing kit’s detailer, properly diluted, makes excellent clay lubricant. Skipping claying reduces protection longevity by 50% or more.
What’s the best temperature range for applying finishing kit products? The sweet spot is 60-75°F with moderate humidity. Sealants can be applied down to 50°F but require extended cure times. Wax becomes difficult to remove below 55°F. Above 85°F, work in smaller sections and keep products in the shade until application. Some advanced kits include temperature-specific formulations, but as a general rule, if you’re comfortable in a long-sleeve shirt, it’s probably suitable for application.
Can I use these products on vinyl wraps or paint protection film? Most finishing kits are safe for PPF and high-quality vinyl wraps, but avoid products containing petroleum distillates or harsh solvents that can degrade these materials. The detailer is usually the safest starting point—test on an inconspicuous edge first. Some sealants with high SiO2 content may leave a visible layer on matte PPF, altering its appearance. When in doubt, contact the wrap manufacturer for approved product lists.
How do I know if a product in my kit has gone bad? Wax that’s dried out, cracked, or won’t soften with gentle heat has lost its solvent base and should be discarded. Sealant that’s separated into distinct layers and won’t remix after thorough shaking has experienced polymer degradation. Detailers that smell sour or rancid have bacterial contamination. Any product that leaves a streaky, hazy finish despite proper technique has likely expired. When uncertain, test on a small glass panel—if performance is subpar, replace the product rather than risk your vehicle’s finish.