Picture this: you’re driving into a low-angle sunrise, and your windshield transforms into a kaleidoscope of swirls and streaks that make every traffic light look like a blurry starburst. Those aren’t just water spots—they’re wiper marks, and they’ve been quietly etching themselves into your glass every time your blades drag across a dry or contaminated surface. While most car owners resign themselves to living with this progressive visibility nightmare, the truth is that modern glass restoration technology has made wiper mark removal a completely achievable DIY project.
Understanding how to select and properly use a glass scratch remover for wiper marks isn’t just about aesthetics; it’s a critical safety and maintenance skill that can extend your windshield’s lifespan by years and save you hundreds in premature replacement costs. This comprehensive guide cuts through the marketing hype to give you the technical knowledge professional detailers use, without requiring you to become a glass restoration expert overnight.
Top 10 Glass Scratch Remover
Detailed Product Reviews
1. Cerium Oxide Glass Polishing Kit - Remove Scratches, Water Spots & Restore Clarity | Windshield Scratch Remover with Polish & Sealant | Complete DIY Kit
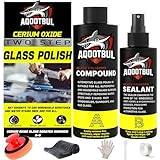
Overview: This comprehensive DIY kit tackles stubborn glass imperfections including water spots, wiper marks, and fine scratches on automotive and household glass. The three-step system (Clean → Polish → Seal) delivers professional results without requiring expensive power tools, making it accessible for beginners seeking crystal-clear restoration.
What Makes It Stand Out: The all-in-one packaging eliminates guesswork by including cerium oxide polish, protective sealant, a manual polishing tool, microfiber cloth, gloves, scraper, and protective tape. The manual polisher provides precise control without risking heat damage from rotary tools. The hydrophobic sealant offers six months of protection against water, bird droppings, and grime, extending the value beyond simple scratch removal.
Value for Money: At $25.99, this kit represents exceptional value compared to purchasing components separately or professional services costing hundreds. The inclusion of both polish and sealant, plus all necessary accessories, makes it competitively priced against basic polish-only products. For DIY enthusiasts, the cost savings on a single windshield restoration justify the entire purchase.
Strengths and Weaknesses:
- Strengths: Complete beginner-friendly package; no power tools required; protective sealant included; safe for multiple glass surfaces; clear instructions.
- Weaknesses: Manual application demands significant elbow grease; may struggle with deep scratches; sealant longevity varies by climate.
Bottom Line: Ideal for first-time users wanting a turnkey solution, this kit delivers professional-grade results with minimal investment and learning curve.
2. 3D Glass Polish – Cerium Oxide Glass Scratch Remover for Car Windows – Restores Clarity & Removes Wiper Marks, Swirls, Water Spots - 16oz

Overview: This professional-grade cerium oxide polish targets automotive glass imperfections with a high-concentration formula designed for serious enthusiasts. The 16-ounce bottle provides ample product for multiple vehicles, while its extended open time allows for meticulous correction work before applying protective coatings.
What Makes It Stand Out: The formulation’s long working time prevents premature drying, maximizing efficiency during rotary polishing. It specifically prepares glass surfaces for ceramic coatings by creating an optically perfect, contaminant-free finish. The polish removes etched water spots and wiper haze that cheaper compounds simply cannot touch, delivering true professional clarity.
Value for Money: Priced at $32.99 ($2.06 per ounce), this represents solid value for enthusiasts who already own rotary equipment. While more expensive than entry-level options, the concentration means less product per job, stretching the 16-ounce supply across numerous applications. Professional glass polishing services start at $150+, making this economical for regular maintenance.
Strengths and Weaknesses:
- Strengths: High-concentration formula; extended workability; coating-prep optimized; large volume for multiple uses; professional results.
- Weaknesses: Requires rotary polisher and felt pad (not included); not beginner-friendly; overkill for minor spot treatments.
Bottom Line: Best suited for experienced detailers with proper equipment seeking maximum correction power and coating preparation performance.
3. Glass Polish (3’’) Glass Scratch Removal Kit for use with a Drill on All Glass Surfaces

Overview: This drill-powered kit transforms your standard electric drill into a glass polishing system, offering professional speed for removing scratches, scuffs, and acid etching from all glass types. The three-inch pad design balances coverage and control, making it three times faster than manual methods while maintaining DIY accessibility.
What Makes It Stand Out: The kit adapts professional-grade technology for home use, working safely on tempered, laminated, and mirrored surfaces. Its drill attachment system delivers consistent rotation speed and pressure distribution that manual polishing cannot match. The included step-by-step visual guide demystifies the process, reducing the learning curve typically associated with power tool glass work.
Value for Money: At $39.97, this kit positions itself as a mid-range power tool solution. While pricier than manual kits, the time savings and superior results justify the cost for those comfortable with drills. Compared to professional services, it pays for itself on the first windshield repair, and the reusable pad design adds long-term value.
Strengths and Weaknesses:
- Strengths: Power tool efficiency; versatile glass compatibility; professional-speed results; reusable components; detailed visual instructions.
- Weaknesses: Requires electric drill; higher initial investment; potential for over-polishing if misused; not suitable for novices uncomfortable with power tools.
Bottom Line: Perfect for DIYers seeking professional speed and results without the professional price tag, provided they own a drill and possess basic tool skills.
4. SONAX PROFILINE GlassPolish (250 ml) - removes slight scratches, blinding and etching from car windows made from glass. Silicone free | Item No. 02731410

Overview: This German-engineered glass polish from SONAX delivers precision correction for light scratches, blinding, and chemical etching on automotive glass. The silicone-free formula ensures compatibility with subsequent coatings and window seals, while the 250-ml size offers enough product for several applications without committing to bulk quantities.
What Makes It Stand Out: SONAX’s reputation for quality automotive chemicals shines through in this professional-grade formulation. The product specifically targets “blinding”—that distracting micro-scattering that reduces visibility in bright conditions. The manufacturer specifies a precise 1000 RPM application speed, demonstrating the technical rigor German automotive care products are known for.
Value for Money: At $22.95 ($2.71 per ounce), this mid-priced option balances quality and quantity. While smaller than the 3D Polish, it’s more concentrated than budget alternatives. The silicone-free composition prevents costly rework when applying coatings, potentially saving money long-term. For brand-conscious buyers, the German heritage justifies the slight premium over generic options.
Strengths and Weaknesses:
- Strengths: Premium German quality; silicone-free formula; precise application specifications; trusted brand heritage; effective on micro-scratches.
- Weaknesses: Smaller volume (8.5 oz); no applicator included; limited to lighter imperfections; requires specific RPM for optimal results.
Bottom Line: A reliable choice for quality-focused users who appreciate German engineering and need a coating-compatible, silicone-free polish for light correction work.
5. PLAYQUEEN 2PCS - Scratch Remover for Eyeglasses(100ml), Lens Scratch Remover for Eye Glasses, Eyeglass Scratch Remover, Lens Scratch Remover, Pocket & Travel Essentials, Eye Glass Cleaners Spray.
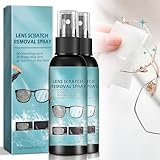
Overview: This specialized lens treatment addresses micro-scratches and clarity issues on eyeglasses, sunglasses, and optical devices. The two-bottle, 100-ml spray format prioritizes convenience and portability, making it fundamentally different from automotive glass polishes. It cleans while minimizing the appearance of fine lens abrasions.
What Makes It Stand Out: Designed specifically for coated optical lenses, this gentle formula won’t damage anti-reflective or UV coatings. The compact spray bottles fit pockets and travel kits, addressing on-the-go cleaning needs. Beyond eyewear, it safely cleans phone screens, camera lenses, and laptop displays, making it a versatile digital lifestyle accessory.
Value for Money: At $15.99 for two bottles ($2.37 per ounce), this offers excellent value within its category. Automotive glass polishes would destroy optical coatings, making this the only viable option for eyewear. The dual-pack configuration provides home and travel bottles, eliminating the need to purchase separate travel-sized cleaners.
Strengths and Weaknesses:
- Strengths: Safe for coated optical lenses; ultra-portable spray format; multi-device versatility; gentle cleaning action; travel-friendly dual-pack.
- Weaknesses: Not for automotive glass; fills rather than removes deep scratches; different chemical category than cerium oxide; limited correction capability.
Bottom Line: Essential for eyeglass wearers needing portable, coating-safe maintenance—categorically different from automotive glass polishes and excellent within its specialized niche.
6. Lens Scratch Remover, Scratch Remover for Eyeglasses, Eyeglass Scratch Remover, Lens Scratch Remover for Eye Glasses, (3.38 Fl Oz (Pack of 2

Overview: This two-pack of Lens Scratch Remover targets eyeglass wearers seeking to restore clarity to their lenses. Each 3.38-ounce bottle promises to clean and maintain glasses without causing damage, while the marketing suggests it can address actual scratches—a claim that warrants scrutiny. The high-concentration formula aims to quickly eliminate fingerprints, dust, and oil film from optical surfaces.
What Makes It Stand Out: The product’s versatility extends beyond eyewear to smartphones, keyboards, and other household items, making it a multi-surface cleaning solution. Its 100ml travel-friendly size qualifies as a pocket essential, while the twin-pack configuration provides home and on-the-go convenience. The undiluted spray application simplifies the cleaning process without requiring complicated mixing.
Value for Money: At $15.99 for two bottles ($4.73 per fluid ounce), this sits in the premium range for lens cleaners. While more expensive than basic drugstore alternatives, the dual-bottle pack and multi-surface capability offset the cost for users wanting portable and stationary solutions. However, genuine scratch removal typically requires physical polishing, not just cleaning solution.
Strengths and Weaknesses: Strengths include excellent portability, versatile household applications, and the convenience of a two-pack arrangement. The high-concentration formula effectively cuts through grime. Weaknesses center on potentially misleading “scratch remover” labeling—most lens scratches cannot be removed by cleaning alone. The price per ounce remains high compared to simple lens sprays, and no microfiber cloths are included.
Bottom Line: This product excels as a high-quality lens and electronics cleaner with travel convenience, but temper expectations regarding actual scratch repair. Ideal for meticulous users wanting specialized cleaner for glasses and devices.
7. 3PCS Lens Scratch Remover for Eye glasses, Lens scratch removal spray,Eyeglass Scratch Remover,Glasses Glass Scratch Repair Liquid.

Overview: This three-pack of Lens Scratch Remover offers eyeglass wearers a convenient cleaning solution in compact 100ml bottles. Marketed as both a cleaner and scratch repair liquid, the formula claims high concentration for rapid removal of fingerprints, dust, oil film, and light varnish buildup. The triple-pack configuration targets frequent users needing multiple storage locations.
What Makes It Stand Out: The three-bottle set provides exceptional placement flexibility—home, office, vehicle, or travel bag. Its streak-free formulation allegedly creates a protective barrier against future staining, extending time between cleanings. Like competitors, it doubles as a multi-surface cleaner for phones, keyboards, monitors, and other daily items, maximizing utility across your tech ecosystem.
Value for Money: Priced at $14.88 for three bottles ($4.96 per fluid ounce), this offers superior quantity value compared to two-pack alternatives. While the per-ounce cost slightly exceeds some competitors, the additional bottle makes it economical for heavy users. The versatility across household items further justifies the investment over single-purpose cleaners.
Strengths and Weaknesses: Strengths include outstanding value through triple-pack distribution, genuine portability, and effective multi-surface cleaning capability. The preventative coating claim adds potential value. Weaknesses mirror category concerns—the “scratch removal” promise overstates what cleaning solutions can achieve for physically damaged lenses. No cloths are provided, and the premium pricing may deter budget-conscious shoppers.
Bottom Line: Excellent choice for users wanting multiple strategically placed cleaners, but understand this maintains and cleans rather than truly repairing scratched lenses. Best for diligent eyeglass wearers and tech users.
8. Meguiar’s Mirror Glaze M105 Ultra-Cut Compound, Car Rubbing Compound for Removing Scratches and Heavy Swirls While Adding Shine, Safe and Effective on All Glossy Car Paint and Clear Coats, 8 oz

Overview: Meguiar’s Mirror Glaze M105 Ultra-Cut Compound represents professional-grade automotive paint correction in an 8-ounce bottle. This rubbing compound tackles moderate to heavy paint defects including scratches, oxidation, swirls, acid rain damage, and even 1200-grit sanding marks. Unlike glass cleaners, this product physically abrades clear coat to restore automotive finish through micro-abrasive technology.
What Makes It Stand Out: The micro-abrasive technology delivers aggressive cutting power while minimizing additional swirling, achieving superior gloss in a single step. Its versatility shines through multiple application methods—hand application, dual-action polisher, or rotary buffer accommodate both novices and professionals. The trusted Meguiar’s brand ensures consistent quality and results for detailing enthusiasts.
Value for Money: At $11.54 for 8 ounces ($1.44 per fluid ounce), this professional compound offers exceptional value. The price per ounce dramatically undercuts consumer-grade alternatives while delivering superior defect removal. A small amount covers substantial area, making it economical for multiple vehicle projects. Compared to professional detailing services, DIY application saves hundreds of dollars.
Strengths and Weaknesses: Strengths include remarkable cutting capability, clear coat safety, versatile application options, and outstanding cost-effectiveness. The formula produces professional results without professional equipment. Weaknesses include potential intimidation for beginners, requirement for additional polishing pads, and possible overkill for minor imperfections. It cannot address glass damage.
Bottom Line: An essential tool for automotive enthusiasts and professionals seeking serious paint correction. Delivers unmatched performance and value for restoring damaged automotive finishes.
9. GLASS POLISH DIY 3” Windshield Polishing Kit for Car Glass Restoration, Remove Wiper Blade Damage, Fine Scratches, Haziness, and Water Spots, Restore Glass Clarity and Shine - GP21005

Overview: The GLASS POLISH DIY Windshield Polishing Kit provides a drill-powered solution for automotive glass restoration. This specialized kit targets wiper blade damage, fine scratches, haziness, and water spots using a 3-inch polishing pad with universal drill attachment. The system aims to restore optical clarity and improve driving safety through mechanical polishing rather than chemical cleaning.
What Makes It Stand Out: The drill integration transforms a labor-intensive hand-polishing process into an efficient mechanical operation, significantly reducing effort and time. The kit specifically addresses windshield-specific issues like wiper streaks and water spot etching that standard cleaners cannot resolve. Its explicit limitation to fine scratches manages expectations realistically.
Value for Money: At $24.95 for a complete kit, this offers substantial savings compared to professional glass polishing services that often exceed $100. The included drill attachment and polishing compound provide everything needed for DIY restoration. For vehicles with light glass damage, it prevents costly windshield replacement while delivering professional-grade results.
Strengths and Weaknesses: Strengths include innovative drill-powered design, comprehensive kit contents, realistic marketing about fine scratches only, and significant safety improvement through enhanced visibility. The DIY approach saves considerable money. Weaknesses require ownership of a drill, include a learning curve to avoid glass damage, and limited effectiveness on deep scratches. Results depend heavily on user technique and patience.
Bottom Line: Highly recommended for car owners battling wiper marks and light glass etching. Provides professional-grade results at a fraction of service costs, but practice on inconspicuous areas first.
10. 1 Lb (453 G) 99% Cerium Oxide Glass Polishing Powder (9-15 Um) – Removes: Oil Films, Water Spots, Swirl Marks, Wiper Streaks, Removes Fine Scratches & Deep-Cleans Glass Surfaces.

Overview: This 1-pound container of 99% Cerium Oxide Glass Polishing Powder delivers professional-grade glass restoration capability across multiple applications. The 9-15 micron particle size effectively removes oil films, water spots, wiper streaks, and fine scratches from automotive glass, architectural glass, shower doors, aquariums, and even optical lenses. The powder format allows customized application strength.
What Makes It Stand Out: The pure cerium oxide composition represents the industry standard for glass polishing, offering unmatched versatility from a single product. The bulk powder format allows custom mixing for specific applications—from light cleaning to heavy scratch removal. This one-pound quantity handles numerous projects, making it ideal for detailers, homeowners, and hobbyists working on various glass surfaces.
Value for Money: At $17 for 453 grams, this represents exceptional economy. The powder form costs significantly less per use than pre-mixed liquids or creams. When compared to specialized automotive glass polish or professional services, the savings multiply substantially. A small amount mixed with water creates ample polishing compound for multiple vehicles or household projects.
Strengths and Weaknesses: Strengths include incredible versatility across glass types, professional-grade purity, outstanding bulk value, and proven effectiveness on stubborn contamination. The powder adapts to any polishing pad system. Weaknesses involve required preparation time, need for separate polishing tools, potential messiness, and possible overkill for users wanting simple spray-and-wipe convenience.
Bottom Line: The ultimate solution for serious DIYers and professionals needing comprehensive glass restoration capability. Unbeatable value and versatility for those willing to invest minimal preparation effort.
Understanding Wiper Marks and Glass Damage
The Anatomy of a Wiper Mark
Wiper marks represent a unique type of glass damage that exists somewhere between surface contamination and physical scratching. Unlike random scratches from road debris, wiper marks follow distinct arc patterns that mirror your wiper blades’ sweep path. These marks typically begin as micro-abrasions in the glass’s hydrophobic coating, eventually wearing through to the glass itself. The damage compounds over time as contaminated wiper blades (loaded with silica, road grit, and degraded rubber) essentially become sanding pads that grind against your windshield with each swipe.
Scratch Depth: Surface vs. Deep Damage
Before reaching for any glass scratch remover, you must understand damage depth. Surface-level marks affect only the windshield’s water-repellent coating and can often be resolved with less aggressive methods. Moderate scratches extend 10-50 microns into the glass surface, creating visible haze and light refraction issues. Deep scratches exceed 50 microns and may catch your fingernail when dragged across them—these require professional assessment. Most wiper marks fall into the moderate category, making them perfect candidates for quality restoration compounds.
Why Conventional Cleaning Methods Fail
The Limitations of Glass Cleaners
Standard ammonia-based glass cleaners excel at dissolving oils and smudges but lack the mechanical action to level glass surfaces. They simply clean the existing damage without removing it. Even “scrubbing” cleaners with mild abrasives are formulated for household glass, not automotive windshields with their complex curvature and laminated structure. Using these products on wiper marks is essentially polishing a scratched CD with water—you’re cleaning the surface while the data remains corrupted.
Why Paper Towels Make It Worse
That quick wipe with a paper towel might feel satisfying, but you’re likely introducing new micro-scratches while doing nothing for existing wiper marks. Paper towels contain wood fibers that act as fine-grit sandpaper on automotive glass. When combined with cleaning solvents, they can actually drive contamination deeper into existing scratches, making subsequent removal more difficult. Microfiber cloths are the absolute minimum standard for glass care, yet even they can’t fix damage that’s already occurred.
The Science of Glass Polishing
How Abrasives Remove Material
Quality glass scratch removers employ a precisely calibrated abrasive slurry that works through controlled material removal. Unlike sandpaper that cuts aggressively, glass polishing compounds use diminishing abrasives—particles that break down into progressively smaller sizes as you work them. This creates a “feathering” effect that gradually levels the glass surface, removing the peaks around scratches while filling the valleys. The process is subtractive, meaning you’re physically removing a microscopic layer of glass to reach the bottom of the scratch and create a flat, optically clear surface.
Understanding Grit Progressions
Professional glass restoration follows a logical grit progression, typically starting around 5,000-10,000 grit for moderate wiper marks and finishing at 50,000+ grit for optical clarity. Think of it like wood finishing: you wouldn’t jump from rough sanding to final varnish without intermediate steps. Each grit level removes the scratches from the previous stage while introducing progressively smaller marks of its own. The final polishing stage uses cerium oxide or similar ultra-fine compounds that create a surface smoother than the original factory finish.
Key Features to Evaluate in Glass Scratch Removers
Abrasive Composition and Quality
The heart of any glass scratch remover is its abrasive system. Cerium oxide remains the gold standard for final polishing due to its unique chemical and physical properties that chemically react with glass while providing mechanical polishing. For initial cutting stages, aluminum oxide and silicon carbide offer controlled removal rates. Avoid products that don’t disclose their abrasive composition—vague terms like “proprietary blend” often hide inconsistent particle sizes that create uneven results. The best formulations specify mesh size or micron rating, giving you precise control over the restoration process.
Applicator Design and Ergonomics
The application method significantly impacts results. Foam pads with specific density ratings (typically 40-60 PPI for glass work) provide the right balance of conformability and pressure distribution. Hard, dense pads can create heat buildup and micro-fractures, while overly soft pads lack the necessary cutting action. Look for systems that include ergonomic handles or drill attachments that maintain consistent pressure across curved windshield surfaces. The applicator’s material should be non-absorbent to prevent compound waste and ensure even distribution.
Single-Stage vs. Multi-Stage Systems
Single-stage products promise convenience but often force you to compromise between cutting power and finish quality. They work adequately for barely-visible marks but struggle with established wiper damage. Multi-stage systems require more time and skill but deliver professional-grade results by allowing you to match the aggression level to your specific damage profile. For wiper marks that have been developing over years, a three-stage system (cutting, refining, polishing) typically provides the best cost-to-results ratio.
Professional vs. DIY Restoration Approaches
When Professional Intervention Is Necessary
Deep scratches that catch your fingernail, damage near windshield edges (where structural integrity is crucial), or scratches over sensors and cameras require professional evaluation. Mobile glass restoration services use specialized equipment that maintains constant pressure and temperature—critical factors for laminated windshields. If your windshield has pre-existing chips or cracks, any polishing can exacerbate these issues. Professionals also carry insurance against glass breakage, a risk that, while small, exists with any mechanical restoration process.
The Economics of DIY Repair
A quality multi-stage glass restoration kit represents a $30-$80 investment, while professional windshield polishing services typically start at $150 and can exceed $400 for severe cases. The break-even point comes after just one use, making DIY highly economical for multi-vehicle households. However, factor in your time investment—expect to spend 1-3 hours on your first attempt. The learning curve is real, but the skills transfer to headlight restoration, marine glass, and household window repair, multiplying the value proposition.
Essential Tools and Materials for the Job
Beyond the Remover: What Else You’ll Need
Successful wiper mark removal requires more than just the polishing compound. You’ll need a spray bottle with distilled water for lubrication and cooling, high-quality microfiber towels (300+ GSM, 80/20 blend), masking tape to protect trim and paint, and a variable-speed drill or polisher with RPM control. A work light that casts shadows at low angles helps reveal scratches during the process. Clay barring the glass before starting removes embedded contamination that would otherwise contaminate your polishing pads and create new scratches.
Safety Equipment Considerations
Glass dust, though minimal with wet polishing, still poses respiratory and eye hazards. A quality N95 or P100 respirator prevents silicon particle inhalation, while safety glasses protect against compound splatter. Nitrile gloves keep abrasive compounds from drying out your skin and prevent oils from transferring to the glass. Work in a well-ventilated area, as even water-based compounds release fine particulates into the air. If you’re working on a lifted truck or large SUV, a stable step stool prevents dangerous reaching that could lead to uneven pressure or falls.
Step-by-Step Wiper Mark Removal Process
Phase 1: Surface Preparation
Begin with a meticulous cleaning using a dedicated glass cleaner and fresh microfiber towels. Follow with a clay bar treatment using plenty of lubricant—this step removes invisible contaminants that would otherwise become embedded in your polishing pads. Mask off all surrounding trim, paint, and gasket material with 1-inch automotive masking tape; glass compounds can stain or damage these surfaces. Finally, use a grease-removing alcohol wipe to eliminate any remaining oils. This preparation phase determines 70% of your final result—skipping steps here virtually guarantees disappointment.
Phase 2: The Polishing Sequence
Start with the lowest grit compound in your system. Apply a quarter-sized amount to your pad and spread it across a 2x2 foot section. Work at 800-1200 RPM with light to moderate pressure, keeping the pad flat against the glass. Use overlapping passes in a cross-hatch pattern, spraying water every 15-20 seconds to maintain lubrication and cooling. Work each section for 3-5 minutes, then wipe clean and inspect. Repeat with medium and fine compounds, reducing pressure and increasing water frequency with each stage. The final polish should use minimal pressure and high water volume to achieve optical clarity.
Phase 3: Final Inspection and Cleanup
After final polishing, remove all masking tape and clean the glass with a fresh microfiber and isopropyl alcohol to remove any compound residue. Inspect your work using a bright LED light at multiple angles—wiper marks should be invisible or dramatically reduced. Apply a rain-repellent treatment to restore hydrophobic properties stripped during polishing. This final step not only improves visibility but also reduces future wiper friction, preventing rapid recurrence of marks.
Common Pitfalls That Damage Your Windshield
Pressure Mistakes
Applying excessive pressure is the most common DIY error. More pressure doesn’t equal faster results—it creates heat buildup that can cause micro-fractures and delamination in your windshield. The glass temperature should never exceed lukewarm to the touch. Let the abrasives do the work; your role is providing consistent, light pressure and lubrication. Conversely, inadequate pressure prevents the abrasives from engaging properly, leading to wasted time and compound. The sweet spot is enough pressure to maintain full pad contact without deforming the foam.
Temperature Considerations
Never attempt glass polishing in direct sunlight or on glass hotter than 80°F. Heat causes compounds to dry prematurely and can crack glass. Conversely, temperatures below 50°F slow the abrasive action and make water-based compounds viscous and difficult to work. Ideal conditions are 65-75°F in shade with moderate humidity. If you must work in less-than-ideal conditions, adjust your technique—more frequent water sprays in heat, shorter working times in cold, and always allow the glass to acclimate to ambient temperature before starting.
Preventative Strategies for Wiper Mark Prevention
Wiper Blade Maintenance Protocol
Preventing wiper marks requires a proactive maintenance schedule. Clean your wiper blades weekly with isopropyl alcohol and a microfiber cloth to remove accumulated grit. Replace blades every 6-12 months, regardless of apparent condition—rubber degrades from UV exposure and ozone even when unused. Never operate wipers on a dry windshield; even a brief swipe can embed particles into the glass. During winter, lift blades overnight to prevent them from freezing to the glass and tearing when activated. These simple habits can extend your windshield’s pristine condition by years.
Protective Glass Treatments
After removing wiper marks, apply a quality glass coating to create a sacrificial layer. Silica-based coatings (SiO2) bond to the glass surface, providing 6-12 months of protection against minor abrasion while dramatically improving water repellency. For maximum protection, consider a professional-grade ceramic coating that can last 2-3 years. These coatings don’t prevent scratches but significantly increase the force required to create them, essentially giving your windshield a suit of armor against daily wear. Reapply these treatments annually as part of your vehicle’s maintenance schedule.
Environmental and Seasonal Factors
How Weather Affects Scratch Development
Your local climate directly impacts wiper mark formation. Desert environments with airborne silica sand create accelerated wear, requiring more frequent blade cleaning and replacement. Coastal areas expose wipers to salt crystallization that acts as an abrasive paste. Cold climates introduce road salt and sand mixtures that become trapped under wiper blades. Even pollen season contributes—dry pollen particles are surprisingly abrasive when dragged across glass. Understanding your region’s specific challenges helps you adjust prevention strategies accordingly.
Regional Considerations
In the Pacific Northwest, frequent rain means wipers see constant use, accelerating wear patterns. Southwestern states face monsoon seasons that deposit fine dust immediately followed by rain, creating perfect conditions for scratching. Northeastern winters demand aggressive ice scraper use that can damage both glass and wiper components. Tailor your maintenance frequency to these patterns—consider pre-wetting the windshield before wiper use in dusty conditions, and implement post-storm blade cleaning routines in areas with heavy road treatment.
Advanced Techniques for Stubborn Marks
Wet Sanding: When and How
For severe wiper marks that resist standard polishing, wet sanding with ultra-fine grit (2000-3000) automotive sandpaper may be necessary. This technique requires extreme care—sand only in straight lines, never circles, and keep the surface flooded with water. Use a foam sanding block to distribute pressure evenly and prevent finger-pressure hot spots. After sanding, you must follow with complete polishing stages to remove sanding scratches. This technique is effective but removes significantly more glass material, making it a one-time solution rather than a repeatable maintenance procedure.
Machine Polishing vs. Hand Polishing
While hand polishing works for light marks, machine polishing delivers consistent, professional results for moderate wiper damage. A dual-action polisher with a 3-inch backing plate provides the best control on curved windshield surfaces. Set your polisher to 1200-1800 OPM (orbits per minute) for glass work—higher speeds generate excessive heat. The random orbital motion prevents the holograms and swirl patterns that rotary polishers can create on glass. If using a drill attachment, keep RPMs below 1500 and take frequent breaks to prevent bearing overheating.
Assessing Scratch Severity Before You Start
The Fingernail Test
Run your fingernail perpendicularly across the wiper mark at a 45-degree angle. If your nail catches significantly, you’re dealing with deep damage that may require professional intervention. Slight catching indicates moderate scratches suitable for multi-stage removal. If your nail glides smoothly but you see visible haze, you’re likely dealing with surface-level coating damage that may respond to lighter polishing. This simple test prevents you from wasting hours on damage beyond DIY capabilities or, conversely, using unnecessarily aggressive methods on minor marks.
Light Refraction Assessment
Park your vehicle facing a uniform light source (like a garage door) and observe the glass from the driver’s seat. Wiper marks will appear as distorted light bands or rainbow diffraction patterns. Use a bright LED flashlight at a low angle to the glass from the outside—this reveals scratches by casting shadows into the damage. Document the damage with photos before starting; this baseline helps you track progress and determine when you’ve achieved acceptable results. Some marks may improve dramatically but never disappear completely—realistic expectations prevent over-polishing.
Time Investment and Realistic Expectations
How Long Should the Process Take?
For a moderately scratched windshield, budget 2-4 hours from setup to cleanup. This includes 30 minutes of preparation, 90 minutes of active polishing (30 minutes per stage), and 30 minutes for final inspection and protection. Your first attempt may take longer as you develop technique. Rushing the process by using overly aggressive compounds or excessive pressure inevitably leads to poor results or glass damage. Treat this as a semi-annual maintenance project rather than a quick Saturday morning chore. The time invested pays dividends in visibility and safety.
What Results to Expect
A successful restoration should eliminate 80-95% of visible wiper marks, restoring optical clarity and eliminating light diffraction. Perfect, factory-new glass is an unrealistic expectation—some ghosting may remain in severely damaged areas. The goal is functional improvement: can you now drive into the sun without being blinded by streaks? Do oncoming headlights appear crisp rather than starbursted? If yes, you’ve achieved success. Over-polishing in pursuit of perfection thins the glass and can create subtle optical distortions that are worse than the original scratches.
Cost Analysis and Value Considerations
Budgeting for Quality Results
Entry-level glass restoration kits start around $25 but often lack sufficient compound quantity or quality pads for complete windshield treatment. Mid-range systems ($50-$80) typically include multiple grit stages and enough material for 2-3 applications, representing the sweet spot for most enthusiasts. Professional-grade compounds alone can cost $40-$60 per bottle, but deliver faster results with less effort. Factor in the cost of supporting materials: quality microfiber towels ($20), masking tape ($5), and protective coatings ($15-$30). The total DIY investment for professional-grade results typically runs $75-$100.
Long-term Value Proposition
Consider the alternative: windshield replacement costs $200-$500 for most vehicles, plus potential recalibration of ADAS sensors that can add another $200-$400. A quality restoration kit that prevents even one premature replacement pays for itself many times over. Additionally, restored visibility reduces eye strain and improves safety, offering intangible value. For vehicles with expensive or hard-to-replace windshields (classic cars, certain European models), restoration isn’t just economical—it’s often the only viable option for maintaining originality and value.
Frequently Asked Questions
Can wiper marks really be removed, or am I just smoothing them out?
Wiper marks are physically removed through controlled glass abrasion, not merely filled or hidden. The polishing process removes microscopic layers of glass until the bottom of the scratch becomes level with the surrounding surface. This is permanent removal, not a temporary cosmetic fix. However, extremely deep scratches may be improved rather than completely eliminated.
Will removing wiper marks weaken my windshield or make it more prone to cracking?
When performed correctly using appropriate compounds and techniques, glass polishing removes less than 0.1% of the windshield’s total thickness—far less than the safety margin engineered into automotive glass. The key is using water lubrication to prevent heat buildup and maintaining light pressure. Over-polishing the same area repeatedly is what creates weakness, which is why following proper progression and knowing when to stop is critical.
How often should I polish my windshield to maintain it?
Windshield polishing should be a corrective procedure, not a regular maintenance task. With proper wiper blade care and protective coatings, you should only need to polish for wiper marks every 2-3 years. If you find yourself needing to polish more frequently, investigate your wiper maintenance routine or blade quality—you’re treating symptoms rather than addressing the root cause.
Can I use the same glass scratch remover on my side windows and rear windshield?
Absolutely, though side windows typically show fewer wiper marks since they’re not contacted by blades. Rear windows with wiper systems benefit greatly from the same treatment. The techniques remain identical, though curved rear windows may require smaller pad sizes for proper contact. Always test a small, inconspicuous area first, especially on tinted windows, as the polishing process can affect some aftermarket tints.
What’s the difference between glass polish and glass compound?
“Polish” typically refers to ultra-fine abrasives (cerium oxide) used for final finishing and light defect removal. “Compound” denotes more aggressive cutting agents for deeper scratches. In practice, many manufacturers use these terms interchangeably, so focus on the specified grit or micron rating rather than the product name. A true restoration system uses both: compounds for correction, polish for refinement.
Will glass scratch removers fix chips and cracks?
No, and attempting to polish chips or cracks will make them worse. Polishing compounds are designed for surface leveling, not structural repair. Chips require resin injection to restore integrity, while cracks need professional evaluation for repair vs. replacement. Always inspect your windshield carefully before polishing and mask off any damaged areas to prevent compound contamination.
Can I polish glass in cold weather or direct sunlight?
Neither extreme is ideal. Cold temperatures below 50°F slow abrasive action and make water-based compounds thick and difficult to work. Direct sunlight heats glass unevenly, causing compounds to flash-dry and potentially crack the glass. The ideal temperature range is 65-75°F in shade. If you must work in suboptimal conditions, adjust technique accordingly: more frequent water sprays in heat, shorter working sessions in cold.
Do electric vehicles or cars with ADAS require special considerations?
Yes. Vehicles with camera-based systems behind the windshield (lane departure, automatic braking) have precise optical requirements. Over-polishing can alter the refractive index in front of sensors, potentially affecting calibration. Always check your owner’s manual for warnings about glass treatment near sensors. When in doubt, consult your dealership or a glass professional familiar with ADAS systems before proceeding.
How do I know when my wiper blades are causing damage versus just being old?
Inspect the blade edge with a magnifying glass. Damaging blades show nicks, embedded grit particles, or hardened rubber that appears shiny rather than matte. Run your finger along the blade (carefully)—it should feel smooth and flexible. If you feel bumps or hardness, replace immediately. A simple test: clean your windshield thoroughly, then run the wipers with water only. If you hear scraping or chattering sounds, the blades are damaging your glass.
Is it normal to see improvement after the first polishing stage, or should I wait until the final stage to judge results?
You should see noticeable improvement after each polishing stage, though the finish will appear hazy until the final stage. If you see no improvement after 5-7 minutes of proper technique with the cutting compound, the damage may be deeper than initially assessed. Don’t proceed to finer stages until the previous stage has produced visible improvement. Each stage builds upon the last, so judging final results prematurely leads to over-working the glass.