Protecting your vehicle’s undercarriage isn’t just for classic car collectors or off-road enthusiasts—it’s one of the smartest maintenance moves any car owner can make. Road salt, moisture, and debris wage a constant war against your vehicle’s most vulnerable components, turning solid metal into flaky rust faster than most people realize. While professional undercoating services can run hundreds of dollars per treatment, the rise of budget-friendly undercoating gun kits has democratized this essential protection, putting professional-grade results within reach of the driveway DIYer.
The challenge? Not all budget kits are created equal, and navigating the sea of options requires more than just hunting for the lowest price tag. Understanding the nuanced differences between nozzle types, air pressure requirements, and material compatibility can mean the difference between a rock-hard protective barrier that lasts years and a sticky mess that traps moisture against your frame. This comprehensive guide cuts through the marketing noise, equipping you with the expert knowledge to evaluate any budget undercoating gun kit like a seasoned pro.
Top 10 Undercoating Gun Kit
Detailed Product Reviews
1. InoKraft Undercoating Spray Gun with Suction Feed Cup, 360° & Straight Spray Hoses, for Truck Bed Liner Coating, Rubberized Undercoat, Rust Proofing

Overview: The InoKraft Undercoating Spray Gun positions itself as a comprehensive solution for automotive protection projects. Designed for both high-volume applications and detailed precision work, this kit addresses the common pain points of undercoating and bed liner spraying. The package includes a pressure regulator, two extension wands (360° and straight), cleaning brush, and detailed instructional materials, making it approachable for users at various skill levels.
What Makes It Stand Out: The standout feature is the claimed 60% increased flow rate for thick materials without requiring dilution, significantly reducing application time. The tool-less nozzle adjustment system allows quick flow changes by hand while working underneath a vehicle—eliminating the frustration of crawling out to make adjustments. The 360° spray wand provides exceptional reach into frame rails and enclosed cavities, ensuring complete coverage in hard-to-access areas that traditional spray guns miss.
Value for Money: At $49.99, this kit delivers strong mid-range value. The inclusion of both wand types, a pressure regulator, and cleaning tools eliminates additional purchases. Compared to entry-level options, the snap-lock pot design prevents messy leaks when tilted, saving material costs and cleanup time. While premium kits exist, InoKraft balances professional features with DIY-friendly pricing.
Strengths and Weaknesses: Strengths include versatile flow control, excellent reach with dual wands, leak-proof snap-lock cup design, and comprehensive accessory package. The large pot opening simplifies refilling, reducing downtime. Potential weaknesses: the 60% flow increase claim lacks independent verification, and the plastic components may not match the durability of all-metal professional guns. Occasional users might find the feature set more than necessary.
Bottom Line: This is an excellent choice for serious DIY enthusiasts and semi-professionals tackling undercoating or bed liner projects. The thoughtful design details and included accessories justify the price, making it a worthwhile investment for multiple applications.
2. FLUID FILM FFSG Spray Gun Applicator Kit

Overview: The FLUID FILM FFSG Spray Gun Applicator Kit represents the official application tool for FLUID FILM’s lanolin-based rust protection products. As a brand-specific applicator, it’s engineered to work optimally with FLUID FILM’s unique formulation, which differs from conventional rubberized undercoatings. The kit focuses on simplicity and reliability for dedicated FLUID FILM users seeking professional application results.
What Makes It Stand Out: This applicator’s primary distinction is its factory-engineered compatibility with FLUID FILM products, ensuring proper atomization and flow characteristics for this specific material. The adjustable nozzle provides basic flow control, while its lightweight 0.921-kilogram package reduces fatigue during extended use. Being manufactured in the United States appeals to buyers prioritizing domestic production and quality control standards.
Value for Money: Priced at $122.99, this kit commands a significant premium over generic alternatives. The value proposition hinges entirely on brand loyalty and verified compatibility. For FLUID FILM purists, the assurance of proper application justifies the cost. However, the sparse feature set and lack of included accessories (no wands, extra bottles, or cleaning tools) make it poor value compared to comprehensive kits offering more versatility at lower prices.
Strengths and Weaknesses: Strengths include guaranteed compatibility with FLUID FILM products, US manufacturing quality, lightweight design, and adjustable nozzle. The simplicity reduces learning curve. Weaknesses are substantial: extremely limited feature disclosure, no extension wands for hard-to-reach areas, minimal included accessories, and poor price-to-feature ratio. The vague specifications leave buyers uncertain about cup capacity, operating pressure, or material compatibility beyond FLUID FILM.
Bottom Line: Only recommended for dedicated FLUID FILM users who prioritize brand-specific tools and are willing to pay a premium for verified compatibility. General undercoating needs are better served by more versatile, feature-rich alternatives at lower price points.
3. Pro Undercoating Spray Gun Kit with 2 Wands, 3 Empty Quart Bottles, and 50 Rust Plugs

Overview: The Pro Undercoating Spray Gun Kit targets professional users and serious DIYers who require a complete, ready-to-work system. This package bundles the spray gun with practical consumables: two extension wands, three empty quart bottles, and fifty rust plugs. The inclusion of multiple bottles and rust plugs suggests a focus on efficiency for users performing multiple jobs or treating extensive rust damage.
What Makes It Stand Out: The kit’s distinguishing characteristic is its practical completeness—having three quart bottles pre-empts the need to clean and switch materials mid-job, while the fifty included rust plugs provide immediate solutions for treating drilled access holes. This foresight saves separate ordering and shipping delays. The two wands offer basic versatility for reaching different areas, though specific length and flexibility details are limited in the provided specifications.
Value for Money: At $96.49, this kit sits in the upper-mid price range. The value depends heavily on the quality of the gun itself, which receives minimal description. If the core tool is robust, the bundled consumables represent decent value. However, without details on material flow control, nozzle adjustability, or cup design, the price feels speculative compared to better-documented alternatives. The rust plugs and extra bottles add tangible value for rust-focused projects.
Strengths and Weaknesses: Strengths include comprehensive packaging with multiple bottles and rust plugs, two included wands, and professional targeting. The kit appears ready for immediate use on extensive projects. Weaknesses are significant information gaps: no mention of pressure regulator, wand specifications, cup capacity, material compatibility, or special features like leak-proofing or tool-less adjustment. This lack of detail makes performance evaluation difficult.
Bottom Line: Suitable for professionals or dedicated enthusiasts tackling multiple rust-proofing jobs who value bundled consumables. The missing technical details make it a gamble compared to transparently specified alternatives. Verify gun quality before committing.
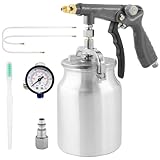
4. TCP Global Air Undercoating Spray Gun with Gauge, Suction Feed Cup & 2 Wands - 22" Long Flexible Extension Wand with Multi-Directional Nozzle - Sprayable Bed Liner, Rubberized Truck Undercoating

Overview: The TCP Global Air Undercoating Spray Gun offers a professional-grade solution at a competitive price point. Engineered for versatility, it handles various automotive coatings including rust-proofing, chip guard, and truck bed liners. The die-cast aluminum alloy construction provides durability while maintaining a lightweight profile. The kit includes two 22-inch flexible extension wands and a built-in air regulator with gauge for precise control.
What Makes It Stand Out: The multi-directional nozzle on the flexible wand is particularly valuable for coating inside boxed frames and complex geometries, ensuring thorough coverage without requiring awkward gun positions. The integrated pressure regulator with gauge allows real-time pressure adjustments, critical for achieving proper texture with different viscosity materials. The 25-ounce aluminum suction feed cup balances capacity with maneuverability, reducing refill frequency without adding excessive weight.
Value for Money: At $44.99, this kit represents exceptional value. It includes professional features—pressure gauge, aluminum body, dual wands—typically found in more expensive units. The build quality suggests longevity that justifies the modest investment over disposable-grade alternatives. While lacking some convenience features of premium kits, it delivers core professional functionality at a DIY-friendly price point.
Strengths and Weaknesses: Strengths include robust aluminum construction, precise pressure control with gauge, versatile multi-directional wand, good cup capacity, and clear professional/DIY positioning. The balanced design reduces operator fatigue. Potential weaknesses: no mention of tool-less adjustment, leak-proofing features, or specialized thick-material flow enhancements. The suction feed design may require more air pressure than gravity-feed alternatives.
Bottom Line: An outstanding value proposition for both professionals and serious DIYers. The combination of durable construction, precise control, and included accessories makes this a top contender in its price class. Highly recommended for users seeking professional results without premium pricing.
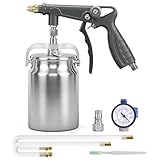
5. Master Elite Undercoating Spray Gun with Regulator, 25 oz Suction Feed Cup & 2 Flexible Extension Wands - Pneumatic Automotive Application Sprayer Undercoating Gun for Truck Bed Liner & Rust Proofing

Overview: The Master Elite Undercoating Spray Gun positions itself as the budget-conscious entry point into pneumatic undercoating application. Despite its $29.99 price tag, it includes essential features: an adjustable air pressure regulator with gauge, a 25-ounce suction feed cup, and two 22-inch flexible extension wands (one multi-directional, one straight). The die-cast aluminum alloy body aims to deliver durability typically absent in economy tools.
What Makes It Stand Out: The primary standout feature is the aggressive pricing combined with a surprisingly complete accessory package. Few sub-$30 kits include both a pressure gauge and dual wands. The multi-directional nozzle provides professional-level reach into hollow frames, a feature often omitted in budget tools. The 25-ounce cup capacity matches more expensive competitors, reducing refill interruptions during projects.
Value for Money: This kit defines budget value. At $29.99, it includes features found in kits costing twice as much. For DIYers with occasional undercoating needs, it removes financial barriers to proper tool acquisition. The value proposition assumes acceptable durability and performance—if the tool lasts through 2-3 projects, it has paid for itself versus professional application costs. However, the low price raises questions about long-term reliability and component quality.
Strengths and Weaknesses: Strengths include unbeatable price, included pressure gauge, dual wands with multi-directional nozzle, adequate cup capacity, and lightweight aluminum construction. The ergonomic grip enhances comfort. Weaknesses: minimal brand recognition, unclear warranty support, potentially inferior seals and threads compared to premium brands, and no mention of specialized features like anti-drip design or tool-less adjustments. Performance with thick bed liner materials may be marginal.
Bottom Line: Perfect for budget-minded DIYers tackling occasional undercoating or rust-proofing projects. While professionals should invest in more robust tools, this offers remarkable features-per-dollar for hobbyists and first-time users. Manage expectations regarding longevity and performance with heavy materials.
6. KCNKCN Undercoating Spray Gun with 1000ml Suction Feed Cup, 2 Wands - 360° & Straight Spray Hoses, Undercoat Gun for Truck Bed Liner Coating, Rubberized Undercoat, Rust Proofing
Overview: The KCNKCN Undercoating Spray Gun delivers professional-grade performance at a DIY-friendly price point. This versatile tool handles everything from rubberized undercoat to truck bed liner applications with its 1000ml suction feed cup and dual wand configuration.
What Makes It Stand Out: The 60% boost in flow rate sets this gun apart, allowing you to spray thick materials without thinning while maintaining precision for detail work. The adjustable knob and pressure regulator provide exceptional control, letting you fine-tune atomization without crawling out from under your vehicle. The inclusion of both a 360° multi-directional wand and a straight wand ensures comprehensive coverage in frame rails, rocker panels, and other inaccessible areas.
Value for Money: At $32.59, this undercoating gun significantly undercuts professional alternatives while delivering comparable performance. The robust snap-lock pot prevents leaks and simplifies cleanup, saving time and material costs. For hobbyists and budget-conscious professionals, this represents an excellent return on investment.
Strengths and Weaknesses: Strengths include impressive flow rate improvement, versatile wand options, precise adjustment controls, and leak-proof design. The lightweight, balanced construction reduces fatigue during extended use. Weaknesses include limited brand recognition and potential long-term durability questions compared to premium manufacturers. The plastic components may wear faster under heavy professional use.
Bottom Line: This KCNKCN spray gun is an outstanding choice for DIY enthusiasts and occasional professional use. It offers the features and performance needed for quality undercoating work without breaking the bank, making it our top budget recommendation.
7. Undercoating Spray Gun with Suction Feed Cup, 360° & Straight Spray Hoses, for Truck Bed Liner Coating, Rubberized Undercoat, Rust Proofing Gun Gray
Overview: This Undercoating Spray Gun positions itself as a mid-range solution for automotive protection projects. Designed for truck bed liners, rubberized undercoating, and rust-proofing applications, it emphasizes accessibility with its unique dual 360° extension tube configuration that reaches deep into complex frame structures.
What Makes It Stand Out: Unlike competitors offering one 360° and one straight wand, this unit includes two 360° extension tubes, maximizing coverage in complex underbody structures. The adjustable nozzle and pressure regulator provide smooth operation, while the snap-lock canister ensures a tight seal and tool-free assembly. The easy-grip trigger handle improves control during extended spraying sessions, reducing operator fatigue.
Value for Money: Priced at $39.89, it commands a modest premium over entry-level models. The additional 360° wand justifies the cost for users tackling intricate frame work or multiple vehicles regularly. However, casual DIYers may find the standard single-360° configuration sufficient for their needs, making this specialized tool potentially unnecessary.
Strengths and Weaknesses: Strengths include exceptional coverage capability with dual rotating wands, user-friendly design, leak-proof operation, and comfortable ergonomics. The adjustable flow accommodates various material viscosities. Weaknesses include the higher price point for hobbyists and potential redundancy of two 360° wands for simpler projects. The gray finish, while professional, shows wear more readily than darker alternatives.
Bottom Line: This spray gun excels for serious DIYers and professionals who frequently work on complex underbody structures. If maximum coverage accessibility is your priority, the dual 360° design makes it worth the slight premium over basic models.
8. Undercoating Spray Gun with 33.82oz Suction Feed Cup, 360° & Straight Spray Hoses and Air Rust Connector, for Truck Bed Liner Coating, Rubberized Undercoat, Rust Proofing

Overview: The most budget-friendly option in our comparison, this Undercoating Spray Gun kit delivers essential functionality for occasional users. With a 33.82oz cup and both 360° and straight wands, it handles truck bed liners and rust-proofing tasks competently, making it an attractive entry point for home mechanics.
What Makes It Stand Out: This kit’s standout feature is its completeness at an unbeatable price point. Beyond the basic gun and wands, it includes a cleaning brush, detailed manual, and instructional videos—resources competitors omit. The snap-lock pot prevents spills, while the large opening simplifies refilling and reduces mess during setup.
Value for Money: At $28.99, this represents exceptional value, costing less than a single professional undercoating service. The included accessories eliminate additional purchases, making it ideal for first-time users. While the 33.82oz cup is smaller than 1000ml alternatives, it’s sufficient for most passenger vehicles and reduces wrist strain during extended use.
Strengths and Weaknesses: Strengths include unbeatable pricing, comprehensive accessory package, user-friendly design, and adequate performance for thin-to-medium viscosity materials. The 60% flow rate improvement claim matches premium options. Weaknesses include potentially inferior build quality, smaller cup capacity requiring more frequent refills, and less precise adjustment mechanisms. Long-term durability under heavy use remains uncertain.
Bottom Line: Perfect for beginners and occasional DIYers, this kit removes barriers to entry for home undercoating. If you’re tackling a single project or annual maintenance, the value proposition is undeniable. Professionals should invest in sturdier alternatives.
9. Air Undercoating Spray Gun with Suction Feed Cup & Gauge, 2 Extension Wands 360°Straight Spray Hoses, Fluid Film Spray Gun for Truck Bed Liner Spray Coating, Rubberized Undercoat

Overview: This Air Undercoating Spray Gun bridges the gap between budget tools and professional equipment. Featuring a pressure gauge and aluminum cup, it targets serious DIYers and professionals who demand precise control and durability for truck bed liners and corrosion protection applications.
What Makes It Stand Out: The integrated pressure gauge provides real-time feedback, eliminating guesswork during application. The threaded aluminum cup with snap-lock seal offers superior durability and leak resistance compared to plastic alternatives. Dynamic dual-flow control handles both high-viscosity bed liners and delicate detail work with 60% increased flow capacity and exceptional atomization.
Value for Money: At $32.77, this gun delivers professional features at a mid-range price. The aluminum cup alone justifies the cost over plastic competitors, while the pressure gauge ensures consistent results. For users applying expensive coatings, the precision prevents costly rework and material waste, quickly offsetting the initial investment.
Strengths and Weaknesses: Strengths include professional-grade aluminum cup, pressure gauge for accuracy, comprehensive kit with cleaning brush, and versatile wand options. The 22-inch wands provide excellent reach. Weaknesses include potentially steeper learning curve for beginners unfamiliar with pressure regulation. The added complexity may overwhelm casual users seeking simplicity over control.
Bottom Line: This is the smart choice for serious enthusiasts and professionals who prioritize precision and durability. The pressure gauge and aluminum construction elevate it above budget options without reaching premium price levels. If you spray regularly, this investment pays dividends in quality and consistency.
10. woolwax Pro Undercoating Gun by Kellsport
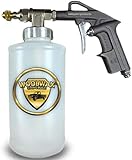
Overview: The woolwax Pro Undercoating Gun by Kellsport occupies a unique niche as a specialized tool designed exclusively for lanolin-based corrosion inhibitors. This premium device caters to professionals and dedicated enthusiasts committed to woolwax products.
What Makes It Stand Out: Purpose-built engineering for lanolin formulations ensures optimal atomization and flow characteristics that general-purpose guns struggle to achieve. The kit includes three empty quart bottles for bulk product transfer, plus 18" 360° and 24" flexible wands—providing superior reach and maneuverability. The adjustable nozzle fine-tunes specifically for lanolin viscosity.
Value for Money: At $119.50, this is a significant investment. However, for woolwax devotees, the specialized design eliminates clogging and inconsistent spray patterns common with standard guns. The included accessories add value, but the price remains steep for single-product loyalty.
Strengths and Weaknesses: Strengths include specialized lanolin optimization, premium build quality, generous wand lengths, and thoughtful inclusion of storage bottles. The tool performs flawlessly with its intended materials. Weaknesses include limited versatility—it’s unsuitable for polyurethane or rubberized coatings. The high price restricts its appeal to woolwax-exclusive users, and the specialized nature makes it a poor choice for general undercoating needs.
Bottom Line: Only purchase this gun if you’re committed to lanolin-based corrosion inhibitors like woolwax. For that specific application, it’s unmatched. For everyone else seeking a versatile undercoating solution, significantly cheaper general-purpose options deliver better overall value and flexibility.
Why Invest in an Undercoating Gun Kit?
Protecting Your Vehicle’s Undercarriage
Your vehicle’s undercarriage faces constant assault from elements that don’t touch the painted surfaces above. Each winter, road salt actively promotes electrochemical corrosion, eating away at unprotected steel. Gravel and debris chip away at factory coatings, while moisture lingers in crevices and boxed sections where rust colonies thrive. An undercoating gun delivers specialized protective compounds into these hard-to-reach areas, creating a flexible, water-resistant barrier that adheres to metal surfaces and self-heals from minor impacts. Unlike spray cans that offer limited reach and inconsistent coverage, a proper gun system atomizes material into a controlled pattern, ensuring even application across complex geometries like control arms, frame rails, and wheel wells.
Cost Savings of DIY Undercoating
The financial math makes DIY undercoating compelling. Professional applications typically cost $150-$300 annually, while a quality budget gun kit pays for itself after just one use. A single gallon of undercoating material covers most passenger vehicles and costs roughly what you’d pay for a professional single-vehicle treatment. Over a typical 10-year vehicle ownership period, DIY undercoating can save you upwards of $2,000 while giving you complete control over application timing, material choice, and coverage thoroughness. Plus, you can tackle multiple vehicles—your daily driver, spouse’s car, and that weekend project truck—for the price of one professional job.
Understanding Undercoating Guns: How They Work
The Basic Mechanics of Undercoating Application
Undercoating guns operate as specialized siphon-feed or gravity-feed spray guns designed for high-viscosity materials. Unlike automotive paint guns that require fine atomization for glossy finishes, undercoating guns prioritize material volume and pattern control over ultra-fine mist. They use larger fluid nozzles—typically 1.8mm to 2.5mm—to pass rubberized or asphalt-based compounds without clogging. Compressed air enters through the gun body, creating venturi suction that draws material from the cup and shears it into a controlled spray pattern. The best budget models maintain this basic functionality while using simpler materials and construction methods to keep costs down.
Types of Undercoating Guns on the Market
You’ll encounter three primary designs in the budget category. Siphon-feed guns mount the cup below the gun body, using air pressure to pull material upward—a design that works reliably but can struggle with very thick materials. Gravity-feed guns position the cup above, letting material flow naturally into the nozzle, which generally provides better performance with heavy-bodied coatings but may feel less balanced during extended use. The third category—pressure-pot systems—uses a separate pressurized container to force material to the gun, offering superior performance for thick materials but rarely appearing in true budget kits. Most sub-$100 kits feature siphon-feed designs as the cost-effective sweet spot for DIY applications.
Key Features to Look for in Budget Undercoating Guns
Nozzle Types and Spray Patterns
The nozzle determines everything about how your undercoating material lands on the surface. Look for kits offering interchangeable nozzles, particularly a fan pattern tip for broad coverage on flat areas like floor pans and a round pattern tip for penetrating boxed sections and spot-treating rust spots. Budget guns often ship with fixed-pattern nozzles, but the better kits include at least two options. Brass nozzles outperform plastic in durability and heat resistance, though you’ll find both in the budget category. Pay attention to orifice size—a 2.0mm nozzle handles most rubberized undercoatings, while thicker asphalt-based materials may demand 2.3mm or larger.
Hose Length and Flexibility
Your kit’s air hose length directly impacts how comfortably you can maneuver around the vehicle. A 10-foot hose represents the practical minimum, allowing you to circle a passenger car without constantly moving your compressor. Premium budget kits stretch to 15 or 20 feet, which proves invaluable when working on trucks or SUVs. More importantly, examine the hose material—rubber hoses resist kinking better than PVC and remain flexible in cold garage temperatures, while braided hoses offer superior durability but add cost. Avoid stiff, coiled hoses that fight you during application, as they lead to fatigue and inconsistent coverage.
Cup Capacity and Material
Cup size balances between application efficiency and gun weight. A 1-quart cup covers most passenger car wheel wells and frame sections before needing a refill, while a 1-liter cup reduces interruptions on larger vehicles. Material matters more than capacity—stainless steel cups resist corrosion from solvent-based materials and clean up easily, while polyethylene cups offer lightweight handling but can absorb solvents and degrade over time. The best budget kits include graduated cups with measurement markings, helping you mix materials to the proper consistency without separate mixing containers.
Air Pressure Requirements
Budget compressors typically deliver 90-120 PSI, which matches most undercoating gun requirements. However, check the gun’s CFM (cubic feet per minute) demand—a critical but often overlooked spec. A gun requiring 6-8 CFM at 90 PSI will cycle a small pancake compressor constantly, leading to moisture issues and inconsistent spray. Look for guns rated for 3-5 CFM, which most portable compressors can sustain comfortably. Some budget guns include pressure regulators with gauges at the gun handle, allowing fine-tuning without walking back to your compressor—a feature that punches above its weight class in convenience.
Build Quality and Durability
Even at budget prices, you shouldn’t accept flimsy construction. Examine product photos for solid metal bodies—zinc or aluminum castings that can withstand drops and garage life. Plastic-bodied guns may save ounces but crack when dropped on concrete. Check trigger action in reviews; a smooth, two-stage trigger (air first, then material) indicates better internal valving. O-ring quality determines leak resistance—look for visible Viton or Buna-N seals in product descriptions, as these resist swelling from undercoating solvents better than basic rubber. The best budget guns balance cost by using metal for critical wear components and plastic for non-stressed parts like cup lids.
Budget vs. Professional-Grade: What’s the Real Difference?
Performance Expectations
Professional-grade guns costing $200+ offer finer atomization, better pattern control, and all-day comfort for shop use. Budget guns sacrifice some refinement—pattern edges may be less crisp, and overspray might be slightly higher—but they absolutely deliver protective results when used correctly. The primary performance gap appears in material waste; a pro gun might transfer 75% of material to the surface versus 60-65% for budget models. For a DIYer coating one or two vehicles annually, this efficiency difference doesn’t justify the price premium. The real question isn’t whether a budget gun works, but whether you’re willing to practice technique to maximize its capabilities.
Longevity and Warranty Considerations
Professional tools survive daily shop abuse with rebuildable designs and readily available parts. Budget guns often lack parts support—when a seal fails, you replace the entire gun. However, with proper cleaning and storage, a $50-80 undercoating gun should last 5-7 years of annual DIY use. Some budget manufacturers now offer 1-year warranties, which indicates confidence in their product. Read warranty terms carefully; many exclude “damage from improper cleaning,” making your maintenance routine critical. Consider the kit’s overall value—if it includes multiple nozzles, cleaning brushes, and a storage case, you’re getting more than just a disposable tool.
Essential Accessories That Should Be in Your Kit
Wands and Extensions for Hard-to-Reach Areas
A basic gun body only gets you so far. Quality budget kits include a 12-18 inch wand extension that reaches into frame rails, inside rocker panels, and behind bumpers without forcing you to contort your body. The best extensions feature angled tips—15 to 30 degrees—that let you spray upward into boxed sections while maintaining a comfortable grip. Some kits include flexible wands that snake around obstacles, though these rarely appear in true budget packages. If your prospective kit lacks an extension, factor in $15-25 for an aftermarket addition; it’s not optional equipment for thorough coverage.
Cleaning Brushes and Maintenance Tools
Undercoating material sets up like rubber cement if not cleaned immediately. Budget kits that include dedicated cleaning brushes demonstrate manufacturer understanding of real-world use. Look for a kit containing a small bottle brush for the fluid passages and a larger brush for the cup interior. Some include pick tools for clearing dried material from nozzle tips—these inexpensive additions save hours of frustration. A basic wrench for nozzle changes should also be present; using adjustable pliers mars brass nozzles and creates leak paths. If these tools are absent, you’ll need to source them separately, adding hidden cost to that “bargain” kit.
Protective Gear and Safety Equipment
While not part of the gun itself, the best budget kits bundle essential safety items. At minimum, expect a pair of chemical-resistant gloves and a basic respirator mask rated for organic vapors. Some kits add disposable coveralls and safety goggles—items you’d purchase anyway. The presence of proper PPE indicates a manufacturer that understands undercoating’s messy reality rather than just selling hardware. If your kit lacks these items, budget an extra $30-40 for quality protection; cutting corners on safety equipment turns a money-saving project into a health hazard.
Types of Undercoating Materials Compatible with Budget Guns
Rubberized Undercoatings
The most common DIY choice, rubberized undercoatings combine asphalt or petroleum compounds with rubber polymers to create a flexible, sound-dampening barrier. These materials typically spray best at 70-90°F with a 2.0mm nozzle and thin slightly with mineral spirits if needed. They build to a 60-80 mil thickness (about 1/16 inch) and dry to a textured black finish. Budget guns handle rubberized products well because manufacturers formulate them for consumer equipment. The material’s flexibility makes it forgiving during application, though it can sag on vertical surfaces if applied too thickly.
Asphalt-Based Coatings
Thicker and more durable than rubberized options, asphalt-based undercoatings offer maximum protection for severe-duty vehicles but demand more from your equipment. These materials require a 2.3mm or larger nozzle and higher air pressure—often 100 PSI minimum—to atomize properly. They create a rock-hard barrier but lack the self-healing properties of rubberized coatings. Budget guns can spray asphalt-based products, but you’ll need to work in warm conditions and keep the material moving to prevent tip clogging. Some DIYers warm the material container in hot water before spraying to reduce viscosity—a trick that works well with budget equipment.
Wax and Oil-Based Options
Fluid film and similar wool wax products represent the environmentally friendly end of the spectrum. These thin, oily coatings creep into seams and provide excellent corrosion protection while remaining removable for inspections. Budget guns excel with these materials because they require minimal air pressure and clean up with simple soap and water. However, they don’t build significant thickness, meaning more frequent reapplication—typically annually versus 2-3 years for rubberized coatings. The trade-off comes in application ease and material cost, as these products often cost more per gallon but waste less during spraying.
Preparing Your Vehicle for Undercoating
Cleaning and Degreasing the Undercarriage
Undercoating over dirt or oil creates a time-release rust bomb, trapping moisture against metal. Start with a thorough pressure washing, focusing on frame rails, wheel wells, and suspension components. Follow with a degreaser application—simple purple degreaser works economically—agitating with a stiff brush to remove road film and factory cosmoline. For heavily rusted vehicles, consider media blasting or wire wheel treatment on accessible surfaces. The goal isn’t showroom perfection but bare, dry metal in critical areas. Budget undercoating guns forgive minor surface imperfections better than professional setups, but they can’t make up for gross contamination.
Drying and Masking Off Areas
After cleaning, let the vehicle dry for 24 hours in a heated garage or use compressed air to blow water from crevices. Any trapped moisture gets sealed in by undercoating, accelerating rust. Masking seems counterintuitive—why protect what you can’t see? But overspray on exhaust components creates smoke and smell, while coating brake lines and ABS sensors can cause functional issues. Use aluminum foil to wrap exhaust pipes, catalytic converters, and brake components; it’s heat-resistant and molds easily around complex shapes. Painter’s tape works for shock absorber shafts and rubber bushings that shouldn’t be coated.
Rust Treatment Protocols
Active rust requires conversion before encapsulation. Apply a rust converter (phosphoric acid-based) to orange, scaly areas, following the product’s dwell time. Once converted and dry, spot-prime with a self-etching primer compatible with undercoating materials. This step adds time and cost but prevents rust from continuing to grow beneath your fresh undercoating. Budget kits don’t include these materials, but skipping this step on rusty vehicles negates the entire project. For vehicles with minimal rust, a simple wipe-down with denatured alcohol ensures adhesion without extensive prep.
Step-by-Step Guide to Using Your Undercoating Gun
Setting Up Your Equipment
Connect your air supply, setting compressor output to 90 PSI as a starting point. Fill the gun cup to the three-quarter mark—never full, as material expansion and agitation creates foam. Attach the appropriate nozzle for your task: fan pattern for broad surfaces, round pattern for penetration. Test spray onto cardboard, adjusting air pressure at the gun (if equipped) until you achieve a consistent pattern without sputtering. The first few minutes reveal whether your material viscosity matches the gun’s capability; if it spits or fails to atomize, thin gradually according to manufacturer specs. Budget guns often need slightly higher pressure than stated to compensate for simpler internal passages.
Achieving the Right Consistency
Undercoating material straight from the can resembles pudding—too thick for any gun. Thinning requires patience and precision. Add reducer (mineral spirits for petroleum-based products, water for water-based) at 5% increments, mixing thoroughly and testing after each addition. The target consistency flows like heavy cream from a spoon—thick enough to build film but fluid enough to siphon and atomize. Temperature dramatically affects viscosity; a material perfect at 70°F becomes unworkable at 50°F. Warm your material to room temperature before thinning. Over-thinning wastes material through runs and reduced build; under-thinning strains the gun and creates orange-peel texture that lacks protection.
Application Techniques for Even Coverage
Start at the rear and work forward, coating one section completely before moving on. Hold the gun 6-8 inches from the surface, moving in overlapping passes at a consistent speed—about one foot per second. For vertical surfaces, start at the bottom and work up to prevent runs. Use the wand extension to reach inside frame rails, spraying in short bursts while slowly withdrawing the wand to ensure complete coverage. Boxed sections require multiple angles; spray from every accessible opening. Listen to the gun’s sound; a steady hiss indicates proper operation, while sputtering suggests material starvation or air leaks. Budget guns reward methodical technique over speed—rushing creates thin spots and overspray that waste material.
Common Mistakes Beginners Make (And How to Avoid Them)
Over-Application and Dripping
The most frequent error involves applying too much material too quickly. Undercoating should build to 60-80 mils thickness; exceeding this creates sagging, dripping, and wasted material. A single heavy coat doesn’t protect better than two medium coats properly dried between applications. Watch for material pooling in frame rail corners—that’s your cue to move faster or hold the gun further away. If you notice sagging, stop immediately and use a brush to redistribute the material; attempting to spray over wet, sagging coating just moves the problem around. Budget guns often have less precise pattern control, making operator technique even more critical for avoiding runs.
Inadequate Surface Preparation
Skipping the cleaning step wastes every dollar and hour you invest. Undercoating bonds to contaminants, not metal, and as that contamination releases, your protective layer peels away in sheets. Even new vehicles arrive with shipping coatings and handling oils that prevent adhesion. The “wipe it with a rag” approach fails; you need chemical degreasing and pressure washing. Another prep mistake involves coating over loose factory undercoating. Scrape off flaking material with a putty knife; otherwise, your new layer simply adds weight while the underlying rust continues spreading unseen.
Ignoring Temperature and Humidity
Undercoating materials cure through solvent evaporation, a process highly dependent on environmental conditions. Applying below 60°F prevents proper curing, leaving a tacky surface that attracts dirt and never hardens. Above 85°F, material dries too fast, creating a skin that traps solvents underneath, leading to bubbling and poor adhesion. Humidity above 70% introduces moisture into the curing film, causing whitish blush and weakened protection. Budget guns don’t compensate for bad conditions; they amplify problems by delivering material less precisely. Check the forecast and wait for a dry day in the 65-75°F range, or rent a heated garage space for the project.
Maintenance and Care for Your Undercoating Gun
Proper Cleaning Procedures
Cleaning starts the moment you finish spraying. Empty remaining material back into the can, then immediately fill the cup with appropriate thinner (mineral spirits for most petroleum products). Spray thinner through the gun onto cardboard until it runs clear. Disassemble the nozzle, fluid needle, and air cap, soaking them in cleaner and brushing with the provided brushes. Use pipe cleaners to scrub fluid passages—budget guns have simpler passages that clog easily if neglected. Never let material dry inside the gun; the cleanup becomes nearly impossible, and replacement becomes your only option. The entire process takes 10 minutes but preserves your $50 investment.
Storage Best Practices
After cleaning, lubricate the fluid needle packing with a drop of air tool oil to prevent drying and cracking. Store the gun hanging from its handle hook or lying flat; standing it on its nozzle can deform seals. Keep it in the provided case or wrap it in a clean rag to prevent dust ingress. Remove O-rings from the cup lid and store them in a sealed bag with a light coating of petroleum jelly to prevent cracking. If you live in a humid climate, add a silica gel packet to the storage container. These simple steps transform a disposable tool into a multi-season investment.
Troubleshooting Common Issues
Sputtering spray usually indicates material starvation—either the cup vent is clogged (clear it with a pin) or the material is too thick. Pattern tails or fingers suggest low air pressure or a dirty air cap; increase pressure 5 PSI increments or clean the cap holes with a needle. Material leaking from the trigger indicates a worn fluid needle packing—replaceable on some budget guns but often signaling end-of-life for the cheapest models. If the gun won’t spray at all, check for hardened material in the fluid tube; remove and soak it in thinner. Most budget gun problems stem from inadequate cleaning rather than mechanical failure.
Safety Considerations When Undercoating
Ventilation and Respiratory Protection
Undercoating solvents produce powerful fumes that cause dizziness and respiratory irritation. Work in a garage with doors open and a fan creating cross-ventilation. Your respirator must be NIOSH-rated for organic vapors—those disposable dust masks from the hardware store provide zero protection. Replace respirator cartridges after each major project or every 40 hours of use, whichever comes first. If you can smell solvents through the mask, it’s not sealing properly or the cartridges are spent. Budget kits rarely include adequate respirators; invest in a half-face respirator with replaceable cartridges—your lungs deserve better than the cheapest option.
Skin and Eye Protection
Undercoating sticks to skin with remarkable tenacity and resists soap and water. Nitrile gloves rated for chemical resistance are non-negotiable; latex gloves dissolve and leave your hands coated. Wear safety goggles with indirect vents to prevent solvent splash from reaching your eyes—standard glasses don’t seal adequately. Long sleeves and pants prevent overspray from adhering to arm hair (a uniquely painful removal experience). Keep a bottle of baby oil or mechanic’s hand cleaner nearby; it dissolves undercoating on skin far better than soap. One overlooked hazard: undercoating on concrete floors creates a slip hazard; wear shoes with good tread and consider laying cardboard.
Fire Hazards and Proper Disposal
Most undercoating materials are petroleum-based and highly flammable. Keep the work area free from open flames, pilot lights, and spark-producing tools. Your compressor motor can spark—position it at least 10 feet from your spray area. Soaked rags and cardboard can spontaneously combust; store them in a sealed metal container until disposal. Never pour waste thinner or cleanup material down drains—collect it in a sealed container and take it to a hazardous waste facility. The environmental impact of improper disposal far exceeds any savings from DIY undercoating. Budget kits never include disposal instructions, making operator responsibility paramount.
Evaluating Your Results: What Good Undercoating Looks Like
Visual Inspection Checkpoints
A properly applied undercoating displays uniform texture without glossy spots (indicating too thick) or bare metal showing through (too thin). The coating should follow surface contours smoothly, filling minor pits without bridging larger gaps. Check inside frame rails with a borescope or inspection camera; uniform coverage should extend at least 12 inches into boxed sections. Tap the coating with a screwdriver handle—it should feel firm but slightly resilient, like a rubber eraser. Hard, brittle coating suggests over-curing or incompatible material; soft, tacky coating indicates insufficient curing or over-thinning. Budget applications may show slightly more texture variation, but the protective qualities remain equivalent if coverage is complete.
Touch Tests and Thickness Checks
After 48 hours of curing, press your thumbnail into an inconspicuous area; it should dent slightly but not penetrate. Use a paint thickness gauge (ultrasonic type) if available—readings between 60-80 mils indicate proper build. Without a gauge, insert a toothpick into a small cut in the coating; measure the depth against a ruler. Check edges and seams carefully; these areas thin during application and require extra attention. Good undercoating feels slightly tacky for several days but shouldn’t transfer to your finger after a week. If it remains gummy, you’ve either applied too thick or the material didn’t cure due to temperature issues.
When to Reapply: Understanding Undercoating Lifespan
Factors That Affect Longevity
Your undercoating’s lifespan depends on driving conditions more than material quality. Daily winter commuting on salted roads may require annual touch-ups, while fair-weather weekend cars can go three years. Off-road use accelerates wear from gravel bombardment. Vehicle washing habits matter—frequent undercarriage washing extends coating life by removing salt before it penetrates. The quality of your initial application plays the biggest role; thin spots fail first, so thoroughness during the first job pays dividends. Budget guns apply material slightly less efficiently, meaning you might need reapplication 10-15% sooner than professional applications.
Seasonal Reapplication Schedules
Mark your calendar for annual inspections each fall before winter road salt appears. Look for chips, thin spots, and areas where gravel has knocked the coating loose. Touch-up these areas rather than recoating the entire vehicle—budget guns excel at spot repairs. Plan a full reapplication every 2-3 years for daily drivers, or when you notice widespread thinning or brittleness. The best timing is early fall, giving the coating weeks to cure before salt season, or late spring after winter’s assault has ended. Never apply over existing undercoating that’s peeling or compromised; strip it back to sound material or bare metal first.
Budget Kit Upgrades and Modifications
Aftermarket Nozzles and Accessories
Your basic kit becomes more versatile with strategic upgrades. Aftermarket brass nozzles in 2.5mm size handle thicker materials your stock nozzle can’t manage. A quick-disconnect air fitting saves time and prevents thread wear from repeated connections. Consider a flexible wand extension for reaching inside boxed frames—these cost $20-30 but transform your ability to protect hidden areas. Some DIYers add an inline air filter/oiler near the gun to remove compressor moisture and lubricate internal parts automatically. These upgrades cost less than $50 total but elevate a budget gun’s performance to near-professional levels.
Improving Your Setup Over Time
Start with the budget kit, then invest in a dedicated 20-gallon compressor if you find yourself undercoating multiple vehicles annually. Add a wall-mounted hose reel to keep your workspace organized. Build a simple rotisserie from pipe fittings to lift and rotate the vehicle, giving you ergonomic access to the undercarriage. Create custom shields from cardboard and magnets to protect brake components and exhaust during spraying. These incremental improvements spread costs over time while dramatically improving results. The budget gun remains the heart of your system; everything else supports its operation.
Making the Final Decision: Your Buying Checklist
Prioritizing Features for Your Specific Needs
If you own a compact car and work in a warm climate, prioritize a kit with a smaller cup and lighter weight over hose length. Truck owners need maximum reach and larger nozzles for thicker materials. Rust-belt residents should insist on multiple nozzle options for different material types as you experiment with formulations. Consider your compressor’s capability—if it’s marginal, choose a low-CFM gun even if other features are limited. Make a honest assessment of how often you’ll use it; occasional users should prioritize ease of cleaning over advanced features. The “best” budget kit is the one that matches your specific vehicle, climate, and usage pattern.
Where to Shop for the Best Deals
Auto parts stores stock budget kits seasonally, often with helpful return policies if the gun proves defective. Online marketplaces offer wider selection and competitive pricing, but verify seller ratings and warranty support. Look for kits shipped directly from the manufacturer, as they often include better documentation and customer service. Avoid no-name brands without online reviews; the $10 savings isn’t worth the risk. Check automotive forums for group buys—enthusiast clubs sometimes negotiate discounts on bulk purchases. Timing matters; buy in late summer when demand is low and retailers clear inventory before winter rush.
Frequently Asked Questions
What’s the minimum compressor size needed for a budget undercoating gun?
Most budget undercoating guns require 3-5 CFM at 90 PSI. A 6-gallon pancake compressor can handle short bursts, but expect frequent cycling. For continuous spraying, a 20-gallon compressor with 5+ CFM output prevents moisture buildup and maintains consistent pressure. If your compressor is marginal, work in sections, allowing it to recover between panels.
Can I use a budget undercoating gun for other automotive fluids?
Yes, but with caveats. These guns work well for spraying rust converters, cavity waxes, and even some thick lubricants. Never use the same gun for paint or clear coat—the internal passages retain undercoating residue that ruins fine finishes. Dedicate your undercoating gun to protective coatings only. Clean thoroughly between different material types to prevent chemical incompatibility.
How do I know if my undercoating material is too thick for the gun?
If the gun sputters, fails to draw material from the cup, or produces a pattern with heavy tails, the material is likely too viscous. Perform a simple “dip test”—dip a stir stick into the material and lift it out. The material should drip off steadily, not flow in a continuous stream or barely move. Thin in 5% increments, testing after each addition, until you achieve smooth, consistent spray.
Is it worth buying a kit with multiple nozzle sizes?
Absolutely. A single 2.0mm nozzle handles most rubberized undercoatings adequately, but thicker asphalt-based materials require 2.3mm or larger. Multiple nozzles let you adapt to different materials and seasons (material thickens in cold weather). Kits including three nozzles offer the best versatility for experimenting with different protection strategies across multiple vehicles.
Can I undercoat over existing rust?
Only if the rust is light surface oxidation. Heavy, scaly rust must be removed or converted first. Apply a rust converter to chemically transform iron oxide into a stable compound, then prime before undercoating. Undercoating over loose rust encapsulates moisture and accelerates hidden corrosion. Budget guns can’t compensate for poor surface prep—no gun can.
How long does undercoating take to dry before I can drive the vehicle?
Most undercoatings skin over in 2-4 hours and cure enough for light driving in 24 hours. However, full hardness and adhesion develop over 7 days. Avoid heavy rain, car washes, and off-road use for at least a week. In humid or cold conditions, double these times. Budget applications may take slightly longer to cure due to thicker material deposition.
What’s the difference between undercoating and rustproofing?
Undercoating creates a visible protective layer on the undercarriage, focusing on impact resistance and moisture barrier. Rustproofing typically involves thinner, creeping oils applied inside body panels and crevices where undercoating can’t reach. Many DIYers use their budget gun for undercoating and apply rustproofing with separate wands or spray cans for complete protection.
Can I apply undercoating in cold weather?
Not recommended. Materials won’t atomize properly below 60°F, and curing essentially stops below 50°F. Cold material is too thick for budget guns, requiring excessive thinning that compromises protection. If you must work in cool conditions, warm the material to 70°F using a hot water bath and work in a heated garage. Never use open flames or space heaters near flammable solvents.
How do I dispose of leftover undercoating material and cleanup waste?
Never pour liquid undercoating or thinner down drains or onto soil. Collect all waste in sealed metal containers and take them to a municipal hazardous waste collection site. Dried undercoating residue can go in regular trash, but liquid waste is considered hazardous due to petroleum solvents. Check local regulations; some areas allow small quantities of dried material in household trash, while others classify any amount as industrial waste.
Will undercoating affect my vehicle’s warranty?
Generally no, but document your work. Factory rust perforation warranties remain valid if you haven’t caused damage during application. Avoid coating components that require inspection or service access. Some manufacturers specify approved undercoating materials—using unapproved products could theoretically void coverage, though this is rarely enforced. Keep receipts and photos of your application process as proof of proper technique if warranty questions arise.