Your vehicle’s undercarriage faces a daily assault that you never see. While you’re enjoying a comfortable cabin and pristine paint job, road salt, moisture, gravel, and chemical deicers wage a silent war on exposed metal surfaces. This hidden battlefield is where corrosion begins its destructive march, often years before you notice the first bubble of rust breaking through your wheel well. Undercoating touch-up kits represent your frontline defense—a cost-effective arsenal that empowers you to maintain that critical protective barrier without scheduling expensive professional appointments.
Understanding how to select and apply the right undercoating touch-up kit isn’t just about saving money; it’s about actively participating in your vehicle’s longevity. Whether you’re a seasoned DIY enthusiast or a conscientious owner looking to protect your automotive investment, mastering the nuances of undercoating maintenance can add years to your vehicle’s structural integrity and thousands to its resale value. Let’s dive deep into everything you need to know to make informed decisions about protecting the most vulnerable parts of your vehicle.
Top 10 Undercoating Touch Up Kit
Detailed Product Reviews
1. Barrier Bond - Rubberized Undercoating Sound Deadener Kit, 28oz 4-Pack, Black Spray, Vehicle Undercoating, with Spray Gun
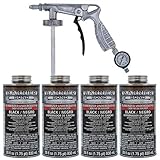
Overview: The Barrier Bond Rubberized Undercoating Kit delivers a four-pack of 28-ounce cans designed for comprehensive vehicle undercarriage protection and sound deadening. This black spray coating comes complete with a spray gun applicator, targeting DIY enthusiasts seeking professional-grade results without shop prices. The formula specifically addresses rust prevention while simultaneously reducing road noise through its rubberized composition.
What Makes It Stand Out: True versatility defines this kit. The paintable nature allows custom top-coating for color-matched applications, while 50-state VOC compliance ensures legal use nationwide. The ready-to-spray formula accelerates project timelines with its fast-drying properties, and the included spray gun eliminates the need for separate equipment purchases. The four-can configuration provides adequate coverage for most passenger vehicles or multiple touch-up projects.
Value for Money: At $114.99 for 112 total ounces, the price point hovers around $1.03 per ounce—competitive for a kit including application hardware. Professional undercoating services typically cost $150-$300, making this a cost-effective alternative for hands-on owners. The multi-pack structure reduces per-unit cost compared to individual aerosol cans, though coverage may require multiple coats on heavily rusted surfaces.
Strengths and Weaknesses: Pros include comprehensive regulatory compliance, dual-function sound deadening, included spray gun, and paint compatibility. Cons involve potential spray gun durability concerns, rubberized formulas being less abrasion-resistant than urethane alternatives, and possible need for three-plus coats on severe corrosion.
Bottom Line: An excellent mid-range solution for DIY undercoating with sound dampening benefits. Ideal for budget-conscious owners prioritizing convenience and regulatory compliance over maximum durability.
2. Matte Black Rim Touch Up Paint - Car Wheel Repair Kit Curb Rash, Gloss or Matte Black Rim Touch Up Paint, Quick And Easy Wheel Scratch Repair Kit, Wheel Repair Kit Curb Rash (Matte Black)
Overview: This Matte Black Rim Touch Up Paint offers an ultra-affordable solution for cosmetic wheel damage, specifically targeting curb rash, rock chips, and surface scratches. The $5.99 kit provides dual applicators—pen tips for fine details and brushes for broader coverage—making it accessible for drivers seeking quick aesthetic improvements without professional refinishing costs.
What Makes It Stand Out: The eight-minute drying time dramatically accelerates repairs compared to traditional automotive paints requiring hours. The dual-application system addresses various damage scales, from pinpoint scratches to larger scuffs. A satisfaction guarantee backs the product, demonstrating manufacturer confidence. The rust-prevention properties add functional value beyond mere cosmetics.
Value for Money: Exceptional affordability defines this offering. At under six dollars, it costs less than 5% of professional wheel refinishing services. While the small volume limits extensive repairs, the targeted application makes it ideal for maintaining factory appearance between major services. The prevention of corrosion cascade from minor scratches provides long-term economic benefits.
Strengths and Weaknesses: Strengths include unbeatable price, rapid curing, versatile applicators, and corrosion prevention. Weaknesses involve limited matte black color matching across wheel manufacturers, insufficient volume for major damage, and a learning curve for achieving seamless blends. The product excels at touch-ups but cannot replicate factory finishes on severe curb rash.
Bottom Line: An indispensable tool for proactive wheel maintenance. Perfect for minor damage control and rust prevention, though users should temper expectations for invisible repairs on premium wheels.
3. Tekton44 Undercoating for Vehicles, Automotive Black Undercoating Kit (8 Liter Cans + 1 Spray Gun + 1 Spray Wand)

Overview: The Tekton44 Undercoating Kit positions itself as a professional-grade solution with eight liters of black coating and specialized spray equipment. Designed for comprehensive automotive undercarriage protection, this system targets serious DIYers and small shop operators requiring extensive coverage for multiple vehicles or large trucks. The permanently flexible formula promises year-round performance.
What Makes It Stand Out: The massive volume and professional spray wand differentiate this from consumer aerosols. Its permanently tacky characteristic maintains flexibility in sub-zero temperatures, preventing the cracking common with rigid undercoatings. The non-run, non-drip formulation ensures clean application even on vertical surfaces, while multi-mode application (spray, brush, dip) adapts to various project requirements.
Value for Money: At $199.00 ($0.74 per ounce), the bulk pricing offers significant savings over smaller kits. Professional undercoating for a single truck can exceed $400, making this economical for full-size vehicle protection. The included spray gun and wand eliminate equipment rental costs, though the high initial investment requires commitment to substantial projects.
Strengths and Weaknesses: Advantages include superior corrosion resistance, cold-weather flexibility, professional application tools, and excellent coverage efficiency. Drawbacks involve the premium upfront cost, potentially excessive quantity for compact cars, and the permanently tacky surface that may accumulate road debris over time.
Bottom Line: A powerhouse for dedicated enthusiasts or professionals. The high entry price is justified by volume, equipment, and performance in harsh climates.
4. Raptor Tintable Urethane Spray-On Truck Bed Liner Kit, Protective, Durable Paint, For Tailgates & Trucks, Vehicle Undercoating, 2 Quart Kit

Overview: Raptor’s 2-Quart Tintable Urethane Kit delivers professional-grade truck bed liner technology in a DIY-friendly package. This two-part 2K urethane system includes base material and hardener, creating a durable, UV-resistant barrier for truck beds, undercarriages, and trailers. The tintable formula allows custom color matching beyond standard black.
What Makes It Stand Out: The 2K urethane chemistry provides exceptional abrasion resistance surpassing rubberized or acrylic coatings. Rapid one-hour recoat times accelerate project completion significantly. Raptor’s industry leadership ensures proven formulations, while the versatile application methods—spray, roll, or brush—accommodate various skill levels and texture preferences. UV stability prevents fading on exposed surfaces.
Value for Money: At $89.99 for approximately 64 ounces, the cost aligns with premium DIY coatings while delivering professional results. The two-quart volume suits single truck beds or undercarriages, eliminating waste. When compared to $500+ professional spray-in liners, the savings are substantial, though compressor requirements add hidden costs for some users.
Strengths and Weaknesses: Strengths include superior durability, rapid curing, brand reputation, versatile application, and custom color capability. Weaknesses involve the need for precise mixing, compressor requirement (8 CFM @ 50-60 PSI), and additional primer needs for optimal adhesion on bare metal.
Bottom Line: Outstanding choice for truck owners demanding professional durability. The learning curve rewards users with a finish rivaling commercial applications.
5. Raptor Black Urethane Spray-On Truck Bed Liner Kit, Protective Paint With Spray Gun, For Tailgates & Trucks, Vehicle Undercoating, 6 Quart Kit

Overview: Raptor’s 6-Quart Black Urethane Kit scales up their professional coating system for extensive projects. This comprehensive package includes 4.5 liters of black base, hardener, and a dedicated spray gun, targeting serious truck owners, restorers, or commercial operators requiring maximum coverage and durability. The pre-colored black formula eliminates tinting steps.
What Makes It Stand Out: The substantial volume handles full-size truck beds plus undercoating in one purchase. The included spray gun, calibrated for Raptor materials, ensures optimal atomization and texture control. The proven 2K urethane chemistry maintains flexibility while resisting impacts, chemicals, and UV degradation. The black pigment is specifically engineered for consistent coverage without thinning.
Value for Money: At $219.99, the per-quart cost drops significantly compared to smaller kits, offering professional economics for large-scale applications. The integrated spray gun, valued at $30-$50 separately, enhances overall value. For comprehensive vehicle protection, this kit costs half of professional services while providing enough material for multiple applications or future touch-ups.
Strengths and Weaknesses: Advantages include generous volume, included application equipment, proven toughness, and time-saving pre-mixed color. Disadvantages center on the substantial upfront investment, requirement for adequate compressor capacity, and potential material waste on smaller projects.
Bottom Line: The definitive choice for comprehensive vehicle protection projects. Premium pricing reflects professional-grade results, equipment inclusion, and volume economics.
6. Raptor Black Urethane Spray-On Truck Bed Liner & Texture Coating, Protective Paint For Tailgates & Trucks, Vehicle Undercoating, 4 Quart Kit

Overview: The Raptor Black Urethane Spray-On Bed Liner Kit delivers professional-grade protection for truck beds and beyond. This comprehensive 4-quart system covers 6-8 foot beds with a 2K urethane coating that cures to form a durable, flexible barrier against the elements.
What Makes It Stand Out: Raptor’s 2K urethane formula offers superior impact resistance while remaining flexible enough to reduce road noise and vibration. The UV-resistant, tintable base won’t fade or crack under harsh sun exposure. Unlike basic DIY liners, this kit includes everything needed for application—four 750ml base bottles, 1-liter hardener, and detailed instructions. The coating bonds directly to OEM paint or self-etching primer, creating a waterproof, corrosion-proof shield that withstands heavy cargo, chemicals, and extreme temperatures.
Value for Money: At $139.99 ($1.04/fl oz), this kit costs a fraction of professional spray-in liners ($400-$800). The four-quart quantity provides complete coverage for most truck beds with material to spare for tailgates or touch-ups. When amortized over 5-7 years of protection, the investment proves exceptionally reasonable compared to annual bed mat replacements or rust repair bills.
Strengths and Weaknesses: Strengths include professional-grade durability, comprehensive kit contents, rapid one-hour recoat time, and versatile application (spray, roll, or brush). The UV resistance ensures long-term color retention. Weaknesses involve requiring proper surface preparation and adequate ventilation. The included spray gun may not match professional equipment quality, and the two-component mixing demands careful measurement.
Bottom Line: For truck owners seeking durable, long-lasting bed protection without professional installation costs, the Raptor kit delivers exceptional value. It’s ideal for DIY enthusiasts willing to invest time in proper prep work.
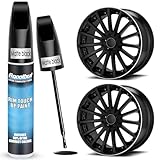
7. FOLLOWIN Black Rim Touch Up Paint for Cars, Black Wheel Paint Repair Kit, Automotive Rim Scratch Repair, Touch up Paint Kit with Brush, Repair Rim Curb Rash, Wheel Scratch, Surface Damage Quick and Easy 1OZ(30ml)

Overview: This compact 1-ounce rim touch-up kit offers an affordable solution for minor wheel cosmetic damage. Designed specifically for black wheels, it helps vehicle owners address curb rash and surface scratches without professional assistance.
What Makes It Stand Out: The integrated brush applicator eliminates need for separate tools, while included sandpaper ensures proper surface prep. The quick-drying formula allows multiple coats within minutes, making it possible to build up coverage on deeper scratches. Unlike paint pens that can leave uneven finishes, the brush provides better control for smooth application across curved rim surfaces.
Value for Money: At $15.26, this kit costs less than a single professional wheel repair ($100-$150) and dramatically less than wheel replacement. The small quantity is precisely what most DIYers need for occasional touch-ups, minimizing waste. For leased vehicles or those preparing for resale, this inexpensive fix can prevent costly turn-in penalties.
Strengths and Weaknesses: Strengths include extremely low cost, straightforward application process, fast drying time, and reusable formula when stored properly. The brush applicator offers superior control compared to pens. Weaknesses include limited quantity for multiple wheels, potential color matching issues with factory black finishes, and inability to repair structural damage or deep gouges. Results depend heavily on prep work quality.
Bottom Line: Perfect for budget-conscious drivers dealing with minor curb rash on black wheels. While not a substitute for professional refinishing, it effectively camouflages small scratches and protects against further corrosion.
8. Rust Bullet - Black Undercoating Undercarriage Truck Kit - 192 oz.

Overview: Rust Bullet’s comprehensive undercoating kit provides industrial-strength corrosion protection for truck undercarriages. This 192-ounce system applies directly over existing rust, creating a patented barrier that seals and protects metal surfaces from further deterioration.
What Makes It Stand Out: Holding two US patents, Rust Bullet’s formula chemically converts rust while forming a rubberized, UV-resistant shield that won’t crack or peel. Unlike traditional undercoatings that require complete rust removal, this product works as both a rust converter and preventative coating. The direct-to-rust application saves significant prep time and labor, making it practical for older vehicles where rust is already present.
Value for Money: At $359.99, this premium kit costs substantially more than basic rubberized undercoatings but delivers superior long-term protection. When compared to professional undercoating services ($500-$1,200) or potential frame repair costs, the investment proves justified for valuable trucks. The 192-ounce quantity covers complete undercarriages with enough material for wheel wells and frame rails.
Strengths and Weaknesses: Strengths include patent-protected technology, ability to apply over rust, exceptional UV resistance, and comprehensive coverage area. The two-in-one rust converter/coating eliminates multiple product purchases. Weaknesses include high upfront cost, strong odor during application, and requirement for thorough cleaning despite rust-tolerant formula. The large quantity may be excessive for smaller vehicles.
Bottom Line: For truck owners in rust-prone regions or those with existing undercarriage corrosion, Rust Bullet offers unparalleled protection. The premium price delivers premium results that can extend vehicle lifespan by years.
9. Air Paint Sprayer, Automotive Paint Air Paint Sprayer High Atomization 1.3mm Nozzle Pot Feed Air Spray Kit for Auto Primer Clear Top Coat Touch Up

Overview: This automotive paint sprayer offers professional-style atomization for DIY auto refinishing projects. Featuring a 1.3mm brass nozzle and aluminum alloy construction, it handles primers, base coats, and clear coats with material-saving efficiency.
What Makes It Stand Out: The brass nozzle provides superior wear resistance compared to cheaper steel alternatives, maintaining consistent spray patterns over time. Adjustable technology reduces overspray by up to 40%, translating directly into material cost savings. The pot-feed design offers better balance than siphon-feed guns, reducing user fatigue during extended painting sessions. Its ability to achieve factory-quality finishes makes it valuable for touch-ups and complete panels alike.
Value for Money: At $48.98, this gun costs significantly less than professional HVLP systems ($150-$400) while delivering comparable atomization quality. The claimed 25-40% material savings can recoup the purchase price within a single paint job. For hobbyists tackling multiple vehicles or panels, the return on investment is substantial compared to rattle-can alternatives that waste significant product.
Strengths and Weaknesses: Strengths include durable brass nozzle, lightweight aluminum body, excellent transfer efficiency, and versatility across coating types. The adjustable pattern control suits various applications. Weaknesses include requiring a compatible air compressor (minimum CFM not specified) and potential learning curve for novices. Quality control may vary at this price point, and replacement parts availability is uncertain.
Bottom Line: An excellent entry-level spray gun for serious DIY auto painters. The material savings and professional results justify the investment over disposable cans, provided you own an adequate compressor.
10. Air Paint Sprayer, Automotive Paint Air Paint Sprayer High Atomization 1.3mm Nozzle Pot Feed Air Spray Kit for Auto Primer Clear Top Coat Touch Up

Overview: This automotive spray gun delivers high-atomization performance for home auto painting projects. Constructed from polished aluminum alloy with a precision brass nozzle, it provides efficient material transfer for primers, base coats, and clear coats.
What Makes It Stand Out: The forged aluminum body undergoes multiple polishing and electroplating cycles, ensuring exceptional durability and corrosion resistance. Its 1.3mm brass nozzle creates finely atomized spray patterns that replicate factory finishes. The gun’s adjustable controls minimize material waste by reducing bounce-back and overspray, while the pot-feed configuration offers superior maneuverability compared to bulkier siphon-feed designs.
Value for Money: Priced at $48.96, this sprayer presents remarkable value against professional-grade equipment costing three to six times more. The potential 25-40% material savings quickly offset the initial investment, particularly for users painting multiple panels or vehicles. Compared to aerosol cans that waste up to 50% of product, this gun pays for itself through efficiency alone.
Strengths and Weaknesses: Strengths include robust aluminum construction, wear-resistant brass nozzle, excellent atomization quality, and broad coating compatibility. The ergonomic design reduces hand fatigue. Weaknesses include unspecified air compressor requirements and possible inconsistencies in manufacturing quality control. Beginners face a learning curve, and warranty support may be limited. The lack of included accessories requires separate purchase of cleaning supplies.
Bottom Line: A cost-effective solution for DIY enthusiasts seeking professional paint finishes. The durable construction and material efficiency make it a smart purchase for anyone with a suitable compressor and patience to master proper technique.
Understanding Undercoating and Why It Matters
Undercoating is a specialized protective coating applied to a vehicle’s underside, creating a barrier between raw metal and the corrosive elements it encounters daily. Unlike the paint on your car’s body panels, undercoating must withstand constant abrasion from road debris, temperature extremes, and prolonged exposure to water and chemicals. Modern formulations have evolved far beyond simple tar-based sprays, incorporating advanced polymers and rust inhibitors that actively combat oxidation.
The undercarriage contains some of your vehicle’s most expensive components—fuel lines, brake lines, floor pans, and structural frame members. When rust compromises these areas, repair costs quickly escalate into thousands of dollars. A quality undercoating touch-up kit allows you to maintain this protection proactively, addressing chips, scratches, and thin spots before they become gateways for corrosion.
Why Touch-Up Kits Are Essential for Vehicle Longevity
Factory undercoating applications provide excellent initial protection, but they’re not permanent. Over time, the constant barrage of road debris creates micro-abrasions, while flexing and vibration cause cracking and separation. Touch-up kits bridge this maintenance gap, allowing you to perform spot repairs and full reapplication as needed.
The Science Behind Rust Formation
Rust is an electrochemical process requiring three elements: iron, oxygen, and water. Your vehicle’s steel components supply the iron, while atmospheric oxygen and road moisture complete the equation. Once rust begins, it expands to nearly six times the original steel volume, creating pressure that cracks surrounding paint and undercoating, accelerating the decay cycle. Effective undercoating disrupts this process by either repelling water or encapsulating metal surfaces with impermeable barriers.
How Undercoating Protects Your Investment
Quality undercoating provides multi-layered defense. First, it creates a physical barrier that blocks water and oxygen. Second, many formulations contain rust inhibitors that chemically neutralize oxidation at the molecular level. Third, modern undercoatings offer sound-dampening properties, reducing road noise and creating a quieter cabin experience. This triple-action approach transforms your undercarriage from a rust magnet into a fortified zone.
Types of Undercoating Materials Explained
Not all undercoating formulations are created equal. Each type offers distinct advantages and trade-offs that impact durability, application complexity, and cost-effectiveness.
Rubberized Undercoating
Rubberized formulations create a flexible, impact-resistant membrane that excels at deadening sound and absorbing vibration. These products typically dry to a textured black finish and remain somewhat pliable, allowing them to flex with body panels without cracking. However, this flexibility comes at a cost—rubberized coatings can trap moisture if applied over existing rust, potentially accelerating hidden corrosion. They perform best when applied to properly prepared, rust-free surfaces.
Asphalt-Based Undercoating
The traditional workhorse of undercoating, asphalt-based products offer exceptional water resistance and durability at an affordable price point. These thick, tar-like coatings create a rock-hard barrier that withstands severe abrasion. The downside? Asphalt coatings become brittle in extreme cold and can crack over time, especially on flexible components. They’re also notoriously difficult to remove if you need to perform repairs underneath.
Wax-Based Undercoating
Wax-based formulations, often called “cosmoline” or “paraffin” undercoatings, penetrate seams and crevices exceptionally well. They remain semi-fluid, allowing them to self-heal minor scratches and flow into hidden rust-prone areas. This creeping ability makes them ideal for touch-up work, though they require more frequent reapplication than rubberized or asphalt options. Wax-based products are particularly valuable in coastal regions where salt air attacks every exposed surface.
Polyurethane Undercoating
The premium choice for serious enthusiasts, polyurethane undercoating forms a tough, chemical-resistant barrier that bonds tenaciously to metal. These two-part systems deliver professional-grade protection that can last five to seven years with proper maintenance. Polyurethane excels in harsh environments but demands meticulous surface preparation and precise mixing. The higher cost and complexity make it best suited for vehicles kept long-term or operated in extreme conditions.
Key Features to Evaluate in Touch-Up Kits
When comparing undercoating touch-up kits, several critical factors determine whether you’re getting a value-packed solution or a disappointing waste of effort.
Coverage Area and Volume
Manufacturers typically specify coverage in square feet per can or kit. A standard sedan undercarriage requires approximately 1.5 to 2 quarts for complete coverage, while trucks and SUVs may need 3 quarts or more. Touch-up kits should provide enough material for multiple spot treatments over several years. Be wary of kits promising unrealistic coverage—quality undercoating requires adequate film thickness to be effective.
Application Method Compatibility
Some kits include aerosol cans for convenience, while others provide bulk material for use with spray guns. Aerosols excel for small touch-ups but struggle to achieve uniform thickness over large areas. Bulk formulations offer better control and economy but require equipment investment. The best touch-up kits include multiple application options or clearly specify compatible tools.
Drying Time and Curing Process
Fast-drying formulations allow quicker project completion but may sacrifice penetration into seams. Slow-curing products demand patience but deliver superior long-term protection. Consider your climate and available workspace—high-humidity environments extend curing times dramatically. Some kits include accelerators or require specific temperature ranges for proper curing.
VOC Content and Environmental Impact
Volatile Organic Compounds (VOCs) affect both environmental footprint and personal safety during application. Low-VOC formulations reduce harmful emissions and often qualify for use in regulated areas. However, they may require longer cure times or specific application conditions. Check local regulations before purchasing, especially in California or the Northeast where VOC restrictions are stringent.
Application Tools and Accessories
Professional results depend as much on proper tools as on the coating itself. Comprehensive touch-up kits should include or recommend specific accessories for each application stage.
Spray Guns and Nozzles
For bulk undercoating, a dedicated undercoating spray gun with a large nozzle (1.8mm or greater) prevents clogging and delivers proper material flow. Look for guns with adjustable fan patterns to control overspray and reach tight spaces. Some kits include disposable wands with 360-degree spray tips for accessing frame rails and enclosed cavities.
Brushes and Rollers
Natural bristle brushes work best for cutting in edges and applying material to heavily corroded areas where spray application proves ineffective. Foam rollers provide quick coverage on flat surfaces like floor pans but struggle with complex geometries. The ideal touch-up kit includes specialized seam brushes designed to work material into pinch welds and lap joints.
Surface Prep Tools
Effective undercoating starts with clean metal. Quality kits should specify or include wire brushes, abrasive pads, and degreasing solvents. Some advanced kits contain phosphoric acid-based rust converters that chemically transform rust into a stable, paintable surface. Power tools like angle grinders with wire wheels dramatically speed preparation but require skill to avoid damaging thin-gauge metal.
Surface Preparation: The Foundation of Success
Even the most expensive undercoating fails when applied over contamination. Proper preparation separates lasting protection from peeling disappointment.
Cleaning Requirements
Begin with aggressive pressure washing, focusing on wheel wells and frame rails. Remove all mud, oil, and previous loose undercoating. Follow with a degreasing solvent applied liberally to dissolve road tar and petroleum residues. Many professionals use steam cleaners for final preparation, as heat opens metal pores and evaporates hidden moisture. Allow the undercarriage to dry completely—preferably 24 hours in a heated, ventilated space.
Rust Treatment Protocols
Never apply undercoating over active rust. Use a wire brush or power tool to remove loose scale until you reach sound metal. For surface rust, apply a rust converter that chemically neutralizes oxidation. Deep pitting requires more aggressive treatment—consider using a rust encapsulator that seals remaining rust while preventing further spread. Remember, undercoating hides rust but doesn’t stop it; proper treatment is non-negotiable.
Masking and Protection Strategies
Protect components that shouldn’t be coated: exhaust systems (which burn off coating and create fumes), rubber bushings (which can degrade), and drivetrain components like U-joints and CV axles. Use heavy-duty aluminum foil for complex shapes and high-temperature masking tape for edges. Remove wheels for complete wheel well access, and mask brake components with plastic bags secured by zip ties.
Professional Application Techniques
Achieving professional results requires understanding environmental factors and mastering application strategies that maximize protection.
Temperature and Humidity Considerations
Ideal application occurs between 65-85°F with humidity below 60%. Cold temperatures thicken material, preventing proper flow and adhesion. Excessive heat causes material to skin over before penetrating seams. In humid conditions, moisture trapped under the coating triggers rust formation. If working in a garage, use space heaters and dehumidifiers to create optimal conditions—this investment pays dividends in coating longevity.
Layering Strategies for Maximum Protection
Professional applications use multiple thin layers rather than one thick coat. Apply the first layer as a “tack coat” at 50% coverage, allowing it to become tacky before subsequent applications. Build to a final thickness of 3-5 mils (about the thickness of a garbage bag). For extreme environments, consider a “sandwich” approach: rust inhibitor, asphalt base coat, rubberized mid-layer, and wax topcoat for comprehensive protection.
Hard-to-Reach Areas and Problem Spots
Frame rails, rocker panels, and inner fenders require special attention. Use extension wands with 360-degree spray tips for enclosed cavities. Apply extra material to the backside of wheel wells where gravel impact is severe. Pay particular attention to seam welds and spot welds—these areas trap moisture and rust from the inside out. A borescope camera helps inspect these hidden zones before and after application.
Common Application Mistakes to Avoid
Learning from others’ errors saves you time, money, and frustration. These pitfalls trap even experienced DIYers.
Overapplication Issues
Thick, gloppy undercoating looks protective but cracks as it cures, creating water channels directly to the metal. Excess material also adds unnecessary weight and can interfere with component operation. Remember: undercoating works best as a thin, uniform membrane. If you can see texture thicker than orange peel, you’re applying too much material.
Inadequate Curing Time
Impatience destroys projects. Driving your vehicle before full cure allows road debris to embed in soft coating, creating permanent imperfections. Most products require 24-48 hours before light use and 7 days for full cure. During this period, avoid water exposure and extreme temperatures. Mark your calendar and resist the urge to rush—proper curing determines ultimate durability.
Skipping Surface Prep
The temptation to spray over existing undercoating or light surface rust is strong, especially when time is limited. This shortcut guarantees failure. Moisture trapped under new coating accelerates rust, and poor adhesion leads to peeling. Always perform at minimum a wire brush cleaning and solvent wipe. Your future self will thank you when the coating remains intact five years later.
Maintenance and Inspection Schedule
Undercoating isn’t a “set and forget” solution. Regular inspection ensures continued protection and identifies problems before they escalate.
When to Touch Up Your Undercoating
Inspect your undercarriage quarterly, focusing on pre-winter and post-winter checks. Look for chips in high-impact areas like wheel wells and leading edges. Perform touch-ups immediately when damage is visible—waiting until “next season” allows rust to establish a foothold. After any off-road excursion or encounter with severe road debris, conduct a quick visual inspection.
Signs of Undercoating Failure
Blistering or bubbling indicates trapped moisture and active rust underneath. Cracking or flapping edges show adhesion failure, often from improper surface prep. White or gray powdery residue suggests chemical breakdown from road salt exposure. Soft, tacky areas mean incomplete curing or contamination. Any of these signs demand immediate attention—remove the failing coating, treat underlying rust, and reapply.
Reapplication Timelines
In moderate climates with minimal salt use, quality undercoating lasts 3-5 years. Severe winter regions with heavy salt application may require annual touch-ups and complete reapplication every 2-3 years. Wax-based coatings need more frequent attention—typically every 12-18 months. Document your application dates and set calendar reminders to maintain consistent protection.
Cost Analysis and Value Proposition
Understanding the economic equation helps justify the time investment and guides purchasing decisions.
Price vs. Performance Metrics
Budget aerosol kits cost $15-30 per can but require 4-6 cans for complete coverage and often need reapplication annually. Mid-range rubberized kits run $50-100 and provide 2-3 years of protection. Premium polyurethane systems cost $150-300 but deliver 5-7 year durability. Calculate cost per year of protection rather than upfront expense—a $200 kit lasting six years costs less than three $30 cans lasting one year each.
Long-Term Savings Calculations
Professional undercoating services charge $150-500 depending on vehicle size and service level. A quality DIY kit costs a fraction while delivering comparable protection. More importantly, effective undercoating prevents rust repairs that easily exceed $1,000 for floor pan replacement or $3,000+ for frame section repairs. When viewed as insurance against catastrophic rust damage, even premium kits deliver exceptional ROI.
Professional vs. DIY: Making the Right Choice
While DIY undercoating saves money, professional services offer advantages worth considering for certain situations.
Skill Level Assessment
Be honest about your capabilities. Proper undercoating requires comfort working underneath vehicles, using power tools, and following chemical safety protocols. If you lack a suitable workspace, proper ventilation, or the patience for meticulous preparation, professional application may be wiser. However, touch-up work is inherently simpler than full undercoating—perfect for building skills and confidence.
Equipment Investment Considerations
DIY undercoating requires basic equipment: jack stands, pressure washer, angle grinder, spray gun, and safety gear. This represents a $200-400 initial investment if you don’t already own these tools. For a single vehicle, professional service might be more economical. For multiple vehicles or ongoing maintenance, equipment costs amortize quickly. Many enthusiasts split the difference—professional initial application with DIY touch-ups thereafter.
Seasonal and Climate Factors
Your local environment dictates undercoating strategy more than any other factor. One-size-fits-all approaches guarantee suboptimal protection.
Winter Road Salt Challenges
Salt brine, increasingly used by transportation departments, penetrates smaller crevices than rock salt and remains active at lower temperatures. This liquid salt finds every pinhole in your undercoating. In salt-heavy regions, apply a wax-based topcoat annually before winter. This sacrificial layer absorbs salt impact, and you can pressure wash it away in spring, taking contaminants with it.
Coastal Environment Considerations
Salt air attacks undercarriages even when vehicles aren’t driven. The combination of humidity and airborne salt creates a perfect rust storm. In coastal areas, prioritize undercoatings with salt-fog test ratings and consider more frequent applications. Elevate inspection frequency to monthly during summer when salt air concentration peaks. Some coastal enthusiasts maintain a light oil coating between major undercoating applications for continuous protection.
High-Humidity Region Protocols
Humidity alone drives rust formation, even without salt. In the Southeast and Pacific Northwest, focus on undercoatings with excellent water displacement properties. Ensure your garage or storage area has adequate dehumidification—moisture rising from damp concrete floors attacks undercarriages from below. Consider installing a vapor barrier under your parking spot for long-term vehicle storage.
Warranty and Insurance Implications
Your undercoating decisions can affect manufacturer warranties and insurance coverage in ways most owners never consider.
Manufacturer Warranty Concerns
Some manufacturers stipulate that aftermarket undercoating applied within the corrosion warranty period (typically 5-7 years) must be performed by certified professionals using approved materials. DIY application could theoretically void rust perforation coverage. Always review your warranty documentation before applying any coating. Document your process with photos and retain product receipts to demonstrate professional-grade application if warranty issues arise.
Insurance Policy Considerations
Aftermarket undercoating is generally considered a maintenance item, not a modification, so it won’t affect premiums. However, if undercoating failure contributes to rust damage, insurers may deny comprehensive claims arguing improper maintenance. Professional application with documentation strengthens your position. Some specialty insurers offer discounts for documented rust prevention programs on classic or collector vehicles.
Environmental and Safety Considerations
Undercoating involves chemicals and processes requiring responsible handling for personal and environmental safety.
Proper Ventilation Requirements
Undercoating solvents release harmful vapors that accumulate in enclosed spaces. Always work with cross-ventilation using exhaust fans to create negative pressure. For garage work, open doors on both ends and use a respirator with organic vapor cartridges—not just a dust mask. Consider timing applications for days with light breeze to naturally ventilate your workspace. Never work in basements or attached garages without professional ventilation equipment.
Disposal Best Practices
Leftover undercoating, solvent-soaked rags, and aerosol cans require proper disposal. Cured undercoating is generally landfill-safe, but liquid material is considered hazardous waste in many jurisdictions. Contact your local waste management authority for guidance. Never pour solvents down drains or onto soil. Store rags in sealed metal containers to prevent spontaneous combustion from solvent oxidation.
Personal Protective Equipment
Minimum PPE includes chemical-resistant gloves, safety glasses, and a respirator with organic vapor cartridges. Coveralls protect skin from overspray and simplify cleanup. A disposable paint suit prevents contaminating personal clothing. For overhead work, wear a hat or hood to protect hair and scalp. Keep a bottle of baby oil nearby—it effectively removes undercoating overspray from skin without harsh scrubbing.
Frequently Asked Questions
How long does undercoating touch-up typically last before needing reapplication?
Touch-up applications generally last 2-4 years in moderate climates, but severe winter regions with heavy salt use may require annual attention. The key is regular inspection—touch up immediately when you notice chips or wear rather than waiting for a set schedule. Quality of surface preparation and application technique dramatically impact longevity.
Can I apply new undercoating over existing factory coating?
Yes, but success depends on the factory coating’s condition. Lightly scuff sound, intact factory undercoating with abrasive pads to promote adhesion. Never apply over loose, flaking, or contaminated coating. If the factory coating is failing, remove it completely in affected areas before touch-up. Test adhesion in an inconspicuous spot first.
What’s the best temperature for applying undercoating touch-up?
The sweet spot is 70-80°F with low humidity. Most products specify a range of 50-90°F, but performance degrades at extremes. Cold makes material thick and prone to runs; heat causes it to skin over before penetrating seams. If you must work in marginal temperatures, use products specifically formulated for those conditions and extend cure times accordingly.
How do I know if my vehicle needs undercoating touch-up or complete reapplication?
If factory coating remains intact over 70% of the undercarriage with isolated wear spots, touch-up is appropriate. Widespread cracking, peeling, or thinning across multiple areas indicates complete reapplication is needed. Perform a “scrape test”—if a putty knife easily removes coating from multiple locations, the bond has failed systemically.
Are aerosol undercoating touch-up kits as effective as bulk formulations?
Aerosols excel for small repairs and hard-to-reach spots but struggle to achieve uniform film thickness over large areas. Bulk formulations applied with proper spray equipment deliver more consistent coverage and better economy. For comprehensive touch-up work, consider hybrid approach: bulk material for broad areas, aerosols for detailing and cavities.
How do I remove old undercoating before applying touch-up material?
For small areas, use a wire brush or oscillating tool with scraper attachment. Large-scale removal demands an angle grinder with wire wheel or specialized undercoating removal discs. Heat guns soften stubborn material but require caution near fuel and brake lines. Always finish with a solvent wipe to remove residue. This is messy, time-consuming work—budget several hours for proper removal on a typical sedan.
Can undercoating touch-up kits be used on other vehicle parts?
Absolutely. These coatings work excellently on inner door panels, trunk floors, and under-hood areas. They’re particularly valuable for classic cars where factory sound deadener has deteriorated. Avoid using them on exhaust components, rubber parts, or anywhere near brake friction surfaces. Some enthusiasts even use leftover material on trailer frames and outdoor equipment.
How do I handle undercoating that gets on unintended surfaces?
Act quickly before material cures. For overspray on paint, use a clay bar lubricated with detailing spray. On glass, a razor blade scraper removes cured material easily. For rubber components, apply a light coating of silicone spray before undercoating—this prevents adhesion and allows easy cleanup. Keep mineral spirits and rags handy during application for immediate wipe-up of mistakes.
Will undercoating touch-up affect my vehicle’s noise levels?
Quality undercoating provides noticeable sound dampening, reducing road noise by 2-4 decibels in many cases. Touch-up applications restore this benefit in worn areas. Rubberized and asphalt-based formulations offer the best sound deadening. If noise reduction is a primary goal, focus on wheel wells and floor pans where resonance is most pronounced.
How do I store leftover undercoating for future touch-ups?
For bulk materials, transfer to smaller containers to minimize air exposure. Store in a climate-controlled environment between 60-80°F. Aerosol cans store best upright in cool, dry locations. Always label containers with purchase date—most undercoatings have a 2-3 year shelf life unopened, but this drops to 6-12 months once opened. Before reuse, test spray pattern and consistency on cardboard to ensure material hasn’t separated or thickened excessively.