Transforming your vehicle’s appearance doesn’t require an expensive paint job or professional shop time. With the right materials, tools, and patience, you can achieve stunning results in your own garage. DIY car wrapping has exploded in popularity among automotive enthusiasts and budget-conscious car owners alike, offering an accessible way to protect your paint, express your personality, and even increase resale value.
But here’s the truth: not all car wraps are created equal, and success depends far more on preparation and technique than on simply buying a roll of vinyl. This comprehensive guide cuts through the marketing hype to give you the expert knowledge you need to select the perfect wrap material for your specific project, avoid costly mistakes, and achieve professional-looking results that will turn heads for years to come.
Top 10 Car Wraps
Detailed Product Reviews
1. VViViD+ Ultra Gloss Premium Vinyl Car Wrap Film (1ft x 5ft, Gloss Piano Black)

Overview: The VViViD+ Ultra Gloss vinyl wrap delivers premium paint-replacement technology in a compact 1ft x 5ft size. This piano black film produces an almost mirror-like finish through advanced polymer engineering, designed for automotive accents, trim pieces, and small panel coverage. The result of extensive R&D, it offers DIY installers and professionals a factory-quality appearance without the paint shop hassle. What Makes It Stand Out: The proprietary Nano Air-Release Technology creates a glass-smooth surface by utilizing micro air-release channels that eliminate the texture irregularities common in conventional wraps. The revolutionary stretchable protective cap remains intact throughout installation, preventing scratches and scuffs until the final reveal—unlike other films requiring premature removal. This combination achieves a depth and clarity virtually indistinguishable from automotive paint. Value for Money: At $12.78 for five square feet, this wrap makes professional-grade results accessible for small projects. Traditional paint jobs cost hundreds or thousands, while cheaper vinyls lack the nano air-release system and protective cap, often resulting in inferior finishes and material waste. For accent work, the technology premium is justified. Strengths and Weaknesses: Strengths include stunning gloss realism, bubble-free installation, protective film preventing handling damage, and chemical-free application. Weaknesses are the limited size restricting project scope, piano black’s tendency to highlight imperfections, and the moderate learning curve for beginners. Bottom Line: Perfect for enthusiasts seeking showroom-quality accents without professional paint costs. While the size limits you to smaller projects, the finish quality and innovative features make it a worthwhile investment for those demanding premium results.
2. Crash Wrap, 36 inch x 100 feet, Clear Collision Wrap for Damaged Vehicles & Car Windows, Removes Cleanly, Made in America

Overview: This collision wrap provides critical temporary protection for vehicles after accidents or glass damage. Measuring 36 inches wide and 100 feet long, this 3.5-mil thick clear film acts as a self-adhesive barrier against weather and debris. It’s engineered for emergency use—covering cracked windshields, broken windows, or sprung doors—preventing water ingress and further damage during transport or while awaiting repairs. What Makes It Stand Out: The American-made construction ensures consistent quality using 100% domestic materials, unlike outsourced alternatives. Its impressive durability resists tearing and puncturing even in extreme conditions, maintaining integrity during towing or driving. Most notably, the adhesive removes completely cleanly without leaving residue, preserving your vehicle’s finish—a critical feature often lacking in cheaper emergency coverings. Value for Money: At $39.95 for 300 square feet, this translates to roughly 13 cents per square foot—exceptional value for emergency protection. Compared to tarps and duct tape that can damage paint or leave residue, this professionally engineered solution prevents costly secondary damage. A single prevented water damage incident could save thousands in interior repairs, making this cheap insurance. Strengths and Weaknesses: Strengths include superior 3.5-mil thickness providing real protection, clean residue-free removal, excellent weather resistance, and versatile application for various damage types. Weaknesses are its temporary nature (not a permanent fix), the large roll requiring storage space, and the utilitarian appearance that may not suit all situations. Bottom Line: An essential addition to any tow truck, body shop, or prepared driver’s emergency kit. The American-made quality and clean removal make it worth the premium over makeshift solutions. Store one in your garage—you’ll be grateful when you need it.
3. Gomake Vehicle Vinyl Wrap Tool Kit Window Tinting Tool Include 4 Inch Felt Squeegee, Retractable 9mm Utility Knife and Blades, Zippy Vinyl Cutter and Mini Go Corner Squeegee for Car Wrapping
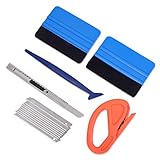
Overview: This comprehensive tool kit equips both professional installers and DIY enthusiasts with essential implements for vinyl wrapping, window tinting, and decal application. The set includes a 4-inch felt squeegee, specialized blue detail squeegee, retractable utility knife with ten blades, zippy vinyl cutter, and mini corner squeegee—everything needed for bubble-free, professional installations. What Makes It Stand Out: The safety-centric design distinguishes this kit. The vinyl cutter encases the razor blade in a plastic holder, preventing dangerous slips during trimming. The felt-edged squeegees minimize scratch risk while effectively removing bubbles. The inclusion of both a standard and detail squeegee demonstrates thoughtful design, addressing both broad surfaces and intricate recessed areas like bumpers and emblems. Value for Money: At $7.99 for five professional tools, this kit represents remarkable value. Purchasing these items individually would cost $20-30, making this an economical choice for beginners or as a backup set for professionals. The retractable knife with ten replaceable blades ensures you always have a sharp cutting edge, reducing material waste from jagged cuts. Strengths and Weaknesses: Strengths include the complete all-in-one solution, safety features protecting users and vehicle surfaces, versatility across multiple applications, and the always-sharp blade system. Weaknesses are the basic build quality not matching high-end professional tools, blades that dull relatively quickly on large projects, and the squeegee felt that may wear with heavy use. Bottom Line: An exceptional starter kit for DIY vinyl wrapping and tinting projects. While professionals may eventually upgrade to premium brands, this set provides everything needed to achieve quality results at a price that can’t be beaten. Perfect for occasional use and learning the craft.
4. VViViD+ Ultra Gloss Premium Vinyl Car Wrap Film (1.5ft x 5ft, Gloss Piano Black)
Overview: This 1.5ft x 5ft version of VViViD’s Ultra Gloss vinyl provides 50% more coverage than its smaller counterpart while maintaining the same stunning piano black finish. Engineered as a premium paint replacement, this film delivers an almost mirror-like gloss through advanced polymer technology. The extra six inches of width makes it practical for larger trim pieces, mirror caps, or multiple smaller accents without seams. What Makes It Stand Out: The identical Ultra Gloss technology features the proprietary nano air-release system that creates a glass-smooth surface unmatched by conventional wraps. The stretchable protective cap remains a standout innovation, staying intact during installation to prevent scratches and scuffs until the final reveal. This combination of technologies produces a finish so realistic it rivals factory paint, making it ideal for visible accent work. Value for Money: Priced at $16.98, the cost per square foot actually improves compared to the 1ft version, offering better value for projects requiring more material. While the upfront cost is higher, the reduced need for seams on wider pieces and ability to complete larger accents makes it more economical for most applications. The technology premium remains justified when compared to cheaper wraps that can’t achieve the same depth of finish. Strengths and Weaknesses: Strengths include the same stunning gloss and realism, expanded coverage area, bubble-free installation, and protective film system. Weaknesses remain the limited overall size for full panels, piano black’s unforgiving nature showing flaws, and the moderate price increase that may deter those with minimal needs. Bottom Line: The sweet spot for VViViD’s Ultra Gloss line—offering enhanced coverage while maintaining the same exceptional finish quality. For most accent projects, this size provides the flexibility you need without excessive waste. The improved value makes it the recommended choice over the 1ft version.
5. VViViD+ Forged Composite Carbon Vinyl Wrap Roll (1ft x 5ft, Black)
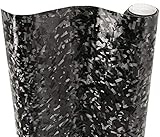
Overview: This forged composite carbon fiber vinyl delivers an aggressive, unique aesthetic distinct from traditional carbon weave patterns. The 1ft x 5ft roll features VViViD’s Hybrid-Elastic PVC formula, creating a film that combines enhanced stretchability with self-healing properties for minor scratches. Designed for accents, partial wraps, or full vehicle applications when purchased in larger quantities, this wrap offers a motorsport-inspired look. What Makes It Stand Out: The forged composite pattern provides a distinctive appearance unavailable in most carbon wraps, mimicking the chopped fiber look seen in high-performance automotive components. The nano air-release adhesive with its self-collapsing diamond pattern significantly reduces lifting and bubbling compared to standard carbon vinyls. Combined with low-tack, heat-activated adhesive, repositioning during installation is effortless, ensuring perfect alignment of the unique pattern. Value for Money: At $11.78, this premium carbon wrap costs less than many conventional carbon films while offering superior technology. Real forged carbon components cost thousands, making this an accessible way to achieve the aesthetic. The self-healing properties add long-term value by maintaining appearance, while the air-release system reduces waste from installation errors. Strengths and Weaknesses: Strengths include the unique forged composite appearance, durable self-healing finish, excellent stretch for complex curves, and forgiving adhesive system. Weaknesses are the niche aesthetic that may not suit all vehicles, pattern matching challenges on larger projects, and the 1ft width limiting seamless coverage on wider pieces. Bottom Line: Ideal for enthusiasts seeking a race-inspired aesthetic beyond typical carbon weave. The advanced features and distinctive finish make it perfect for mirror caps, interior trim, or strategic exterior accents. For those wanting authentic motorsport style on a budget, this delivers exceptional results.
6. VViViD Matte Black Vinyl Wrap Adhesive Film Air Release Decal Sheet (1ft x 5ft)

Overview: The VViViD Matte Black Vinyl Wrap offers DIY enthusiasts an accessible entry point into vehicle customization. Measuring 1ft by 5ft, this decal sheet provides sufficient material for small accent pieces, mirrors, or interior trim. Engineered specifically for non-professionals, it delivers a durable, lightweight alternative to traditional paint with a sophisticated matte finish that suppresses reflections while maintaining deep color saturation.
What Makes It Stand Out: This film’s acrylic-based adhesive incorporates VViViD’s proprietary Air Release and Heat Fuse technologies, virtually eliminating bubbles and creases during installation. The material exhibits impressive conformability, stretching to complex curves without discoloration or visible stretch marks. Its 5-7 year outdoor lifespan demonstrates remarkable resilience for an entry-level product, while the solvent-based, repositionable adhesive allows for precise placement before permanent bonding.
Value for Money: At $11.69 for five square feet, this wrap positions itself as an economical choice for beginners testing vinyl application or completing small projects. While premium wraps can exceed $3 per square foot, this offering provides professional-grade features at approximately $2.34 per square foot—delivering genuine value without compromising essential functionality.
Strengths and Weaknesses: Strengths include exceptional air-release technology, impressive stretchability, straightforward application without additional chemicals, and genuine outdoor durability. The matte finish effectively hides minor imperfections. Weaknesses involve the modest dimensions limiting project scope, potential adhesion challenges on compound curves without 3M primer (sold separately), and matte’s tendency to show fingerprints and require specialized cleaning.
Bottom Line: This VViViD matte wrap excels for DIY newcomers tackling modest projects. Its forgiving installation characteristics and honest durability make it an intelligent starting point before committing to larger, more expensive wraps. For accent work and learning the craft, it’s highly recommended.
7. VViViD+ Ultra Gloss Premium Vinyl Car Wrap Film (6ft x 5ft, Gloss Piano Black)

Overview: VViViD+ Ultra Gloss represents the pinnacle of vinyl wrap technology, delivering a mirror-like Piano Black finish that rivals factory paint. Spanning 6ft by 5ft, this premium film provides substantial coverage for hoods, roofs, or complete vehicle sections. The result of extensive R&D, it targets enthusiasts refusing to compromise on aesthetics, offering a transformative, wet-looking gloss that conventional wraps cannot replicate.
What Makes It Stand Out: Revolutionary nano air-release technology employs micro-channels so fine they don’t compromise surface smoothness, creating an almost glass-like finish. The unique stretchable protective cap remains intact during installation, preventing scratches and contamination until final reveal. Every component, from polymer formulation to adhesive chemistry, has been re-engineered to maximize reflectivity and depth, producing a finish virtually indistinguishable from multi-stage paint.
Value for Money: At $59.99 for thirty square feet ($2 per square foot), this premium wrap commands a higher investment but delivers proportionate returns. Competitive high-gloss films often exceed $3-4 per square foot, making this an attractive proposition for serious enthusiasts. The included protective cap and advanced technology justify the premium over standard gloss options.
Strengths and Weaknesses: Strengths include breathtaking ultra-gloss clarity, innovative protective cap system, superior conformability, and bubble-free application. The nano air-release technology genuinely differentiates it from competitors. Weaknesses center on the significant price jump from entry-level products, the skill required to maximize its potential, and potential waste on smaller projects where its capabilities remain underutilized.
Bottom Line: For those demanding show-car quality, VViViD+ Ultra Gloss is unmatched. The investment pays dividends in stunning visual impact and professional results. Ideal for experienced wrappers or ambitious first-timers committed to perfection on significant projects.
8. Auto Accessories 5D Glossy Carbon Fiber Wrap Vinyl Film Car Interior Wrap Stickers, Car DIY Interior Exterior (12 * 60inch) (US Stock)

Overview: This budget-conscious carbon fiber vinyl targets DIYers seeking aggressive aesthetics without financial commitment. Measuring 12 by 60 inches, the “5D” glossy film mimics carbon fiber weave for interior and exterior applications. Marketed for motorsport aesthetics and fleet marketing, it provides an economical alternative to genuine carbon fiber or paint, shipping from US stock for rapid delivery.
What Makes It Stand Out: The hyper-realistic 5D carbon fiber pattern delivers visual depth exceeding traditional 3D or 4D films at a remarkably low price point. Explicit DIY focus includes detailed application instructions utilizing household tools like hair dryers and scrapers. The eco-friendly composition appeals to environmentally conscious modifiers, while US stock availability ensures quick project turnaround without international shipping delays.
Value for Money: At $9.99 for five square feet, this is the most economical option in the comparison—under $2 per square foot. It enables experimentation and learning without significant financial risk. While premium carbon fiber wraps can cost $15-25 for similar dimensions, this offers accessible entry into textured finishes, making it ideal for inconspicuous testing or temporary applications.
Strengths and Weaknesses: Strengths include unbeatable price, realistic carbon texture, comprehensive application guidance, and versatile interior/exterior suitability. US stock ensures prompt delivery. Weaknesses involve questionable long-term durability, potential for lifting without proper edge sealing, tendency to curl requiring heat application, and unclear warranty support. The “5D” marketing lacks technical definition, raising quality questions.
Bottom Line: Perfect for interior accents and experimental wrapping on a shoestring budget. Manage expectations regarding longevity and professional finish. Excellent for practicing technique before upgrading to premium materials, but consider alternatives for exterior, long-term applications where durability matters.
9. ColorFusion PPF by VViViD, Gloss Cosmic Blue Dry Apply PPF Vinyl Car Wrap Roll 1ft x 5ft
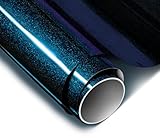
Overview: ColorFusion PPF revolutionizes vehicle customization by merging paint protection film durability with vibrant color wrap aesthetics. This Cosmic Blue film measures 1ft by 5ft, offering a hybrid solution that preserves original paint while delivering eye-catching color. Engineered for both dry and wet application methods, it provides flexibility for various surfaces and installer skill levels, representing the most advanced automotive wrap in VViViD’s lineup.
What Makes It Stand Out: Exceptional self-healing properties surpass standard wraps—minor scratches disappear with gentle heat application. The hybrid application methodology allows wet application for large flat areas, minimizing bubbles and stretch marks, while dry application suits complex curves. Color is embedded deep within the film, ensuring fade resistance and vibrant longevity. The paint-safe, heat-activated adhesive prevents surface damage, a critical advantage over corrosive alternatives.
Value for Money: At $18.48 for five square feet ($3.70 per square foot), ColorFusion commands premium pricing but justifies it through PPF-level protection. Standard colored PPF can exceed $5-7 per square foot, making this a cost-effective hybrid. For those prioritizing paint preservation alongside aesthetics, the value proposition is compelling despite higher initial cost.
Strengths and Weaknesses: Strengths include industry-leading self-healing, versatile application methods, deep color saturation, and genuinely paint-safe adhesive. The PPF foundation provides superior impact resistance. Weaknesses involve the premium price point, smaller coverage area limiting project scope, and wet application’s learning curve requiring careful solution management. The adhesive’s heat-activation demands patience during installation.
Bottom Line: For enthusiasts wanting protection and color in one solution, ColorFusion is exceptional. The self-healing capability alone warrants the investment. Best suited for high-impact areas like hoods, mirrors, and bumpers where protection matters as much as appearance. Highly recommended for long-term, high-value applications.
10. VViViD+ Matte Demon Black Premium Vinyl Wrap Film (1ft x 5ft)

Overview: VViViD+ Matte Demon Black elevates the standard matte wrap with premium features typically reserved for high-end films. This 1ft by 5ft film provides a deep, aggressive matte finish with self-healing capabilities and a remarkable 10-year lifespan claim. Engineered for DIYers and professional installers alike, it offers advanced protection and aesthetics in a manageable size for targeted applications or practice projects.
What Makes It Stand Out: Self-healing technology allows minor abrasions to disappear, a rare feature in matte wraps that typically show damage permanently. The safe, non-corrosive acrylic adhesive ensures application and removal without damaging factory clear coats—critical for leased vehicles or future resale. Air-release membrane guarantees bubble-free application without liquids, while the 10-year durability claim significantly exceeds industry standard 5-7 year expectations for matte films.
Value for Money: At $11.98 for five square feet, this premium matte wrap costs nearly identical to standard matte options but includes advanced features. Self-healing technology and extended lifespan provide exceptional long-term value, reducing replacement frequency. When factoring in the non-corrosive adhesive’s safety benefits, the modest price premium over basic wraps becomes negligible.
Strengths and Weaknesses: Strengths include genuine self-healing capability, impressively safe adhesive chemistry, straightforward dry application, and outstanding durability claims. The matte finish effectively conceals minor surface imperfections. Weaknesses involve limited coverage area, matte’s inherent cleaning challenges, and potential underutilization of premium features on small, low-impact areas. The 10-year claim lacks extensive field verification.
Bottom Line: This is the matte wrap to beat for serious enthusiasts. Self-healing technology transforms expectations for matte finishes, while the safe adhesive provides peace of mind. Ideal for exterior accents, mirror caps, and areas prone to minor scuffs. The minimal price premium over standard matte makes upgrading a no-brainer for any project beyond basic experimentation.
Understanding DIY Car Wraps: What You Need to Know
What Exactly Is a Car Wrap?
A car wrap is a large vinyl decal applied directly over your vehicle’s factory paint. Modern wrap films are engineered with multiple layers: a protective topcoat, the colored or textured layer, adhesive backing, and a release liner. Unlike traditional stickers, quality wrap materials are designed to conform to complex curves, stretch up to 30% without distortion, and remove cleanly without damaging underlying paint. The DIY revolution in car wrapping stems from improved adhesive technology that allows repositioning during installation and air-egress channels that prevent bubble formation.
Benefits of Wrapping Your Car Yourself
The financial advantage is obvious—you’ll save 50-70% compared to professional installation costs. But the real benefits run deeper. DIY wrapping gives you complete creative control, allows you to learn a valuable skill, and provides the satisfaction of personal accomplishment. You’ll develop an intimate understanding of your vehicle’s contours and can work at your own pace, ensuring every detail meets your standards. Plus, you’ll know exactly how to maintain and repair your wrap because you installed it yourself.
Types of Car Wrap Materials Explained
Cast Vinyl vs. Calendered Vinyl
This fundamental distinction determines everything about your project’s outcome. Cast vinyl starts as a liquid poured into casting sheets, resulting in a thin, stable film (roughly 2-4 mils thick) that resists shrinking and conforms beautifully to complex curves. It’s the premium choice for full vehicle wraps and lasts 5-7 years. Calendered vinyl starts as a dough-like mass that’s rolled flat, creating a thicker, less stable material prone to shrinking and cracking. While cheaper and fine for flat surfaces or short-term applications, calendered vinyl will fail prematurely on vehicle contours.
Finish Options: From Glossy to Matte and Beyond
Your finish choice dramatically impacts both appearance and installation difficulty. Gloss wraps mimic factory paint but show every imperfection, demanding flawless prep work. Matte finishes hide minor flaws but require special cleaning techniques to prevent glossy spots. Satin splits the difference, offering a soft sheen that’s more forgiving. Textured finishes like carbon fiber or brushed metal add visual interest but increase installation complexity around curves. Color-shift or chameleon wraps contain multiple pigment layers that change hue based on viewing angle—these are the most challenging for beginners due to their thickness and directional installation requirements.
Specialty Wraps: Chrome, Carbon Fiber, and Color Shift
Chrome wraps create mirror-like finishes but are notoriously difficult to work with, showing every fingerprint and requiring perfect technique to avoid visible seams. Carbon fiber wraps offer a three-dimensional texture that looks authentic but demands extra attention to pattern alignment. Color shift wraps use advanced pigment technology for stunning visual effects but typically cost 30-50% more than standard colors and require specific installation temperatures to activate their adhesive properties properly.
Essential Tools and Equipment for DIY Wrapping
Must-Have Tools for Success
Your tool investment directly impacts your results. A high-quality squeegee with felt edges prevents scratching, while a precision knife with breakaway blades ensures clean cuts. Magnets or tape help hold large panels in place. Heat guns (not hair dryers) with adjustable temperature controls are non-negotiable for activating adhesive and stretching film. Microfiber towels, clay bars, and isopropyl alcohol are essential for surface prep. A wrap glove or cotton glove protects the film’s finish during installation. Expect to spend $150-300 on proper tools—skimping here guarantees frustration.
Nice-to-Have Equipment That Makes a Difference
While not strictly necessary, certain tools elevate your results dramatically. A wrap workstation or cutting mat protects film during trimming. infrared thermometers ensure you’re heating vinyl to optimal temperatures (typically 80-120°F). Detailing swabs help clean tight crevices before wrapping. A second pair of hands becomes invaluable for large roof or hood panels. Professional installers use plotter cutters for precise patterns, but beginners can achieve excellent results with careful hand-cutting and patience.
Preparing Your Vehicle: The Foundation of Success
Deep Cleaning and Decontamination
This step separates stunning results from disastrous failures. Wash your vehicle three times: first with standard car soap, second with a degreasing wash, and third with a clay bar treatment to remove embedded contaminants. Any wax, sealant, or ceramic coating residue will prevent proper adhesion. Use an adhesive promoter on plastic trim pieces, and ensure every panel reaches room temperature. Even microscopic dust particles become magnified under wrap film, creating visible bumps that ruin the finish.
Removing Hardware and Obstacles
Professional results require wrapping edges and recesses, which means removing emblems, door handles, mirror caps, and sometimes trim pieces. Use plastic pry tools to avoid scratching paint. Take detailed photos before removal to ensure proper reassembly. Mask off areas you won’t wrap with high-quality automotive tape. This extra effort creates seamless, factory-looking results where the wrap disappears into panel gaps rather than stopping abruptly at edges.
Temperature and Environment Considerations
Your workspace must stay between 65-75°F with low humidity (under 50%) for optimal adhesive activation. Cold vinyl becomes brittle and won’t stretch; hot vinyl over-stretches and loses memory. Install in a clean, dust-free garage with minimal air movement. Direct sunlight heats panels unevenly, causing inconsistent adhesion. Professional installers maintain climate-controlled bays for this reason—replicating those conditions at home dramatically improves your success rate.
How to Choose the Right Wrap for Your Project
Vehicle Size and Complexity
A compact car requires approximately 50-60 square feet of material, while a full-size SUV needs 75-100 square feet. But complexity matters more than size. Vehicles with sharp body lines, deep concave areas, or numerous compound curves demand more material for relief cuts and repositioning. Sports cars with aggressive aerodynamics can require 20% more film than their footprint suggests due to the need for overlaps and pattern matching.
Skill Level Assessment
Be brutally honest about your experience. First-timers should avoid metallic finishes, complex patterns, and chrome materials. Solid colors in satin or gloss finishes offer the most forgiving learning experience. If you’ve never applied large vinyl graphics, practice on smaller panels like mirrors or spoilers first. Your first full wrap will take 40-60 hours—rushing because you underestimated the difficulty leads to wasted material and disappointing results.
Durability and Warranty Factors
Quality cast vinyl wraps carry 5-7 year warranties against fading, cracking, and peeling when properly installed. However, DIY installation often voids manufacturer warranties. Look for materials specifically marketed for DIY use with more forgiving adhesives. Consider your climate—intense sun exposure demands UV-resistant topcoats, while cold climates require adhesives formulated for low-temperature flexibility. Horizontal surfaces (hood, roof, trunk) degrade twice as fast as vertical panels due to direct sun exposure.
Budget Planning
Material costs range from $500 for economy calendered vinyl to $3,500 for premium color-shift films on large vehicles. Factor in tool costs ($200-400), potential rework material (add 20% to your square footage calculation), and the value of your time. A $600 professional wrap job might seem expensive until you’ve spent three weekends struggling with a $400 DIY kit. Budget-conscious DIYers should prioritize quality tools and mid-grade cast vinyl over premium film with cheap tools.
The DIY Car Wrap Process: Step-by-Step Overview
Planning Your Panel Approach
Never start unrolling film randomly. Begin with the flattest, largest panels (hood, roof, doors) to build confidence. Work from top to bottom to prevent dust settling on completed sections. Map out your seams strategically—hide them in body lines and avoid placing them in high-visibility areas. Allow 2-3 inches of excess material on all edges for proper wrapping into recesses. Create a written plan detailing the order of panel installation.
Cutting and Weeding Techniques
Use a fresh blade for every major cut—dull blades drag and tear vinyl. Cut with minimal pressure, letting the sharpness do the work. Never cut directly on paint; always use a cutting tape or backing material. For complex shapes, create paper templates first. Weed small sections at a time, keeping the backing intact on large panels until you’re ready to apply. This prevents contamination and allows repositioning if you misalign a section.
Application Techniques for Bubble-Free Results
The key is “tack and stretch”—lightly adhere the film’s center, then work outward using a 45-degree squeegee angle. Apply moderate, consistent pressure and overlap strokes by 50%. Use heat to relax vinyl around curves, but never stretch more than 10-15% to avoid memory snap-back. For concave areas, heat and “float” the film on a cushion of air before squeegeeing from the center outward. Work slowly—speed comes with experience, not force.
Post-Heating and Finishing
This critical step activates the adhesive’s permanent bond. Use an infrared thermometer to heat all wrapped edges and recessed areas to 180-200°F, maintaining temperature for 30-60 seconds. This prevents lifting and ensures longevity. Trim excess material with a fresh blade, leaving 1/16 inch to tuck edges. Use a soft roller on all seams and edges. Wait 24-48 hours before washing, and avoid waxing for two weeks to allow full adhesive cure.
Common DIY Car Wrap Mistakes and How to Avoid Them
Inadequate Surface Preparation
The number one cause of wrap failure is poor prep. Even new cars have dealership wax, rail dust, and handling marks. Use a paint thickness gauge to identify areas with excessive filler or previous repairs—these spots often have adhesion issues. Pay special attention to plastic trim; many require adhesion promoters formulated specifically for low-energy surfaces. A $50 investment in proper cleaning chemicals saves a $500 material failure.
Stretching and Overworking the Film
Beginners tend to stretch vinyl excessively to avoid seams, creating thin spots that fail within months. Learn to recognize when a relief cut is necessary. The “triangle technique”—making small triangular cuts at stress points—allows vinyl to relax without creating visible seams. If you’re fighting the material and it keeps springing back, you’re either not using enough heat or you’ve exceeded the film’s stretch limit. Stop, heat the area to 100°F, and reassess.
Temperature Management Errors
Applying wrap in direct sunlight creates a nightmare scenario—the film adheres before you’re ready, bubbles form under heated panels, and adhesive activates unevenly. Conversely, cold garages make vinyl brittle and prone to tearing. Use ceramic heaters to warm your workspace and infrared thermometers to monitor panel temperatures. Never store vinyl in unheated areas before installation—bring it indoors 24 hours prior to allow thermal stabilization.
Calculating How Much Wrap Material You Need
Measuring Your Vehicle
Create a detailed measurement sheet. Measure each panel’s length and width, then add 4 inches to each dimension for handling. Multiply to get square footage per panel, then sum all panels. For complex vehicles, use the “footprint method”—measure length x width x 1.5 for sedans, x 2.0 for SUVs with complex body lines. Always round up to the nearest 5-foot increment; running short mid-installation is catastrophic.
Accounting for Mistakes and Complex Curves
First-timers should add 30% waste factor to their calculation. This covers mis-cuts, contamination issues, and learning curves. Directional patterns (carbon fiber, brushed metal) require an additional 20% for pattern matching. Vehicles with deep concavities or numerous body lines need 15% more material for relief cuts. Buy an extra 5-foot roll of the same lot number for future repairs—vinyl color varies between production batches.
Budget Breakdown: True Cost of DIY Car Wrapping
Material Costs
Entry-level calendered vinyl runs $5-8 per square foot but isn’t recommended for full wraps. Mid-grade cast vinyl costs $10-15 per square foot and offers the best value for DIYers. Premium materials (color shift, chrome, textured) range $20-35 per square foot. A typical sedan requires 60 square feet, putting material costs between $600-$2,100 depending on quality. Never compromise on adhesive quality—cheap glue leads to premature failure regardless of vinyl grade.
Tool Investment
Essential tool kits cost $150-250, while professional-grade setups run $400-600. Quality heat guns with digital temperature control ($80-150) prevent overheating. Squeegees with interchangeable felt strips ($20-40) protect film finishes. Knives, blades, cleaning supplies, and application fluids add another $50-100. Consider tool costs amortized over multiple projects—your second wrap costs significantly less once you’re equipped.
Hidden Costs to Consider
Factor in 40-60 hours of your time at your personal hourly rate. Workspace preparation (lighting, dust control) might require $50-100 in supplies. Vehicle disassembly tools (plastic trim removal kits, socket sets) add $30-80. If you make critical errors, replacement material costs can double your initial investment. Professional removal of failed DIY wraps costs $500-800, exceeding the original professional installation quote. Budget for a potential “learning wrap” on a less visible vehicle first.
Maintenance and Care for Your Wrapped Vehicle
Washing Techniques
Hand washing is mandatory—automatic car washes will peel edges and scratch finishes. Use pH-neutral, wax-free soap and microfiber mitts. Pressure washers are acceptable only if kept below 2000 PSI and held 12+ inches from surfaces, never directed at edges. Dry immediately with clean microfiber towels to prevent water spots. Wash weekly to prevent contaminant buildup, which becomes harder to remove and can stain light-colored wraps.
Protection and Longevity Tips
Apply a wrap-specific sealant every 3-6 months to maintain UV protection and hydrophobic properties. Avoid petroleum-based products and waxes containing carnauba—they can discolor vinyl. Park in shade whenever possible; UV exposure remains the primary degradation factor. For winter protection, rinse road salt weekly. Bird droppings, tree sap, and fuel spills must be removed within 24 hours to prevent etching. Consider paint protection film on high-impact areas like hoods and mirrors.
When to Consider Professional Help
If your wrap develops widespread lifting, severe discoloration, or adhesive failure within the first year, professional assessment is wise. Small repairs (torn edges, localized lifting) are DIY-friendly, but panel replacement requires matching film from the same production lot. Professionals have access to heat lamps, plotter cutters, and experienced installers who can salvage partially failed wraps. Sometimes paying $200 for a pro to fix your mistakes saves a $1,000 material replacement.
Removing Car Wraps: What to Expect
Safe Removal Techniques
Professional removal costs $500-800, but DIY is possible with patience. Heat sections to 180-200°F and peel at a 45-degree angle, keeping tension consistent. Work slowly—rapid pulling tears vinyl and leaves adhesive residue. For stubborn areas, use specialized adhesive removers or citrus-based cleaners. Never use metal scrapers on paint. Expect removal to take 6-10 hours for a full vehicle, longer if the wrap is brittle from age or sun exposure.
Dealing with Adhesive Residue
Old wraps, especially those past their lifespan, leave stubborn adhesive. Use 3M Adhesive Remover or equivalent, applied with microfiber towels. Work in small sections, letting the solvent dwell for 30-60 seconds. Aggressive scrubbing damages paint; patience and repeated application work better. For severe cases, clay bars with lubricant remove residue without marring. After cleanup, wash and inspect paint thoroughly—some correction may be needed.
Assessing Paint Condition Post-Removal
Wraps protect paint but can reveal hidden issues. Expect some paint swirls that require polishing. Areas with poor factory paint or previous bodywork may show lifting—these spots had weak adhesion from the start. Check for clear coat failure, especially on horizontal surfaces. Document any damage immediately if planning an insurance claim. In most cases, paint is in better condition than unwrapped counterparts, but 7-year-old wraps on 10-year-old cars can’t perform miracles.
Legal and Warranty Considerations
Registration and Insurance Implications
Most states require reporting color changes to the DMV, even with wraps. Keep original color registered but update records to avoid issues during traffic stops. Insurance companies generally cover wraps as aftermarket modifications—notify your agent to ensure proper coverage. Some policies cover wrap damage under comprehensive claims, but only if professionally installed. DIY installations may be considered “custom work” with limited coverage. Get written confirmation from your insurer.
Manufacturer Warranties vs. Wrap Warranties
Factory paint warranties remain intact when using quality cast vinyl installed correctly—wraps actually protect against UV and minor damage. However, improper removal that damages paint voids coverage. Wrap manufacturers offer material warranties (5-7 years) that cover defects but exclude installation errors. Since DIY installation voids most manufacturer warranties, purchase from suppliers offering DIY-specific warranties. Document your installation with photos showing proper surface prep and technique in case claims arise.
Professional vs. DIY: Making the Right Choice
When DIY Makes Sense
DIY wrapping excels when you have time, patience, and a suitable workspace. Enthusiasts with detailing experience adapt quickly. Wrapping a daily driver you own outright reduces risk anxiety. Projects under $1,500 in material costs make financial sense for DIY. If you enjoy meticulous work and view it as a learning experience, the satisfaction outweighs the time investment. Starting with partial wraps (roof, mirrors, accents) builds skills before attempting full vehicles.
When to Call the Professionals
Complex vehicles (Tesla Model X with falcon doors, Corvette with deep body lines) challenge even experienced DIYers. High-value vehicles deserve professional installation to protect asset value. If you lack climate control or adequate lighting, pros guarantee better results. Tight deadlines demand professional efficiency—what takes you 50 hours takes them 20. When using premium materials ($2,000+), professional installation protects that investment. The cost difference often justifies the warranty and peace of mind.
Troubleshooting Common Issues
Dealing with Bubbles and Wrinkles
Small bubbles often self-heal within 48 hours as adhesive outgasses. Persistent bubbles require puncturing with a fine pin and pressing out air. Never cut bubbles open—it creates visible scars. Wrinkles form from inadequate stretching or improper squeegee technique. Gently heat wrinkled areas to 120°F and lift the film partially, then reapply with proper tension. Deep wrinkles may require panel replacement—attempting to fix severe wrinkles usually makes them worse.
Addressing Lifting Edges
Edges lift from insufficient cleaning, inadequate post-heating, or contamination. Clean the area with isopropyl alcohol, apply heat to 180°F, and press firmly with a squeegee. For persistent lifting, apply edge sealant or primer specifically designed for vinyl wraps. If lifting occurs within weeks, the underlying issue is likely poor surface prep—the panel must be removed and reinstalled correctly. Edges lifting after years indicate wrap lifespan expiration, requiring panel replacement.
Color Mismatch Solutions
Vinyl from different production lots varies slightly in color. Always purchase extra material from the same lot number for repairs. If you must mix lots, install them on separate panels (one door from Lot A, another from Lot B) rather than adjacent areas where differences become obvious. For existing mismatches, creative solutions include adding stripes or graphics to break up color blocks. In severe cases, replacing entire panels with film from a single lot ensures consistency.
Frequently Asked Questions
How long does a DIY car wrap typically last compared to a professional installation?
With proper installation and maintenance, a DIY wrap using quality cast vinyl lasts 5-7 years, identical to professional work. The key difference isn’t longevity but initial appearance—professionals achieve better finish quality. However, a meticulous DIYer can match professional durability by following proper prep, installation, and post-care procedures.
Can I wrap a car with paint chips, scratches, or rust?
Small scratches are acceptable, but chips and rust must be repaired first. Wraps conform to surface texture, magnifying imperfections. Rust continues spreading underneath vinyl, causing adhesion failure. Fill chips with touch-up paint, sand scratches smooth, and ensure rust is completely removed and treated. The wrap will fail if the underlying surface isn’t sound.
What’s the hardest part of DIY car wrapping for beginners?
Most beginners struggle with managing tension on large panels and achieving seamless edges around curves. The hood is notoriously difficult due to size and visibility. Start with smaller, less visible panels to build skills. The learning curve is steep but manageable—most people master basic techniques after wrapping 2-3 panels.
How does temperature affect the wrapping process?
Temperature control is critical. Install in 65-75°F ambient temperature with low humidity. Cold vinyl (below 60°F) becomes brittle and won’t conform. Hot panels (above 90°F) cause premature adhesion. Use heat guns to warm vinyl to 80-120°F during installation for optimal stretch. Post-heat all edges to 180-200°F to activate permanent adhesive bond.
Will removing a wrap damage my car’s paint?
Quality cast vinyl on factory paint removes cleanly after up to 7 years. Problems arise with poor-quality vinyl, repainted panels, or failing clear coats. Always test a small, inconspicuous area first. Remove slowly with heat, never pulling at 90-degree angles. If paint lifts, stop immediately—this indicates pre-existing adhesion issues, not wrap damage.
Can I wrap my car outdoors or does it need to be in a garage?
Indoor installation is strongly recommended. Outdoor wrapping introduces wind-blown debris, temperature fluctuations, and humidity issues. If you must work outdoors, choose a calm, overcast day with stable temperatures and create a temporary clean room using plastic sheeting. Even a basic garage with decent lighting and temperature control dramatically improves results.
How do I fix mistakes without wasting entire panels?
Small errors (bubbles, minor wrinkles) can be corrected with heat and careful squeegee work. For tears or severe misalignment, use relief cuts to salvage portions of the panel. Keep 5-foot rolls of matching vinyl for spot repairs. Learning to make invisible seams in body lines saves material. Document your mistakes—they’re valuable learning tools for future panels.
Is it cheaper to wrap or repaint a car?
For color changes, wrapping is 30-50% cheaper than quality paint jobs ($3,000-6,000). Economy paint jobs ($1,000-2,000) may seem comparable, but they rarely include door jambs and trim. Wraps offer reversibility and paint protection, adding value beyond cost comparison. For permanent color changes on high-value vehicles, quality paint remains superior.
How soon can I wash my car after wrapping it?
Wait minimum 48 hours before the first wash to allow adhesive initial cure. Use pH-neutral, wax-free soap and hand wash only. Avoid pressure washers for the first two weeks. Full adhesive cure takes 1-2 weeks depending on climate—avoid waxes, sealants, or ceramic coatings during this period. Gentle washing with microfiber towels is safe after 48 hours.
What should I do if my wrap starts failing within the first year?
Document the failure with photos and contact your material supplier immediately. Most issues stem from installation errors (poor prep, inadequate post-heating) rather than material defects. If it’s material failure and you purchased DIY-warranty film, you may receive replacement material. For installation errors, consult professional wrap forums or hire a pro for assessment. Early intervention prevents small problems from becoming total failures.