Your vehicle’s undercarriage faces a daily assault from road salt, moisture, debris, and chemical contaminants that can transform a solid frame into a rust-riddled safety hazard. While spray-on undercoatings dominate the conversation, brush-on asphalt formulations offer a compelling alternative that puts precision and control directly in your hands. Whether you’re restoring a classic car, maintaining a daily driver, or tackling a fleet vehicle, understanding the nuances of brush-applied asphalt protection can mean the difference between decades of corrosion-free performance and costly structural repairs down the road.
This comprehensive guide dives deep into everything you need to know about brush-on asphalt undercoatings—from the science behind their protective properties to advanced application techniques that professionals use. We’ll explore how to evaluate quality, avoid common pitfalls, and achieve a durable finish that stands up to the harshest driving conditions without mentioning specific brands, focusing instead on the universal principles that make this DIY-friendly approach so effective.
Top 10 Brush-on Asphalt Undercoating
Detailed Product Reviews
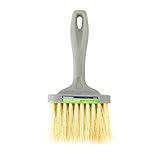
1. Rusfre RUS-1013 Brush-on Rubberized Undercoating, 1-gallon, black

Overview: Rusfre’s RUS-1013 offers a brush-on solution for vehicle undercarriage protection, providing a robust rubberized barrier against rust, corrosion, and road debris. This one-gallon container delivers a thick, asphalt-based coating designed for DIY enthusiasts and professional restorers who prefer manual application control. The black finish blends seamlessly with most undercarriages while creating a sound-dampening layer that reduces road noise transmission into the cabin.
What Makes It Stand Out: The brush-on format distinguishes this product from aerosol alternatives, allowing precise application in tight spaces and built-up areas where spray methods waste material. The rubberized formula remains flexible after curing, preventing cracks from chassis flex and temperature fluctuations. Its one-gallon volume covers approximately 75-100 square feet with two coats, making it ideal for complete car undercarriages or multiple touch-up projects without the pressure of rushing through a spray can.
Value for Money: At $36.04 per gallon, this undercoating costs significantly less than professional applications ($150-$400) and offers better coverage than $8-12 aerosol cans that require 6-8 units per vehicle. The brush-on method eliminates overspray waste and equipment costs associated with spray systems. While labor-intensive, the material savings and precision make it exceptionally cost-effective for meticulous DIYers who prioritize thoroughness over speed.
Strengths and Weaknesses: Pros: Precise application control; Excellent coverage per gallon; Flexible, durable finish; No special equipment needed; Superior rust prevention. Cons: Time-consuming manual application; Requires thorough surface prep; Not ideal for large-scale operations; Brush marks may be visible; Messy cleanup process.
Bottom Line: Perfect for dedicated DIY restorers who value precision and cost savings over application speed. The brush-on method ensures complete coverage in critical areas where spray applications miss, making it a smart investment for long-term vehicle protection.
2. Warner Tampico Asphalt Brush
Overview: Warner’s Tampico Asphalt Brush is a specialized masonry tool engineered for asphalt, cement, and stucco applications. Measuring 4.5 by 9.5 inches, this brush features natural Tampico fibers renowned for their optimal balance of stiffness and flexibility. The durable plastic comfort-grip handle includes a hanging hole for convenient storage, making it a practical addition to any contractor’s or homeowner’s toolkit for both wet and dry applications.
What Makes It Stand Out: The authentic Tampico bristles provide superior performance compared to synthetic alternatives, holding and releasing material evenly without excessive dripping. The bristles’ natural stiffness allows aggressive work on rough surfaces while maintaining enough flex to prevent gouging. The ergonomic handle design reduces hand fatigue during extended use, and the integrated storage hole keeps the brush accessible on job sites. Its versatility across wet sealcoating and dry debris removal makes it a true multi-purpose masonry tool.
Value for Money: At $9.99, this brush sits in the sweet spot between disposable economy brushes ($4-6) and professional-grade tools ($15-25). The Tampico fibers outlast synthetic bristles by 3-4 times on abrasive surfaces, eliminating frequent replacements. For occasional driveway sealing or concrete work, it pays for itself in a single project compared to hiring contractors. The durability ensures consistent performance across multiple seasons of home improvement projects.
Strengths and Weaknesses: Pros: Natural Tampico fiber durability; Comfortable ergonomic grip; Versatile wet/dry functionality; Convenient storage design; Optimal bristle stiffness. Cons: Plastic handle less durable than wood; 4.5-inch width small for large driveways; Bristles may shed initially; Not suitable for varnish or paint; Requires thorough cleaning after use.
Bottom Line: An exceptional value for homeowners tackling asphalt maintenance or masonry projects. The quality Tampico bristles and thoughtful design make it a reliable tool that outperforms its price point, ideal for small to medium-scale applications.
3. Automotive Spray-On Rubberized Undercoating Material, 1-Gallon RUS-1020F1

Overview: Rusfre’s RUS-1020F1 is a spray-on rubberized undercoating formulated for professional spray gun application, delivering rapid vehicle undercarriage protection. This one-gallon container provides the same corrosion-resistant barrier as brush-on alternatives but optimizes for speed and uniform coverage. Designed for use with standard undercoating spray equipment, it creates a flexible, sound-deadening shield against moisture, salt, and debris for long-term automotive preservation.
What Makes It Stand Out: The spray-ready formulation enables coverage rates of 100-125 square feet per gallon with a single coat, significantly faster than brush applications. The material atomizes evenly without clogging professional-grade spray tips, producing a consistent textured finish that mimics factory undercoating. Its quick-build formula achieves recommended thickness in fewer passes, reducing labor time by 60-70% compared to manual methods while reaching recessed areas that brushes cannot access.
Value for Money: Priced at $47.11, this spray-on version commands an $11 premium over the brush-on alternative, but the time savings justify the cost for professionals and serious DIYers with equipment. When factoring in labor value, the spray method completes a typical sedan in under 30 minutes versus 2-3 hours brushing. For shops or enthusiasts performing multiple vehicles annually, the efficiency gains recover the price difference quickly. However, the added expense of spray equipment ($50-200) affects overall value for one-time users.
Strengths and Weaknesses: Pros: Extremely fast application; Uniform professional finish; Reaches inaccessible areas; Higher coverage rate per gallon; Excellent sound deadening. Cons: Requires spray gun equipment; Overspray concerns; More expensive per gallon; Poor ventilation hazards; Not suitable for touch-ups without full setup.
Bottom Line: Ideal for professionals and equipped DIYers prioritizing speed and efficiency. The premium price delivers measurable time savings and superior coverage in complex undercarriage areas, making it worthwhile for frequent users despite equipment requirements.
4. Kraft Tool 36-inch Asphalt Sealcoat Brush Refill
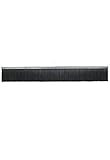
Overview: Kraft Tool’s 36-inch Asphalt Sealcoat Brush Refill is a professional-grade replacement head designed for large-scale driveway and parking lot sealing projects. The oversized width enables rapid coverage of expansive asphalt surfaces, significantly reducing application time compared to standard brushes. Note: The listed features incorrectly describe a glitter applicator—these details are erroneous and should be disregarded in favor of the product’s actual sealcoating purpose.
What Makes It Stand Out: The massive 36-inch span covers three times the width of conventional brushes, making it indispensable for commercial contractors and homeowners with long driveways. The refill-only design allows users to replace worn bristles while retaining their existing handle hardware, reducing waste and long-term tool costs. Professional-grade bristle density holds substantial sealcoat material, minimizing reload frequency and maintaining consistent application thickness across wide sections without lap marks.
Value for Money: At $39.00 for just the refill, this represents a mid-range professional investment. While initially expensive compared to complete smaller brushes, the replaceable design saves 40-50% over buying entirely new tools as bristles wear. For projects exceeding 1,000 square feet, the time savings alone justify the cost—completing work in one-third the time of 9-inch brushes. However, the separate handle requirement adds $15-25 to the total investment, impacting value for first-time buyers who don’t already own compatible hardware.
Strengths and Weaknesses: Pros: Exceptional coverage speed; Professional-grade durability; Eco-friendly refill design; Consistent material application; Ideal for large surfaces. Cons: Handle not included; Cumbersome for small areas; Premium price point; Erroneous product description; Requires significant storage space.
Bottom Line: Best suited for professionals and homeowners with extensive asphalt surfaces who own compatible handles. The efficiency gains are undeniable for large projects, but the misleading product description and additional handle cost warrant careful purchase consideration from first-time buyers.
What Are Brush-On Asphalt Undercoatings?
Brush-on asphalt undercoatings are heavy-bodied, bitumen-based protective coatings specifically formulated for manual application to a vehicle’s undercarriage. Unlike their sprayable counterparts, these products feature a thicker viscosity that allows them to cling to vertical surfaces and build substantial protective layers without running or sagging. The asphalt base—derived from refined petroleum—creates a moisture-impermeable barrier that actively displaces water while providing a flexible, impact-resistant shield against road debris.
The Science Behind Asphalt-Based Protection
The protective power lies in asphalt’s unique molecular structure. The long-chain hydrocarbons create a dense, cross-linked matrix when cured, effectively blocking oxygen and electrolytes from reaching the metal surface. This interrupts the electrochemical corrosion process before it can begin. Modern formulations enhance this natural protection by incorporating rust inhibitors, reinforcing fibers, and flexible polymers that prevent cracking as the vehicle chassis flexes during normal operation.
Why Choose Brush Application Over Spray?
The decision to brush rather than spray often comes down to three critical factors: precision, economy, and environment. Brush application eliminates overspray concerns completely, making it ideal for garage-based DIY projects where ventilation is limited and neighboring surfaces need protection. You gain tactile feedback through the brush, instantly detecting surface irregularities, rust pockets, or previous coating failures that might be missed with spray equipment.
Precision and Control Benefits
With a brush, you can work asphalt coating into complex geometries—inside frame rails, around suspension mounting points, and across weld seams—with surgical accuracy. This targeted approach ensures complete coverage in critical rust-prone areas while minimizing waste. The ability to “push” the coating into corners and crevices creates a more uniform barrier than spray patterns that might not penetrate deeply enough into confined spaces.
Cost-Effectiveness for DIY Enthusiasts
Brush-on products typically cost 40-60% less per coverage area than aerosol or professional spray alternatives. You eliminate equipment rental fees, compressor requirements, and the learning curve associated with spray guns. A single quart can cover an entire compact car undercarriage when applied properly, making it an accessible entry point for enthusiasts building their car care toolkit.
Key Benefits of Asphalt Undercoating
Beyond basic rust prevention, quality asphalt undercoatings deliver multiple protective advantages that extend vehicle life and improve the driving experience. Understanding these benefits helps justify the effort and investment in proper application.
Superior Corrosion Protection
Asphalt’s natural water repellency creates a hydrophobic layer that actively sheds moisture rather than absorbing it. This is crucial in winter climates where road salt creates highly conductive brine solutions. The coating’s thickness—typically 1/16 to 1/8 inch when cured—provides a sacrificial layer that withstands years of abrasion before the underlying metal becomes exposed.
Sound Deadening Properties
The viscoelastic nature of asphalt dampens vibrations transmitted from the road surface into the cabin. Independent testing shows properly applied asphalt undercoating can reduce road noise by 3-5 decibels, particularly in the 200-500 Hz range where tire drone and exhaust resonance occur. This acoustic benefit transforms highway driving comfort without adding significant weight.
Stone Chip Resistance
The reinforced, rubberized texture of modern asphalt formulations absorbs impact energy from gravel and road debris that would otherwise chip paint and expose bare metal. This is especially valuable for vehicles operating on gravel roads or in construction zones where impact velocities can exceed 50 mph.
When Should You Apply Brush-On Undercoating?
Timing significantly impacts coating adhesion and long-term performance. The ideal application window depends on climate, vehicle condition, and your maintenance schedule.
Seasonal Timing Considerations
Early fall presents the optimal application period in most regions. Temperatures between 60-80°F with moderate humidity allow proper curing before winter salt exposure begins. The undercarriage should be completely dry—apply at least 48 hours after the last rain or wash. Avoid application when temperatures drop below 50°F or exceed 90°F, as this affects viscosity and cure time dramatically.
Vehicle Age and Condition Factors
New vehicles benefit most from immediate application before any surface rust can establish. For used vehicles, you must first address existing corrosion—simply coating over rust traps moisture and accelerates hidden decay. Vehicles 3-7 years old typically show early rust formation that requires aggressive prep but responds well to brush-on treatment. Classics and restoration projects demand complete media blasting to bare metal before asphalt application.
Essential Features to Evaluate
Not all brush-on asphalt undercoatings share the same quality characteristics. Learning to read technical data sheets and evaluate physical properties separates professional results from disappointing failures.
Viscosity and Coverage Rate
Look for products with a viscosity between 3,000-6,000 centipoise—thick enough to hang vertically but fluid enough to brush smoothly. Coverage rates should specify 25-35 square feet per quart at recommended thickness. Avoid extremely thick products requiring thinning, as this compromises solids content and protection.
Drying Time and Curing Process
Quality formulations skin over in 2-4 hours and cure to touch-dry in 8-12 hours at 70°F. Full chemical cure takes 7-14 days, during which the coating reaches maximum hardness and adhesion. Fast-drying products often sacrifice flexibility, leading to cracking. Check for products specifying “non-tracking” after 24 hours to avoid road debris embedding in soft coating.
Flexibility and Crack Resistance
The product should maintain flexibility down to -20°F without cracking. Look for elongation ratings of 200-400% in technical specifications. Rubberized formulations containing styrene-butadiene polymers excel here, remaining pliable even after years of thermal cycling. Non-flexible coatings fail catastrophically when chassis flex occurs.
VOC Content and Odor Level
Modern low-VOC formulations contain less than 250 grams per liter, making garage application feasible without extensive ventilation. High-VOC products (over 400 g/L) deliver faster drying but produce overwhelming fumes and may be restricted in certain states. Water-based asphalt emulsions offer the lowest odor but typically sacrifice durability and require more frequent reapplication.
Surface Preparation: The Foundation of Success
The best undercoating fails quickly when applied over contaminated surfaces. Preparation represents 70% of the work and 90% of the success in any undercoating project.
Cleaning Requirements
Start with pressure washing at 2,000+ PSI to remove loose scale, mud, and previous undercoating failures. Follow with a degreaser or wax-and-grease remover applied with scuff pads to eliminate oily residues. For existing rust, use a wire brush or needle scaler to remove loose oxidation, then treat with a phosphoric acid-based rust converter that chemically transforms remaining rust into stable iron phosphate.
Rust Treatment Protocols
Never encapsulate active rust without conversion. After mechanical cleaning, apply rust converter generously to pitted areas and allow 24-hour curing. For severe pitting, fill depressions with epoxy-based filler before undercoating. This prevents moisture pooling in voids beneath the asphalt layer. Bare metal spots should be primed with etching primer compatible with asphalt—typically a thin epoxy or moisture-cured urethane.
Masking and Protection Strategies
Use heavy-duty aluminum foil to protect exhaust components, brake lines, and sensors from accidental coating. Foil conforms to complex shapes better than tape and withstands brush contact. Cover wheel wells and tires with disposable plastic sheeting secured with painter’s tape. Remove or thoroughly mask rubber bushings, as asphalt solvents can cause swelling and premature failure.
Step-by-Step Application Guide
Mastering brush technique transforms a messy chore into a satisfying process that yields professional-grade protection.
Tools You’ll Need
Select a 2-inch chip brush for detail work and a 3-inch angled sash brush for broad surfaces. Natural bristles hold heavy asphalt better than synthetics. Keep mineral spirits handy for brush cleaning and minor touch-ups. A headlamp provides critical lighting for inspecting coverage in dark frame rails. Wear chemical-resistant gloves and disposable coveralls—this material does not wash out of clothing.
Technique for Even Coverage
Load the brush heavily and apply using cross-hatch strokes—horizontal followed by vertical—to ensure complete film formation. Work in 2x2 foot sections, maintaining a wet edge to avoid lap marks. Apply medium pressure to work coating into seams and spot welds. The first coat should be thin, just enough to obscure the metal surface. Allow 4-hour flash time, then apply a second heavier coat to achieve final thickness.
Recommended Coating Thickness
Use a wet-film thickness gauge to verify 15-20 mils per coat. Two coats yield 30-40 mils dry thickness—optimal for protection without wasting material. Thicker applications crack from thermal stress; thinner coats provide insufficient protection. The coating should feel slightly textured but uniform when cured, not smooth like paint.
Common Application Mistakes to Avoid
Even experienced DIYers fall into these traps that compromise coating integrity and longevity.
Inadequate Surface Prep
Rushing preparation is the number one cause of failure. Coating over invisible surface contaminants like silicone from previous undercoatings or tire dressings creates delamination zones. Take time to perform a water-break test: spray a clean surface with water—if it beads up rather than sheeting off, contamination remains and requires additional cleaning.
Applying Too Thick or Too Thin
Excessive thickness leads to solvent entrapment, causing soft spots that never fully cure and eventually bubble. Too-thin application fails to build adequate film thickness for protection. Use the gauge, not guesswork. Remember: two medium coats always outperform one heavy coat.
Ignoring Temperature and Humidity
Applying in high humidity (above 70%) traps moisture beneath the coating, causing blisters. Low temperatures (below 50°F) prevent proper flow and adhesion. Always check the dew point—application should occur when surface temperature is at least 5°F above dew point.
Comparing Application Methods
Understanding when brush application excels helps you choose the right method for your specific project constraints.
Brush vs. Spray vs. Roll-On
Spray application covers large flat areas faster but wastes 30-40% of material to overspray and requires extensive masking. Roll-on methods work for floor pans but cannot access tight spaces. Brush application uniquely combines material efficiency with access to complex geometry, making it superior for comprehensive undercarriage protection where every surface matters.
When Each Method Makes Sense
Choose brush application for: restoration projects requiring meticulous prep, garage environments with limited ventilation, vehicles with complex frame designs, and budget-conscious maintenance. Reserve spray methods for fleet applications where speed trumps precision, or when applying over perfectly prepped surfaces in professional booths.
Understanding Different Asphalt Formulations
Modern undercoatings vary significantly in composition, affecting performance characteristics and application requirements.
Rubberized vs. Non-Rubberized
Rubberized formulations incorporate synthetic elastomers that dramatically improve flexibility and impact resistance. These products excel in northern climates with extreme temperature swings. Non-rubberized versions offer harder, more abrasion-resistant surfaces ideal for desert environments where sand blasting occurs but thermal cycling is minimal. For most users, rubberized provides the best balance.
Solvent-Based vs. Water-Based Options
Solvent-based products dominate the professional market due to superior adhesion and water resistance. They cure by solvent evaporation, creating a dense, non-porous film. Water-based emulsions appeal to environmentally conscious users and those with extreme sensitivity to fumes. However, they remain slightly porous, re-emulsify if exposed to water before full cure, and typically require reapplication every 2-3 years versus 5-7 years for solvent-based.
Longevity and Durability Factors
A properly applied brush-on asphalt undercoating should provide reliable protection for 5-7 years in normal driving conditions, but several variables influence actual service life.
Expected Lifespan
Mildew and chemical resistance determine longevity. Quality formulations withstand 1,000+ hours of salt spray testing (ASTM B117) without failure. Real-world lifespan extends to 10+ years for garaged vehicles in moderate climates, while daily-driven vehicles in salt-belt states may need touch-ups every 3-4 years.
Impact of Driving Conditions
Gravel roads accelerate wear by 30-40% due to constant impact. Coastal environments with salt air reduce lifespan by 20%. Frequent off-road exposure to mud and moisture creates a need for annual inspection and spot repairs. Highway driving in dry conditions poses minimal wear, often extending coating life beyond manufacturer estimates.
Signs It’s Time to Reapply
Inspect annually using a headlamp and scraper. Flaking, cracking, or areas where the coating has worn through to primer indicate immediate attention needed. White or gray discoloration suggests UV degradation (common in water-based products). Soft, tacky areas signal solvent breakdown from oil contamination. Catch these early and spot-repair to avoid full stripping.
Maintenance and Inspection Protocols
Proactive maintenance dramatically extends coating life and prevents minor issues from becoming major rust problems.
Regular Check-Up Schedule
Perform visual inspections every spring and fall. Use a putty knife to gently probe suspicious areas—sound coating resists penetration. Pay special attention to wheel wells, frame rail bottoms, and areas behind tires where sandblasting effect is maximum. Document findings with photos to track degradation over time.
Touch-Up Techniques
Clean the area with mineral spirits and a wire brush, feathering the edges of surrounding sound coating. Apply rust converter if any oxidation is visible. Use a small artist’s brush for precision touch-ups, applying thin coats that blend into existing material. Avoid creating a ridge at the repair edge by tapering the new coating gradually.
Professional vs. DIY Application
The choice between professional installation and DIY depends on equipment access, skill level, and vehicle value.
Cost-Benefit Analysis
Professional application runs $400-800 depending on vehicle size and prep requirements. DIY materials cost $50-100, but require 8-12 hours of labor. For vehicles worth under $10,000, DIY makes economic sense. High-value classics or late-model trucks benefit from professional warranties and booth-controlled environments that justify the premium.
Skill Level Requirements
Brush application demands patience and attention to detail rather than specialized skills. If you can paint a room with clean edges, you can apply undercoating successfully. The critical skill is surface prep—recognizing contamination and properly treating rust. Most novices succeed on their first attempt by following prep protocols meticulously.
Environmental and Safety Considerations
Responsible application protects both the user and the environment while ensuring regulatory compliance.
Proper Ventilation Requirements
Even low-VOC products require active ventilation. Use a box fan exhausting outward to create negative pressure in your workspace. Wear a respirator with organic vapor cartridges—not just a dust mask. Take fresh air breaks every 30 minutes. The asphalt odor can cause headaches and nausea in enclosed spaces.
Disposal Best Practices
Never pour leftover coating or cleaning solvents down drains. Allow waste material to cure completely in a disposable container, then dispose as solid waste. Check local regulations—some municipalities classify unused coating as hazardous waste requiring special disposal. Store rags in water-filled metal containers to prevent spontaneous combustion from solvent oxidation.
Troubleshooting Common Issues
Even perfect application can encounter problems. Understanding causes and solutions saves rework.
Bubbling and Peeling
Bubbles indicate trapped moisture or solvent. Small blisters can be slit with a razor, pressed flat, and sealed with additional coating. Large-scale peeling requires stripping the affected area completely and re-prepping. Always investigate the root cause—if moisture is coming from inside the frame, drill weep holes to allow drainage before recoating.
Uneven Texture Problems
Ridged or heavily textured finishes result from over-brushing partially dried coating. If caught while still tacky, lightly roll with a solvent-dampened foam roller to smooth. If cured, sand lightly with 80-grit paper and apply a thin skim coat to level. The goal is uniform protection, not cosmetic perfection—some texture is normal and acceptable.
Frequently Asked Questions
How long does brush-on asphalt undercoating take to fully cure?
While the surface becomes touch-dry in 8-12 hours, full chemical curing takes 7-14 days depending on temperature and humidity. During this period, avoid heavy water exposure and off-road driving. The coating reaches maximum hardness and adhesion after two weeks, though light driving is safe after 24 hours if the surface is protected from road spray.
Can I apply brush-on undercoating over existing rust?
Never apply over active, flaking rust. You must first remove loose scale mechanically, then treat remaining oxidation with a phosphoric acid-based rust converter. The converter chemically transforms rust into a stable, paintable surface. Simply coating over rust traps moisture and accelerates hidden corrosion. For severe rust, consider professional media blasting before undercoating.
What’s the best temperature range for application?
Apply between 60-80°F with humidity below 70%. The metal surface should be at least 5°F above the dew point to prevent moisture condensation. Avoid application below 50°F (coating won’t flow properly) or above 90°F (solvents flash off too quickly, preventing adhesion). A garage with passive heating or cooling provides ideal conditions.
How does brush-on compare to rubberized spray undercoating?
Brush-on offers superior material efficiency (no overspray waste), better access to complex geometry, and lower equipment costs. Spray application is faster for large flat areas but requires extensive masking and ventilation. Rubberized brush formulas match spray performance in flexibility and protection, while providing tactile feedback during application that ensures complete coverage.
Will asphalt undercoating damage rubber bushings or plastic components?
The solvents in asphalt undercoating can swell natural rubber and degrade certain plastics. Always mask rubber suspension bushings, CV joint boots, and plastic fuel/brake line clips with aluminum foil. If accidental contact occurs, wipe immediately with mineral spirits. For vehicles with extensive rubber components, consider water-based formulations though they sacrifice durability.
How often should I inspect and maintain my undercoating?
Perform visual inspections twice yearly—spring to assess winter damage and fall to prepare for the next salt season. Use a flashlight and scraper to probe suspicious areas. Touch up any chips or cracks immediately. Well-maintained undercoating lasts 5-7 years, but spot repairs every 2-3 years in high-wear areas extend overall life indefinitely.
Can I paint over asphalt undercoating for a cleaner appearance?
Technically yes, but it’s generally unnecessary and can compromise protection. Asphalt undercoating is designed as a final finish. If aesthetics matter, use a thin topcoat of chassis black paint specifically formulated for flexibility over undercoating. Avoid thick paint layers that reduce flexibility. Most enthusiasts embrace the textured black finish as a badge of proper maintenance.
Is brush-on undercoating suitable for classic car restoration?
Absolutely, and it’s often preferred. The brush allows precise application on valuable originals without overspray hitting restored components. Use a non-rubberized, harder formulation for show vehicles. For driver-quality classics, standard rubberized asphalt provides superior protection. Always apply to properly prepped surfaces—classic car restorations demand the highest prep standards.
How do I remove old undercoating before reapplication?
Mechanical removal works best: heat guns soften material for scraping, followed by wire wheels on an angle grinder. Chemical strippers exist but are messy and environmentally problematic. For small areas, a sharp cabinet scraper and patience suffice. Never use torches—undercoating vapors are flammable and toxic. Complete removal is only necessary for failing coating; sound, well-adhered material can be coated over after cleaning.
What’s the realistic coverage I can expect per quart?
Expect 25-35 square feet per quart at proper thickness for a single coat. A typical sedan undercarriage requires 2-3 quarts for two complete coats. Trucks and SUVs need 3-4 quarts. Buy 20% more than calculated to account for waste and touch-ups. Coverage varies based on surface roughness—heavily pitted or rusty surfaces consume more material than smooth, well-prepped metal.