That tiny star on your windshield might seem harmless today, but temperature swings and road vibrations can transform it into a spiderweb crack by next week. Professional auto glass technicians use sophisticated equipment to stop this progression, but modern professional-style repair kits have closed the gap dramatically. These aren’t the flimsy syringe-and-resin tubes from discount stores—they’re precision-engineered systems that can restore optical clarity and structural integrity when deployed correctly.
Understanding what separates legitimate professional-grade kits from marketing hype empowers you to make informed decisions about protecting your vehicle’s safety glass. Whether you’re a mobile detailer expanding services, a fleet manager controlling costs, or a dedicated DIY enthusiast who demands flawless results, the right system makes all the difference between an invisible repair and a visible eyesore that weakens your windshield.
Top 10 Windshield Repair Kit
Detailed Product Reviews
1. Rain-X 600001 Windshield Repair Kit - Quick and Easy Durable Resin Based Windshield Repair Kit for Chips and Cracks, Good for Round Damage Below 1" in Diameter and Cracks Smaller Than 12" in Length

Overview: The Rain-X 600001 offers a straightforward approach to windshield damage control. This budget-friendly kit targets small chips under 1 inch and cracks shorter than 12 inches, providing car owners with a simple DIY solution to prevent minor damage from escalating into costly replacements. The kit includes everything needed for multiple repairs without requiring specialized equipment.
What Makes It Stand Out: Rain-X emphasizes simplicity and accessibility. The durable resin formula strengthens damaged glass by penetrating up to the first layer, while the universal fit design works on all laminated windshields. The brand’s clear instructions warn against common mistakes like applying resin too quickly or working on contaminated cracks, helping first-time users achieve better results.
Value for Money: At $11.49, this kit represents exceptional value. Professional windshield repairs typically cost $75-150, making this an economical choice for minor damage. The ability to perform multiple repairs further enhances its cost-effectiveness, though success depends heavily on following instructions precisely and repairing damage before contamination.
Strengths and Weaknesses: Strengths include the trusted brand name, straightforward application process, and affordable price point. The kit works best on fresh, clean damage. Weaknesses involve reliance on direct sunlight for curing, which limits usability in overcast conditions, and the lack of vacuum technology that could improve resin penetration. Results may vary based on user skill and damage type.
Bottom Line: The Rain-X kit is ideal for budget-conscious drivers dealing with small, recent chips. It’s a solid entry-level option that delivers adequate results when used correctly.
2. Permatex 09103 Automotive Windshield Repair Kit For Chipped And Cracked Windshields. Permanent Air-Tight Repairs, With Repair Syringe & Plunger, 9-piece Kit

Overview: The Permatex 09103 positions itself as a professional-grade solution for bullseye damage up to 1.25 inches. This 9-piece kit targets drivers seeking permanent, air-tight repairs without the expense of professional service. The system focuses on simplicity with its spring-lock syringe mechanism that eliminates mixing and reduces mess.
What Makes It Stand Out: The advanced spring-lock delivery system provides controlled resin application, preventing air bubbles and ensuring deeper penetration. Unlike many competitors, this kit cures naturally in daylight, eliminating the need for UV lamps or direct sunlight. The comprehensive instructions with photographic guides make the process accessible to novices while delivering results that approach professional quality.
Value for Money: Priced at $14.18, the Permatex kit offers strong middle-ground value. It costs slightly more than basic kits but provides superior application control and can handle larger bullseye damage. The permanent repair claim, if achieved, saves hundreds compared to replacement. However, the single-repair focus may limit value for those with multiple chips.
Strengths and Weaknesses: Strengths include the innovative syringe system, clear visual instructions, and daylight curing flexibility. The kit excels at bullseye repairs. Weaknesses include limited versatility for crack types beyond bullseyes, no vacuum technology for complex damage, and a slightly higher price point than entry-level options. The 9-piece set may feel overwhelming for simple repairs.
Bottom Line: A reliable choice for drivers prioritizing application control and permanent bullseye repairs. The Permatex kit balances professional features with user-friendly design.
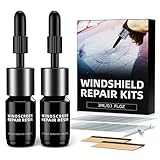
3. BLUTOKS Windshield Repair Kit, 2 PCS Windshield Crack Repair Kit with Suction Cup Curing Light, Automotive Nano Fluid Vehicle Windscreen Tool, Glass Repair Kit for Chips and Cracks (Navy)

Overview: The BLUTOKS kit delivers professional-grade windshield repair capabilities in a consumer package. This two-piece set handles chips, cracks, spider webs, and holes up to 12 inches using advanced vacuum technology and UV curing. Designed for serious DIYers, it promises near-invisible results that restore structural integrity.
What Makes It Stand Out: The 20PA vacuum holder creates an airtight seal that forces resin deep into damage, virtually eliminating air bubbles. The included UV curing light with multiple timer settings enables precise 5-10 minute cures regardless of weather conditions. This versatility extends to repairing star-shaped chips, half-moon cracks, and complex spider webs that simpler kits cannot address.
Value for Money: At $16.99 for two complete kits, BLUTOKS offers compelling value. Each unit costs less than $8.50, making it competitive with single-use kits while providing superior technology. Professional repairs for complex cracks can exceed $200, so successful DIY repairs yield substantial savings. The durability claims, backed by high shear-strength resin, justify the modest premium over basic options.
Strengths and Weaknesses: Strengths include powerful vacuum technology, professional UV curing light, multi-damage versatility, and excellent per-unit pricing. The resin formula creates durable, nearly invisible repairs. Weaknesses involve a steeper learning curve for beginners and the need for careful surface preparation. The two-kit package may be excessive for users with only one vehicle.
Bottom Line: The BLUTOKS kit is the top choice for enthusiasts seeking professional results. Its advanced features justify the investment for those tackling varied or complex windshield damage.
4. Windshield Repair Kit, Windshield Crack Repair Kit with Suction Cup Curing Light, 4 Pcs Car Glass Repair Kit Quick Fix for Chips & Cracks, Windshield Chip Repair Kit, Automotive Nano Fluid(Yellow)

Overview: This comprehensive four-piece windshield repair kit provides exceptional quantity without sacrificing quality. Engineered for professional results at home, each unit repairs chips and cracks up to 12 inches using vacuum technology and UV curing. The kit targets multi-vehicle households or frequent repair needs with its generous package size.
What Makes It Stand Out: The adjustable UV curing lamp features multiple timer and exposure settings, allowing customization based on damage severity and resin type. Like premium competitors, the 20PA vacuum holder ensures deep resin penetration and bubble-free application. The four-kit configuration stands out in a market dominated by single or double packs, offering unmatched value per repair.
Value for Money: At $16.97 for four complete kits, this represents the lowest per-unit cost in its class at approximately $4.24 per kit. This pricing structure makes professional-grade repairs accessible for fleet vehicles, families with multiple cars, or windshield repair businesses. The quality matches kits costing twice as much individually, making it an economical bulk solution.
Strengths and Weaknesses: Strengths include unbeatable quantity-to-price ratio, smart UV lamp with adjustable settings, effective vacuum technology, and versatility across damage types. The kit excels in value for high-volume users. Weaknesses include potential waste for single-vehicle owners and storage requirements for unused kits. The brand recognition is lower than established names, though features match premium offerings.
Bottom Line: Perfect for households with multiple vehicles or small repair businesses. This kit delivers professional technology at an unprecedented per-unit price.
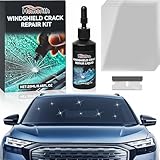
5. Windshield Crack Repair Kit,2025 Latest Upgraded Glass Crack Repair Kit,5MinQuick-Glass Repair Liquid,Long-Lasting for Windshields, Windows, Mirrors,All Crack Types Windshield Repair Kit (Black).

Overview: Marketed as the latest upgraded solution for 2025, this budget-friendly kit promises comprehensive glass repair across multiple surfaces. At just $9.99, it targets cost-conscious consumers seeking versatility beyond typical windshield applications. The kit claims to repair various crack types using high-transparency resin and multi-layer curing technology.
What Makes It Stand Out: The multi-surface versatility is exceptional, extending to side windows, sunroofs, mirrors, headlight covers, and even industrial equipment glass. The nano-scale crack injection technology aims to maximize glass integrity restoration. The five-minute repair process requires no glass removal or circuit contact, simplifying application for novices.
Value for Money: At $9.99, this is the most affordable kit reviewed. The low price point makes it attractive for experimental repairs or minor damage. However, the unknown brand and vague “latest upgraded” claims raise questions about long-term reliability. Professional repairs remain expensive, so successful fixes provide significant savings, but the risk of subpar results is higher than with established brands.
Strengths and Weaknesses: Strengths include the lowest price, impressive versatility across glass types, easy application, and fast curing claims. The kit addresses multiple crack patterns effectively. Weaknesses involve unverified brand reputation, potentially exaggerated claims, lack of vacuum technology, and no UV curing light. The “2025” designation seems premature and marketing-driven.
Bottom Line: A high-risk, high-reward option for adventurous DIYers on tight budgets. Consider this for non-critical repairs before trusting it with your windshield.
6. NASILOOP Windshield Repair kit, Quick and Efficiency Glass Repair Fluid, Car Windshield Crack Repair Resin Kit for Fixing Chips, Bulls-Eye, Cracks and Star-Shape Cack-2 Pack

Overview: The NASILOOP Windshield Repair Kit arrives as a budget-friendly two-pack solution priced at $9.95, targeting drivers dealing with minor glass damage. This kit promises rapid repairs through its high-speed curing formula, addressing chips, bullseyes, star-shaped cracks, and even linear cracks up to 12 inches long. The manufacturer emphasizes its specially-engineered polymers that penetrate micro-fissures for durable bonding.
What Makes It Stand Out: The 12-inch crack repair capability exceeds most competitors in this price range, which typically max out at 6-8 inches. The two-pack configuration provides backup for multiple repairs or mistakes. Its nano-level repair fluid claims cross-linking chemical reactions that restore structural integrity within minutes, positioning it as a professional-grade solution for DIYers.
Value for Money: At under $10 for two complete kits, this represents exceptional value compared to $75-$150 professional windshield repairs. Each kit costs less than $5, making it cheaper than most single-application competitors. The inclusion of two bottles effectively halves the per-repair cost, ideal for households with multiple vehicles or those prone to windshield damage.
Strengths and Weaknesses: Strengths include comprehensive damage coverage, rapid curing time, user-friendly instructions, and outstanding price-per-unit value. The two-pack offers practical redundancy. Weaknesses involve hyperbolic marketing claims (“magical chemical reaction”) that may oversell capabilities. Effectiveness diminishes with cracks longer than 6 inches despite 12-inch claims, and results require direct sunlight for optimal curing. The kit lacks professional-grade injection tools, limiting pressure application.
Bottom Line: The NASILOOP kit delivers solid value for minor chip and crack repairs under six inches. While marketing language is exaggerated, the actual product performs adequately for its price point. Best suited for budget-conscious drivers addressing small damage promptly before it spreads.
7. popalula Windshield Chip Repair Kit - 2025 Upgrade Car Windshield Crack Repair Kit, Glass Repair Liquid for Cracks and Chips, Rock Chip Repair Kit for Fix Windows, Mirrors, Glasses, All Crack Types
Overview: The popalula Windshield Chip Repair Kit positions itself as a 2025-upgraded solution costing $12.99, promising five-minute repairs for various glass surfaces beyond just automotive windshields. This kit addresses bullseyes, star-shaped cracks, radial fractures, and reticular damage using imported high-transparency resin. Its multi-surface versatility extends to side windows, mirrors, headlights, and even industrial glass.
What Makes It Stand Out: The genuine differentiator is its universal application scope—few competitors explicitly support smartphone screens, headlight covers, and industrial equipment. The multi-layer curing technology and nano-scale penetration claims suggest advanced formulation. The “2025 upgrade” branding implies recent formulation improvements, though specific enhancements remain vague.
Value for Money: At $12.99, it commands a slight premium over basic kits but justifies this through expanded utility. Professional smartphone screen repair costs $100+, while headlight restoration services run $50-$100. This kit’s versatility across multiple surfaces creates compound value, effectively serving as a household glass repair solution rather than a single-use automotive product.
Strengths and Weaknesses: Strengths include remarkable versatility, rapid five-minute curing, high-transparency resin for near-invisible results, and prevention of secondary cracking. The straightforward three-step process requires no glass removal. Weaknesses involve ambiguous “2025 upgrade” claims lacking substantiation. Multi-surface versatility may compromise windshield-specific optimization. The kit contains minimal resin quantity, limiting multiple large repairs. Extreme temperature performance remains unverified.
Bottom Line: The popalula kit excels for users seeking a multi-purpose glass repair solution beyond automotive applications. While slightly pricier than basic windshield-only kits, its versatility justifies the cost. Ideal for households wanting one product for vehicles, devices, and household glass, though dedicated windshield purists may prefer specialized alternatives.
8. J-B Weld 2100 Windshield Saver Repair Kit, 0.025 fl. oz

Overview: The J-B Weld 2100 Windshield Saver Repair Kit leverages the respected J-B Weld brand name at $12.95, though it contains a mere 0.025 fluid ounces of repair resin. This minimalist kit targets small chips and star damage under 1.25 inches in diameter on laminated windshields. The package focuses on simplicity rather than advanced features, embodying the brand’s straightforward approach to adhesive solutions.
What Makes It Stand Out: The J-B Weld brand equity provides trustworthiness that generic competitors lack. Its reputation for durable adhesives translates to perceived reliability in automotive glass repair. The kit’s simplicity appeals to purists wanting proven chemistry without marketing fluff. The precision applicator design minimizes waste for single small-chip repairs.
Value for Money: At $518 per fluid ounce, this is astronomically expensive by volume. However, the brand premium may justify cost for users prioritizing reliability over quantity. For a single small chip repair, $12.95 still undercuts professional services. Yet competitors offer 10-20x more product for similar prices, making this poor value for multi-repair households. It’s essentially a single-use, premium-priced solution.
Strengths and Weaknesses: Strengths include trusted brand reputation, proven adhesive technology, clear instructions, and reliable prevention of damage spread. The minimal packaging reduces environmental waste. Weaknesses center on exceptionally limited quantity, restricting repairs to one tiny chip. It lacks modern injection tools, nano-resin formulations, and multi-surface versatility. The 1.25-inch diameter limitation is restrictive compared to competitors claiming 12-inch capabilities.
Bottom Line: The J-B Weld kit suits brand-loyal customers needing a single, small-chip repair on a primary vehicle. Its trustworthiness is undeniable, but value is severely compromised by quantity. For multiple vehicles, larger damage, or budget-conscious buyers, alternatives offer substantially better value. Choose this for brand confidence, not economy.
9. LOMEEN Windshield Crack Repair Kit, 2 Bottles Nano Glass Crack Repair Liquid Quick Windshield Repair for Chips and Cracks, Bulls-Eye and Star-Shaped Crack
Overview: The LOMEEN Windshield Crack Repair Kit offers dual-purpose functionality at $9.99, including two bottles of nano glass repair liquid for both automotive windshields and smartphone screens. This kit targets chips, bullseyes, and star-shaped cracks using a straightforward application process. The product blurs the line between automotive and electronics repair, appealing to tech-savvy consumers.
What Makes It Stand Out: The smartphone screen repair capability is genuinely unique, addressing a common pain point that traditional windshield kits ignore. Two included bottles provide backup for multiple repairs or different applications. The “no complicated tools” approach emphasizes accessibility for non-technical users. Its nano-scale repair fluid claims penetrate gaps for seamless finishes.
Value for Money: At $5 per bottle, this undercuts most dedicated smartphone screen repair kits while including windshield functionality. Professional phone screen repair costs $100-$300, creating substantial potential savings. For households with both vehicle and device glass damage, this offers two-in-one convenience. However, automotive-specific competitors may provide superior results for vehicle-only needs.
Strengths and Weaknesses: Strengths include innovative dual-surface application, two-bottle value, simple three-step process, and near-invisible finish claims. The kit works on multiple crack types and requires no maintenance. Weaknesses involve questionable optimization—formulations ideal for phone screens may compromise automotive durability. Temperature resistance and UV stability for vehicle use remain unverified. Instructions lack automotive-specific guidance, and curing requirements are ambiguous.
Bottom Line: LOMEEN suits users prioritizing versatility over specialization. It’s an economical choice for minor phone screen scratches and small windshield chips, but automotive purists should seek dedicated kits. Consider this a convenient hybrid solution for light-duty repairs, not a professional-grade automotive product.
10. tuncate Windshield Repair Kit for Chips and Cracks– 4 Pack Glass Repair Kit with Enhanced Injection Head for Chips, Cracks & Star-Shaped Cracks, Quick & Easy DIY Fix for Windshields, Black

Overview: The tuncate Windshield Repair Kit arrives as a value-packed four-pack solution priced at just $8.91, featuring an enhanced injection head and nano-enhanced resin formula. This kit promises professional-grade repairs across extreme temperatures from -4°F to 104°F, targeting bullseyes, star cracks, half-moon fractures, and combination damage. Safety certifications and child/pet-friendly formulation distinguish it from budget competitors.
What Makes It Stand Out: The four-pack configuration offers unparalleled per-unit value at $2.23 per kit. The enhanced injection head provides superior pressure application compared to dropper-style competitors. Impressive safety credentials—requiring no protective gloves, biodegradable resin, and 97% light transmittance—address health and environmental concerns. Extreme temperature versatility enables repairs in harsh conditions where others fail.
Value for Money: This represents the best cost-per-kit ratio in the market. Professional repairs cost $75-$150 per incident; this kit handles four repairs for under $9. The nano-enhanced resin claiming 120MPa compressive strength (130% of ordinary glass) delivers premium features at budget pricing. For families with multiple vehicles or fleet operators, the value proposition is extraordinary.
Strengths and Weaknesses: Strengths include exceptional multi-kit value, advanced injection applicator, proven extreme-temperature performance, comprehensive safety certifications, and high-strength resin. The three-step process works day or night. Weaknesses involve brand obscurity compared to J-B Weld, potential waste for single-vehicle owners, and unclear individual kit shelf life. Four repairs require four separate damage incidents, which may exceed typical user needs.
Bottom Line: The tuncate kit dominates for value seekers and multi-vehicle households. Its professional-grade injection head and safety certifications surpass expectations at this price point. Single-vehicle owners may find the four-pack excessive, but the per-unit cost is unbeatable. Choose this for comprehensive features, environmental safety, and maximum economy.
What Defines a Professional-Style Windshield Repair Kit?
Professional-style kits share DNA with the equipment used in auto glass shops, emphasizing controlled resin delivery, vacuum cycling, and cure precision. Unlike basic consumer versions that rely on gravity and guesswork, these systems provide repeatable results through engineered pressure differentials and stable bridge mounting.
The Core Components That Separate Pros from DIY
The hallmark of professional-grade equipment starts with a rigid bridge assembly that anchors securely to the glass without flexing. This stability ensures the injector maintains perpendicular alignment throughout the repair process—a critical factor for resin penetration. Look for machined aluminum or reinforced composite bridges rather than plastic components that warp under pressure.
Resin viscosity options separate serious kits from toys. Professional systems include multiple resin formulations: thin water-like resin for filling micro-cracks, medium viscosity for standard bullseye repairs, and thick pit filler for surface finishing. Single-resin kits simply cannot address the spectrum of damage types you’ll encounter.
Bridge vs. Injector Systems: Which Configuration Works Best?
Bridge-mounted systems dominate professional applications because they create a stable, three-point contact with the windshield. This design isolates the injector from hand tremors and allows technicians to step away during vacuum or pressure cycles. The bridge’s suction cups should feature vacuum indicators or locking levers—redundant security that prevents movement during critical phases.
Handheld injector systems offer portability for tight spots near edges or corners where bridges won’t seat properly. However, they demand steady hands and constant pressure management. For most repairs, a quality bridge system delivers superior consistency, especially when working on heated windshields or acoustic glass that requires extended resin dwell times.
Understanding Windshield Damage: What Can Actually Be Fixed?
Not every chip qualifies for repair, regardless of kit quality. Professional technicians evaluate damage based on size, depth, location, and contamination level before committing to the process. Your kit’s effectiveness depends entirely on matching its capabilities to the damage characteristics.
Bulls-Eyes, Stars, and Combination Breaks
Bullseye damage—circular impacts with a clean cone-shaped crater—respond best to repair, often achieving 90-95% visual improvement. Star breaks feature radial cracks extending from the impact point; these demand resin with excellent wicking properties and patience during vacuum cycles to draw air from each leg.
Combination breaks merge both patterns and represent the ultimate test of your equipment. Professional-style kits with adjustable pressure staging excel here, allowing you to first stabilize the central impact before addressing individual crack extensions. Without this capability, you’ll trap air pockets that become permanent blemishes.
The Critical Role of Damage Size and Location
The repairable sweet spot exists for damage smaller than a quarter (approximately 1 inch) and cracks under 12 inches. However, location matters more than size. Damage in the driver’s direct line of sight—typically the center 12 inches of the steering wheel’s visual path—requires perfection because even slight distortion affects safety. Professional kits can achieve this, but the margin for error approaches zero.
Edge cracks within 2 inches of the windshield perimeter present structural concerns. While your kit might fill them, the stress concentration often means replacement remains the safer choice. Most professional standards reject repairs in this zone unless the crack is exceptionally short and stable.
Essential Features to Evaluate Before Buying
When shopping for professional-style equipment, prioritize function over flashy packaging. The best kits earn their reputation through engineering details that only become apparent during actual repairs.
Resin Quality and Viscosity Grades
Professional resin cures crystal-clear with a refractive index matching factory glass (approximately 1.52). Avoid kits that don’t specify this property—mismatched indices create visible distortions. The resin should remain stable for 12-18 months when stored properly, without yellowing or separating.
Multiple viscosity options aren’t optional for professional results. Your kit should include:
- Low-viscosity (5-10 cps): For hairline cracks and moisture displacement
- Medium-viscosity (20-30 cps): General-purpose for standard impacts
- High-viscosity (100+ cps): Pit filler that polishes to a smooth finish
Vacuum and Pressure Cycle Capabilities
Look for kits advertising “dual-action” or “vacuum-pressure cycling.” This feature actively pulls air out of the damage before injecting resin—crucial for preventing trapped bubbles. The vacuum should achieve at least 20 inches of mercury (inHg) to effectively evacuate air from complex cracks.
Pressure staging matters more than maximum pressure. Professional injectors allow incremental pressure increases (5-10 psi steps) rather than slamming resin in at 50+ psi. This controlled approach prevents resin from blowing through the laminate layer and creating a permanent fog spot between glass plies.
Curing Technology: UV Lamps vs. Sunlight
While sunlight can cure resin, professional results demand consistent UV exposure. Portable UV lamps (365-395nm wavelength) with 5-10 minute cure times eliminate weather dependency and ensure complete polymerization. LED-based lamps run cooler than old halogen models, preventing thermal stress during curing.
Consider lamp geometry. A focused beam works for single repairs, but a broader output covers combination breaks where resin spreads across a wider area. Some advanced kits include curing strips that you place over the repair, allowing you to move the lamp around without disturbing the resin.
The Anatomy of a Complete Professional Kit
Beyond the headline components, professional-grade systems include specialized accessories that streamline workflow and improve outcomes. Missing these items signals a kit that’s incomplete out of the box.
Bridge Assembly and Suction Stability
Examine the suction cup design. Professional bridges use cups with individual vacuum locks and pressure gauges, letting you verify each seal independently. The bridge should articulate to accommodate windshield curvature without requiring excessive force that could crack the glass.
The injector mounting point needs micro-adjustment capability—typically 1-2mm of X-Y movement—to perfectly center over the impact point after the bridge is locked down. This prevents the need to reposition suction cups repeatedly, which weakens their grip.
Resin Injector Mechanisms: Piston vs. Screw-Driven
Piston injectors offer rapid resin delivery but can create pressure spikes. Screw-driven mechanisms provide smoother, more controlled flow with tactile feedback that prevents over-pressurization. For professional use, screw-driven systems with calibrated pressure indicators deliver the repeatability needed for commercial work.
The injector seal that contacts the glass should be replaceable and made from fuel-resistant rubber. This seal compresses to create a resin-tight chamber; cheap silicone versions degrade quickly and leak resin onto the glass surface.
Pit Fillers and Polish: The Finishing Touch
After resin injection, the impact point remains slightly concave. Professional kits include pit filler resin—thicker than repair resin—that levels the surface when cured under a curing film. The final step involves polishing with a compound specifically formulated for glass (not automotive paint polish) to restore optical clarity and smoothness.
Advanced Techniques for Flawless Repairs
Mastering professional equipment requires understanding techniques that maximize the kit’s capabilities. These methods separate shop-quality results from amateur attempts.
Proper Drilling Techniques for Impact Points
Some damage requires a tiny drill hole at the impact point’s deepest center to create a reservoir for resin entry. Use a 1/16-inch diamond burr bit at 10,000 RPM or higher—slow speeds create chips and cracks. The hole should penetrate only the outer glass layer, stopping before the PVB interlayer.
Professional kits include depth stops or guide bushings that prevent drilling too deep. Without this control, you risk punching through to the laminate, which contaminates the PVB and necessitates windshield replacement.
Moisture Removal and Dryout Procedures
Water contamination kills repairs. Professional kits incorporate moisture evaporators—typically isopropyl alcohol solutions applied before resin injection. For soaked damage, some systems include tiny heating elements that warm the glass to 100-120°F, turning trapped water to vapor that escapes during vacuum cycles.
Never apply heat directly with a hair dryer; uneven thermal expansion can extend the crack. Professional equipment distributes heat gently across the damage zone while monitoring temperature with an infrared thermometer.
Managing Complex Multi-Leg Cracks
Each crack leg requires individual attention. Professional technique involves sealing each leg’s terminus with pit filler to create a closed system before main injection. Then, using a fine-tipped injector or capillary tube, you introduce resin into each leg separately while maintaining vacuum on the central impact point.
This methodical approach prevents air migration and ensures complete filling. Rushing this process by flooding from the center leaves microscopic air channels that become visible under polarized light or at certain viewing angles.
Common Pitfalls That Ruin Repairs
Even the best equipment fails when used improperly. Recognizing these errors before they occur saves time, resin, and potentially your windshield.
Overfilling and Underfilling Resin
Overfilling creates a resin “volcano” that cures proud of the glass surface, requiring aggressive polishing that can scratch surrounding areas. More critically, excess resin seeps under the injector seal and contaminates the glass surface, leaving permanent rings.
Underfilling leaves voids that appear as dark shadows. Professional injectors with graduated barrels prevent this—each milliliter of resin corresponds to a specific damage size. As a rule, a quarter-sized bullseye requires 0.3-0.4ml of medium-viscosity resin.
Temperature and Humidity Considerations
Repair in direct sunlight heats the windshield unevenly, causing cracks to expand during the process. Ideal conditions are 60-80°F with less than 60% humidity. Professional kits include shade cloths or reflective blankets that cover the entire work area, maintaining stable glass temperature.
High humidity introduces moisture that interferes with resin bonding. If you must work in damp conditions, extend vacuum cycles to 10-15 minutes and consider using a moisture-displacing primer. Some professional systems integrate desiccant packs that attach to the injector, actively drying the air space during evacuation.
Impatience with Curing Times
Resin needs full cure time to achieve structural strength. Rushing to remove the bridge or polish the surface can pull uncured resin from the repair, creating voids. Follow the manufacturer’s cure time religiously—typically 5-10 minutes under UV lamp, or 30-60 minutes in direct sunlight. For deep damage, cure in stages: partially cure after initial injection, add more resin, then final cure.
Cost-Benefit Analysis: DIY vs. Professional Service
A quality professional-style kit represents a $100-300 investment, while commercial repairs cost $60-120 per incident. The break-even point arrives after your second or third repair, making kits attractive for households with multiple vehicles or small business applications.
However, factor in the learning curve. Your first 3-5 repairs will take 45-60 minutes each and may not achieve perfection. Professional technicians perform repairs in 15-20 minutes with guaranteed results. If you value time over money or need a flawless repair in the driver’s sightline, professional service justifies its cost.
For fleet managers and mobile detailers, the ROI becomes compelling immediately. Performing repairs on-site during routine maintenance eliminates vehicle downtime and creates a new revenue stream. The key is practicing on scrap windshields before offering commercial services.
Safety Protocols and Best Practices
Windshield repair involves chemicals and glass manipulation that present real hazards. Professional kits include safety equipment for good reason.
Always wear nitrile gloves—resin causes skin sensitization with repeated exposure. Safety glasses protect against glass dust if drilling becomes necessary. Work in a ventilated area; while modern resins are low-VOC, the acrylate monomers can irritate respiratory passages.
Never attempt repairs on windshields with existing stress cracks or previous repairs that failed. The structural integrity may be compromised, and pressure from injection could cause catastrophic failure. Professional standards mandate inspecting the entire windshield for secondary damage before beginning work.
Maintaining Your Repair Kit for Longevity
Professional-grade equipment lasts years with proper care. After each use, flush the injector with isopropyl alcohol to prevent resin curing inside the mechanism. Store resin bottles in a cool, dark place—refrigeration at 40-50°F doubles shelf life but requires warming to room temperature before use.
Replace injector seals every 20-30 repairs or immediately if you notice resin leakage. Keep suction cups clean and store them uncompressed; prolonged compression deforms the rubber and compromises vacuum hold. Periodically lubricate screw-driven injector threads with a drop of silicone oil to maintain smooth operation.
When to Walk Away: Limitations of Kit Repairs
Professional-style kits handle 80% of common damage scenarios, but certain conditions demand replacement. Any damage penetrating both glass layers (you’ll see inner-layer spalling) is beyond repair. Cracks longer than 12 inches, especially those that branch, exceed the resin’s ability to restore structural strength.
Damage in the acute angle area where the windshield meets the A-pillar experiences extreme stress; repairs here typically fail within months. Similarly, any chip directly in front of a camera or sensor (common in ADAS-equipped vehicles) requires OEM-spec replacement to ensure calibration integrity. Professional technicians will refuse these repairs for liability reasons—your kit’s manual should list similar contraindications.
Frequently Asked Questions
How long do professional-style repairs typically last?
When properly executed with quality resin and full curing, repairs last the remaining life of the windshield. The resin bonds permanently to the glass and doesn’t degrade under normal conditions. Failed repairs usually trace to contamination, incomplete curing, or damage that exceeded repairable limits initially.
Can I repair a crack that still has moisture inside?
No. Moisture prevents resin adhesion and causes cloudy repairs. Professional kits include moisture evacuation procedures using vacuum cycles and gentle heat. For soaked damage, apply vacuum for 15+ minutes while warming the glass to 100°F. You’ll see condensation in the injector chamber when moisture remains.
Will my insurance company accept a DIY professional-style repair?
Most insurers cover professional repairs without deductibles but don’t reimburse DIY attempts. However, a successful repair prevents the damage from spreading, which could trigger a full replacement claim later. Some fleets self-insure and accept DIY repairs when documented with before/after photos.
What’s the difference between repair resin and pit filler?
Repair resin is low-viscosity to penetrate cracks and has refractive index matching. Pit filler is thicker, designed to level the surface depression after repair. Using repair resin as filler results in a concave dimple; using filler for cracks leaves air voids because it can’t flow into tight spaces.
Can repairs be done in cold weather?
Below 50°F, resin becomes too viscous to flow properly and cure times extend dramatically. Professional technicians use portable heaters to warm the glass to 60-70°F before starting. Never apply sudden heat—gradual warming prevents thermal shock from expanding the damage.
How do I know if I’ve drilled too deep?
You’ll feel a slight “give” when the bit reaches the PVB interlayer, and drilling dust may change color. Professional kits include depth-stop collars that prevent drilling beyond 0.08 inches (typical outer glass thickness). If you suspect you’ve penetrated too far, stop immediately and consult a professional—continuing likely ruins the windshield.
Why do my repairs look good initially but show shadows later?
This indicates incomplete air removal or resin shrinkage during cure. Extend vacuum cycles and ensure you’re using fresh, non-expired resin. Old resin polymerizes incompletely and shrinks, pulling away from glass walls. Professional-grade resin includes inhibitors that minimize shrinkage to less than 3%.
Can I reuse resin that cured in the injector?
Absolutely not. Cured resin cannot be re-liquefied. Attempting to reuse it contaminates fresh resin and damages the injector. Professional practice involves flushing the injector with alcohol immediately after each repair. If resin cures inside, disassemble and soak components in acetone, replacing any permanently clogged parts.
Are professional-style kits safe for heated windshields?
Yes, with precautions. Heated windshields contain embedded wires that can be damaged by aggressive drilling. Use a wire detector (included in premium kits) to map the grid, then position your bridge to avoid wires. The heating function must be off during repair, and you should avoid excessive pressure that could dislodge wire connections.
How do I achieve truly invisible results in the driver’s sightline?
This requires perfection at every step: pristine glass cleaning, perfect injector alignment, extended vacuum cycles, incremental pressure staging, and complete curing. Even then, some faint distortion may remain visible at certain angles. Professional technicians have a 90% success rate for sightline repairs; DIY success runs 60-70% until you’ve completed 20+ practice repairs. For critical sightline damage, consider this your learning threshold before offering guaranteed results.