That tiny star-shaped chip staring back from your windshield might seem harmless now, but it’s secretly plotting to become a sprawling crack that costs you hundreds. We’ve all been there—cruising down the highway when a rogue pebble makes contact at exactly the wrong angle. The good news? Modern DIY windshield repair kits have evolved from glorified superglue tubes into sophisticated systems that can genuinely restore structural integrity and optical clarity. The bad news? Choosing the wrong kit or using the right kit incorrectly can turn a simple fix into a permanent eyesore.
Whether you’re a weekend warrior who tackles every automotive challenge or simply someone who wants to save money on professional repairs, understanding what makes a windshield repair kit truly effective is crucial. This guide dives deep into the engineering, chemistry, and practical techniques that separate successful star chip repairs from expensive mistakes. No product pitches, no sponsored rankings—just the unvarnished expertise you need to make an informed decision and execute a repair that lasts.
Top 10 Windshield Repair Kit
Detailed Product Reviews
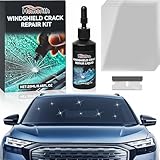
1. Rain-X 600001 Windshield Repair Kit - Quick and Easy Durable Resin Based Windshield Repair Kit for Chips and Cracks, Good for Round Damage Below 1" in Diameter and Cracks Smaller Than 12" in Length

Overview: The Rain-X 600001 Windshield Repair Kit offers a straightforward solution for minor windshield damage, handling chips under 1 inch and cracks shorter than 12 inches. This universal-fit kit from a trusted automotive brand provides everything needed for DIY repairs on laminated windshields.
What Makes It Stand Out: Rain-X leverages its reputation for glass care with a durable resin formula that penetrates the first glass layer, creating a stronger repair than the original damage. The minimalist design requires no complex tools—just apply resin, add curing strips, expose to direct sunlight, and remove excess. The kit supports multiple repairs, making it economical for vehicles with several small chips.
Value for Money: At $11.49, this kit sits in the budget-friendly sweet spot. Professional windshield repairs typically cost $50-100, so a successful DIY fix saves substantial money. While cheaper than the $13.99 Permatex alternative, it lacks advanced application tools, trading sophistication for simplicity and brand reliability.
Strengths and Weaknesses: Strengths: Trusted brand name; complete kit with clear instructions; durable, strengthening resin; supports multiple repairs; minimal learning curve. Weaknesses: Requires direct sunlight for curing; limited to relatively small damage; technique-sensitive (risk of air pockets); no specialized vacuum or pressure system; results depend heavily on contamination-free application.
Bottom Line: The Rain-X kit excels for drivers seeking a no-frills, brand-name solution for minor chips. It’s ideal for proactive repairs before damage spreads, though success demands careful, patient application. For bullseyes and small cracks, it’s a cost-effective alternative to professional service, but those needing advanced features should look elsewhere.
2. Permatex 09103 Automotive Windshield Repair Kit For Chipped And Cracked Windshields. Permanent Air-Tight Repairs, With Repair Syringe & Plunger, 9-piece Kit

Overview: The Permatex 09103 Automotive Windshield Repair Kit targets bullseye damage up to 1.25 inches on laminated glass. This nine-piece system promises permanent, air-tight repairs without professional intervention, positioning itself as a state-of-the-art solution for common impact damage.
What Makes It Stand Out: The spring-lock syringe and plunger system delivers controlled resin injection with professional precision, eliminating mixing and reducing mess. Unlike simpler kits, this advanced application tool creates consistent pressure for thorough penetration. The included photographic instructions demystify the process, while natural daylight curing removes the need for UV lamps or direct sunlight exposure.
Value for Money: Priced at $13.99, it commands a modest premium over the Rain-X kit but offers superior application control. Professional repairs start at $50, making this a worthwhile investment for single, quality repairs. The specialized tool justifies the extra cost for those prioritizing precision over multiple-repair capacity.
Strengths and Weaknesses: Strengths: Professional-grade syringe system; permanent air-tight seals; clear photo instructions; no mixing required; cures in ambient daylight; mess-free application. Weaknesses: Limited to bullseyes (not ideal for long cracks); single-repair focus reduces multi-chip value; slightly higher price point; requires contamination-free surface.
Bottom Line: For bullseye damage specifically, the Permatex kit delivers unmatched application precision. The advanced syringe system makes it worth the small premium over basic kits, especially for first-time users. While not versatile enough for all crack types, it excels at its specialized task, making it the top choice for targeted, professional-quality repairs.
3. Windshield Repair Kit, Windshield Crack Repair Kit with Suction Cup Curing Light, 4 Pcs Car Glass Repair Kit Quick Fix for Chips & Cracks, Windshield Chip Repair Kit, Automotive Nano Fluid(Yellow)

Overview: This professional-grade windshield repair kit combines advanced vacuum technology with a UV curing light to tackle chips, bullseyes, star breaks, and cracks up to 12 inches. The comprehensive system promises professional results in 5-10 minutes without mixing, targeting drivers seeking shop-quality repairs at home.
What Makes It Stand Out: The upgraded 20PA vacuum holder forces resin deep into damage, preventing air bubbles and ensuring superior penetration compared to gravity-fed systems. The smart UV lamp features multiple timer and exposure settings, allowing customized curing cycles for different damage types. This versatility addresses everything from small chips to complex spider web cracks on any laminated auto glass.
Value for Money: At $16.97, this kit represents a mid-range investment that includes a powered curing system—something most competitors lack. While nearly 50% more expensive than basic kits, it handles a broader range of damage and includes the UV lamp, eliminating weather dependency. Professional repairs cost $50-150, so the savings remain substantial.
Strengths and Weaknesses: Strengths: Powerful 20PA vacuum technology; adjustable UV curing light; rapid 5-10 minute process; versatile damage coverage; no mixing required; professional-grade results. Weaknesses: Higher price point; UV lamp requires power access; more components increase complexity; suction cup may struggle on curved surfaces.
Bottom Line: This kit suits serious DIY enthusiasts willing to invest in professional-grade tools. The vacuum system and UV lamp deliver superior results across diverse damage types, justifying the premium price. For those facing multiple or complex repairs, it’s an excellent value that bridges the gap between basic kits and professional service.
4. BLUTOKS Windshield Repair Kit, 2 PCS Windshield Crack Repair Kit with Suction Cup Curing Light, Automotive Nano Fluid Vehicle Windscreen Tool, Glass Repair Kit for Chips and Cracks (Navy)

Overview: The BLUTOKS kit provides two complete repair systems in one package, each equipped with 20PA vacuum technology and UV curing lights. Designed for bullseyes, star chips, spider webs, and cracks up to 12 inches, this navy-colored set targets users needing multiple repairs or maintaining several vehicles.
What Makes It Stand Out: Getting two professional-grade kits for essentially the price of one competitors’ single kit creates exceptional value. Each system features the same powerful vacuum holder that prevents air bubbles and forces resin deep into damage. The UV lamp offers multiple settings for customized curing, while the resin boasts remarkable shear strength for structural integrity restoration.
Value for Money: At $16.99 for two complete kits, the per-repair cost drops to around $8.50—cheaper than most basic single kits. This makes it ideal for families with multiple cars or those wanting a backup for future damage. Professional service costs $50-150 per repair, so the savings multiply across both kits.
Strengths and Weaknesses: Strengths: Two complete kits for one price; powerful 20PA vacuum technology; adjustable UV curing; high-shear-strength resin; covers diverse damage types; straightforward four-step process. Weaknesses: Higher upfront cost; assumes need for multiple repairs; component quality may vary between kits; suction cups can be tricky on complex curves.
Bottom Line: This BOGO-style package delivers the best per-unit value for anyone anticipating multiple repairs. The professional-grade tools match single-kit competitors while effectively halving your cost-per-repair. It’s an unbeatable choice for households with several vehicles or those wanting spare capacity, provided you actually need both kits.
5. Windshield Crack Repair Kit,2025 Latest Upgraded Glass Crack Repair Kit,5MinQuick-Glass Repair Liquid,Long-Lasting for Windshields, Windows, Mirrors,All Crack Types Windshield Repair Kit (Black).

Overview: Marketed as a 2025 upgraded solution, this budget-friendly kit promises five-minute repairs on windshields, windows, mirrors, and even headlight covers. Using imported high-transparency resin with multi-layer curing technology, it targets cost-conscious drivers wanting maximum versatility for under $10.
What Makes It Stand Out: The multi-surface adaptability breaks traditional limitations, handling laminated glass, mirrors, and industrial equipment beyond just automotive windshields. The nano-scale crack penetration claims advanced optical resin injection, while the five-minute process emphasizes speed. At this price point, it removes financial barriers for experimental or emergency repairs.
Value for Money: At $9.99, it’s the most affordable option reviewed, costing less than a fast-food meal. Professional repairs start at $50, creating dramatic potential savings. However, the unknown brand and vague “latest upgraded” claims raise questions about long-term durability compared to established names. It includes enough resin for multiple applications, further stretching value.
Strengths and Weaknesses: Strengths: Extremely low price; versatile multi-surface application; rapid five-minute cure; no mixing required; simple three-step process; covers comprehensive crack types. Weaknesses: Unknown manufacturer reliability; lacks UV curing equipment; “2025 upgraded” claims unverified; no vacuum pressure system; questionable long-term durability; no brand support reputation.
Bottom Line: This kit serves as an excellent low-risk entry point for minor repairs or non-windshield glass. While the price and versatility are compelling, the unproven brand and absence of professional-grade tools suggest tempering expectations. Use it for mirrors, side windows, or experimental fixes, but consider established alternatives for critical windshield repairs where safety is paramount.
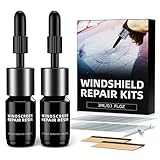
6. WOOKKIT Windshield Repair Kit 2 Bottles Car Windshield Crack Repair Kit Nano Glass Repair Liquid Adhesive Solution for Fix Chips Bullseye

Overview: The WOOKKIT Windshield Repair Kit delivers professional-grade glass repair capabilities in a DIY-friendly package. This $9.99 kit includes two 3mL bottles of nano glass repair resin, sufficient for 4-6 repairs of chips, bullseyes, and spiderweb cracks on laminated automotive glass. Designed for drivers seeking dealership-quality results without the premium price, it promises to restore over 90% of original strength and transparency.
What Makes It Stand Out: This kit’s proprietary nano-repair technology penetrates molecular-level fractures, creating superior adhesion compared to traditional resins. The UV-resistant, waterproof formulation withstands extreme temperatures from -40°F to 200°F after curing, making it reliable in any climate. The sub-30-minute process eliminates complex drilling or pumping—simply inject, cure under UV/sunlight using the included films, and polish. Multi-surface compatibility extends beyond windshields to phone screens and mirrors.
Value for Money: At approximately $1.60-$2.50 per repair, this kit saves users 80% compared to $100+ professional services. The two-bottle design provides exceptional value for multi-vehicle households or recurring damage. While single-use competitors offer similar upfront costs, WOOKKIT’s dual-bottle approach doubles the repair opportunities, making it one of the most economical choices for proactive maintenance.
Strengths and Weaknesses: Strengths include rapid curing, comprehensive accessory inclusion (curing films, applicators), and impressive temperature durability. The nano-technology ensures deep penetration for lasting repairs. Weaknesses involve limited effectiveness on cracks exceeding 6 inches and a learning curve for first-time users. Results heavily depend on proper surface prep and adequate UV exposure; insufficient sunlight may lead to incomplete curing.
Bottom Line: Ideal for car owners tackling minor chips and bullseyes proactively. The WOOKKIT kit offers near-professional results at a fraction of dealership costs, though users should maintain realistic expectations for larger cracks. A smart investment for regular maintenance.
7. popalula Windshield Chip Repair Kit - 2025 Upgrade Car Windshield Crack Repair Kit, Glass Repair Liquid for Cracks and Chips, Rock Chip Repair Kit for Fix Windows, Mirrors, Glasses, All Crack Types
Overview: The popalula Windshield Chip Repair Kit markets itself as a 2025-upgraded solution promising five-minute repairs for all glass damage types. Priced at $12.99, this kit uses imported high-transparency resin and advanced multi-layer curing technology to address chips, star patterns, radial cracks, and even complex reticular damage across automotive and household glass surfaces.
What Makes It Stand Out: The aggressive five-minute repair claim dramatically outpaces standard 20-30 minute kits, appealing to time-conscious users. Its comprehensive damage coverage includes crack types often ignored by competitors, while multi-surface versatility extends to sunroofs, headlight covers, and industrial equipment. The kit breaks traditional limitations with a universal formula designed for seamless, trace-free restoration.
Value for Money: While slightly pricier than budget options, the kit justifies its cost through time efficiency and expanded capabilities. Professional chip repair costs $60-$100, making this kit profitable after one successful use. The 2025 upgraded formulation and imported resin suggest higher quality than generic alternatives, though the premium may deter casual users who repair glass infrequently.
Strengths and Weaknesses: Strengths include exceptional speed claims, durable bonding that withstands temperature shifts and vibrations, and straightforward DIY application requiring no glass removal. The kit addresses an impressive range of damage types. Weaknesses involve potentially overstated five-minute curing times that may not reflect full hardening. Marketing language is heavy on superlatives but light on technical specifications. The higher price point offers less value for single, small repairs.
Bottom Line: Best suited for drivers prioritizing speed and versatility across multiple glass surfaces. While the five-minute promise requires real-world verification, the kit’s comprehensive capabilities and upgraded formulation make it a strong mid-range choice for multi-vehicle households or commercial applications.
8. J-B Weld 2100 Windshield Saver Repair Kit, 0.025 fl. oz

Overview: The J-B Weld 2100 Windshield Saver Repair Kit leverages the brand’s trusted reputation in durable adhesives for automotive glass repair. At $12.95 for 0.025 fluid ounces, this minimalist system focuses on simplicity for repairing chips and star patterns up to 1-1/4 inches in diameter on laminated windshields.
What Makes It Stand Out: J-B Weld’s brand equity differentiates this kit from generic competitors, offering confidence in bonding reliability. The system prioritizes ease-of-use over complex technology, appealing to users intimidated by multi-step processes. It sets realistic expectations by focusing on minimizing damage appearance and preventing crack propagation rather than promising invisible results, an honest approach in a market filled with overpromising claims.
Value for Money: The per-ounce cost ($6.48/fl oz) appears high, but the kit provides precisely measured resin for 1-2 quality repairs. Value stems from brand trustworthiness and catastrophic crack prevention, potentially saving $200-$500 in replacement costs. However, competitors offer larger quantities with more accessories at similar prices, making this kit less economical for users anticipating multiple repairs.
Strengths and Weaknesses: Strengths include trusted brand backing, proven effectiveness on minor damage, and straightforward application that prevents cracks from spreading. The kit addresses the primary concern of small chip escalation. Weaknesses are the extremely limited resin quantity, absence of advanced nano-technology, and restricted damage size capacity. It lacks included curing films or polish, requiring separate purchases that increase total cost.
Bottom Line: Perfect for J-B Weld loyalists needing a reliable, one-time solution for a single small chip. For frequent repairs or larger damage, consider kits with greater resin volume and comprehensive accessories. This is a dependable, no-frills option that delivers on its modest promises.
9. NASILOOP Windshield Repair kit, Quick and Efficiency Glass Repair Fluid, Car Windshield Crack Repair Resin Kit for Fixing Chips, Bulls-Eye, Cracks and Star-Shape Cack-2 Pack

Overview: The NASILOOP Windshield Repair Kit offers a budget-conscious two-pack solution at $9.95, targeting drivers seeking rapid repairs for extensive damage. This kit makes bold claims, including the ability to repair cracks up to 12 inches long using a high-speed curing formula and specially-engineered polymers.
What Makes It Stand Out: The kit’s most compelling feature is its claimed 12-inch crack capacity, dramatically exceeding typical DIY kit limitations of 6 inches. The two-bottle packaging provides immediate backup for multiple repairs or larger jobs. Its marketing emphasizes “magical chemical reaction” cross-linking for instant structural restoration, appealing to users wanting immediate results without professional wait times.
Value for Money: This represents exceptional value at under $5 per bottle, making it the most economical option for extensive damage coverage. Professional 12-inch crack repair typically requires full windshield replacement ($200-$500), so successful large-crack repair would deliver massive savings. The two-pack design doubles repair opportunities compared to single-bottle competitors at similar price points.
Strengths and Weaknesses: Strengths include unbeatable price, generous crack size capacity claims, and user-friendly design with clear step-by-step instructions. The rapid curing formula suits emergency situations. Weaknesses involve potentially exaggerated 12-inch capabilities, which generally exceed safe DIY repair thresholds. Marketing language is hyperbolic without technical substantiation. Durability on large repairs remains questionable, and the kit may underdeliver on its most ambitious promises.
Bottom Line: An excellent value proposition for experimental users or those with multiple small damages. Treat 12-inch crack claims with healthy skepticism, but for standard chips and bullseyes, this kit delivers affordable, adequate results. Ideal as a backup kit in your garage or glove compartment for emergency use.
10. LOMEEN Windshield Crack Repair Kit, 2 Bottles Nano Glass Crack Repair Liquid Quick Windshield Repair for Chips and Cracks, Bulls-Eye and Star-Shaped Crack
Overview: The LOMEEN Windshield Crack Repair Kit distinguishes itself through dual-purpose functionality, addressing both automotive glass and smartphone screen damage. At $9.99 for two bottles of nano glass repair liquid, this kit appeals to tech-savvy car owners seeking a versatile, maintenance-free solution for minor glass damage across multiple devices.
What Makes It Stand Out: Unique multi-device compatibility sets this kit apart from purely automotive-focused competitors. The nano-formula works on laminated windshields and tempered glass screens alike, offering seamless restoration without visible residue. The no-maintenance claim suggests durable, long-lasting repairs without degradation, while the straightforward three-step process (clean, apply, cure) simplifies DIY execution for non-technical users.
Value for Money: Smartphone screen repair capability adds significant value, as professional replacement costs $100-$300. For users with both vehicle and device glass damage, this kit effectively serves two purposes at no extra cost. Compared to purchasing separate automotive and electronics repair kits, LOMEEN offers clear economic advantages, essentially providing two specialized tools for the price of one.
Strengths and Weaknesses: Strengths include exceptional versatility, easy application, and comprehensive damage coverage (chips, bullseyes, stars). The two-bottle package supports multiple repairs across different surfaces. Weaknesses involve compromised specialization—resin optimized for both surfaces may not excel at either application. The kit lacks specific curing timeframes and temperature range specifications. Effectiveness on phone screens remains unverified in product documentation, creating uncertainty for electronics use.
Bottom Line: Best for users seeking a jack-of-all-trades solution for minor glass damage across vehicles and devices. While specialized automotive kits may outperform it for dedicated car use, LOMEEN’s dual-purpose design and affordable price make it a smart choice for households with varied glass repair needs, particularly those comfortable with experimental applications.
Understanding Star Chips: Why They Demand Immediate Attention
Star chips are the automotive equivalent of a small wound that refuses to stop bleeding. Unlike simple bullseye breaks, these damage patterns feature multiple tiny cracks radiating from a central impact point, creating a fragile web that compromises your windshield’s structural integrity. What makes them particularly treacherous is their propensity to spread—temperature fluctuations, road vibrations, and even closing your car door with too much enthusiasm can cause those delicate fissures to expand into full-blown cracks that span your entire field of vision.
The physics behind windshield glass makes timely intervention critical. Your windshield isn’t just a single pane of glass; it’s a laminated sandwich consisting of two glass layers bonded to a polyvinyl butyral (PVB) interlayer. When a star chip occurs, the top glass layer fractures while the PVB layer stretches to absorb impact energy. This design prevents shattering but creates a microscopic void where air and moisture can infiltrate. Once contamination breaches this space, achieving a clear, strong repair becomes exponentially more difficult. Professional technicians emphasize that repairs within 24-48 hours yield success rates above 90%, while waiting weeks drops that figure to below 60%.
The Anatomy of a Professional-Grade Repair Kit
Resin Quality: The Heart of Every Repair
The resin is where the magic happens—or doesn’t. Premium repair kits utilize optically matched resins with refractive indices specifically formulated to match laminated automotive glass (typically 1.52-1.54). This isn’t just chemistry jargon; mismatched refractive indices create that telltale “oil slick” distortion that makes repaired chips visible from every angle. High-quality resins also feature controlled viscosity ratings measured in centipoise (cP), with thinner formulations (20-50 cP) designed to wick into hairline cracks and thicker versions (100-200 cP) for filling larger impact pits.
Bridge Assembly Design: Precision Matters
The bridge assembly acts as the surgical platform for your repair, and its engineering directly impacts success rates. Look for designs featuring three-point stabilization systems that create a vacuum-tight seal against the glass surface. Single-point suction mounts might seem convenient but they introduce wobble during the critical injection phase, allowing air to re-enter the repair zone. The best assemblies incorporate micrometer-style resin injection controls, enabling pressure adjustments as small as 0.1ml increments—crucial for star chips where over-pressurization can cause cracks to run.
Curing Mechanisms: UV Light vs. Chemical Catalysts
Curing transforms liquid resin into a solid polymer that bonds with the surrounding glass. UV-cured systems dominate the DIY market because they offer controlled curing times and superior clarity. The wavelength matters significantly: true UV-A (365nm) LEDs provide consistent cures without the heat buildup that can stress the glass. Chemical catalyst systems, while less common, work independently of sunlight and can be advantageous for mobile repairs in unpredictable weather. However, they require precise mixing ratios and often result in slightly yellowish repairs if proportions are off by even 5%.
Key Features That Separate Premium Kits from Budget Options
Viscosity Grades for Different Damage Types
Sophisticated kits include multiple resin viscosities because star chips aren’t monolithic damage patterns. The central impact crater needs a thicker pit filler to restore surface level, while the radiating legs require ultra-thin resin that can travel through capillary action. Budget kits typically offer a one-size-fits-all medium viscosity that either fails to penetrate cracks completely or leaves the surface concave, creating optical distortion and a weak spot that collects water. Premium options provide graduated viscosity sets with color-coded applicators, taking the guesswork out of matching resin to damage geometry.
Vacuum Pressure Systems: Single vs. Dual Stage
This is where advanced kits justify their higher price tags. Single-stage vacuum systems simply pull air out before resin injection. Dual-stage systems create alternating cycles of vacuum and pressure that actively massage air bubbles from crack extremities while drawing resin deeper into the damage matrix. For star chips with multiple crack legs, this pulsating action can mean the difference between a repair that’s 80% filled versus 99% filled. The remaining 1% of trapped air might seem negligible, but it creates stress concentration points that can initiate new cracking under thermal cycling.
Curing Time and Clarity Standards
Professional-grade resins achieve full tensile strength (typically 2,500-3,000 psi) within 5-10 minutes of proper UV exposure. Beware of kits claiming “instant” cures—these often use inferior resins that remain partially polymerized, leaving them soft and prone to yellowing. Clarity standards should reference the ASTM D1003 haze measurement test, with premium resins scoring below 1% haze. Anything above 3% creates visible fogging, especially problematic for star chips located within the driver’s primary viewing area.
DIY vs. Professional Repair: When to Choose What
Assessing Damage Size and Complexity
The repairable zone for DIY kits maxes out at approximately 1.5 inches in diameter for star chips, though this varies by state regulations. Within this boundary, success depends more on crack complexity than size. A simple star chip with 3-4 short legs? DIY territory. A spider web with 10+ radiating cracks extending to the edges? That’s professional territory. The key metric is whether the longest crack leg terminates within the outer black border of your windshield—if it reaches the edge, the structural bond is compromised and replacement becomes the safer option.
Your Skill Level and Patience Threshold
Be brutally honest about your mechanical aptitude. Successful star chip repair requires steadier hands than you might expect—tremors during bridge placement or injection can introduce new fractures. The process also demands patience: rushing the vacuum cycle (which should last 5-10 minutes) or curing stage (another 10 minutes) accounts for 75% of DIY failures. If you’re someone who skips reading instructions, professional repair will likely cost less than the windshield replacement you’ll eventually need.
Cost-Benefit Analysis for Single vs. Multiple Repairs
A quality DIY kit priced at $40-60 equals roughly one professional repair. The economics shift dramatically if you own multiple vehicles or live in construction zones where chips are frequent. Three repairs and you’ve broken even; five repairs and you’re saving money. However, factor in the learning curve—your first repair might not be cosmetically perfect. Consider practicing on an old windshield from a salvage yard before tackling the chip in your daily driver.
Essential Tools Beyond the Basics
Pit Polishers and Razor Blades
The repair doesn’t end when resin cures. Pit polishers—small felt pads charged with cerium oxide polishing compound—restore optical clarity to the impact point. Without this step, even perfect resin fills leave a microscopic dimple that refracts light oddly at certain angles. Single-edge razor blades, used with a specific 30-degree scraping technique, remove excess surface resin without scratching surrounding glass. These seemingly minor tools differentiate repairs that pass casual inspection from those invisible to scrutiny.
Cleaning Solutions and Lint-Free Cloths
Contamination is the enemy of adhesion. Isopropyl alcohol at 99% concentration evaporates completely without leaving residue, unlike lower grades that contain oils and water. Lint-free cloths aren’t just marketing—regular paper towels shed cellulose fibers that create voids in the resin. For star chips, which have multiple crack terminations where contamination hides, a small spray bottle of dedicated glass cleaner followed by compressed air can improve success rates by 30%.
Cure Tabs and UV Shielding Films
Cure tabs are small adhesive dots placed over the repair during curing to create a perfectly flat surface. They prevent the “volcano” effect where resin domes up, requiring excessive polishing. UV shielding films protect the uncured resin from premature hardening if you’re working in partial sunlight—a common issue with star chips that require longer injection times due to their complex geometry. These accessories often separate comprehensive kits from bare-bones options.
Step-by-Step Repair Process Demystified
Preparation: The 90% Success Factor
Preparation determines outcomes more than any other phase. Start by covering the dashboard and seats—resin drips are permanent on fabric. Clean the damage area with glass cleaner, then alcohol, then compressed air. The bridge assembly must mount on pristine glass; any dust under the suction cups creates micro-leaks that prevent vacuum formation. For star chips, use a fine pick to gently open crack legs to their terminations, ensuring resin can travel the full path. This delicate operation requires magnification—jeweler’s loupes work perfectly.
Resin Injection Technique: Slow and Steady Wins
With the bridge secured, initiate the vacuum cycle. For star chips, run vacuum for a full 10 minutes; you’re not just removing air, you’re drawing out microscopic moisture that condensed in the cracks. When injecting resin, turn the screw no more than 1/4 rotation every 30 seconds. Watch through the magnifier as resin travels each crack leg—when you see it reach the termination, stop. Overfilling creates hydraulic pressure that can extend cracks. The central pit requires a separate thicker resin application after crack legs are filled.
Curing Protocols for Maximum Strength
Once filled, place a cure tab over the repair and expose to UV light. The light source should be 1-2 inches away—closer risks thermal stress, farther results in incomplete curing. For star chips, cure in stages: 2 minutes, then gently press the repair with a gloved finger to collapse any remaining micro-bubbles, then cure for another 8 minutes. This “press-and-cure” technique, borrowed from aerospace composite repair, eliminates the tiny voids that plague complex damage patterns.
Common Mistakes That Ruin Repairs
Rushing the Vacuum Stage
Impatience kills more repairs than bad resin. The vacuum stage isn’t just about removing visible air bubbles; it’s about reducing atmospheric pressure within the crack network so resin can flow via capillary action. Interrupting this process after 2-3 minutes leaves micro-bubbles trapped in crack extremities. These bubbles expand and contract with temperature changes, eventually creating new stress risers. For star chips, which have multiple crack terminations, incomplete vacuuming virtually guarantees eventual failure.
Using Expired or Contaminated Resin
Resin has a shelf life, typically 12-18 months unopened. Once opened, oxygen and moisture begin degrading the polymerization initiators. That half-used bottle from three years ago? It’s now yellow-tinted goo that will never achieve full strength. Contamination also occurs at the applicator tip—resin that drips and cures on the nozzle gets pushed into the next repair, creating inclusion defects. Store resin in the refrigerator to double its viable life, but always let it reach room temperature before use to prevent condensation.
Improper Curing: The Hidden Killer
Cloudy days are the enemy of UV curing. Ambient UV on an overcast day is approximately 10% of sunny conditions, meaning your 10-minute cure might need 100 minutes to achieve the same polymerization. Worse, partially cured resin feels hard but lacks tensile strength, slowly flowing away from the repair under gravity and vibration. Always use a dedicated UV lamp—never rely on sunlight alone. Position the lamp directly over the repair; angled light creates uneven curing that manifests as internal stress patterns visible under polarized sunglasses.
Longevity Expectations: How Long Will Your Repair Last?
Factors Affecting Repair Durability
A properly executed star chip repair should last the remaining life of the windshield. Real-world data shows 85% of DIY repairs remain stable after three years. The 15% that fail typically involve contamination, improper curing, or damage exceeding size limits. Location matters: repairs in the acute area (directly in front of the driver) experience more thermal cycling from defrosters and more mechanical flexing from wiper blades, reducing longevity by about 20% compared to edge repairs.
Warranty Considerations for DIY Repairs
Here’s the uncomfortable truth: most windshield warranties explicitly exclude coverage for damage “repaired by non-certified technicians.” However, many insurance companies now accept quality DIY repairs for small chips, especially if you document the process with photos. Some advanced resin manufacturers offer their own warranties—if their product fails within a specified timeframe, they’ll reimburse professional repair costs. Read the fine print: these warranties require following their exact protocols, including using their specified UV light intensity and cure times.
Safety Standards and Legal Implications
DOT Regulations on Windshield Repairs
The Department of Transportation doesn’t specifically regulate DIY repairs, but they do mandate that windshields must not have damage that interferes with driver vision. A failed DIY repair that creates significant optical distortion technically violates these standards, though enforcement is virtually non-existent for passenger vehicles. Commercial vehicles face stricter scrutiny—DOT inspections can cite improperly repaired windshields, making professional repair the safer choice for work trucks.
Insurance Company Perspectives
Most insurers waive deductibles for professional chip repairs because a $60 repair prevents a $600 replacement claim. DIY repairs occupy a gray area. If your repair fails and the chip spreads, some insurers may deny the subsequent comprehensive claim, arguing the DIY attempt constituted negligence. Progressive companies now offer app-based photo assessments where you can submit pre- and post-repair images. Get approval before you repair to avoid coverage disputes later.
Environmental Factors Affecting Repair Quality
Temperature and Humidity Considerations
Ideal repair conditions sit between 60-80°F with humidity below 60%. Cold glass causes resin to thicken, preventing proper flow into crack extremities. Hot glass accelerates curing before resin fully penetrates. Humidity introduces moisture that competes with resin for crack space, creating weak bonds. Working in a garage with the door partially open often provides the most stable environment. In winter, use a hair dryer on low setting to warm the glass to room temperature before starting.
Working in Direct Sunlight vs. Shade
Direct sunlight is a double-edged sword. The UV helps curing but the heat causes resin to polymerize prematurely. Worse, solar heating creates temperature gradients across the glass, with the repair area potentially 30°F hotter than surrounding glass. This differential expansion puts the repair under immediate stress. Always work in shade, then move the vehicle into sunlight for the final cure stage. If shade isn’t available, construct a simple cardboard tent over the repair area to block direct sun while allowing ambient UV to penetrate.
Storage and Shelf Life: Maximizing Your Investment
Proper Resin Storage Protocols
Treat resin like fine wine—cool, dark, and sealed. The refrigerator at 40°F is ideal, but never freeze resin as ice crystals rupture polymer chains. After opening, purge the bottle with compressed air or nitrogen before resealing to displace oxygen. Some enthusiasts transfer resin to smaller bottles as they use it, reducing the air space above the liquid. Date every bottle with a permanent marker; 18 months from manufacture is the absolute limit, with 12 months being more realistic after opening.
Tool Maintenance for Longevity
The bridge assembly’s suction cups degrade with UV exposure and ozone. Store them in the provided case away from sunlight. Clean the injector threads after each use—cured resin here prevents smooth operation and introduces jerky injection that creates air pockets. The UV lamp’s LEDs lose intensity over time; test it periodically by curing a drop of resin on glass and checking for tackiness after the recommended time. If it’s still tacky, the lamp is failing and needs replacement.
Advanced Techniques for Challenging Repairs
Dealing with Contamination
When resin refuses to penetrate despite proper vacuum, contamination is the culprit. A technique borrowed from aerospace repair involves injecting a small amount of acetone-based cleaner, letting it sit for 30 seconds, then vacuuming aggressively. Follow with several vacuum/injection cycles using fresh resin. This solvent flush dissolves oils and waxes that block resin flow. Warning: this is an advanced technique that can damage paint if the cleaner drips, and it voids most resin warranties.
Multiple Chip Repair Strategies
Vehicles that collect several star chips require strategic sequencing. Repair the smallest, freshest chips first when your technique is sharpest. For multiple chips within 6 inches of each other, consider that repairs create localized stress fields. The resin shrinks slightly during curing, pulling on surrounding glass. Repairing adjacent chips simultaneously can cause them to connect. Instead, repair one, let it cure for 24 hours, then assess whether the neighboring chip has changed before proceeding.
The Economics of Windshield Repair Kits
Price Ranges and What They Indicate
Kits under $30 typically use generic resins with questionable optical matching and single-stage vacuum systems. The $40-60 range represents the sweet spot for DIY enthusiasts, offering dual-stage vacuum, matched resins, and proper UV lamps. Kits exceeding $80 often include multiple viscosity resins, professional-grade bridges, and sometimes even refractometers to verify resin clarity. For occasional users, mid-range kits provide 90% of professional results. For perfectionists or those repairing exotic glass (acoustic laminated, heated windshields), premium kits justify their cost.
Calculating Cost Per Repair
A $50 kit containing enough resin for 8-10 repairs costs $5-6 per use. Add the value of your time (1-2 hours including learning) and the risk of a failed repair requiring professional intervention. Compare this to $60-80 for a mobile technician’s visit. The math favors DIY if you’re repairing more than two chips over the kit’s lifespan. For single incidents, professional repair often makes more economic sense when factoring in the learning curve and potential warranty implications.
Aftercare and Maintenance Post-Repair
Cleaning Recommendations
Treat repaired areas like fresh paint for the first 48 hours. Avoid car washes with high-pressure wands directly on the repair. Hand washing is preferable; if you must use a pressure washer, stay 12 inches away and use a 45-degree angle. For cleaning, use ammonia-free glass cleaners—ammonia can slowly degrade uncured resin at the repair edges. Apply cleaner to your cloth, not directly to the glass, to prevent liquid from seeping into microscopic gaps.
When to Seek Professional Help
If after following all protocols the repair still shows visible air pockets, distortion, or the chip continues spreading, stop. Multiple DIY attempts can enlarge the damage beyond repairable limits. Professional technicians have tools like powered injectors that generate 100+ psi and industrial vacuum pumps that remove contamination you can’t access. They also carry liability insurance. Know the point where pride becomes penny-wise but pound-foolish.
Future Innovations in DIY Windshield Repair
The next generation of repair kits is borrowing technology from smartphone screen repair. Imagine resin cartridges with built-in mixing nozzles that ensure perfect catalyst ratios every time. Emerging UV-LED arrays with programmable intensity curves could automatically adjust curing profiles based on ambient temperature. Some manufacturers are experimenting with nanoclay additives that make resin self-leveling and increase impact resistance by 40%. While these innovations remain premium features today, they typically trickle down to consumer kits within 2-3 years. The DIY windshield repair market is finally receiving the engineering attention it deserves.
Frequently Asked Questions
How small is too small for a star chip to be worth repairing?
Any star chip visible to the naked eye warrants repair, but chips smaller than 1/8 inch might not be worth the effort. These micro-chips often don’t penetrate the PVB layer and can sometimes be polished out with cerium oxide. However, if you can catch a fingernail on the damage, it’s deep enough to require resin injection. Waiting for it to “get worse” is risky because contamination begins immediately.
Can I repair a star chip in my windshield if it’s directly in my line of sight?
Yes, but with extreme caution. Repairs in the acute area (the 12-inch wide strip centered on the steering wheel) must meet stricter optical clarity standards. Use only premium optically-matched resin and consider practicing first. If the repair creates any distortion, haze, or residual marking, professional replacement becomes necessary for safety. Many states require replacement, not repair, for damage in this zone that exceeds 1/2 inch.
Why does my repaired star chip still look slightly visible after curing?
Perfect invisibility is rare with star chips due to their complex geometry. Slight visibility doesn’t mean failure. The repair has succeeded if: the cracks are filled (no air pockets visible), the surface is smooth, and the damage doesn’t spread. A faint outline is normal and often less noticeable than the original black impact point. Over-polishing trying to achieve perfection can thin the surrounding glass and create new weaknesses.
How long must I wait before driving after repairing a star chip?
The resin reaches handling strength after 10 minutes of proper UV curing, but full polymerization takes 24 hours. You can drive immediately if the repair is fully cured and excess resin has been scraped. However, avoid car washes, extreme temperatures, and aggressive driving for the first day. The resin continues cross-linking and gaining strength for up to a week, though 90% of final strength is achieved within the first day.
Will a DIY repair affect my vehicle’s resale value?
Disclosure laws vary, but unrepaired windshield damage typically impacts value more than a quality repair. A professional repair certificate can actually preserve value by documenting the fix. DIY repairs are harder to document. When selling, be honest about the repair; most buyers appreciate proactive maintenance. A visible but stable DIY repair is preferable to an obvious unaddressed chip that suggests neglect of other maintenance items.
Can temperature extremes cause my repair to fail?
Properly cured resin handles temperature swings from -40°F to 200°F without issues. However, the glass around the repair expands and contracts at a different rate than the resin, creating microscopic stress. This is why repairs near edges fail more often—the glass has less room to flex. Avoid directing defroster vents straight at a fresh repair for the first week, and don’t pour hot water on an icy windshield over a repaired chip.
Is it normal for the resin to shrink during curing?
Yes, all resins exhibit some polymerization shrinkage, typically 2-4%. Quality formulations include shrinkage-compensating additives, and the injection process overfills cracks slightly to account for this. The “press-and-cure” technique mentioned earlier helps collapse bubbles that form from shrinkage. Excessive shrinkage (over 5%) indicates old or low-quality resin and results in weak bonds and visible sink marks.
Can I repair a star chip that has already started to spread into a small crack?
If the longest crack is under 6 inches and hasn’t reached the windshield edge, you can attempt repair, but success rates drop to 60-70%. The spreading indicates stress is already propagating, and the crack tip is extremely fragile. Use the absolute slowest injection rate possible to avoid hydraulic pressure extension. Some pros drill a tiny stop-hole at the crack’s end to relieve stress, but this requires specialized bits and risks complete fracture.
How do I know if my UV lamp is still strong enough to cure resin?
Test it monthly. Place a drop of fresh resin on a glass slide, cover with a cure tab, and expose for the recommended time. The resin should be rock-hard with no tackiness. If it’s soft or sticky, your lamp’s LEDs have degraded. UV intensity drops significantly with age—after 1,000 hours, many consumer LEDs output only 60% of original power. Replacement UV bulbs are inexpensive compared to failed repairs.
Are there any windshield types that shouldn’t be repaired with DIY kits?
Avoid DIY repair on acoustic laminated glass (marked with “A” or sound wave symbols), heated windshields (fine wires visible), or heads-up display (HUD) windshields. These specialized glasses have interlayers with different refractive properties or embedded elements that DIY resins can’t properly bond to. Repairs on these windshields require manufacturer-specific resins and techniques. Attempting DIY repair often results in visible distortion that ruins the specialized function and can cost over $1,500 to replace.