Your wheels are the jewelry of your vehicle—they catch the light, frame your ride, and tell the world you care about the details. But between road grime, brake dust, and the relentless assault of the elements, even the most expensive rims can lose their luster. The question isn’t whether to polish them, but how: the meditative, hands-on approach of manual polishing, or the efficient, powerful precision of machine polishing?
This comprehensive guide dives deep into the hand versus machine wheel polishing debate, equipping you with the knowledge to make the right choice for your specific situation. We’ll explore the nuances of each method, break down the technical considerations, and help you understand when to trust your own two hands versus when to harness mechanical advantage. Whether you’re a weekend warrior chasing concours-level shine or a daily driver enthusiast seeking practical maintenance, you’ll discover the strategies that deliver results without wasting time or money.
Top 10 Wheel Polishing
Detailed Product Reviews
1. Tworider 6 pcs Buffing Wheel for Drill,Buffing Pad Polishing Wheel Kits,Wheel Shaped Polishing Tool for Metal Aluminum,Stainless Steel,Chrome,Jewelry,Wood,Plastic,Ceramic,Glass,etc
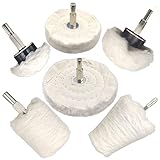
Overview: The Tworider 6-piece buffing wheel kit delivers comprehensive drill-mounted polishing for diverse materials. This versatile collection includes mushroom, cylindrical, conical, and circular shapes from 1.57" to 4", addressing automotive detailing, jewelry restoration, and household tasks. Constructed from high-quality cotton wool, these wheels ensure effective polishing without risking surface damage.
What Makes It Stand Out: Unlike single-form kits, this professional-grade set provides six distinct profiles that adapt to cars, motorcycles, ceramics, glass, and wood surfaces. The soft cotton construction guarantees gentle yet thorough cleaning and waxing, while the varied shapes access tight spokes, intricate crevices, and broad panels with equal efficiency. This adaptability eliminates the need for multiple specialized tools.
Value for Money: At $14.86 for six wheels, the kit offers exceptional versatility for DIY enthusiasts. Individual comparable wheels typically retail for $3-5 each, making this set economically advantageous. The broad material compatibility means users avoid purchasing separate tools for different applications, maximizing both budget and workshop space.
Strengths and Weaknesses: Pros: Six shapes for comprehensive coverage; soft cotton prevents scratching; extensive material compatibility; good size range. Cons: Cotton wears faster than foam under heavy use; no included polishing compound; requires careful drill speed control to prevent fraying.
Bottom Line: An excellent starter kit for hobbyists and detailers seeking maximum versatility. The shape variety justifies the investment, though professionals should stock backup wheels for high-volume projects.
2. Mothers PowerCone 360, Polishing Tool with Quick Swap Bit — Patented Spherical Cone for Deep, Safe Metal Polishing in Hard-to-Reach Areas — Ideal for Wheels & Curved Surfaces (05146)
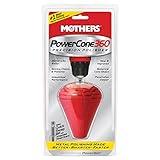
Overview: The Mothers PowerCone 360 is a specialized polishing tool engineered for challenging automotive surfaces. Featuring a patented spherical cone design, this professional-grade attachment excels at reaching tight spaces where traditional flat pads fail. Compatible with standard drills, it targets wheels and curved metalwork with precision.
What Makes It Stand Out: The unique 360-degree spherical cone dramatically extends effective polishing area while maintaining contact in recessed spokes and contoured trim. Mothers’ quick-swap bit system enables tool-free changes, saving valuable time during detailing sessions. The design shines billet, chrome, stainless steel, and aluminum with precision that flat wheels cannot match.
Value for Money: Priced at $25.48, this premium tool costs more than basic wheel sets but delivers specialized performance. For enthusiasts struggling with intricate wheel designs or motorcycle components, the time saved and superior results offset the investment. It pairs with your existing Mothers polish, adding capability without recurring supply costs.
Strengths and Weaknesses: Pros: Unmatched access to tight curves; quick bit changes; durable construction; trusted brand quality. Cons: Single tool vs. multi-piece kits; premium pricing; requires separate polish purchase; limited to automotive applications.
Bottom Line: Ideal for serious detailers prioritizing wheel and trim work. The innovative design justifies the cost for those needing precision, but casual users may prefer more versatile multi-wheel kits.
3. Unicaravan Aluminum Wheel Polishing Kit for Drill Buffing Wheel for Car Motorcycle Wheel Rim Manifold Polishing for Stainless Steel Chrome Wood Plastic Ceramic Glass Woods Machine Jewelry etc 6PCS

Overview: The Unicaravan 6-piece kit provides a systematic two-stage polishing approach for drill users. Featuring yellow and white wheels in multiple shapes, this budget-friendly set targets metal restoration with a clear process: yellow for initial cleaning and oxidation removal, white for final brightening. The cotton construction ensures durability across various surfaces.
What Makes It Stand Out: The color-coded system simplifies polishing for beginners, eliminating guesswork about which wheel does what. Yellow wheels handle heavy-duty metal prep on wheels and handles, while white wheels refine stainless steel and ceramic surfaces. The included mushroom, T-shape, and conical forms reach most interior and exterior vehicle surfaces effectively.
Value for Money: At just $9.99, this is the most affordable comprehensive kit reviewed. The two-stage approach mirrors professional processes typically requiring separate purchases. For under $10, users get six washable, reusable wheels with clear usage instructions that rival more expensive alternatives.
Strengths and Weaknesses: Pros: Two-stage color system; excellent price point; washable and reusable; clear application guidance; compact storage. Cons: Smaller size range (30-100mm); cotton construction may shed initially; limited brand recognition; no polishing compound included.
Bottom Line: Outstanding value for budget-conscious DIYers. The systematic approach and low price make it perfect for learning metal polishing, though professionals might prefer larger wheel diameters for efficiency.
4. 5Pcs Aluminum Polishing Kit Foam Sponge Polishing Balls Wheel Polishing Kit for Drills, Car Wheel and Polisher Kits for Car Care, Chrome, Rims, Metal, Plastic, Ceramic and Glass.

Overview: This 5-piece foam sponge polishing kit transforms standard drills into versatile polishing stations. The dense foam construction provides a modern alternative to traditional cotton wheels, delivering consistent results across automotive and household applications. The set combines aluminum and wheel polishing capabilities in one durable package.
What Makes It Stand Out: Unlike fabric wheels, these dense foam balls resist tearing and maintain uniform polish distribution, preventing uneven spots on rims and trim. The washable, reusable design offers sustainability and long-term value. The kit’s versatility extends beyond cars to metal fixtures, ceramic vases, and glass, making it a true multi-tasker for garage and home.
Value for Money: At $13.09 for five pieces ($2.62 each), this kit balances affordability with durability. Foam typically outlasts cotton for heavy-duty polishing, reducing replacement frequency. The elimination of separate tools for different materials provides additional cost savings for homeowners and detailers who value longevity.
Strengths and Weaknesses: Pros: Durable foam construction; washable and reusable; even polish application; versatile household use; cost-effective long-term. Cons: Limited shape variety (mostly spherical); foam may be too firm for delicate surfaces; no included polish; requires careful cleaning.
Bottom Line: A smart choice for users prioritizing durability and versatility. The foam construction justifies the slightly higher per-unit cost, ideal for regular use on tougher surfaces.
5. Mothers Mag & Aluminum Polish, 10 oz. – Brilliant Shine, Easy to Use, for All Uncoated & Unplated Metals Including Aluminum Wheels, Stainless Steel Trim and Exhaust Tips, Brass & More (05101)

Overview: Mothers Mag & Aluminum Polish is a dedicated compound for uncoated metal surfaces, not a wheel attachment. This 10-ounce tube delivers professional-grade results for aluminum wheels, stainless steel trim, brass, and exhaust tips. The formula balances aggressive cleaning with gentle regular use for lasting protection.
What Makes It Stand Out: Unlike universal polishes, this Mothers formula specifically targets oxidation on raw metals without damaging underlying surfaces. The easy application requires only a clean cloth, making it accessible for beginners. Regular use builds protective layers, extending time between full restorations and maintaining brilliant shine.
Value for Money: At $12.49 ($1.25 per ounce), this premium polish costs more than generic alternatives but delivers consistent, trusted results. A little product goes far, making the 10-ounce container economical for multiple vehicles. When paired with quality buffing wheels, it eliminates the need for professional detailing services.
Strengths and Weaknesses: Pros: Metal-specific formulation; trusted brand reputation; easy cloth application; builds protective layer; versatile across metal types. Cons: Requires separate buffing wheels; not for painted/coated surfaces; manual application demands effort; higher price than all-in-one kits.
Bottom Line: Essential companion to any buffing wheel kit for metal work. The specialized formula justifies the cost for enthusiasts seeking optimal results, but users wanting convenience should consider all-in-one solutions.
6. Mothers PowerBall 2, Polishing Tool with 10” Quick Swap Bit – Drill-Powered, Polishes Deep-Dish Wheels & Tight Areas with Ease, Delivers Fast & Unmatched Shine (05143)

Overview: The Mothers PowerBall 2 is a drill-powered polishing tool specifically engineered for tackling deep-dish wheels and other hard-to-reach areas. This innovative attachment transforms your standard power drill into a high-performance polishing machine, eliminating the tedious hand-polishing process. The kit includes a 10-inch Quick Swap Bit extension that reaches deep into wheel barrels and tight crevices where traditional polishing methods fail. Designed to work seamlessly with Mothers metal polishes, this tool delivers professional-grade results on any uncoated, polishable metal surface.
What Makes It Stand Out: The standout feature is undoubtedly the 10-inch extension shaft that accesses previously unreachable wheel surfaces with ease. Unlike bulky rotary polishers, this compact tool maneuvers effortlessly around spokes and into narrow barrel sections. The Quick Swap Bit system allows for rapid attachment changes, saving valuable time during detailing sessions. As a drill-powered solution, it leverages tools most car enthusiasts already own, making professional results accessible without investing in expensive dedicated equipment. The PowerBall’s unique spherical design compresses to fit various contours while maintaining consistent pressure.
Value for Money: At $23.75, this specialized tool offers exceptional value for anyone serious about wheel maintenance. Considering professional wheel polishing services can cost $50-100 per session, the PowerBall 2 pays for itself after just one use. While it requires purchasing polish separately, its durability and time-saving capabilities make it a worthwhile investment compared to manual polishing methods that demand hours of labor.
Strengths and Weaknesses: Strengths include remarkable reach into deep-dish wheels, drill-powered efficiency, trusted brand quality, and versatility across metal types. The tool dramatically reduces polishing time while delivering consistent shine. However, weaknesses include dependency on a compatible drill, limited use for non-wheel applications, and potential wear on the foam material with heavy use. It also requires careful speed control to avoid sling.
Bottom Line: The Mothers PowerBall 2 is an essential tool for car enthusiasts struggling with deep-dish wheel maintenance. If you own challenging wheel designs and want professional results without professional prices, this attachment deserves a spot in your garage.
7. Chemical Guys Heavy Metal Polish Restorer and Protectant - Cleans, Restores, and Protects Chrome, Aluminum, Stainless Steel, and More, Safe for Cars, Trucks, Motorcycles, RVs, and Boats - 16 oz
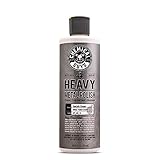
Overview: Chemical Guys Heavy Metal Polish is a comprehensive metal care solution designed to clean, restore, and protect various metal surfaces across automotive, marine, and RV applications. This 16-ounce bottle tackles tarnish, oxidation, and rust stains on chrome, aluminum, stainless steel, brass, and silver. The formula works as a three-in-one treatment that not only removes imperfections but also leaves behind a protective sealant to resist future degradation and grime buildup.
What Makes It Stand Out: The product’s unique selling proposition is its combination of aggressive cleaning power with protective capabilities. Unlike basic polishes that only shine, this formula deposits a durable protective layer that actively prevents future oxidation. Its versatility across multiple metal types and vehicle categories makes it a true multi-purpose solution. The easy application process requires minimal elbow grease—simply apply with a microfiber, work into the surface, and buff to a brilliant high-gloss finish. The professional-grade results belie the user-friendly approach.
Value for Money: Priced at $19.99 for 16 ounces, this polish sits in the mid-range category, offering excellent value considering its dual-action formula. Competing products often require separate cleaners and protectants, effectively doubling the cost. For vehicle owners maintaining multiple metal surfaces, this single bottle replaces several specialized products, delivering significant savings while achieving showroom-quality results.
Strengths and Weaknesses: Strengths include impressive oxidation removal, lasting protective coating, wide material compatibility, and straightforward application. It works effectively on exhaust tips, wheels, trim, and railings. However, the formula may have a strong chemical odor requiring ventilation. It’s not suitable for coated or painted metal surfaces, and heavily pitted areas might need multiple applications. The protective layer may require reapplication every few months.
Bottom Line: Chemical Guys Heavy Metal Polish is a reliable, all-in-one solution for maintaining metal surfaces across various vehicles. For those seeking effective cleaning with lasting protection in a single product, this polish delivers consistent, professional-grade results.
8. Polishing Cone, SPTA Car Wheel Hub Drill Buffing Sponge Pads Kit, Polishing Ball, 5 Pack Car Buffers and Polishers Kit, Attaches to Standard Household Drill

Overview: The SPTA Polishing Cone Kit is a versatile five-piece sponge polishing set designed for drill-powered applications. This comprehensive kit includes conical buffing pads in five distinct hardness levels, ranging from coarse yellow T80 to fine blue T40, enabling users to tackle everything from heavy correction to final finishing. The multifunctional design accommodates waxing, sealing, and general cleaning tasks across an impressive array of materials including chrome, glass, stainless steel, aluminum, plastics, and ceramics.
What Makes It Stand Out: The kit’s primary differentiator is its graduated hardness system, providing professional-grade versatility rarely seen in consumer kits. Each cone’s specific density matches particular polishing needs, ensuring optimal results while preventing surface damage. The conical shape naturally fits wheel hubs, exhaust tips, and intricate details that flat pads cannot reach. Universal compatibility with pneumatic tools, electric polishers, and standard household drills makes this accessible to both professionals and DIY enthusiasts. The high-quality sponge construction maintains durability through repeated use.
Value for Money: At $21.84 for five specialized cones, the kit offers solid value for detailers needing material-specific solutions. Purchasing individual pads of varying hardness would typically cost $30-40, making this bundled approach economical. The multi-material capability eliminates the need for separate kits for different surfaces, further enhancing its cost-effectiveness for comprehensive vehicle maintenance.
Strengths and Weaknesses: Strengths include excellent versatility across hardness levels, wide material compatibility, smart conical design for tight spaces, and universal drill attachment. The progressive system allows proper polishing sequences. However, sponge material may degrade faster than wool on heavy oxidation, and the kit lacks polishing compounds. Beginners might struggle to select the correct hardness initially, and the cones can tear if used at excessively high drill speeds.
Bottom Line: The SPTA Polishing Cone Kit is an excellent choice for versatile detailers tackling multiple surfaces and materials. If you need a comprehensive, drill-powered solution for intricate polishing tasks beyond just wheels, this kit offers impressive flexibility and value.
9. Konvixon 8" Airway Buffing Wheel, 9Pcs Aluminum Wheel Polishing Kit in Diameter 5/8 inch Arbor Hole, Polishing Compound and Aluminum Metal Polishing Wheel Kit for Angle Grinder Mirror Finish

Overview: The Konvixon 9-Piece Aluminum Polishing Kit is a comprehensive professional-grade system designed for angle grinder use. This complete package includes four 8-inch airway buffing wheels with varying cloth densities and five 2.5-ounce polishing compound bars covering every stage from cutting to mirror finishing. The innovative flange-free installation features a one-piece hub that locks securely onto 5/8-inch arbors, eliminating wobble and safety concerns during high-speed operation up to 6000 RPM.
What Makes It Stand Out: The kit’s completeness sets it apart—everything needed for professional aluminum polishing arrives in one package. The airway wheel design allows for cooler, longer operation compared to standard buffs, preventing heat buildup that can warp metal. The progressive compound system (blue hard, orange coarse, yellow medium, white fine) provides a clear path to mirror finishes. Safety features like the integrated hub design prevent wheel detachment, a common hazard with traditional buffing setups. The multilayer cloth construction ensures durability and consistent performance.
Value for Money: At $45.99, this kit represents significant savings compared to purchasing components separately, which would exceed $70. For serious enthusiasts or professionals regularly polishing aluminum wheels, tanks, or trim, the investment quickly pays dividends. The professional results achievable rival commercial services costing hundreds of dollars, making it economically attractive for frequent users.
Strengths and Weaknesses: Strengths include complete all-in-one system, superior safety features, professional-grade airway wheels, progressive compound selection, and excellent heat management. The kit produces true mirror finishes. However, it requires an angle grinder (not included), making it less accessible for casual users. The higher price point may deter occasional detailers, and the learning curve for proper technique is steeper than drill-powered alternatives.
Bottom Line: The Konvixon Kit is ideal for serious automotive enthusiasts and professionals seeking professional mirror finishes on aluminum and other metals. If you own an angle grinder and demand show-quality results, this comprehensive system delivers unmatched performance and safety.
10. Neeki 6 Drill Buffing Wheels and 3 Polishing Compounds, Multi-Specification Wheel Kit for Metal, Stainless Steel, Jewelry, Wood, Ceramic, Glass, and Other Surfaces

Overview: The Neeki Drill Buffing Kit is a budget-friendly, comprehensive polishing solution featuring six varied buffing wheels and three polishing compounds. This versatile set includes T-shaped pads, column wheels, cones, and mushrooms in multiple sizes (40mm to 100mm) to address different contours and applications. The kit covers metal, stainless steel, jewelry, wood, ceramic, glass, and more, making it a true multi-surface workhorse for DIY enthusiasts.
What Makes It Stand Out: The exceptional variety of shapes and sizes distinguishes this kit from competitors. The inclusion of three distinct polishing compounds (red rough, white medium, green fine) plus a pair of protective cotton gloves at this price point is remarkable. The special cotton cloth construction features velvet-treated edges to prevent workpiece damage, while metal gaskets increase durability. This thoughtful design provides professional-style tools for under $16, democratizing access to quality polishing equipment.
Value for Money: At $15.80, this kit offers outstanding value—arguably the best cost-to-component ratio in its category. Similar kits typically cost $25-35, making Neeki’s offering highly attractive for budget-conscious buyers. While quality compromises exist at this price, the sheer variety of tools and included compounds provide everything needed to start polishing immediately without additional purchases.
Strengths and Weaknesses: Strengths include incredible affordability, diverse wheel shapes, included compounds and gloves, wide material compatibility, and immediate usability. The kit effectively removes scratches and restores shine. However, lower price means potentially shorter lifespan—wheels may shed fibers initially and wear faster than premium options. The cotton material lacks the cutting power of wool for heavy oxidation. Quality control can be inconsistent, and the compounds are smaller than professional sizes.
Bottom Line: The Neeki Kit is perfect for beginners and occasional users seeking an affordable entry into power polishing. If you need decent results on a tight budget and don’t mind replacing components periodically, this kit delivers remarkable versatility and value.
Understanding Wheel Polishing Fundamentals
Before choosing between hand and machine methods, you need to understand what polishing actually does to your wheel surfaces. Polishing isn’t just about making wheels shiny—it’s a controlled abrasion process that removes microscopic layers of oxidized material, creating a smoother surface that reflects light more uniformly.
The Anatomy of a Wheel Surface
Every wheel consists of multiple layers: the base material (usually aluminum alloy), protective clear coat (on modern wheels), and accumulated contaminants. Polishing interacts differently with each layer. Hand polishing works at a human pace, allowing you to feel variations in the surface and adjust pressure intuitively. Machine polishing operates at consistent speeds and pressures, removing material more aggressively but requiring careful monitoring to prevent crossing into irreversible territory.
Why Polishing Matters for Wheel Longevity
Proper polishing extends wheel life by removing corrosive brake dust particles and oxidation before they pit the surface. The process also prepares wheels for protective coatings, creating a molecularly smooth foundation that sealants can bond to effectively. Neglect this step, and you’re essentially trapping contaminants under protection layers, accelerating damage.
Hand Polishing: The Traditional Approach
The ancestral art of hand polishing connects you directly with your vehicle’s surfaces. This method demands patience but rewards you with unparalleled control and the ability to detect subtle imperfections through tactile feedback.
Essential Hand Polishing Techniques
Success with hand polishing hinges on your technique. Work in small sections using overlapping circular motions with consistent, moderate pressure. The “two-thumb” method—placing both thumbs behind your polishing pad—distributes force evenly and prevents finger pressure points that can create holograms. Always maintain a wet edge, adding polish before the previous application dries to avoid creating new scratches.
Pros and Cons of Hand Polishing Wheels
Advantages: Total control over pressure and speed, zero risk of burning through clear coat, ability to feel surface imperfections, minimal equipment investment, and exceptional results on intricate spoke designs where machines can’t reach.
Disadvantages: Physically demanding for full sets, extremely time-consuming (2-4 hours per wheel for thorough jobs), inconsistent results if fatigue sets in, and limited cutting power for heavily oxidized surfaces.
When Hand Polishing Makes Sense
Hand polishing excels when working on wheels with complex geometry—think multi-spoke BBS designs, deep-dish lips with tight corners, or factory-painted wheels with delicate clear coats. It’s also ideal for maintenance polishing between major details, touch-up work on specific scuffed areas, and situations where you can’t justify the storage space or cost of machine equipment.
Machine Polishing: The Modern Powerhouse
Machine polishing represents the intersection of automotive passion and technological efficiency. These tools amplify your capabilities, transforming weekend-long projects into afternoon tasks while delivering consistent, professional-grade results.
Types of Machine Polishers for Wheels
The market offers three primary categories: rotary polishers that spin on a single axis for maximum cutting power (best for experienced users), dual-action (DA) polishers that oscillate and rotate for safer operation (perfect for beginners and intermediates), and gear-driven forced rotation units that bridge the gap. For wheels, compact 3-inch DA polishers with smaller backing plates navigate tight spaces while minimizing the risk of clear coat failure.
Machine Polishing Techniques and Best Practices
Always start with the least aggressive pad and polish combination that yields results. Use the “three C’s” method: Control your speed (typically 3,000-4,500 OPM for wheels), Consistency in your overlapping passes (50% overlap ensures uniform coverage), and Cooling—spritz the wheel surface with water between stages to prevent heat buildup. Work at a 90-degree angle to spokes rather than parallel to avoid catching edges.
Pros and Cons of Machine Polishing Wheels
Advantages: Dramatically faster completion times (30-45 minutes per wheel), consistent pressure and speed, ability to correct heavy oxidation and scratches, reduced physical fatigue, and superior results on large flat surfaces like wheel lips.
Disadvantages: Higher initial equipment cost, steeper learning curve, risk of burning through clear coat or damaging wheel edges, difficulty accessing tight spaces between spokes, and noise that may limit when you can work.
The Great Debate: Hand vs. Machine
The hand versus machine decision isn’t about which is “better”—it’s about which is better for your specific scenario. Understanding the trade-offs helps you invest your time and money wisely.
Time Investment Comparison
A full set of four 18-inch wheels requires approximately 8-12 hours of focused hand polishing to achieve show-quality results. The same job with a machine polisher takes 2-3 hours once you’re proficient. However, factor in setup time, pad cleaning, and equipment maintenance, and the gap narrows slightly for occasional users. The real time advantage emerges when you polish regularly or maintain multiple vehicles.
Quality of Finish Analysis
Under ideal conditions, both methods achieve comparable gloss levels. Hand polishing often produces a deeper, “wetter” look on intricate designs because you can work polish into every crevice. Machine polishing delivers more consistent defect removal and higher clarity on accessible surfaces. The deciding factor becomes your skill level—an expert with a machine beats a novice by hand, but a master of hand technique surpasses a clumsy machine operator.
Cost Considerations Over Time
Hand polishing requires minimal startup investment: quality microfiber pads, applicators, and polish might cost $75-150. Machine polishing demands $200-400 for a reliable DA polisher, backing plates, pads, and polish. However, amortize this over 20+ details, and the machine becomes more economical. Consider also the hidden cost: your time. At $20/hour value, saving 6 hours per detail pays for the machine in just two sessions.
Skill Level Requirements
Hand polishing demands patience and attention to detail but poses minimal risk—you can learn effective techniques in a single afternoon. Machine polishing requires understanding paint thickness, pad selection, speed control, and heat management. Mistakes happen faster and cost more to fix. Most enthusiasts benefit from mastering hand technique first, then graduating to machines for efficiency.
Key Factors in Choosing Your Method
Your wheels themselves should dictate your approach more than any other variable. One size does not fit all in the polishing world.
Wheel Material and Finish Types
Raw aluminum or chrome wheels tolerate aggressive machine polishing and respond beautifully to high-speed correction. Clear-coated wheels (most modern factory wheels) require careful machine work with low cut pads or dedicated hand polishing to avoid burning through the thin protective layer. Powder-coated or painted wheels benefit most from gentle hand polishing or very light machine finishing to preserve coating integrity.
Assessing Wheel Condition and Damage
Light oxidation and swirl marks respond to either method. Moderate scratches and etching from brake dust demand machine cutting power. Deep curb rash or pitting requires professional refinishing before polishing becomes relevant. Always run your finger across imperfections—if you can feel it, you can’t polish it out completely; you’ll need sanding or repainting first.
Your Car Care Goals and Expectations
Are you preparing for a car show where judges scrutinize wheels with flashlights? Hand polishing those final 5% of details might make the difference. Maintaining a daily driver where “good enough” means significantly better than average? Machine polishing offers the best return on effort. Building a detailing side business? You need both methods in your arsenal to handle diverse client needs.
Step-by-Step: Hand Polishing Process
Mastering the sequence matters as much as the technique itself. Skip steps, and you’ll achieve mediocre results or create new problems.
Preparation and Safety
Remove wheels for best access, or jack up each corner and remove one wheel at a time. Clean thoroughly with a dedicated wheel cleaner and iron remover, then clay bar the surface to remove embedded contaminants. Mask off tire rubber and valve stems with painter’s tape. Work in a shaded area below 80°F to prevent polish from drying too quickly. Wear nitrile gloves to protect your skin from abrasive compounds.
The Multi-Stage Hand Polishing Workflow
Start with a cutting polish on a foam applicator for defect removal, working in 1x1 foot sections. Apply moderate pressure in overlapping circles for 30-60 seconds per section. Wipe residue with a clean microfiber, inspect, and repeat if needed. Follow with a finishing polish on a fresh pad using lighter pressure to refine the gloss. Complete the job with a polymer sealant or ceramic coating applied by hand in thin, even layers. The entire process requires 4-6 passes per wheel for show-quality results.
Step-by-Step: Machine Polishing Process
Machine polishing follows a similar progression but demands more rigorous safety protocols and equipment familiarity.
Setup and Safety Protocols
Secure the wheel on a padded stand or workbench to prevent movement. Install the smallest backing plate that accommodates your wheel’s contours—typically 3 inches for most passenger vehicles. Perform a “pad priming” by spreading polish across the pad face before touching the wheel. Always start the machine off the surface, then place it gently against the wheel to avoid sling. Keep the cord over your shoulder to prevent it from contacting the wheel face.
Machine Polishing Execution
Work at speed setting 3-4 (of 6) on your DA polisher, making 4-6 slow passes per section. Use a cross-hatch pattern: horizontal passes followed by vertical passes to ensure even coverage. Apply minimal pressure—let the machine’s weight and polish do the work. Check pad temperature every 2-3 minutes; if it’s hot to the touch, it’s too hot for your wheel. Clean pads with a pad brush between wheels to prevent contamination. Complete with a fine finishing pad and light polish, then apply protection immediately while the surface is still warm.
Hybrid Approaches: Best of Both Worlds
Smart detailers don’t limit themselves to one ideology. The hybrid approach leverages machines for heavy lifting and hands for finesse work, optimizing both time and quality.
Strategic Method Combination
Use machine polishing on accessible faces: lips, centers, and wide spokes. Switch to hand polishing for tight spaces between spokes, lug nut recesses, and inner barrel sections. This approach cuts total time by 40-60% compared to pure hand polishing while maintaining the detail quality of hand work in critical areas. Many professionals machine-polish 80% of the wheel, then spend 20% of their time hand-perfecting the details that machines miss.
Common Mistakes and How to Avoid Them
Both methods punish arrogance and reward patience. Recognizing common errors before you make them saves wheels and sanity.
Hand Polishing Pitfalls
Uneven pressure creates inconsistent gloss and holograms. Solve this by folding your microfiber into quarters and using the flat palm technique. Working too large an area lets polish dry before you can work it properly—keep sections to 1x1 foot maximum. Reusing dirty pads reintroduces contaminants; have 8-10 clean pads available per wheel set.
Machine Polishing Errors
Excessive speed and pressure burns clear coat in seconds. Always start conservative. Poor lighting hides defects until it’s too late; invest in a quality LED work light. Skipping pad cleaning turns your finishing pad into a cutting pad, ruining your final stage. Ignoring backing plate size—using a 5-inch plate on tight spokes guarantees edge damage and uneven results.
Maintaining Your Polished Wheels
Polishing is an investment. Protect that investment with proper maintenance, or you’ll be repeating the process far sooner than necessary.
Protection Strategies
Apply a silica-based wheel sealant immediately after polishing while the surface is clean and warm. For maximum durability, follow with a ceramic coating designed for wheels, which withstands the 400°F+ temperatures near brake components. Consider adding wheel wax on top for sacrificial protection that you can renew monthly without full re-polishing.
Maintenance Schedules
Weekly maintenance washes using pH-neutral shampoo prevent brake dust bonding. Monthly deep cleans with iron remover keep embedded particles at bay. Reapply sealant quarterly, and perform a light hand polish annually to maintain clarity. Machine polishing should only be necessary every 2-3 years for well-maintained wheels. Neglect this schedule, and you’ll be machine polishing every six months to restore neglected wheels.
Professional Insights and Advanced Tips
The difference between good and jaw-dropping results lies in the details that separate hobbyists from professionals.
Expert Techniques for Showroom Shine
Temperature management: Chill your polish in the refrigerator for 15 minutes before application—it stays workable longer. Pad priming: Dab polish on the wheel face, not just the pad, for more even distribution. Inspection lighting: Use a dual-LED setup with one direct and one raking light to catch defects from multiple angles. Final wipe technique: Use a 70% isopropyl alcohol wipe-down to remove oils and reveal the true finish before applying protection. For ultimate gloss, perform a final hand-polish stage with a jeweling polish after machine work—the combination produces depth that neither method achieves alone.
Frequently Asked Questions
1. Can I machine polish wheels while they’re still on my car?
Technically yes, but it’s not recommended. You’ll miss the inner barrels and backs of spokes, risk damaging brake components with polish sling, and the limited angles force awkward positions that increase error risk. Professional results require wheel removal.
2. How do I know if my wheels have clear coat or are raw metal?
Perform a polish test in an inconspicuous area. If the pad picks up black or dark gray residue, it’s likely raw aluminum oxidizing. Clear-coated wheels produce minimal residue. When in doubt, assume clear coat and use gentler methods to avoid irreversible damage.
3. What’s the minimum equipment investment for safe machine polishing?
A quality entry-level dual-action polisher ($150-200), two 3-inch backing plates, a set of foam pads (cutting, polishing, finishing), and appropriate polishes will run $250-350 total. Skimping on equipment quality increases failure risk exponentially.
4. How often should I polish my wheels?
With proper maintenance and protection, machine polishing every 2-3 years and hand polishing annually is sufficient for daily drivers. Show cars might receive light hand polishing before each event. Over-polishing thins clear coat and shortens wheel lifespan.
5. Can hand polishing remove deep scratches?
No. Hand polishing can only address surface-level defects. If you can catch a scratch with your fingernail, it requires wet sanding (for clear-coated wheels) or professional refinishing. Hand polishing is for refinement, not heavy correction.
6. Why do my wheels look hazy after machine polishing?
Haze indicates either polish residue left in microscopic scratches (insufficient finishing stage), heat damage to the clear coat (too much speed/pressure), or pad contamination. Wipe thoroughly with isopropyl alcohol; if haze remains, you need to re-polish with a finer polish.
7. Is it worth polishing steel wheels or should I just paint them?
Polished steel wheels can look stunning but require constant maintenance to prevent rust. For daily drivers in harsh climates, painting or powder coating is more practical. For restored classics or show cars, polishing is historically accurate and visually impressive.
8. What’s the biggest mistake beginners make with either method?
Impatience. Beginners rush the cutting stage, don’t inspect between stages, and apply protection before the surface is truly refined. Each stage builds on the previous one. Skipping the time needed for proper inspection and refinement guarantees mediocre results.
9. Can I use the same polish for hand and machine application?
Some polishes are formulated for dual use, but most perform optimally for one method. Machine polishes contain different abrasives and lubricants designed for higher speeds and friction. Using hand polish with a machine often leads to dusting and poor cut; using machine polish by hand requires excessive work to break down abrasives properly.
10. How do I polish between tight spokes where even 3-inch pads won’t fit?
This is where hand polishing becomes mandatory. Wrap a microfiber cloth around a wooden dowel or use specialized cone-shaped foam applicators. Some professionals create custom tools by cutting foam pads to fit specific wheel designs. If you can’t access it, you can’t machine polish it—period.