Your vehicle’s floor pans endure relentless abuse. Hidden beneath carpets and insulation, they’re constantly bombarded by road salt, moisture, debris, and temperature extremes. This silent assault gradually compromises the metal, turning solid steel into brittle, flaking rust that threatens structural integrity and resale value. Spray undercoating offers a powerful defense—a proactive shield that can add decades to your vehicle’s lifespan while preserving its value and quieting road noise.
But not all undercoatings are created equal, and the difference between a job that lasts ten years and one that fails in two often comes down to understanding the nuances of product selection, preparation, and application. Whether you’re restoring a classic muscle car or protecting a daily driver through harsh winters, this comprehensive guide will equip you with the expert knowledge to make informed decisions and achieve professional-grade results.
Top 10 Undercoating Spray
Detailed Product Reviews
1. Rust-Oleum 248657-6PK Stops Rust Undercoating Spray, 15 oz, Rubberized Black, 6 Pack

Overview: This six-pack bundle delivers Rust-Oleum’s consumer-grade rubberized undercoating for comprehensive vehicle protection projects. Designed for bare or primed metal underbodies, each 15-ounce can covers 10-12 square feet, making it suitable for cars, trucks, trailers, and RVs. The rubberized formula creates a protective barrier against water, salt, and chemical corrosion while providing sound-deadening benefits for a quieter ride.
What Makes It Stand Out: The bulk packaging stands out for DIY enthusiasts tackling multiple vehicles or extensive undercarriage work. The 30-minute dry time significantly accelerates project completion compared to professional-grade alternatives. The any-angle spray technology with a comfort tip allows for effortless application in tight underbody spaces, even when spraying upside down to reach frame rails and wheel wells.
Value for Money: At $0.40 per ounce, this six-pack offers the lowest unit price in the Rust-Oleum lineup. For $35.59, you get six cans, making it ideal for large projects or sharing among car clubs. While consumer-grade may require more frequent reapplication than professional formulas, the cost savings are substantial for budget-conscious users maintaining multiple vehicles annually.
Strengths and Weaknesses: Strengths include exceptional bulk value, fast drying, versatile application angles, and effective noise reduction. The six-pack ensures consistent product across large projects. Weaknesses involve consumer-grade durability that may not match professional formulations, and the 30-minute dry claim might vary with humidity. The multi-can commitment could be excessive for single-vehicle owners.
Bottom Line: This six-pack excels for dedicated DIYers managing multiple vehicles or extensive undercoating projects. The per-ounce savings and fast application make it a smart choice for regular maintenance, though professional results may require more frequent touch-ups.
2. Rust-Oleum 248656 Professional Grade Rubberized Undercoating Spray, 15 oz, Black

Overview: This professional-grade undercoating spray from Rust-Oleum delivers superior corrosion protection for vehicle underbodies. Formulated for bare or primed metal surfaces on cars, trucks, trailers, and RVs, the 15-ounce can provides enhanced coverage of 10-15 square feet. The rubberized coating protects against water, salt, and chemical damage while dampening road noise and reducing component wear.
What Makes It Stand Out: The professional-grade formula distinguishes itself with superior adhesion and longevity compared to consumer versions. The extended coverage area per can means fewer cans needed for complete underbody protection. The any-angle spray technology with comfort tip ensures thorough application in hard-to-reach areas, including vertical surfaces and overhead spots that are difficult to access.
Value for Money: At $8.27 per can ($0.55 per ounce), this represents a middle-ground option. You pay a premium over consumer-grade without committing to bulk packaging. For small to medium projects or first-time users wanting professional results, it’s an accessible entry point. The superior durability may offset the higher price through longer-lasting protection and reduced reapplication frequency.
Strengths and Weaknesses: Strengths include professional-grade protection, flexible single-can purchase, excellent coverage efficiency, and versatile application. The sound-deadening properties are effective. Weaknesses center on the one-hour dry time, which slows workflow, and the higher per-ounce cost versus bulk options. Single-can pricing makes large projects expensive compared to multi-packs.
Bottom Line: Ideal for discerning DIYers seeking professional results without bulk commitment. Perfect for treating a single vehicle or for those wanting to test professional-grade performance before investing in larger quantities. The quality justifies the modest price premium.
3. Rust-Oleum 248656-6PK Stops Rust Professional Grade Undercoating Spray Paint, 15 oz, Rubberized Black, 6 Pack

Overview: This six-pack of Rust-Oleum’s professional-grade undercoating provides serious DIYers and small shops with premium underbody protection. Each 15-ounce can covers 10-15 square feet of bare or primed metal on vehicles, trailers, and RVs. The professional formula creates a durable rubberized barrier against corrosion, water, salt, and chemicals while reducing road noise for improved driving comfort.
What Makes It Stand Out: The combination of professional-grade performance with bulk packaging makes this unique. You get the superior adhesion and longevity of the pro formula across multiple cans for consistent large-project application. The any-angle spray technology ensures complete coverage of complex undercarriage geometries, including inside wheel wells, frame rails, and other difficult-to-reach areas.
Value for Money: At $49.62 for six cans ($0.55 per ounce), this requires significant upfront investment. However, the per-ounce cost matches the single professional can, so there’s no bulk discount. The value lies in having matching product for extensive projects rather than cost savings. For professionals or enthusiasts, the consistent quality across multiple vehicles justifies the price.
Strengths and Weaknesses: Strengths include professional durability, uniform batch consistency, excellent coverage per can, and superior sound deadening. The any-angle application is practical for underbody work. Weaknesses are the high initial cost, one-hour dry time per coat, and potential overkill for casual users. The lack of bulk pricing discount disappoints compared to consumer multi-packs.
Bottom Line: Best suited for automotive enthusiasts, restorers, or small repair shops treating multiple vehicles. The professional formula’s longevity makes it cost-effective long-term, despite the steep upfront price. Casual DIYers should consider single cans first.
4. Rust-Oleum 248657 Rubberized Undercoating Spray, 15 oz, Black

Overview: This single-can consumer-grade undercoating offers an affordable entry into vehicle corrosion protection. Designed for bare or primed metal underbodies on cars, trucks, trailers, and RVs, the 15-ounce can covers 10-12 square feet. The rubberized formula provides a protective shield against water, salt, and chemical damage while helping to deaden road noise for a more refined driving experience.
What Makes It Stand Out: As the most affordable single-can option in the Rust-Oleum lineup, it provides the fastest drying time at 30 minutes to touch. This accelerates project completion and allows quicker vehicle return to service. The any-angle spray technology with comfort tip enables thorough application in confined underbody spaces without awkward positioning or incomplete coverage.
Value for Money: At $7.98 per can ($0.53 per ounce), this offers the lowest entry cost for testing undercoating application. It’s perfect for small touch-ups, single-vehicle treatment, or first-time users hesitant to invest in bulk. While consumer-grade durability may require more frequent reapplication, the initial savings are attractive for budget-minded DIYers performing annual maintenance.
Strengths and Weaknesses: Strengths include lowest single-can price, rapid drying, flexible application angles, and effective noise reduction. The product performs adequately for seasonal protection. Weaknesses involve shorter lifespan compared to professional formulas, slightly less coverage per can, and potentially thinner consistency requiring more coats for equivalent protection in harsh environments.
Bottom Line: An excellent choice for beginners or those needing quick, affordable underbody protection. Ideal for annual maintenance on daily drivers in moderate climates. For harsh conditions or long-term storage, consider upgrading to professional grade. This offers the best risk-free introduction to undercoating.
5. 3M Professional Grade Rubberized Undercoating, Corrosion, Water and Salt Spray Resistant, 03584, 16 oz. Aerosol

Overview: 3M’s professional-grade undercoating offers a trusted alternative to Rust-Oleum products with an asphalt-based formulation. The 16-ounce aerosol can be applied to cars, trucks, and RV undercarriages, wheel wells, quarter panels, and inner fenders. It provides robust protection against rust, abrasion, water, and salt spray while reducing road noise and vibration.
What Makes It Stand Out: The asphalt-based composition differs from typical rubberized formulas, potentially offering enhanced durability in extreme conditions. The 3M brand carries strong credibility in automotive care. The slightly larger 16-ounce can provides more product than standard 15-ounce competitors, and the formulation is specifically designed for professional body shop use and severe-duty applications.
Value for Money: At $9.99 per can ($0.62 per ounce), this commands the highest unit price but reflects 3M’s premium brand positioning. The asphalt base may provide longer-lasting protection, offsetting the cost through reduced reapplication frequency. For brand-loyal users or those in severe winter climates, the premium is justified by proven performance and the extra ounce per can.
Strengths and Weaknesses: Strengths include 3M’s reputation for quality, asphalt-based durability, excellent sound deadening, and versatile application areas. The product withstands severe conditions well. Weaknesses are the highest per-ounce cost, potentially messier application due to asphalt consistency, and longer curing times. The spray pattern may be less precise than rubberized competitors.
Bottom Line: Recommended for users prioritizing brand reputation and maximum durability, especially in harsh environments. The asphalt formulation excels in heavy salt regions. While pricier, the long-term protection justifies the cost for valuable vehicles or severe-duty applications. Casual users may find better value elsewhere.
6. Rust-Oleum Black Undercoating 15 oz. (12 Pack)

Overview: The Rust-Oleum Black Undercoating 12-pack delivers industrial-scale rust protection for vehicle undercarriages in a convenient aerosol format. This bulk offering from a trusted brand provides a straightforward solution for coating frames, wheel wells, and exposed metal surfaces against moisture and road salt damage. Each 15-ounce can applies a durable black finish that helps extend vehicle life.
What Makes It Stand Out: This package excels in sheer volume and value proposition. The 12-can bulk format makes it ideal for automotive shops, fleet maintenance, or serious DIY enthusiasts tackling multiple vehicles. At $0.45 per ounce, it represents one of the most economical options on the market. The familiar Rust-Oleum name ensures consistent quality and widespread availability at most hardware and automotive retailers.
Value for Money: Exceptional bulk pricing makes this the cost-per-ounce leader. The $80.62 investment covers approximately 180 ounces of product, sufficient for 3-4 full vehicle applications. For professional settings or restoration projects requiring extensive coverage, this bulk approach saves significant money compared to purchasing individual cans.
Strengths and Weaknesses: Strengths: Unbeatable price per ounce; trusted brand reputation; convenient aerosol application; ample quantity for large projects; widely available. Weaknesses: Basic formulation lacks advanced features like sound dampening; no included accessories (wand/gun); not paintable over; limited environmental friendliness claims.
Bottom Line: Perfect for high-volume users seeking reliable, no-frills undercoating protection at the best possible price. Ideal for fleet maintenance and budget-conscious restorations where quantity trumps specialized features.
7. 3M 3584 Professional Grade Rubberized Undercoating 6 16oz Cans

Overview: 3M’s Professional Grade Rubberized Undercoating delivers premium protection for vehicle undercarriages through a scientifically formulated rubberized coating. This six-pack provides 96 ounces of professional-quality defense against corrosion, moisture, and salt damage. Designed for maximum durability, it creates a flexible barrier that moves with your vehicle’s components while providing excellent adhesion to metal surfaces.
What Makes It Stand Out: The professional-grade formulation combines corrosion protection with sound dampening capabilities, addressing two common vehicle concerns simultaneously. Its rubberized composition remains flexible, preventing cracks and peeling unlike harder coatings. The aerosol design ensures uniform application without runs, making it accessible for DIY users while meeting professional standards. 3M’s reputation for automotive solutions adds credibility and peace of mind.
Value for Money: At $0.57 per ounce, this mid-priced option balances quality and cost effectively. While more expensive than basic undercoatings, the dual-action protection (rust + noise reduction) justifies the premium. Six cans provide adequate coverage for 1-2 vehicles, making it suitable for personal vehicle maintenance without excessive leftover product.
Strengths and Weaknesses: Strengths: Professional-grade formulation; excellent sound dampening; flexible rubberized finish; easy uniform application; trusted 3M brand; suitable for various vehicles. Weaknesses: Higher cost than basic options; not paintable; contains solvents; no application accessories included; may require multiple coats for maximum protection.
Bottom Line: An excellent choice for discerning vehicle owners wanting professional results without professional equipment. The sound dampening bonus makes it worth the modest premium over budget alternatives.
8. Fluid Film 11.75 Oz Undercoating Protection Aerosol Spray Can 6 Pack, Rust Inhibitor and Prevention, Anti Corrosion and Lubricant, Spray Can Extension Wand

Overview: Fluid Film revolutionizes undercoating with its unique lanolin-based formula derived from natural sheep’s wool. This six-pack kit includes extension wands for precision application, offering eco-friendly corrosion protection without harsh solvents. The non-drying coating actively prevents rust while providing ongoing lubrication for moving metal components, making it fundamentally different from traditional hard-coating products.
What Makes It Stand Out: The all-natural lanolin base creates a permanently slick, non-tacky surface that never freezes and won’t wash off easily. Its eco-friendly, non-toxic classification allows safe indoor use. The included extension wand enables access to tight frame rails and enclosed spaces competitors can’t reach. Unlike paint-like undercoatings, Fluid Film remains active, creeping into seams and self-healing minor abrasions.
Value for Money: At approximately $1.05 per ounce, Fluid Film commands premium pricing, but its unique properties justify the cost for specific applications. The non-drying formula means one application can last a full season, and its multi-purpose nature (lubricant + rust prevention) eliminates need for separate products. The included wands add value absent in competitors.
Strengths and Weaknesses: Strengths: Eco-friendly lanolin base; non-toxic and non-hazardous; superior penetration; remains flexible year-round; includes extension wands; multi-functional lubricant; safe on all metals. Weaknesses: Highest price per ounce; non-paintable finish; may attract dirt due to oily nature; requires reapplication more frequently than hard coatings; distinct lanolin odor.
Bottom Line: Best suited for environmentally conscious users and those in harsh winter climates where flexibility and penetration matter most. Worth the premium for its unique benefits and included accessories.
9. Barrier Bond - Rubberized Undercoating Sound Deadener Kit, 28oz 4-Pack, Black Spray, Vehicle Undercoating, with Spray Gun
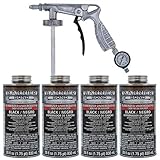
Overview: Barrier Bond’s comprehensive kit provides professional-level undercoating capabilities with its 28-ounce cans and included spray gun applicator. This four-pack system delivers paintable, fast-drying rubberized coating that meets all 50-state VOC regulations. The larger can size and specialized application equipment position it as a premium solution for serious automotive enthusiasts and professionals seeking customizable finishes.
What Makes It Stand Out: The included spray gun transforms application precision and efficiency, delivering professional results impossible with standard aerosol nozzles. Its paintable formulation allows color-matching or top coating for seamless integration with vehicle aesthetics. The 50-state VOC compliance ensures legal use nationwide, while the substantial 28-ounce cans reduce the need for frequent can changes during large projects.
Value for Money: At roughly $1.03 per ounce, this kit appears expensive until you factor in the $15-25 value of the included spray gun. The fast-drying formula saves time, and paintable compatibility eliminates need for separate primers. For users seeking professional equipment and finish flexibility, the investment pays dividends in quality and efficiency.
Strengths and Weaknesses: Strengths: Professional spray gun included; paintable and top coat compatible; fast-drying formula; 50-state VOC compliant; large 28oz cans reduce application time; excellent sound deadening. Weaknesses: Highest upfront cost; spray gun requires cleaning and maintenance; overkill for single small vehicle applications; rubberized texture may not suit all preferences.
Bottom Line: The ultimate choice for DIYers wanting professional tools and finish options. The spray gun and paintable formula make it worth the premium for those prioritizing quality and customization.
10. Rust-Oleum 248658 Stops Rust Reformer Spray Paint, 10.25 oz, Matte Black
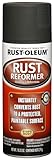
Overview: Rust-Oleum Stops Rust Reformer takes a fundamentally different approach from traditional undercoatings by chemically converting existing rust into a stable, paintable surface rather than simply covering it. This 10.25-ounce can tackles light to moderate rust on metal surfaces, transforming iron oxide into a protective matte black primer that prevents future corrosion. It’s a targeted solution for restoration projects where rust has already taken hold.
What Makes It Stand Out: The unique reformer technology eliminates labor-intensive sanding and grinding of rusted surfaces. Its oil-based formula penetrates deeply, creating a chemical bond with rust that traditional primers cannot achieve. The any-angle spray technology allows treatment of hard-to-reach areas like frame interiors and underside brackets without product waste. This specialized approach saves hours of prep work.
Value for Money: At $0.90 per ounce, it’s pricier than basic undercoatings but delivers unique value by converting rust rather than just covering it. For restoration projects where time savings matter, the cost is justified. However, it’s not a substitute for preventative undercoating on clean metal and works best as part of a multi-step rust management system.
Strengths and Weaknesses: Strengths: Converts existing rust chemically; eliminates sanding requirement; any-angle spray technology; creates paintable surface; fast tack-free drying (20-40 minutes); trusted Rust-Oleum brand. Weaknesses: Not for bare metal prevention; limited coverage area; requires topcoat for maximum protection; contains solvents; single can insufficient for full undercarriage.
Bottom Line: Essential for restoration work on rusted vehicles but should be paired with a traditional undercoating for comprehensive protection. A specialized tool, not an all-in-one solution.
Why Floor Pan Protection Matters
The Hidden Enemy: Rust and Corrosion
Floor pans represent your vehicle’s lowest structural point, making them ground zero for corrosion. Every time you drive through rain, snow, or even morning dew, moisture collects in the crevices and seams. Road salt and chemical deicers act as electrolytes, accelerating the electrochemical reaction that devours steel from the inside out. What begins as surface oxidation can quickly penetrate welds, spreading to frame rails and rocker panels. By the time you notice a wet carpet or smell mildew, the damage beneath could be extensive and expensive to repair.
Impact on Vehicle Longevity and Value
A compromised floor pan doesn’t just create holes—it undermines the entire vehicle’s structural rigidity. Modern unibody vehicles rely on floor pans as integral stress-bearing components. Rust-weakened pans can affect crash safety, cause mysterious squeaks and rattles, and lead to failed inspections. For collectors and enthusiasts, original, rust-free floor pans can mean the difference between a concours-quality restoration and a parts car. Even for daily drivers, documented undercoating maintenance can boost resale value by 10-15% in rust-belt regions.
Understanding Spray Undercoating Technologies
Rubberized Undercoatings
Rubberized formulations create a flexible, textured barrier that deadens sound exceptionally well. These products typically contain asphalt or petroleum compounds suspended in a solvent with rubber polymers. Once cured, they form a durable, slightly tacky surface that resists chipping from gravel impact. However, their thickness can mask developing rust underneath, and some lower-grade versions may crack in extreme cold if not properly formulated. The key is looking for products with high solids content and UV stabilizers to prevent drying and cracking over time.
Asphalt-Based Formulations
The traditional workhorse of undercoating, asphalt-based products offer excellent water repellency and affordability. They create a hard, waxy shell that sheds moisture effectively. Modern formulations have evolved significantly from the crude undercoatings of the 1970s, now incorporating corrosion inhibitors and adhesion promoters. While they provide robust protection, they tend to be less flexible than rubberized options and may not offer the same level of sound deadening. They’re ideal for restoration projects where authenticity and cost-effectiveness are priorities.
Wax and Paraffin-Based Options
These penetrating formulations work differently from surface-builders. Thin and fluid, they creep into seams and lap joints where rust typically begins. Wax-based undercoatings remain somewhat pliable and self-healing from minor abrasions. They’re particularly effective for vehicles in moderate climates but may require more frequent reapplication in severe conditions. Their low viscosity makes them excellent for reaching blind areas but demands meticulous masking to prevent overspray on exhaust components.
Polyurethane and Polyurea Coatings
Representing the premium tier, these two-component formulations deliver professional-grade performance. They cure through chemical reaction rather than solvent evaporation, creating an incredibly tough, flexible membrane with exceptional adhesion. Polyurea coatings can stretch up to 400% without tearing and resist extreme temperatures from -40°F to 250°F. While they demand precise mixing and application, their 10-15 year lifespan and superior protection justify the higher cost for serious enthusiasts and professionals.
Key Features to Evaluate Before Buying
Adhesion Strength and Substrate Compatibility
The best undercoating in the world is worthless if it doesn’t stick. Check product specifications for compatibility with your substrate—bare metal, factory E-coat, existing undercoating, or surface rust. Look for ASTM D4541 pull-off strength ratings above 300 psi for professional results. Products with silane or phosphate adhesion promoters bond molecularly to metal, creating a lasting connection that won’t delaminate when subjected to thermal cycling.
Flexibility and Crack Resistance
Your floor pans flex constantly from chassis twist, temperature changes, and road impacts. An effective undercoating must move with the metal without cracking. Evaluate elongation-at-break percentages—quality products should exceed 200% flexibility. The “bend test” is a simple field check: apply the product to a thin metal strip and bend it 90 degrees after curing. If the coating cracks or flakes, it won’t survive real-world conditions.
Drying Time and Curing Process
Understanding the difference between “dry to touch” and fully cured is critical for project planning. Fast-drying products might be paintable in 30 minutes but require 7-14 days to reach maximum hardness and chemical resistance. Consider your climate and application schedule. Humidity-cured products accelerate in moist conditions, while solvent-based coatings need dry weather. Factor in garage time—rushing the cure process by driving too soon can sling uncured product onto your paint.
Sound Deadening Properties
Floor pans act as massive drumheads, transmitting road noise and tire roar into the cabin. Undercoating mass and damping coefficient directly affect NVH (Noise, Vibration, Harshness) reduction. Rubberized and asphalt-based products typically offer the best sound deadening, with decibel reductions of 3-6 dB achievable. For luxury restorations, consider combining a structural undercoating with a dedicated sound deadener for maximum acoustic comfort.
Temperature Resistance Range
Your undercoating must survive summer heat soaking above 200°F from exhaust proximity and remain pliable at sub-zero winter temperatures. Check the service temperature range in product data sheets. Quality formulations maintain flexibility down to -20°F and resist softening up to 300°F. Products that can’t handle this thermal swing will crack, sag, or melt, creating channels for moisture intrusion.
Application Environment Considerations
Climate Zone Implications
Your geographic location should dictate your undercoating strategy. Coastal areas with salt air demand maximum corrosion inhibition and frequent inspection schedules. Desert environments require UV stability and resistance to sandblasting. Rust-belt states need the thickest, most durable barriers possible. Mountain regions with temperature extremes benefit from highly flexible formulations. Always select products specifically tested and warranted for your climate zone.
Seasonal Application Timing
Timing your application can make or break results. Ideal conditions are 65-85°F with low humidity and no precipitation for 24-48 hours. Spring and early fall typically offer the best windows. Avoid application when temperatures are below 50°F or above 90°F, as curing chemistry becomes unpredictable. Never apply before predicted rain within the product’s cure window—even dew can cause whitening and adhesion failure.
Indoor vs Outdoor Application
Professional shops apply undercoating in climate-controlled booths for good reason. If you’re working outdoors, create a temporary shelter to control dust, wind, and moisture. Indoor applications require excellent ventilation—some products release flammable vapors for days. Consider a garage with active exhaust ventilation or at least multiple fans. The controlled environment affects not just immediate results but long-term performance through proper cure cycles.
Surface Preparation: The Foundation of Success
Cleaning Protocols
Start with aggressive cleaning—not just a rinse, but a chemical decontamination. Use a degreaser to remove oil and road film, followed by a wax-and-grease remover. Pressure wash at 3,000+ psi to blast debris from seams. For restoration projects, media blasting may be necessary to remove old undercoating and scale. The goal is a surface that passes the “white glove” test—wipe with a clean white cloth and see no residue. Any contamination left behind becomes a failure point.
Rust Treatment Requirements
Never encapsulate active rust without proper treatment. Light surface rust can be converted with phosphoric acid-based converters that chemically transform iron oxide into stable iron phosphate. For heavier scale, mechanical removal is mandatory—wire wheels, sanding discs, or blasting. After treatment, apply a rust-inhibitive primer within hours before flash rusting occurs. Some premium undercoatings include rust encapsulation properties, but they work best on stable, converted rust, not active corrosion.
Masking and Protection Strategies
Overspray on exhaust components creates smoke and fire hazards; on suspension parts, it attracts dirt. Use high-temperature masking tape and plastic sheeting to protect critical areas. Remove or mask brake lines, fuel lines, and wiring harnesses. Cover wheels and tires completely. Don’t forget the drain holes—plug them temporarily to prevent clogging, but remove plugs before the coating cures to maintain proper water evacuation pathways.
Application Techniques for Professional Results
Spray Gun Selection and Setup
The right equipment transforms application quality. For DIYers, an undercoating gun with a 2.0-2.5 mm tip provides optimal atomization. Professionals prefer HVLP systems with pressure pots for consistent flow. Set pressure according to product viscosity—too high creates bounce-back and waste; too low causes orange peel and poor coverage. Practice on cardboard to dial in your pattern: a 6-8 inch fan with wet, even coats.
Optimal Spray Patterns and Coverage
Apply in overlapping passes, holding the gun 8-12 inches from the surface. Start at the edges and seams, building up these vulnerable areas with extra material. Use a cross-hatch pattern—horizontal passes followed by vertical—to ensure complete coverage. Aim for 4-6 mils wet film thickness per coat, which typically dries to 2-3 mils. Two coats are standard, but three provide superior protection in wheel wells and high-impact zones.
Layering Strategies for Maximum Protection
Think stratigically about build. First coat: thin, penetrating layer to seal seams and provide adhesion. Second coat: build thickness on flat panels and impact zones. For extreme duty, consider a third “sacrificial” coat on wheel wells that can be touched up annually. Allow proper flash-off between coats—typically 30-60 minutes depending on conditions. Rushing layers traps solvents, leading to soft, uncured spots that fail prematurely.
Hard-to-Reach Areas and Coverage
The difference between amateur and professional work lies in complete coverage. Use extension wands to reach up inside frame rails and rocker panels. Remove access panels and interior trim when possible to spray from inside-out. A borescope inspection camera helps verify coverage in blind cavities. Don’t forget the vertical surfaces inside wheel wells and the transitions between floor pans and frame rails—these are rust’s favorite starting points.
Curing and Drying: Patience Pays Off
Understanding Cure Times vs Dry Times
“Dry to touch” means solvents have evaporated from the surface; “cured” means the coating has reached full chemical and physical properties. This distinction is crucial. You might be able to handle the vehicle after 24 hours, but full chemical resistance and maximum hardness could take 7-30 days depending on formulation. Driving through puddles or exposing to harsh chemicals during the cure window can permanently compromise the coating.
Environmental Factors Affecting Curing
Temperature, humidity, and airflow all influence cure rate. Most products cure from the outside-in, which can trap solvents if conditions are too cool or humid. Ideal curing occurs at 70°F with 50% relative humidity. In high humidity, consider using a dehumidifier. Cold weather drastically slows curing—some products won’t cure below 50°F, remaining tacky indefinitely. Heat lamps can accelerate curing but maintain safe distance to prevent skinning over uncured material underneath.
Post-Application Inspection
After full cure, conduct a thorough inspection. Look for thin spots, pinholes, and missed edges. Perform a tap test—gently tap the coating with a screwdriver handle; a hollow sound indicates poor adhesion. Check thickness with a coating thickness gauge in multiple locations. Document your work with photos for warranty purposes and future reference. This inspection is your last chance to touch up before reassembly.
Longevity and Maintenance Expectations
Typical Lifespan of Different Formulations
Realistic expectations prevent disappointment. Wax-based undercoatings may need annual touch-ups in severe climates, lasting 1-3 years. Rubberized and asphalt-based products typically provide 3-7 years of protection. Polyurethane/polyurea systems can last 10-15 years when properly applied. However, these timelines assume ideal application conditions and regular maintenance. Wheel wells and high-impact areas will always require more frequent attention than center tunnel sections.
Signs of Degradation to Watch For
Set a semi-annual inspection schedule. Look for cracking, especially at panel edges and seams. Check for peeling or blistering, which indicates adhesion failure. Whitening or chalking suggests UV degradation (common with asphalt-based products). Soft, tacky spots indicate incomplete cure or chemical contamination. Pay special attention after winter—salt and gravel impact take their toll. Catching degradation early allows for spot repairs rather than complete redo.
Touch-Up and Maintenance Schedules
Proactive maintenance extends service life dramatically. Clean undercarriage thoroughly each spring to remove salt buildup. Touch up stone chips and thin spots immediately—don’t wait for rust to start. For wax-based products, consider an annual refresh coat in wheel wells. Keep a small supply of matching product for quick repairs. Document all maintenance for warranty compliance and resale value. A well-maintained undercoating system protects indefinitely.
Cost Analysis: Investment vs Protection Value
Price Per Square Foot Calculations
Break down costs realistically. A $30 aerosol can might cover 10-12 square feet at proper thickness ($2.50-3.00/sq ft). A $150 gallon of professional-grade product covers 150-200 square feet ($0.75-1.00/sq ft) but requires equipment investment. Factor in prep materials—degreaser, masking supplies, rust converter—which can add $50-100 to the project. Professional application ranges $500-1,500 depending on vehicle size and prep requirements. Calculate your vehicle’s total floor pan area to estimate accurately.
DIY Material Costs vs Professional Services
DIY saves labor costs but requires tool investment. A quality undercoating gun runs $30-80; a compressor capable of sustained spray, $200-500. Professional shops charge $75-150/hour for prep and application but bring expertise, warranty, and proper facilities. For a single vehicle, DIY might cost $200-400 in materials and equipment. For multiple vehicles or ongoing maintenance, equipment costs amortize quickly. Consider your skill level and time value—what takes a pro 4 hours might take a weekend for a first-timer.
Long-Term Value Proposition
Frame the cost as insurance. Replacing floor pans can exceed $3,000-5,000 in a modern vehicle, while proper undercoating costs a fraction of that. Factor in resale value—a documented undercoating history can increase trade-in offers by $500-1,000 in rust-prone regions. For classics, it preserves irreplaceable metal. Calculate cost per year of protection: a $400 DIY job lasting 7 years costs $57/year. That’s less than a single tank of gas for peace of mind and structural security.
Environmental and Safety Considerations
VOC Content and Regulations
Volatile Organic Compounds (VOCs) aren’t just an environmental concern—they affect your health and legal compliance. Many states limit automotive coatings to 450 g/L VOC content. Water-based undercoatings offer low-VOC alternatives but sacrifice some durability. Check local regulations before purchasing. Even compliant products require adequate ventilation. VOCs remain in curing coatings for days; keep the vehicle in a ventilated area and avoid enclosed spaces during the initial cure period.
Personal Protective Equipment Requirements
Treat undercoating like the hazardous material it is. A NIOSH-approved respirator with organic vapor cartridges is non-negotiable. Safety goggles or a full face shield protect from bounce-back. Chemical-resistant gloves (nitrile, not latex) and coveralls prevent skin absorption. Long-term exposure to asphalt and petroleum compounds has been linked to health issues. Even with low-VOC products, the particulate matter from overspray is harmful. Your health is worth more than any project savings.
Disposal and Cleanup Responsibilities
Undercoating waste is hazardous waste. Never pour solvents or cleanup materials down drains. Collect overspray and used thinner in sealed containers for proper disposal at a hazardous waste facility. Aerosol cans remain pressurized and require special handling. Rags soaked in petroleum products can spontaneously combust—store them in metal containers with tight-fitting lids. Check local regulations; improper disposal can result in significant fines. Responsible car care includes environmental stewardship.
Common Application Mistakes to Avoid
Inadequate Surface Prep Pitfalls
The number one cause of failure is rushing prep. Applying over wax, grease, or loose rust guarantees delamination. Another critical error is applying to damp surfaces—even morning dew prevents proper adhesion. Metal temperature must be within 5°F of ambient to avoid condensation issues. Don’t trust visual inspection alone; use a moisture meter on bare metal. Remember, the coating is only as good as the surface it’s bonded to. Prep work should consume 60-70% of your total project time.
Overapplication Issues
More is not better. Excessive thickness creates a soft, uncured layer that traps solvents and attracts road debris. Thick coatings are prone to sagging on vertical surfaces and can crack from thermal stress. Follow manufacturer wet film thickness recommendations precisely. If you desire extra protection, apply multiple thin coats rather than one heavy coat. Overapplication also wastes material and money—a common mistake that novices make thinking they’re adding extra protection.
Ignoring Temperature and Humidity Guidelines
Product data sheets aren’t suggestions—they’re critical instructions. Applying at 40°F when the minimum is 50°F means the product may never cure properly. High humidity can cause blushing, whitening, and poor adhesion. Direct sunlight heats metal surfaces far above ambient temperature, causing solvents to flash off too quickly and creating a skin-over effect. Use a thermometer on the metal surface, not just the air. A simple infrared thermometer is an invaluable tool for professional results.
Professional vs DIY: Making the Right Choice
Skill Level Assessment
Be brutally honest about your capabilities. Can you safely raise and support a vehicle for extended periods? Do you have experience with spray equipment and chemical safety? Undercoating mistakes are costly and dangerous. A botched DIY job that requires professional removal and reapplication costs more than hiring a pro initially. Consider starting with a less critical area like wheel wells to build confidence. There’s no shame in recognizing when a job exceeds your current skill set.
Equipment Investment Requirements
Quality results demand quality tools. Beyond the spray gun, you’ll need jack stands rated for your vehicle’s weight, proper lighting, ventilation fans, and safety equipment. A lift dramatically improves access but represents a significant investment. Compressors must deliver consistent CFM at 90 PSI—underpowered units cause pulsating spray and poor coverage. Calculate total equipment cost before committing. Renting a lift for a weekend ($200-400) might be more economical than purchasing.
When to Call a Professional
Some scenarios demand professional expertise. Vehicles with existing rust damage requiring structural assessment need a restoration shop. Newer vehicles under warranty may require certified application to maintain corrosion warranty coverage. If you’re dealing with a rare or high-value vehicle, the risk of DIY mistakes outweighs cost savings. Professionals also offer warranties on their work—peace of mind that’s worth the premium. Consider hybrid approaches: DIY prep with professional application, or vice versa.
Warranty and Product Support
Manufacturer Warranty Terms
Read warranty fine print carefully. Most cover product defects but not application errors. Many require professional installation for full coverage. Some premium products offer 10-year warranties but mandate annual inspections and touch-ups. Understand what constitutes a valid claim—typically adhesion failure over a specified percentage of surface area, not just cosmetic issues. Keep all receipts, batch numbers, and application documentation. Photos of each stage are invaluable for warranty claims.
What Voids Coverage
Common warranty killers include inadequate surface preparation, application outside specified temperature/humidity ranges, and applying over unsuitable substrates. Most warranties require application to bare metal or approved primers—spraying over existing rust or previous undercoating often voids coverage. Using incompatible thinners or additives is another automatic disqualifier. Follow manufacturer prep and application protocols to the letter. When in doubt, contact technical support before starting—they’ll document your plan, strengthening any future warranty claim.
Frequently Asked Questions
How long should I wait after applying undercoating before driving my vehicle?
Wait at least 24-48 hours before driving, even if the surface feels dry. Full cure times range from 7 days for fast-curing formulations to 30 days for maximum protection. Driving too early can sling uncured material onto paint and expose the coating to road contaminants before it’s fully hardened.
Can I apply new undercoating over an existing coating?
Generally, no—unless the existing coating is perfectly intact and you use a compatible product. Most failures occur from applying over old, compromised undercoating. The best practice is complete removal to bare metal. If removal isn’t feasible, thoroughly clean and scuff the existing coating, then apply a tie-coat primer specifically designed for intercoat adhesion.
What’s the ideal temperature for applying spray undercoating?
Most products specify 65-85°F as optimal, with a minimum of 50°F and maximum of 90°F. Metal surface temperature is more critical than air temperature—use an infrared thermometer. Avoid application when metal is hot to the touch or when temperatures are dropping below the minimum within 8 hours of application.
How do I remove old undercoating before reapplication?
Mechanical removal works best: wire wheels on a drill, media blasting, or specialized undercoating removal tools. Chemical strippers are available but messy and environmentally problematic. Heat guns soften old material but create toxic fumes. Expect 8-12 hours of labor for a complete removal on a sedan. Always wear respiratory protection—old undercoating contains decades of trapped road chemicals.
Will undercoating void my vehicle manufacturer’s warranty?
Factory corrosion warranties typically aren’t voided by aftermarket undercoating, but the application must not cause damage. Poor application that traps moisture or blocks drain holes could potentially cause issues. Some manufacturers require dealer-installed undercoating to maintain warranty coverage. Check your owner’s manual and consider having the work done by a certified facility familiar with your vehicle make.
How thick should undercoating be applied on floor pans?
Target 8-12 mils dry film thickness total, built in 2-3 coats. This typically means 4-6 mils wet per coat. Too thin provides inadequate protection; too thick leads to cracking and solvent entrapment. Use a wet film thickness gauge during application to verify. Critical areas like seams and wheel wells can benefit from slightly heavier application.
Can I undercoat over surface rust, or must it be completely removed?
Light surface rust can be treated with a rust converter before undercoating, but heavy scale must be removed. Undercoating over active rust is like painting over termite damage—it hides the problem while it continues to spread. The only exception is specialized “rust encapsulator” products designed to penetrate and stabilize rust, but even these work best on properly prepared surfaces.
How does undercoating affect vehicle weight?
A complete floor pan undercoating adds 15-25 pounds to a typical sedan. While not negligible, this is minimal compared to the vehicle’s total weight and the protection benefits. Rubberized and asphalt-based products are heaviest; wax-based are lightest. For race applications where every pound matters, consider ceramic-based thin-film coatings that add only 2-3 pounds while providing moderate protection.
Is undercoating effective on aluminum or galvanized floor pans?
Yes, but product selection is critical. Aluminum requires coatings with specific adhesion promoters to prevent galvanic corrosion. Galvanized steel needs products compatible with zinc coatings. Some undercoatings can actually trap moisture against aluminum, accelerating corrosion. Always verify substrate compatibility on the product data sheet. Stainless steel and aluminum benefit more from clear penetrating sealers than heavy build coatings.
How often should I inspect my undercoating after application?
Perform visual inspections every spring and fall, plus after any off-road or severe winter driving. Use a borescope to check inside frame rails and blind cavities annually. Touch up any damage immediately—don’t wait for your scheduled inspection. A quick 10-minute check can prevent a $1,000 repair. Document each inspection with photos to track changes over time and support warranty claims if needed.