Your vehicle’s undercarriage faces a constant assault from road salt, moisture, gravel, and chemical deicers. While you can’t see this hidden battlefield, the damage accumulates with every mile—transforming solid metal into flaky rust that compromises structural integrity and resale value. Undercoating isn’t just another line item in your car care budget; it’s a strategic defense system that can add years to your vehicle’s life and thousands to its value.
The most-wished-for undercoating products represent what discerning vehicle owners are actively researching—solutions that balance protection, durability, and value. But with so many formulations and application methods available, making an informed decision requires more than a quick product comparison. This comprehensive guide cuts through marketing claims to examine what truly matters when selecting undercoating protection, empowering you to choose the right solution for your specific climate, vehicle type, and maintenance philosophy.
Top 10 Undercoating Products
Detailed Product Reviews
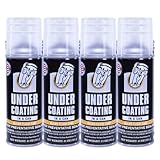
1. Undercoating In A Can - Black Wax Coating (12) 12oz. Case

Overview: The Undercoating In A Can Black Wax Coating case delivers a military-grade solution for vehicle undercarriage protection. This 12-pack of 12-ounce aerosol cans provides a convenient, ready-to-use rust prevention system approved to MIL-PRF-62218B specifications. Designed for DIY enthusiasts and professional shops alike, this wax-based formula creates a durable barrier against moisture, salt, and road debris while offering sound-deadening properties.
What Makes It Stand Out: The MIL-SPEC approval sets this product apart from typical retail undercoatings, indicating rigorous testing and proven performance. Its unique wax composition actively stops existing rust from spreading rather than merely covering it. The manufacturer claims it lasts four times longer than conventional asphalt-based and rubberized coatings, making it a long-term investment in vehicle preservation. The sound-deadening characteristic adds value beyond just corrosion protection.
Value for Money: At $74.18 for 144 total ounces, this works out to approximately $0.52 per ounce. While pricier than basic rubberized sprays, the extended longevity and superior rust-stopping capability justify the premium. For comparison, cheaper alternatives often require annual reapplication, whereas this product’s durability reduces long-term maintenance costs. The case quantity provides enough material for multiple vehicles or periodic touch-ups.
Strengths and Weaknesses: Strengths include military-grade formulation, proven rust inhibition, easy aerosol application, and excellent sound dampening. The wax base remains pliable, resisting cracking and peeling. Weaknesses involve aerosol limitations—coverage per can is modest for large trucks, and overspray requires careful masking. The black finish may not suit all applications, and professional results demand thorough surface preparation.
Bottom Line: This case offers exceptional quality for dedicated car owners seeking professional-grade protection without compressor-based equipment. It’s ideal for sedans, crossovers, and light trucks where convenience and proven performance outweigh bulk pricing advantages.
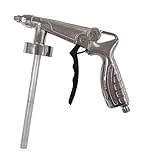
2. woolwax Pro Undercoating Gun by Kellsport
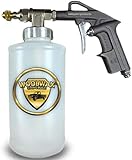
Overview: The woolwax Pro Undercoating Gun by Kellsport is a specialized application system engineered specifically for lanolin-based corrosion inhibitors. This professional-grade tool kit includes the spray gun, three empty quart bottles, an 18-inch 360-degree extension wand, and a 24-inch flexible extension wand—everything needed for comprehensive undercarriage coverage.
What Makes It Stand Out: Unlike generic paint guns, this system is purpose-built for the unique viscosity and application requirements of lanolin-based products like Woolwax and Fluid Film. The adjustable nozzle provides precise flow control, preventing clogging while ensuring optimal film thickness. The dual extension wands allow access to frame rails, rocker panels, and enclosed cavities that standard spray tips cannot reach, delivering professional results.
Value for Money: At $119.50, this represents a significant but worthwhile investment for serious DIYers and professional shops. Comparable professional undercoating guns often exceed $150 without including specialized wands or bottles. When paired with bulk lanolin products, the system quickly pays for itself compared to repeated aerosol can purchases. The reusable components offer years of service with proper maintenance.
Strengths and Weaknesses: Strengths include purpose-specific design, superior reach with included wands, adjustable flow control, and durable construction. The system eliminates waste and provides consistent application. Weaknesses include the requirement for an air compressor, initial cost barrier for casual users, and limited compatibility—it’s optimized for lanolin-based products and may not perform as well with rubberized or asphalt coatings.
Bottom Line: This gun is essential equipment for anyone committed to lanolin-based undercoating protection. It transforms the application process from tedious to efficient, delivering professional results that justify the investment after just two to three vehicle treatments.
3. POR-15 Semi-Gloss Black Stop Rust Undercoating System, 3 Products, 32 fluid ounces each
Overview: The POR-15 Semi-Gloss Black Stop Rust Undercoating System is a comprehensive three-product solution designed for maximum corrosion protection. This kit includes three 32-ounce containers that work together to permanently seal and protect metal surfaces from rust. POR-15 has built a legendary reputation in the automotive restoration world for creating coatings that bond to rust and prevent further oxidation.
What Makes It Stand Out: This isn’t a simple spray-and-forget undercoating—it’s a multi-stage system engineered for permanent results. Each product serves a specific purpose in the rust-neutralization and encapsulation process. The semi-gloss black finish provides a professional appearance while creating a rock-hard, non-porous barrier that moisture cannot penetrate. POR-15’s unique chemical bonding properties make it particularly effective on heavily rusted surfaces.
Value for Money: Priced at $125.87 for 96 total ounces ($1.34 per ounce), this system commands a premium but delivers professional restoration-grade results. While significantly more expensive per ounce than wax-based alternatives, its permanent nature eliminates reapplication costs. For restoration projects where replacing metal isn’t feasible, this system offers value that transcends price-per-ounce calculations.
Strengths and Weaknesses: Strengths include permanent rust encapsulation, professional-grade durability, trusted brand reputation, and excellent adhesion to properly prepared surfaces. The system provides comprehensive protection when all steps are followed. Weaknesses include a complex multi-step application process requiring extensive prep work, higher cost, and lack of flexibility once cured—impacts can chip the coating.
Bottom Line: This system is best suited for restoration enthusiasts and professionals tackling severely rusted vehicles where permanent encapsulation is critical. For routine undercoating maintenance, simpler and more flexible products offer better value and ease of use.
4. Undercoating In A Can - Black Wax Coating (5 Gallon Pail)
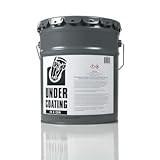
Overview: The Undercoating In A Can Black Wax Coating in a 5-gallon pail delivers the same MIL-PRF-62218B approved formula in bulk quantity for professional applications. This industrial-size container provides the identical military-grade wax-based protection as the aerosol version but in a format designed for spray gun application. It’s engineered for shops, fleet maintenance, or dedicated DIYers protecting multiple vehicles.
What Makes It Stand Out: The bulk packaging transforms this from a consumer product into a professional solution. While maintaining the same four-times-longevity claim and rust-stopping capabilities as the canned version, the pail format enables efficient large-scale application. The wax-based formula remains flexible, won’t crack or peel, and provides excellent sound deadening across entire undercarriages with uniform coverage.
Value for Money: At $223.91 for 640 ounces, the per-ounce cost drops to approximately $0.35—representing significant savings over the aerosol cans at $0.52 per ounce. For shops or clubs coordinating undercoating days, this pail can treat 15-20 vehicles, making it substantially more economical than purchasing multiple cases. The investment pays for itself after just a few vehicles compared to retail spray options.
Strengths and Weaknesses: Strengths include exceptional per-ounce value, professional quantity, identical MIL-SPEC performance, and reduced packaging waste. The bulk format allows for consistent application thickness. Weaknesses include the requirement for professional spray equipment and compressor, limited shelf life after opening, and substantial initial investment. Storage requires climate-controlled space to prevent separation.
Bottom Line: This pail is the smart choice for professional shops, restoration businesses, or serious enthusiasts maintaining multiple vehicles. The cost savings and performance make it superior to any retail alternative for high-volume applications, provided you have the equipment and storage capacity.
5. Undercoating in a Can Clear Wax Coating - 12/12oz. Case

Overview: The Undercoating In A Can Clear Wax Coating offers the same protective benefits as its black counterpart but in a transparent formula that preserves the original appearance of metal surfaces. This case of twelve 12-ounce aerosol cans provides convenient, military-grade corrosion protection without altering the visual character of components like aluminum suspension parts, exhaust systems, or restored chassis.
What Makes It Stand Out: The clear formulation solves a critical problem for show vehicles, restorations, and modern cars where aesthetic preservation matters. While delivering identical corrosion resistance and rust-stopping capabilities, it allows the underlying metal finish to remain visible. This is particularly valuable for vehicles with polished or coated components where a black undercoating would detract from the intended appearance.
Value for Money: At $74.18 for 144 ounces, the pricing mirrors the black version at $0.52 per ounce. The clear formula commands no premium, making it an equal value proposition. For applications requiring transparency, there’s simply no alternative that matches this product’s MIL-SPEC performance. The case quantity ensures adequate coverage for multiple vehicles or detailed touch-up work.
Strengths and Weaknesses: Strengths include invisible protection, MIL-SPEC performance, easy aerosol application, and versatility across various surfaces. The clear finish won’t hide imperfections but also won’t create unwanted black overspray on visible components. Weaknesses include the same aerosol limitations as the black version—modest coverage per can and potential overspray. The clear coating may show dirt accumulation more readily than black, requiring occasional cleaning.
Bottom Line: This clear version is essential for enthusiasts who demand protection without compromise to appearance. It’s ideal for show cars, restorations, and modern vehicles where component visibility matters, delivering proven performance with an invisible finish.
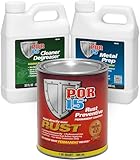
6. POR-15 Gray Stop Rust Undercoating System, 3 Products, 32 fluid ounces each

Overview: The POR-15 Gray Stop Rust Undercoating System delivers a professional-grade, three-step solution for permanent corrosion protection. This comprehensive kit includes 32-ounce containers of Cleaner Degreaser, Metal Prep, and Rust Preventive Coating, designed to transform rusted metal into a protected, durable surface. Engineered for direct application on stable rust or seasoned metal, this system creates a non-porous barrier that seals surfaces from moisture and oxygen.
What Makes It Stand Out: Unlike single-step rust paints, this system’s methodical approach ensures maximum adhesion and longevity. The Metal Prep etching stage creates an ideal surface profile, while the final coating cures to a hammer-tough finish that withstands acids, alkalis, oils, and fuels. The gray finish offers a professional appearance for visible undercarriage components, making it ideal for restoration projects where both function and aesthetics matter.
Value for Money: While pricing isn’t specified, this complete system typically represents significant savings compared to purchasing each component separately. When measured against the cost of professional undercoating services or repeated applications of inferior products, the investment pays dividends. Each 32-ounce container covers substantial surface area, and the permanent protection eliminates the need for annual reapplication, making it economically superior for long-term vehicle preservation.
Strengths and Weaknesses: Strengths include the scientifically-backed three-step process, exceptional chemical resistance, and permanent bonding to properly prepared surfaces. The coating’s fuel and oil repellency is particularly valuable for automotive applications. Weaknesses involve the labor-intensive preparation required—skipping steps compromises results. The system demands meticulous application and adequate ventilation. Additionally, the permanent nature means mistakes are difficult to correct, requiring careful masking and technique.
Bottom Line: For enthusiasts tackling frame-off restorations or addressing severe undercarriage corrosion, this system offers unmatched durability. The three-step process demands patience but delivers professional results that outlast conventional rust paints. Recommended for serious DIYers committed to proper preparation.
7. POR-15 Semi-Gloss Black Stop Rust Undercoating System, 3 Products, 32 fluid ounces each

Overview: This POR-15 Semi-Gloss Black system provides the same three-step rust prevention technology as its gray counterpart, but with documented performance metrics that meet military specifications. The kit includes Cleaner Degreaser, Metal Prep, and Rust Preventive Coating, each in 32-ounce containers. The semi-gloss black finish delivers a factory-original appearance ideal for frames, suspension components, and undercarriage restoration.
What Makes It Stand Out: The product’s certification to rigorous standards sets it apart. Exceeding Mil-D-3134J Impact Resistance and passing ASTM B-117 Salt Spray testing for 250 hours demonstrates real-world durability. NACE certification confirms zero porosity, while ASTM C-501 Taber Abraser testing shows no loss after 1,000 cycles. The coating maintains adhesion at 450°F for 10 hours, proving its suitability for high-heat applications like exhaust proximity areas.
Value for Money: At $118.05, this premium system costs less than a single professional undercoating session while providing enough material for multiple vehicles. The quantified performance data justifies the price premium over generic rust converters. For restoration professionals or owners of valuable classic vehicles, the documented specifications provide insurance against costly corrosion recurrence, making it a prudent long-term investment.
Strengths and Weaknesses: Strengths include independently verified performance metrics, exceptional impact and abrasion resistance, and high-temperature stability. The semi-gloss finish hides imperfections while providing authentic appearance. Weaknesses mirror the gray system: time-consuming application process, permanent nature that allows no room for error, and strong fumes requiring excellent ventilation. The price point may deter casual users with minor rust issues.
Bottom Line: For those demanding validated performance over marketing claims, this system delivers. The military-grade testing credentials make it the choice for professional restorers and serious enthusiasts. The $118 investment protects vehicles worth thousands—cheap insurance for frames and structural components.
8. Undercoating In A Can Clear Fluid Coat 12/11oz Case
Overview: This case of twelve 11-ounce cans provides oil-based undercoating in a clear fluid formulation designed for annual maintenance applications. The product penetrates tight joints and crevices, displacing moisture and corrosion from hard-to-reach areas. Unlike permanent coatings, this solution offers a convenient spray-and-go approach for vehicle owners seeking seasonal protection without extensive preparation.
What Makes It Stand Out: The clear fluid’s creeping action distinguishes it from traditional undercoatings. It actively pushes out existing moisture rather than simply sealing over it, reaching areas brushes cannot access. The aerosol delivery eliminates need for spray equipment, making it accessible to casual DIYers. This case quantity ensures coverage for multiple vehicles or annual reapplication cycles, creating a systematic maintenance routine.
Value for Money: At $76.48 for 132 total ounces, this represents economical seasonal protection. While requiring yearly reapplication, the per-vehicle cost remains under $10 for most cars—far less than professional treatments. However, the cumulative five-year expense approaches permanent system costs. For lease vehicles or those in moderate corrosion climates, the lower upfront investment makes sense. For long-term ownership, costs accumulate significantly.
Strengths and Weaknesses: Strengths include user-friendly application, excellent penetration into seams and crevices, and immediate moisture displacement. The clear finish preserves factory appearance and simplifies inspection of underlying metal. Weaknesses center on the one-year durability limit, requiring diligent annual reapplication. Oil-based formula may attract dirt and road grime, and overspray can be difficult to remove from unintended surfaces. It provides no structural rust conversion.
Bottom Line: Ideal for annual maintenance programs and vehicles in less severe corrosion environments. The spray-can convenience trades long-term durability for accessibility. Best suited for car owners comfortable with yearly undercarriage care rather than those seeking permanent, one-time solutions. A practical middle ground between neglect and professional coating.
9. Bedliner/Undercoating Gun
Overview: This entry-level spray gun provides basic application capability for bedliners and undercoating materials at an accessible price point. The tool features adjustable fan control, allowing users to modify spray patterns from narrow streams to wider fans. Designed for pneumatic operation, it connects to standard air compressors for DIY automotive protection projects.
What Makes It Stand Out: Simplicity defines this product. The single feature—adjustable fan control—addresses the primary variable in coating application without overwhelming novice users with complex adjustments. Its minimal design reduces failure points and keeps costs exceptionally low. For occasional use on personal vehicles, this straightforward approach eliminates learning curves associated with professional-grade equipment.
Value for Money: At $24.15, this represents minimal financial risk for experimenting with undercoating application. Comparable guns from premium brands cost 3-5 times more, making this an attractive option for one-time projects. However, the low price raises questions about material quality and longevity. For users applying a single vehicle coating, the cost-benefit ratio proves excellent. For regular use, replacement costs may accumulate.
Strengths and Weaknesses: Strengths include affordability, intuitive operation, and adequate functionality for basic projects. The adjustable fan control provides essential versatility for different undercarriage areas. Weaknesses stem from unspecified construction materials likely indicating lower-grade components. Lack of detailed specifications suggests limited durability and potential clogging issues with thicker materials. The absence of included accessories requires separate purchase of hoses and connectors.
Bottom Line: A functional budget tool for occasional DIY undercoating jobs. Suitable for first-time users testing the waters of automotive coating application. Professionals or frequent users should invest in higher-quality equipment with replaceable parts and better material compatibility. For its price, it delivers expected functionality but don’t anticipate decades of service.
10. NDNCZDHC Air Undercoating Spray Gun with Stainless Steel Tube, Pneumatic Automotive Undercoating Gun Kit with 53cm Quick Connector Hose

Overview: This comprehensive undercoating kit offers enhanced features for automotive rustproofing and protective coating applications. The spray gun combines copper, aluminum, and stainless steel construction with a 53cm quick-connect hose, creating a ready-to-use package. Designed for versatility, it handles rubber undercoating, truck bed liners, and various oil-based and water-based coatings.
What Makes It Stand Out: The inclusion of a stainless steel tube and industrial quick-connect plug distinguishes this from basic models. The ergonomic trigger handle reduces fatigue during extended use—a significant advantage for larger vehicles. Multi-material compatibility expands beyond typical undercoating guns, accommodating diverse coatings without dedicated tools. The 53cm hose provides practical reach without tangling.
Value for Money: At $23.79, this kit delivers remarkable value by including the quick-connect hose—often a $10-15 separate purchase. The upgraded construction materials suggest better longevity than budget alternatives at the same price point. For DIYers requiring versatility across multiple projects, the multi-material capability eliminates need for separate guns, effectively saving money long-term.
Strengths and Weaknesses: Strengths include the ergonomic design for comfort, versatile material compatibility, quality construction, and included quick-connect hose. The stainless steel tube resists corrosion from water-based materials. Weaknesses involve the obscure brand name potentially complicating warranty support. While materials are specified, manufacturing tolerances remain unknown. The tool may still require frequent cleaning to prevent clogging with heavy-bodied coatings.
Bottom Line: An exceptional value proposition for serious DIY enthusiasts. The feature set exceeds expectations at this price, making it a smarter purchase than bare-bones alternatives. Ideal for homeowners maintaining multiple vehicles or experimenting with different coating types. While not professional-grade, it offers the best balance of functionality and affordability in its class.
What Is Undercoating and Why Does Your Vehicle Need It?
Undercoating is a protective barrier applied to the exposed metal components beneath your vehicle. Unlike cosmetic car care products, undercoating works silently in the harshest environment your vehicle faces—constantly bombarded by debris, saturated with corrosive substances, and subjected to temperature extremes that accelerate metal degradation.
The Science Behind Rust Formation
Rust is an electrochemical process requiring three elements: iron, oxygen, and water. Your vehicle’s undercarriage provides the iron, while road spray delivers water and oxygen in a continuous cycle. Add electrolytes like road salt or magnesium chloride, and you’ve created a perfect corrosion cell that can eat through quarter-inch steel in just a few seasons. The process begins the moment water penetrates microscopic cracks in factory paint, creating an anode-cathode relationship that pulls iron molecules from the metal surface.
How Undercoating Protects Your Investment
Quality undercoating disrupts this corrosion triangle by creating an impermeable membrane that blocks water and oxygen from reaching metal surfaces. Premium formulations add corrosion inhibitors that chemically neutralize rust formation at the molecular level. This dual-action approach doesn’t just slow rust—it actively prevents it while providing impact resistance against rock chips that would otherwise expose bare metal.
Types of Undercoating Products Explained
Understanding the five primary undercoating categories helps you match product characteristics to your specific protection needs. Each formulation offers distinct advantages and trade-offs in durability, application complexity, and cost-effectiveness.
rubberized undercoatings
Rubberized products create a flexible, textured barrier that excels at sound dampening and impact resistance. The rubberized membrane remains pliable across temperature ranges, allowing it to absorb rock strikes without cracking. These formulations typically contain asphalt or synthetic rubber suspended in a solvent carrier, curing to a durable, slightly tacky finish. While excellent for noise reduction, the thickness can mask structural issues during inspections and may trap moisture if applied over unprepared surfaces.
Asphalt-Based Undercoatings
The traditional choice for commercial vehicles and heavy-duty applications, asphalt-based undercoatings offer maximum thickness and abrasion resistance. These products form a hard, tar-like shell that withstands severe road debris impact but sacrifice flexibility in extreme cold. The dense barrier provides exceptional water resistance, though the rigid nature makes it prone to cracking in climates with dramatic temperature swings. Professional application is strongly recommended due to the specialized equipment needed for proper coverage.
Wax and Paraffin-Based Undercoatings
Penetrating wax formulations creep into seams and crevices where sprays can’t reach, providing comprehensive protection for hidden rust-prone areas. These products remain semi-fluid, self-healing minor scratches as the wax flows back into damaged zones. The thin application maintains factory appearance while delivering excellent corrosion inhibition. However, wax undercoatings require more frequent reapplication—typically annually—and offer minimal sound dampening compared to rubberized alternatives.
Polyurethane Undercoatings
Modern polyurethane formulations represent the premium tier, combining exceptional flexibility with chemical resistance. These two-part catalyzed coatings cure to a tough, rubber-like membrane that won’t crack, chip, or peel. Polyurethane offers superior adhesion to properly prepared surfaces and maintains integrity through thousands of thermal cycles. The higher material cost and precise mixing requirements make this option best suited for enthusiasts seeking maximum longevity or restoration projects where factory-original appearance is paramount.
Oil-Based Penetrating Undercoatings
Oil-based products work through capillary action, wicking into welded seams and double-wall construction where rust originates. These formulations displace moisture while leaving a corrosion-inhibiting film that remains active for years. Annual touch-up applications refresh the protective layer, making this a low-effort maintenance strategy. The thin, non-drying nature means minimal change to the undercarriage’s appearance, but also provides no impact protection or sound dampening benefits.
Key Features to Look for in Premium Undercoating Products
Discerning buyers evaluate undercoating performance through specific technical metrics that separate genuine protection from cosmetic coatings. These characteristics determine real-world effectiveness across different vehicle types and operating conditions.
Corrosion Resistance Rating
Look for products tested to ASTM B117 salt spray standards, which quantify how long a coating prevents rust on a scribed steel panel in a controlled corrosive environment. Premium undercoatings should withstand 1,000+ hours of continuous salt spray exposure without failure. Some manufacturers also publish SAE J2334 test results, which better simulate real-world cyclic corrosion with wet/dry phases and temperature variations.
Flexibility and Crack Resistance
The elongation-at-break percentage reveals how much a coating can stretch before fracturing. Quality rubberized undercoatings should exceed 200% elongation, while polyurethane formulations may reach 400%+. This flexibility prevents cracks from forming when frame rails flex off-road or during extreme temperature swings. Check the low-temperature flexibility rating—top-tier products remain pliable at -40°F without cracking.
Sound Dampening Properties
Decibel reduction measurements quantify noise suppression, with premium products reducing road noise by 3-6 dB. The mass of the applied coating directly influences sound dampening, with thicker rubberized applications providing the greatest reduction in tire hum and road resonance. Consider the frequency range attenuated, as some formulations specifically target the low-frequency drone that penetrates vehicle cabins.
Drying Time and Curing Process
Understanding the difference between “dry to touch” and fully cured is critical for planning vehicle use. Solvent-based products may feel dry in 30 minutes but require 7-14 days for complete solvent evaporation and maximum hardness. Water-based formulations cure faster but demand specific humidity levels for proper film formation. Two-part catalyzed coatings cure through chemical reaction, achieving full properties within 24-48 hours regardless of environmental conditions.
Application Methods: Professional vs. DIY
The application technique significantly impacts undercoating effectiveness, with each method presenting distinct cost, equipment, and quality considerations. Your choice should balance budget constraints with desired protection level and available workspace.
Professional Spray Systems
Professional shops use high-volume, low-pressure (HVLP) spray systems with specialized wands that reach inside frame rails and box sections. These systems atomize thick undercoating materials into consistent patterns, ensuring uniform 3-5 mil coverage without runs or thin spots. Professional equipment also incorporates air filtration and recovery systems, allowing clean application of solvent-based products that would be hazardous in home garages. The investment in proper PPE, ventilation, and cleanup often makes professional application more economical for one-time projects.
DIY Aerosol Cans
Aerosol products offer convenience for touch-ups and small vehicles but present coverage challenges for full applications. A typical car requires 6-10 cans for adequate protection, making material costs approach professional pricing. Aerosols struggle to build sufficient film thickness in a single coat, often requiring three or more applications to achieve meaningful protection. The propellant can also cause the product to dry too quickly, reducing adhesion and creating a porous film that traps moisture.
DIY Spray Gun Application
Investing in a $30-80 undercoating spray gun connected to a 2-3 HP air compressor provides professional-level results for DIY enthusiasts. These guns feature large fluid nozzles (1.8-2.2mm) that handle thick materials without clogging, and adjustable patterns for broad coverage or pinpoint application. The key is maintaining consistent 40-60 PSI at the gun while keeping the material warm (70-80°F) for proper flow. This method requires meticulous masking but delivers 90% of professional quality at 50% of the cost.
Brush-On Applications
Brush application works exceptionally well for penetrating wax and oil formulations, allowing forced entry into seams and overlaps where corrosion begins. Natural bristle brushes (not foam) work the material into metal pores and around bolt heads. While labor-intensive, brushing eliminates overspray concerns and provides the thinnest, most uniform application for concourse-level restorations. The technique also reveals surface defects and existing rust that spray applications might mask.
Surface Preparation: The Critical First Step
Even the most expensive undercoating fails when applied over contaminated surfaces. Proper preparation represents 70% of the work but determines 100% of the results. Skipping steps here virtually guarantees premature coating failure and wasted investment.
Cleaning and Degreasing
Begin with a thorough pressure wash, removing all mud, road grime, and loose scale. Follow with a biodegradable degreaser applied with a pump sprayer, agitating with a stiff brush to break down petroleum residues and old undercoating. Rinse thoroughly and allow complete drying. For vehicles with existing undercoating, use a specialized remover to strip failed material down to bare metal or stable original coating. Any grease or oil left behind creates a parting line that will cause delamination.
Rust Removal and Treatment
Mechanically remove all loose rust using wire wheels, abrasive pads, or media blasting. Don’t attempt to encapsulate flaking rust—it will continue expanding beneath the coating. After mechanical removal, apply a phosphoric acid-based rust converter that chemically transforms remaining iron oxide into a stable iron phosphate layer. This conversion creates a tenacious anchor for undercoating while neutralizing corrosion activity. Allow 24-48 hours for complete conversion before proceeding.
Drying Time and Environmental Factors
Metal must be completely dry before undercoating application. Even trace moisture trapped beneath the coating creates a corrosion cell. In humid climates, use forced air or infrared heaters to ensure deep drying of box sections and seams. Ideal application conditions are 60-80°F with relative humidity below 60%. Avoid application when metal surfaces are cool enough to cause condensation or hot enough to cause solvent flash-off that prevents proper leveling.
Climate Considerations for Undercoating Selection
Your local environment dictates which undercoating characteristics matter most. A product perfect for Arizona’s dry heat fails miserably in Maine’s salty winters, while coastal Florida demands different protection than inland Colorado.
Cold Weather and Road Salt Protection
Vehicles operating in the Salt Belt require maximum salt spray resistance and flexibility at sub-zero temperatures. Rubberized undercoatings with high elongation ratings prevent cracks from freeze-thaw cycles. Look for products specifically formulated with sodium chloride resistance additives. Asphalt-based coatings become brittle below 20°F, making them poor choices for regions where temperatures regularly drop below zero. Annual inspection and touch-up before winter ensures continuous protection.
High Humidity and Coastal Environments
Salt air and constant humidity demand undercoatings with exceptional water displacement properties. Oil-based penetrating formulations excel here, as they actively repel moisture from seams where salt crystals accumulate. Polyurethane coatings with high cross-link density provide superior barrier protection against constant moisture exposure. In these climates, avoid products that cure porous or require long drying times, as ambient humidity can interfere with proper film formation.
Extreme Heat and UV Exposure
Desert and southern climates subject undercoatings to 200°F+ surface temperatures and intense UV radiation that breaks down organic binders. Asphalt-based products soften and flow in extreme heat, collecting debris that traps moisture. Polyurethane and high-temp rubberized formulations maintain integrity above 300°F. UV stabilizers are critical—without them, coatings become brittle and chalk within two years. Light-colored undercoatings reflect heat better than black formulations, reducing thermal cycling stress.
Longevity and Durability Factors
Understanding realistic lifespan expectations prevents disappointment and ensures proper maintenance scheduling. No undercoating lasts forever, but premium products significantly extend reapplication intervals when properly maintained.
Reapplication Intervals
Wax-based undercoatings require annual application to maintain effectiveness, making them high-maintenance but thorough. Rubberized products typically last 3-5 years before requiring touch-up, with complete reapplication needed at 7-10 years. Polyurethane coatings can provide 10+ year protection with proper initial application. Oil-based treatments need annual refreshment but involve simple spray-over application without surface prep. Consider your willingness to perform ongoing maintenance when selecting a product category.
Warranty Coverage
Manufacturer warranties range from one year to lifetime, but read the fine print carefully. Most warranties cover material defects, not application errors or existing rust. Some premium products offer pro-rated warranties that pay a percentage of material costs based on failure timeframe. Professional applications often include workmanship warranties covering labor for touch-ups. Document application with photos and receipts—warranty claims universally require proof of proper surface preparation and application conditions.
Inspection and Maintenance
Establish a semi-annual inspection routine, checking for cracks, chips, or thinning in high-impact areas behind wheels and along rockers. Use a borescope camera to inspect inside frame rails without drilling access holes. Touch-up any damage immediately—waiting until next season allows rust to establish a foothold. Pressure wash the undercarriage quarterly to remove road salt and debris that can abrade the coating. Annual steam cleaning followed by a fresh wax or oil application rejuvenates protection and extends overall system life.
Cost vs. Value Analysis
Price shopping undercoating products misses the bigger economic picture. The true value calculation must include application costs, longevity, and potential repair savings. A cheap product that fails in two years costs more than a premium option lasting a decade.
Initial Investment vs. Long-Term Savings
Professional undercoating for a sedan ranges from $150-400, while DIY materials cost $50-150. However, consider the $3,000-8,000 cost of replacing rusted subframes, brake lines, and suspension components. Premium polyurethane systems costing $500+ professionally applied save money if they prevent one major repair. Factor in resale value—a documented undercoating maintenance history can increase trade-in value by $1,000-2,000 on older vehicles in rust-prone regions.
Professional Application Costs
Shop rates vary dramatically, from $75/hr at independent shops to $150+/hr at dealerships. A complete undercoating job requires 2-4 hours depending on vehicle size and preparation needs. Many shops offer package deals that include annual inspections and touch-ups, spreading cost over time. Ask about what’s included—comprehensive jobs remove plastic undertrays, coat inside frame rails, and protect fuel/brake lines, while budget services may only spray visible surfaces.
DIY Material Costs
Aerosol cans cost $8-15 each, requiring 8-12 cans for full coverage ($64-180). Spray gun-ready quarts run $20-40, with a gallon covering most vehicles ($40-80). Two-part polyurethane kits cost $100-200 but require mixing equipment and careful application. Don’t forget ancillary costs: degreaser ($15), rust converter ($20), masking supplies ($10), and safety equipment ($30). The DIY route saves money on subsequent vehicles once you own the equipment, making it economical for multi-car families.
Common Mistakes to Avoid When Undercoating
Even experienced DIYers make critical errors that compromise protection. Recognizing these pitfalls before starting ensures your effort and investment deliver maximum corrosion resistance.
Insufficient Surface Prep
The number one cause of undercoating failure is inadequate cleaning. Skipping degreasing or rust conversion creates a weak boundary layer that delaminates within months. Another common error is applying over factory undercoating that’s beginning to fail—new material bonds to loose old coating, which then peels off together. Always test existing coatings for adhesion and remove anything that flakes or lifts with a fingernail.
Applying Too Thick or Thin
More isn’t better with undercoating. Excessive thickness creates a heavy, mud-collecting surface that traps moisture against metal. Thick applications also crack from thermal expansion stress. Conversely, thin applications below 3 mils provide insufficient barrier protection. Use a wet-film thickness gauge during application to verify 4-6 mil coverage. Apply multiple thin coats rather than one heavy coat for optimal adhesion and curing.
Ignoring Drainage Holes and Moving Parts
Blocking factory drainage holes with undercoating is a critical error that traps water inside frame rails and body cavities. Use foam plugs or masking tape to keep holes clear during application. Avoid coating U-joints, brake components, exhaust systems, and rubber bushings—undercoating here causes more problems than it solves. Mask these areas meticulously, and inspect moving parts after application to ensure no overspray restricts function.
Environmental and Health Considerations
Modern undercoating formulations balance performance with regulatory compliance and user safety. Understanding these factors helps you choose products appropriate for your workspace and environmental values.
VOC Regulations
Volatile Organic Compound (VOC) regulations vary by state, with California’s CARB standards being most restrictive. Many high-performance solvent-based undercoatings exceed 500 g/L VOC, making them illegal for retail sale in some states. Water-based formulations meet all current regulations but may sacrifice some performance characteristics. Check local requirements before purchasing—online retailers won’t ship non-compliant products to restricted areas, and using them violates air quality laws.
Proper Ventilation and Safety Gear
Solvent-based undercoatings require forced ventilation with 10+ air changes per hour to prevent vapor accumulation and fire hazards. Wear organic vapor respirators (not dust masks), chemical-resistant gloves, and eye protection. Two-part polyurethanes demand isocyanate-rated respirators and full-body coverage to prevent sensitization. Even “low-VOC” products release hazardous fumes during application and curing—never apply in enclosed spaces without professional exhaust systems.
Eco-Friendly Formulations
Bio-based undercoatings using soybean oil and natural waxes offer reduced environmental impact without sacrificing performance. These products use water carriers and natural corrosion inhibitors like tannic acid. While historically less durable than synthetic formulations, recent advances have closed the gap significantly. For the environmentally conscious, these products provide peace of mind, especially when reapplication involves minimal surface prep and no hazardous waste generation.
How to Evaluate Undercoating Performance
Determining whether your undercoating is performing requires more than a visual glance. Systematic evaluation techniques reveal protection quality before rust becomes visible.
Visual Inspection Checkpoints
Use a bright LED work light and inspection mirror to examine critical areas monthly during winter, quarterly otherwise. Check for cracking along weld seams, thinning on high-impact zones behind tires, and lifting around edges. Look for color changes indicating UV degradation or chemical attack. Inside frame rails, use a borescope to inspect for moisture accumulation or rust staining at drain holes. Any orange discoloration at coating edges signals active corrosion beneath.
The Tap Test Method
Gently tap the undercoating with a plastic screwdriver handle. Properly adhered coating produces a solid, dull thud. Hollow or drummy sounds indicate delamination and trapped moisture. Tap systematically across the surface, marking suspect areas with chalk. Confirm delamination by pressing firmly—bubbles or soft spots require immediate attention. This simple test reveals adhesion failures long before they become visible rust.
Professional Assessment Options
Corrosion specialists offer electronic corrosion potential testing, measuring the electrical activity of metal beneath undercoating. High readings indicate active rust despite intact coating. Ultrasonic thickness gauges measure remaining steel thickness in suspect areas, quantifying hidden rust damage. Annual professional inspection ($75-150) provides documentation for warranty claims and catches problems early when repairs are inexpensive. Many shops offer free inspection with undercoating purchase.
Undercoating vs. Rust Proofing: Understanding the Difference
These terms are often used interchangeably, but they describe complementary protection strategies. Confusing them leads to incomplete protection and disappointed expectations.
Target Areas
Undercoating protects exterior undercarriage surfaces—frame rails, floor pans, wheel wells—from impact and abrasion. Rust proofing treats internal cavities—doors, rocker panels, frame interiors—where moisture accumulates but isn’t visible. A comprehensive protection plan includes both: undercoating for external armor and rust proofing for internal preservation. Products designed for one purpose typically perform poorly when misapplied to the other area.
Application Techniques
Undercoating requires visible, uniform coverage with emphasis on high-impact zones. Rust proofing uses specialized wands to inject thin, creeping oil into enclosed spaces through factory access holes. The application equipment differs significantly—undercoating guns produce broad patterns at low pressure, while rust proofing wands operate at higher pressure to force material into seams. Professional shops often perform both services, but DIY kits typically focus on one method or the other.
Complementary Protection Strategies
The most effective approach combines undercoating’s barrier protection with rust proofing’s penetrating preservation. Apply undercoating first to external surfaces, then follow with cavity injection of thin oil that seeps into overlaps and welds the undercoating can’t reach. This layered defense addresses all rust pathways. Some modern hybrid products claim to do both, but specialized applications still deliver superior results for vehicles in severe service environments.
Seasonal Timing for Undercoating Application
Strategic timing maximizes undercoating effectiveness and ensures proper curing. Applying at the wrong time wastes effort and compromises adhesion.
Best Months for Application
Late spring (April-May) and early fall (September-October) offer ideal conditions in most climates—moderate temperatures, low humidity, and minimal precipitation. Spring application protects through summer’s humidity and the following winter’s salt assault. Fall application provides immediate pre-winter protection but requires warm weather curing before cold arrives. Avoid summer’s high humidity, which interferes with curing, and winter’s cold, which prevents proper film formation.
Temperature Requirements
Most undercoatings require ambient and surface temperatures between 60-85°F for proper application and curing. Below 60°F, the material becomes too viscous to atomize properly and won’t level correctly. Above 85°F, solvents flash off too quickly, causing poor adhesion and a porous film. Check product-specific requirements—some advanced formulations cure at temperatures as low as 40°F, while others demand 70°F minimum. Never apply when metal surfaces are cold enough to cause condensation.
Pre-Winter Preparation Timeline
Begin surface preparation six weeks before the first anticipated salt application. This allows time for rust conversion, thorough drying, and proper curing. Schedule undercoating application two weeks before winter weather arrives, giving the coating time to achieve initial hardness. Rushing this timeline risks applying over damp surfaces or using the vehicle before the coating can withstand road spray. Mark your calendar for post-winter inspection in April, addressing any damage before spring rains accelerate hidden rust.
Professional Installation: What to Expect
Knowing the professional process helps you evaluate shop quality and ensures you receive the comprehensive protection you’re paying for. A proper job involves far more than a quick spray.
The Multi-Step Process
Quality shops begin with a thorough undercarriage wash using hot water and degreasing agents, followed by compressed air drying. They then perform detailed rust removal and conversion, documenting severe areas with photos. Masking protects components that shouldn’t be coated, and removable panels are taken off for complete access. The undercoating is applied in multiple thin passes, building to specified thickness while maintaining proper flash times between coats. Finally, the vehicle is cured in a heated booth before quality inspection.
Turnaround Time
Expect to leave your vehicle for a full day. Preparation and application typically require 4-6 hours, followed by 2-4 hours of curing time before the vehicle can be driven. Shops offering “while you wait” service likely skip critical preparation steps. Some high-end facilities keep vehicles overnight to ensure full curing before exposure to road spray. Plan accordingly, and ask about loaner vehicles if transportation is an issue.
Post-Application Care
Professionally applied undercoating requires a 500-mile “settling period” where you should avoid heavy water exposure and off-road conditions. The shop should provide written care instructions and a warranty document. Schedule a free touch-up inspection at 30 days and 6 months—reputable shops include this service. Ask about recommended cleaning methods; some coatings require specific pH-neutral cleaners to avoid degradation. Keep all documentation, as warranty claims require proof of professional application and maintenance compliance.
Frequently Asked Questions
How long does undercoating last before needing reapplication?
Most rubberized undercoatings provide 3-5 years of effective protection before requiring touch-ups, with complete reapplication needed every 7-10 years. Wax-based products need annual renewal, while premium polyurethane systems can last 10+ years. Actual lifespan depends on climate severity, driving conditions, and whether you perform regular inspections and maintenance.
Can I apply undercoating over existing rust?
Never apply undercoating over loose, flaking rust. You must mechanically remove unstable rust, then treat remaining corrosion with a phosphoric acid converter that chemically stabilizes the surface. Applying over active rust seals in moisture and accelerates hidden corrosion. Light surface rust that’s been properly converted can be coated, but heavy pitting requires professional assessment.
Does undercoating void my vehicle’s factory warranty?
Properly applied undercoating does not void factory warranties and may actually preserve warranty coverage by preventing rust damage. However, coating certain components like exhaust systems or rubber suspension parts can cause issues if those parts later fail. Keep documentation of professional application and avoid coating parts specified as exclusions in your owner’s manual.
What’s the difference between undercoating and bedliner material?
While both are protective coatings, bedliners are formulated for extreme abrasion resistance and texture, using harder polymers that would crack on a vehicle’s flexible undercarriage. Undercoatings remain more pliable to accommodate frame flex and thermal expansion. Some DIYers misuse bedliner as undercoating, resulting in cracking and moisture entrapment. Always use products specifically formulated for undercarriage application.
How much does professional undercoating typically cost?
Professional undercoating for a standard sedan ranges from $150-400, depending on preparation needs and product quality. SUVs and trucks cost $200-500 due to larger surface area. Premium polyurethane systems with extensive preparation can reach $600-800. Shop around, but be wary of prices significantly below these ranges, which likely indicate skipped steps or inferior products.
Can I undercoat my vehicle myself in my driveway?
DIY application is possible with proper preparation, but presents challenges. You’ll need to safely raise and support the vehicle, manage overspray, and ensure adequate ventilation for solvent-based products. Weather conditions must be perfect, and you need 4-6 hours of uninterrupted work time. Many enthusiasts successfully undercoat at home, but first-timers often achieve better results using a professional shop’s controlled environment.
Will undercoating make my car quieter inside?
Quality rubberized undercoatings reduce interior noise by 3-6 decibels, noticeably decreasing road roar and tire drone. The effect is most pronounced on older vehicles with minimal factory sound deadening. However, undercoating primarily targets corrosion protection; if noise reduction is your main goal, dedicated sound deadening mats on floor pans provide greater improvement. Think of undercoating’s sound benefit as a bonus, not the primary feature.
How soon before winter should I undercoat my vehicle?
Schedule undercoating at least two weeks before the first anticipated salt application, but after temperatures drop below 50°F consistently. This timing ensures the coating cures properly while providing immediate pre-winter protection. Applying in early fall (September-October) is ideal in most climates, giving you a buffer against early winter weather. Avoid last-minute applications in November when shops are overwhelmed and curing conditions are marginal.
Does undercoating add significant weight to my vehicle?
A complete undercoating application adds 15-25 pounds to a typical sedan—negligible compared to the vehicle’s overall weight. The protection is applied in thin layers totaling 3-6 mils thickness, not the heavy buildup some imagine. The weight distribution is low on the vehicle, potentially lowering the center of gravity slightly. Fuel economy impact is virtually unmeasurable, while the weight of rust that develops without protection can actually exceed the coating’s weight over time.
Can undercoating be removed if I change my mind or need repairs?
Removing undercoating is labor-intensive but possible. Chemical strippers soften rubberized and asphalt-based coatings for scraping, while media blasting removes harder polyurethane films. Heat guns help peel thick applications. Professional removal costs $300-600 for a complete job. Most undercoatings can be spot-removed for repairs using rotary wire wheels, then touched up after the repair is completed. Consider this when choosing a product—oil-based undercoatings are easiest to remove, while polyurethanes require aggressive mechanical removal.