Your light bar takes a beating. Mounted front and center on your off-road rig, work truck, or emergency vehicle, it faces a constant barrage of salt spray, gravel impacts, moisture intrusion, and UV radiation that would destroy lesser equipment. While most enthusiasts obsess over lumen output and beam patterns, the silent killer of expensive LED light bars isn’t electrical failure—it’s corrosion creeping through microscopic scratches and unsealed mounting points. Undercoating isn’t just for frame rails and rocker panels anymore. Applying the right protective coating to your light bar can mean the difference between a decade of reliable service and replacement after just two winters.
But here’s the challenge: not all undercoating formulations play nice with aluminum housings, polycarbonate lenses, or the heat generated by high-output LEDs. Choose wrong and you’ll trap moisture, block cooling fins, or create a yellowed, cracked mess that voids your warranty. This guide cuts through the marketing jargon to arm you with the technical knowledge needed to evaluate undercoating products like a professional. We’ll explore the chemistry, application techniques, and performance metrics that separate legitimate protection from snake oil.
Top 10 Undercoating Products
Detailed Product Reviews
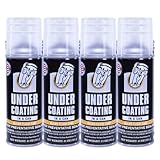
1. Undercoating In A Can - Black Wax Coating (12) 12oz. Case

Overview: This military-grade undercoating system delivers professional corrosion protection in convenient aerosol cans. The black wax formula creates a durable barrier against moisture, salt, and road debris while providing sound-dampening benefits. Each case contains twelve 12-ounce cans, making it suitable for complete undercarriage coverage on multiple vehicles or annual reapplication on a daily driver.
What Makes It Stand Out: The MIL-PRF-62218B approval signals this isn’t ordinary spray paint—it’s a specification-grade product tested for military applications. Its claim to last four times longer than rubberized or asphalt-based alternatives stems from advanced wax chemistry that remains pliable and self-healing. The formula actively stops existing rust from spreading rather than merely covering it, addressing problems beneath the surface.
Value for Money: At approximately $6.18 per can, this represents significant savings compared to professional undercoating services ($150-$300 per vehicle). For DIY enthusiasts maintaining multiple cars, the case quantity eliminates frequent reordering. While pricier than hardware store alternatives, the extended longevity means less frequent applications, ultimately reducing long-term costs and labor.
Strengths and Weaknesses: Strengths: Military specification approval ensures proven performance; stops rust migration at the chemical level; excellent sound deadening properties; superior durability versus conventional coatings; convenient aerosol application for hard-to-reach areas.
Weaknesses: Aerosol cans have limited coverage per unit; requires thorough surface prep for optimal adhesion; black finish may not suit all vehicle restorations; ventilation and safety equipment mandatory during application.
Bottom Line: Ideal for serious DIYers in rust-belt regions, this case offers professional-grade protection with convenience. The upfront investment pays dividends through reduced application frequency and proven military-tested performance.
2. woolwax Pro Undercoating Gun by Kellsport
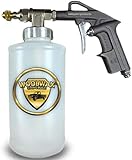
Overview: This professional-grade application system is engineered specifically for lanolin-based corrosion inhibitors like Woolwax. The kit includes a precision spray gun, three empty quart bottles for custom mixing, and two specialized wands—an 18-inch rigid 360-degree wand and a 24-inch flexible extension. Designed for compressor operation, it transforms undercoating from a chore into an efficient, professional-quality process.
What Makes It Stand Out: Unlike generic spray guns, this system’s adjustable nozzle and specialized wands deliver targeted coverage to frame rails, rocker panels, and inner cavities. The 360-degree wand provides complete internal coverage without rotation, while the flexible wand navigates complex geometries. The lanolin-specific design ensures proper atomization of thick, waxy coatings that clog conventional equipment.
Value for Money: At $119.50, this kit costs less than a single professional undercoating service while delivering equivalent results indefinitely. The included accessories—valued separately at over $60—provide immediate functionality. For vehicle collectors, restoration shops, or serious enthusiasts, the system pays for itself after two applications while providing superior control and coverage compared to aerosol alternatives.
Strengths and Weaknesses: Strengths: Precision application reduces product waste; reusable system eliminates disposable can expenses; specialized wands access impossible-to-reach areas; adjustable flow control prevents runs and overspray; robust construction ensures years of service.
Weaknesses: Requires air compressor (minimum 6 CFM @ 90 PSI); learning curve for optimal settings; initial investment substantial for one-time users; cleaning and maintenance required after each use; product must be purchased separately.
Bottom Line: A must-have investment for anyone regularly applying lanolin-based undercoatings. The professional results, material savings, and access capabilities justify the price for serious automotive preservationists.
3. Undercoating In A Can - Black Wax Coating (5 Gallon Pail)
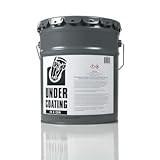
Overview: This bulk offering delivers the same MIL-PRF-62218B approved black wax formula in a professional five-gallon pail format. Designed for restoration shops, fleet maintenance, or multi-vehicle owners, this volume provides coverage for approximately 15-20 complete vehicles. The pail format requires separate spray equipment but offers maximum economy for high-volume applications.
What Makes It Stand Out: The bulk packaging eliminates the waste and cost associated with individual aerosol cans while providing identical military-specification performance. This format allows custom thinning for specific application methods and climate conditions. The substantial volume ensures consistent batch quality across multiple vehicles, critical for restoration shops seeking uniform results. The pail’s resealable design maintains product integrity over extended storage periods.
Value for Money: At $223.91, the per-ounce cost drops dramatically to approximately $0.35 versus $0.51 for aerosol cans—a 30% savings that compounds for volume users. For shops charging $200+ per undercoating service, the pail yields 15+ services, generating over $3,000 in revenue. Fleet operators maintaining 5+ vehicles achieve ROI within the first year through DIY application versus outsourced services.
Strengths and Weaknesses: Strengths: Maximum economy for high-volume users; identical military-grade performance; customizable viscosity; environmentally friendly (less packaging waste); stable long-term storage; ideal for professional settings.
Weaknesses: Requires spray gun system ($100+ additional investment); not portable like aerosol cans; significant upfront cost; needs dedicated storage space; mixing and thinning adds preparation time.
Bottom Line: The economical choice for professionals and serious enthusiasts managing multiple vehicles. The substantial savings and performance consistency make it the smart investment for regular undercoating operations.
4. Undercoating in a Can Clear Wax Coating - 12/12oz. Case

Overview: This transparent variant of the military-spec undercoating provides invisible corrosion protection for vehicle undercarriages, trailers, and exposed metal components. The clear wax formula maintains the original appearance of metal surfaces while delivering the same moisture and salt resistance as its black counterpart. Packaged as twelve 12-ounce aerosol cans, it offers convenient application for preservation purists and show vehicle owners.
What Makes It Stand Out: The transparent finish solves a critical aesthetic problem for classic car restorations, aluminum trailers, and vehicles with exposed structural components where black coating would appear unsightly. The clear formula allows visual inspection of the underlying metal without coating removal. This is particularly valuable for concourse restorations and vehicles with polished or natural metal finishes requiring discreet protection.
Value for Money: Priced identically to the black version at $74.18 per case, the clear formula offers equivalent protection without aesthetic compromise. For show vehicles where appearance is paramount, this prevents costly repainting or stripping of black overspray. The ability to monitor rust development visually can catch problems early, potentially saving thousands in structural repairs.
Strengths and Weaknesses: Strengths: Invisible protection preserves original appearance; allows ongoing rust inspection; versatile for non-automotive metal equipment; same military-grade performance; excellent for aluminum and polished surfaces; no visible overspray concerns.
Weaknesses: Less effective at concealing existing surface rust; application harder to see, increasing risk of missed spots; may yellow slightly over time with UV exposure; same aerosol coverage limitations as black version; requires meticulous prep for transparent finish.
Bottom Line: Essential for preservation-focused owners of classic, show, or specialty vehicles where appearance cannot be compromised. The invisible protection justifies the investment for aesthetic-conscious applications.
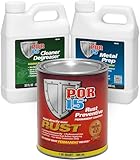
5. POR-15 Gloss Black Stop Rust Undercoating System, 3 Products, 32 fluid ounces each

Overview: This comprehensive three-step system provides permanent rust prevention through a chemically-bonded approach. The kit includes Cleaner Degreaser, Metal Prep, and Rust Preventive Coating—each 32 ounces—forming a complete solution for transforming rusty metal into a protected, hammer-tough finish. Designed for direct application on stable rust, it creates a non-porous barrier that repels fuels, acids, and alkalis.
What Makes It Stand Out: Unlike single-product wax coatings, POR-15’s system chemically converts and encapsulates rust permanently. The Metal Prep etches the surface for molecular adhesion, while the coating cures via moisture exposure, creating a ceramic-like finish that cannot be removed with solvents. This isn’t maintenance—it’s a one-time permanent solution for critical structural components, making it fundamentally different from traditional undercoatings.
Value for Money: While pricing isn’t specified, comparable POR-15 kits retail around $90-$110. Considering professional rust encapsulation services charge $500-$1,500 for frame-off treatments, the DIY kit offers extraordinary value. The 32-ounce quantities cover an entire frame and suspension components with proper application. For vehicles with existing rust requiring permanent stabilization, this system prevents costly component replacement.
Strengths and Weaknesses: Strengths: Permanent chemical bond to rust; hammer-tough finish resists physical damage; impervious to automotive chemicals; single application lasts vehicle lifetime; stops rust progression completely; professional-grade results achievable by DIYers.
Weaknesses: Labor-intensive three-step process; requires meticulous surface prep; toxic fumes necessitate respirator and ventilation; irreversible application mistakes; not suitable for surfaces requiring future welding; UV exposure requires topcoating.
Bottom Line: The definitive solution for vehicles with existing rust requiring permanent arrestment. For structural components and frames, this system’s permanence and chemical resistance justify the extensive preparation requirements.
6. POR-15 Semi-Gloss Black Stop Rust Undercoating System, 3 Products, 32 fluid ounces each
Overview: The POR-15 Semi-Gloss Black Stop Rust Undercoating System is a comprehensive three-step solution designed for permanent corrosion protection. This kit includes three 32-ounce containers—cleaner degreaser, metal prep, and the signature rust preventive coating—providing everything needed for a professional-grade undercoating application on vehicles, trailers, or equipment.
What Makes It Stand Out: Unlike single-step rust paints, this system’s three-part approach ensures maximum adhesion and longevity by properly cleaning, etching, and sealing metal surfaces. The semi-gloss black finish delivers a durable, hammer-tough coating that chemically bonds with rusted metal, creating a non-porous barrier impervious to moisture, salts, and chemicals. POR-15’s reputation for permanent rust conversion sets it apart from conventional undercoatings that merely cover the problem.
Value for Money: At $125.87 for 96 total ounces ($1.31 per ounce), this system commands a premium price but delivers professional results that outperform budget alternatives. Purchasing the components separately would cost significantly more, and the permanent protection eliminates the need for annual reapplication, saving long-term labor and material costs compared to yearly treatments.
Strengths and Weaknesses: Strengths include permanent rust encapsulation, exceptional durability against harsh conditions, and a complete all-in-one system. The semi-gloss finish provides an attractive, professional appearance. Weaknesses involve the labor-intensive three-step process requiring meticulous surface preparation, strong chemical handling requiring proper ventilation and protection, and the premium upfront cost that may exceed casual DIY budgets.
Bottom Line: For vehicle owners battling severe rust or seeking permanent undercarriage protection, this POR-15 system is worth every penny. The investment pays dividends in longevity and protection, making it ideal for restoration projects and harsh climate vehicles.
7. POR-15 Gray Stop Rust Undercoating System, 3 Products, 32 fluid ounces each

Overview: The POR-15 Gray Stop Rust Undercoating System offers the same renowned three-step permanent corrosion protection as its black counterpart, but in a neutral gray finish. This comprehensive kit includes 32-ounce containers of Cleaner Degreaser, Metal Prep, and Rust Preventive Coating, engineered to stop rust permanently on vehicles, equipment, and structural metal.
What Makes It Stand Out: The three-step process—clean, prep, and coat—creates a chemical bond that converts stable rust into a rock-hard, non-porous protective layer. The gray coating provides a professional, OEM-style appearance while delivering hammer-tough resistance to acids, alkalis, oils, and fuels. Unlike surface-level paints, POR-15 penetrates rust and prevents moisture migration from within, effectively halting corrosion progression permanently.
Value for Money: While pricing isn’t specified, POR-15 systems typically retail in the $115-130 range. This represents excellent value considering the permanent protection eliminates annual reapplication costs. The three-in-one kit prevents purchasing incompatible products, and the professional-grade results can save thousands in potential rust-related repairs, making it economical for serious restoration work.
Strengths and Weaknesses: Strengths include permanent rust encapsulation, exceptional chemical resistance, and the ability to apply directly to stable rust. The gray finish offers versatile aesthetics for various applications. Weaknesses include a complex multi-step process requiring careful execution, noxious fumes necessitating excellent ventilation and respirator use, and rigid surface preparation requirements where shortcuts compromise results. The coating is also UV-sensitive and requires topcoating for prolonged sun exposure.
Bottom Line: This gray system is a top-tier choice for permanent rust remediation. Ideal for frame restorations, undercarriages, and hidden structural components where long-term protection outweighs application complexity.
8. POR-15 Semi-Gloss Black Stop Rust Undercoating System, 3 Products, 32 fluid ounces each

Overview: The POR-15 Semi-Gloss Black Stop Rust Undercoating System is a scientifically-validated, three-step permanent rust prevention solution. This kit includes 32-ounce containers of Cleaner Degreaser, Metal Prep, and the flagship Rust Preventive Coating, backed by rigorous testing that proves its exceptional durability under extreme conditions.
What Makes It Stand Out: This system boasts impressive certifications: exceeding military impact resistance standards (Mil-D-3134J), surviving 250-hour salt spray testing with zero rust, and demonstrating zero porosity per NACE standards. The coating withstands 1,000 abrasion cycles without loss and maintains adhesion at 450°F for 10 hours. These aren’t just marketing claims—they’re laboratory-proven performance metrics that separate POR-15 from conventional undercoatings.
Value for Money: Priced at $118.05 for 96 ounces, this system costs approximately $1.23 per ounce—slightly less than similar POR-15 kits. The price premium is justified by certified performance and permanent protection. For restoration professionals or owners of valuable vehicles in rust-prone regions, the cost is minimal compared to frame replacement or structural repairs.
Strengths and Weaknesses: Strengths include certified military-grade durability, complete three-step system, permanent rust encapsulation, and exceptional temperature and chemical resistance. The semi-gloss black finish provides attractive, professional results. Weaknesses involve demanding surface preparation, toxic fumes requiring professional ventilation, UV sensitivity necessitating additional topcoating, and a higher price point than basic rubberized undercoatings. Application requires strict adherence to instructions.
Bottom Line: With certified test results backing its claims, this system is the gold standard for permanent rust prevention. Perfect for restorers, off-road vehicles, and anyone requiring documented, professional-grade protection.
9. Undercoating In A Can Clear Fluid Coat 12/11oz Case
Overview: Undercoating In A Can Clear Fluid Coat is an oil-based, penetrating rust protection system supplied as a case of twelve 11-ounce cans. Designed for easy application, this clear fluid creeps into tight joints, crevices, and hard-to-reach areas, displacing moisture and providing comprehensive undercarriage protection for up to one year.
What Makes It Stand Out: The clear, oil-based formula offers unique advantages over traditional coatings: it actively pushes out existing moisture and corrosion rather than trapping it, ensuring protection starts immediately. The aerosol application eliminates need for spray equipment, making it accessible for DIYers. Its creeping ability reaches areas brushes and conventional sprays miss, providing complete coverage in complex undercarriage geometries.
Value for Money: At $76.48 for 132 total ounces (12 cans), this costs approximately $0.58 per ounce—significantly cheaper than professional-grade systems. However, the annual reapplication requirement means long-term costs accumulate. For budget-conscious users or those in moderate climates, it’s an accessible entry point to undercoating protection without equipment investment.
Strengths and Weaknesses: Strengths include easy aerosol application, excellent penetration into hidden areas, clear finish that doesn’t alter appearance, and affordable upfront cost. The oil-based formula provides good initial moisture displacement. Weaknesses include limited one-year durability requiring frequent reapplication, less robust protection than permanent coatings, potential for dripping and mess during application, and lower resistance to severe chemical and abrasion exposure compared to epoxy-based systems.
Bottom Line: This is an excellent maintenance product for annual undercarriage treatment. Ideal for DIYers seeking convenient, affordable protection, but professionals and those in harsh climates should invest in permanent solutions.
10. Bedliner/Undercoating Gun
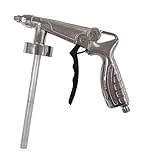
Overview: The Bedliner/Undercoating Gun is a specialized application tool designed for spraying truck bedliner and undercoating materials. Featuring adjustable fan control, this affordable spray gun allows users to achieve professional-quality results when applying various coating products to vehicle undercarriages and truck beds.
What Makes It Stand Out: The adjustable fan control provides versatility, enabling users to switch from narrow streams for penetrating inside frame rails to wide fans for covering large floor pan areas. This adaptability ensures efficient material usage and comprehensive coverage. Its compatibility with both bedliner and undercoating materials makes it a dual-purpose tool, offering flexibility for multiple automotive protection projects without requiring separate equipment.
Value for Money: At $24.15, this gun represents exceptional value for DIY enthusiasts and small shop owners. Professional undercoating equipment can cost hundreds of dollars, while this tool provides core functionality at a fraction of the price. When paired with quality coating products, it significantly improves application efficiency and finish quality compared to brush or aerosol methods, paying for itself on the first major project.
Strengths and Weaknesses: Strengths include affordable price point, adjustable spray pattern, versatility for multiple coating types, and improved application speed over manual methods. It’s lightweight and easy to clean with proper maintenance. Weaknesses include limited durability compared to professional-grade spray equipment, potential for clogging with heavy materials if not properly thinned, requires an air compressor (not included), and may not provide the ultra-fine finish of premium spray guns.
Bottom Line: An essential tool for DIY undercoating and bedliner applications. This gun delivers professional results at a hobbyist price, making it a smart investment for anyone tackling multiple automotive protection projects.
Why Undercoating Your Light Bar Matters
The Hidden Enemy: Corrosion and Moisture Damage
Light bars live in the worst possible environment for metal components. Every time you blast through a puddle or drive in rain, water infiltrates mounting brackets, breather holes, and seam gaps. Road salt acts as an electrolyte, accelerating galvanic corrosion between dissimilar metals—like your stainless steel mounting hardware and aluminum light bar housing. Even powder-coated finishes develop micro-fractures from vibration and thermal cycling, exposing bare metal that rusts from the inside out. Quality undercoating forms a flexible, impermeable barrier that actively displaces moisture and seals these vulnerable entry points before oxidation takes hold.
Protecting Your Investment
A premium 50-inch curved LED light bar can easily top $1,200, yet most owners spend zero dollars protecting the housing. Think of undercoating as insurance that pays dividends. Beyond corrosion prevention, proper coatings absorb rock strikes that would normally chip finishes, reduce road noise transmitted through the housing, and maintain thermal efficiency by preventing oxidation buildup on cooling surfaces. When it comes time to sell or upgrade, a well-preserved light bar commands significantly higher resale value and demonstrates meticulous maintenance to potential buyers.
Performance Preservation
Corrosion isn’t just cosmetic. When oxidation builds up on internal heat sinks or electrical connections, it creates resistance that reduces LED efficiency and generates excess heat. This thermal stress degrades diode lifespan and shifts color temperature, turning your crisp white light into an amber-tinted disappointment. A quality undercoating maintains the thermal pathway integrity while sealing out moisture that could cause condensation inside the lens—a common issue that scatters light and reduces effective output by up to 40%.
Understanding Undercoating Technologies
Traditional Asphalt-Based Formulations
The granddaddy of undercoating, asphalt cutbacks offer serious thickness and sound deadening. These products combine bitumen with solvents that evaporate, leaving a dense, tar-like film. While exceptionally effective at blocking moisture and resisting gravel impact, they’re often too heavy for light bar applications and can sag in high heat. Modern asphalt formulations may include rubber modifiers for flexibility, but the high VOC content and long curing times make them better suited for frame components than precision electronics housings.
Polyurethane and Polymer-Based Solutions
This is where modern chemistry shines for light bar protection. Single-component polyurethane undercoatings cure through moisture reaction, creating a flexible, rubbery film that adheres tenaciously to aluminum and powder-coated surfaces. They typically offer 200-300% elongation before breaking, meaning they stretch with thermal expansion without cracking. Many include corrosion inhibitors like zinc phosphate that actively neutralize rust at the molecular level. The downside? They require meticulous surface prep and specific humidity levels to cure properly—apply in too-dry conditions and they may never fully harden.
Wax and Oil-Based Penetrants
Penetrating oils and wax-based undercoatings work through capillary action, wicking into seams and migrating behind brackets where sprays can’t reach. These products never fully dry, remaining slightly tacky to continuously creep and self-heal minor scratches. They’re ideal for light bars with complex mounting systems or internal cavities. However, their thin film thickness means less impact protection, and they require annual reapplication. Watch for formulations with high flash points—some cheaper versions remain flammable and can smoke when the light bar heats up.
Rubberized Coatings
Rubberized undercoatings combine synthetic rubber polymers with adhesives and fillers, delivering a textured finish that deadens sound and resists impact. They typically dry to a matte black finish that matches most light bar housings and can be painted over if desired. The key differentiator is solids content—premium versions contain 60-70% solids, building a thicker film in fewer coats. Lower solids products require multiple applications and may remain soft indefinitely. Always verify temperature resistance; some rubberized coatings soften above 150°F, which is easily exceeded by high-output light bars in summer.
Key Features to Evaluate
Corrosion Resistance Rating
Don’t trust vague “rust-proof” claims. Look for products tested to ASTM B117 salt spray standards, which specify exposure duration in hours. For light bar duty, aim for a minimum of 500 hours—this simulates roughly five years of harsh winter driving. Premium formulations exceed 1,000 hours. Also check for SAE J2334 testing, which uses cyclic corrosion (wet/dry, salt/ambient) that more accurately reflects real-world conditions. Products passing both tests provide redundant protection verification.
Flexibility and Crack Resistance
Your light bar experiences constant vibration and temperature swings from -40°F to over 200°F at the housing. Undercoating must maintain flexibility across this entire range. Check technical data sheets for “mandrel bend test” results—a 1/8-inch mandrel bend without cracking indicates excellent flexibility. Elongation percentage tells a similar story; anything under 150% is too brittle for automotive exterior use. The best products include plasticizers that migrate to the surface over time, maintaining pliability for years rather than becoming brittle.
Temperature Range Compatibility
This is critical for light bars. The undercoating must withstand housing temperatures without softening, sagging, or emitting odors. Review the “service temperature” specification, not just the application temperature range. Quality products remain stable from -40°F to 250°F. Pay special attention to “heat soak” performance—some coatings pass static heat tests but fail when subjected to rapid thermal cycling, which is exactly what happens when you power down a hot light bar and it cools quickly in cold air.
Curing Time and Application Window
Fast-cure products may seem convenient, but they often sacrifice final film properties. Two-component epoxies and urethanes that cure in 4-6 hours typically outperform single-component products that dry in 30 minutes. Consider your climate: high-humidity formulas cure faster in wet environments but may skin over before leveling in arid conditions. Most manufacturers specify ideal application between 60-90°F with 40-60% relative humidity. Outside this window, you risk solvent entrapment, which leads to bubbling and poor adhesion.
Application Methods Explored
Spray Application Techniques
Aerosol cans offer convenience but limited control. For professional results, use a undercoating gun with 1.8-2.2mm nozzle at 40-60 PSI. This delivers a textured, even coat without runs. Hold the gun 8-10 inches from the surface and apply in overlapping passes. The “wet on wet” technique—applying a second coat within the recoat window before full cure—creates a monolithic film with superior intercoat adhesion. Always spray mounting brackets, bolt heads, and the backside of the housing where moisture pools.
Brush and Roll-On Approaches
Brushing allows precise application to intricate areas like heat sink fins and wiring pass-throughs. Use natural bristle brushes for oil-based products and synthetic brushes for water-based formulas. The stipple technique—dabbing rather than brushing—creates a textured surface that mimics factory undercoating. Roll-on application works best for flat surfaces on oversized light bars; use a short-nap roller (3/16-inch) to minimize stipple. Both methods allow heavier film builds but require more skill to avoid brush marks and uneven thickness.
Dipping for Complete Coverage
For new light bars before mounting, dipping provides 100% coverage in a single operation. Build a simple dip tank from PVC pipe capped at both ends. Suspend the light bar via its mounting bolts and submerge slowly to prevent air pockets. Withdraw at 1-2 inches per minute to allow excess to drain evenly. This method ensures coating penetrates internal cavities and threads, but requires significant product volume and proper ventilation. Only dip fully disassembled light bars—never dip units with lenses or gaskets installed.
Professional vs. DIY Application
Professional shops use heated pressure pots and booth ventilation, achieving consistent results in controlled environments. They also offer warranty coverage on application defects. DIY saves money but demands meticulous prep and safety precautions. The deciding factor? If your light bar shows any existing corrosion, professional media blasting and treatment justifies the cost. For brand-new units, DIY application with proper technique yields equivalent protection at 1/3 the price. Budget $50-75 in materials versus $200-300 for professional coating.
Surface Preparation Fundamentals
Cleaning and Degreasing Protocols
This is where 90% of DIY failures originate. Start with a petroleum-based degreaser to remove silicone, wax, and road film—water-based cleaners can’t cut through these contaminants. Scrub with a stiff nylon brush, then rinse with denatured alcohol. Never use brake cleaner; it leaves a residue that interferes with adhesion. For factory powder-coated housings, lightly scuff with 320-grit wet/dry sandpaper to create a mechanical tooth. The “water break test” is your final verification—spray with distilled water; if it sheets off evenly, you’re clean. If it beads or separates, keep degreasing.
Rust Removal and Treatment
Any existing rust must be completely removed or converted. For light surface oxidation, use a phosphoric acid-based rust converter that chemically transforms iron oxide into iron phosphate, an inert primer. Heavy scaling requires mechanical removal via wire wheel or sandblasting to white metal. After rust removal, apply a zinc-rich primer within two hours—bare steel begins re-oxidizing immediately. This primer provides cathodic protection, sacrificing itself to protect the base metal if the undercoating is breached. Skip this step and you’re simply painting over a time bomb.
Masking and Protection Strategies
Mask lens surfaces with high-temperature automotive masking tape, not blue painter’s tape. The adhesive on painter’s tape can melt under light bar heat, leaving residue. For lenses, extend tape 1/8-inch onto the housing to create a clean line, then run a bead of petroleum jelly along the edge—this prevents undercoating from creeping under the tape. Cover breather valves with small pieces of aluminum foil; these must remain functional to prevent internal condensation. Remove mounting hardware and coat it separately; coated threads prevent galvanic corrosion and make future removal easier.
Performance Metrics That Matter
Salt Spray Test Results
ASTM B117 testing involves constant salt fog at 95°F. While impressive, it doesn’t reflect real-world freeze-thaw cycles. Better products also list ASTM G85 results, which incorporate sulfur dioxide and acetic acid for more aggressive testing. For light bars, focus on “creep corrosion” performance—how far rust spreads from an intentional scribe mark. Premium undercoatings limit creep to less than 2mm after 1,000 hours, while budget products may show 10mm or more. This metric directly translates to how well the coating protects scratches from gravel impact.
UV Stability and Color Retention
Many undercoatings yellow and chalk when exposed to sunlight, especially on roof-mounted light bars. Look for products with UV inhibitors and hind amine light stabilizers (HALS) in their formulation. These additives sacrifice themselves to UV radiation, preserving the underlying polymer. Test data should show less than 5% color change after 1,000 hours of QUV-A exposure (equivalent to 2-3 years of Florida sun). Matte black finishes hide yellowing better than glossy coatings, but chalking still indicates polymer breakdown and loss of protection.
Sound Dampening Properties
While not the primary goal, undercoating’s mass dampens harmonic vibrations that can loosen mounting bolts and fatigue housing seams. This is measured in decibels of sound transmission loss. A 20 mil coating typically reduces noise by 3-5 dB, which is perceptible. For light bars mounted on vibrating surfaces like grille guards, this can extend fastener life by 50%. Products with higher density fillers like calcium carbonate or barium sulfate provide better damping but add weight—balance this against your light bar’s mounting system capacity.
Thickness and Coverage Rates
Film thickness directly correlates to protection level, but more isn’t always better. The sweet spot for light bars is 15-25 mils (0.015-0.025 inches) dry film thickness. Below 10 mils, you lack adequate barrier protection; above 30 mils, you risk solvent entrapment and cracking. Coverage rates vary by product solids content: a 70% solids product covers 25-30 square feet per gallon at 20 mils, while a 40% solids product needs two coats to achieve the same thickness. Calculate your light bar’s surface area—most 50-inch bars need 1-1.5 quarts for complete coverage.
Environmental and Safety Considerations
VOC Content and Regulations
Volatile Organic Compounds contribute to smog and pose health risks. Federal law limits automotive undercoatings to 420 g/L VOC, but California’s CARB standards are stricter at 250 g/L. Water-based products can be as low as 50 g/L but sacrifice some performance. Always check the product’s VOC compliance for your state—using non-compliant products can result in fines and failed inspections. For garage DIY application, lower VOC means less odor and safer breathing conditions, but may require longer cure times.
Flammability and Handling Precautions
Many solvent-based undercoatings have flash points below 100°F, making them extremely flammable during application. Use only in well-ventilated areas away from pilot lights, and keep a Class B fire extinguisher within reach. The real danger is spontaneous combustion of application rags—linseed oil-based products can self-ignite as they oxidize. Soak all rags in water before disposal and store in a sealed metal container. For light bars that generate significant heat, verify the cured coating’s autoignition temperature is above 400°F to prevent engine bay fires.
Cleanup and Disposal Best Practices
Mineral spirits clean up most solvent-based products, but require hazardous waste disposal. Water-based formulas clean with soap and water but may need multiple washes. Never pour leftover undercoating down drains—it solidifies and causes blockages. Many auto parts stores participate in paint recycling programs. For aerosol cans, completely empty them (spray until only propellant hisses) before recycling the steel can. Partially filled cans are considered hazardous waste and require special disposal.
Longevity and Maintenance
Expected Service Life
Real-world service life depends on exposure severity. A daily driver in the Rust Belt might need reapplication every 2-3 years, while a fair-weather weekend warrior could see 5-7 years. The coating’s “chalk rating” indicates how long it maintains integrity—look for products rated 8 or higher on a 10-point scale after 3 years. High-quality undercoatings don’t suddenly fail; they degrade gradually. Annual inspection reveals thinning areas before they become problems. Keep a small amount of leftover product for spot repairs.
Touch-Up Procedures
Never touch up undercoating with spray paint—it lacks flexibility and will crack at the interface. Instead, lightly scuff the surrounding coating with 220-grit paper, clean with wax and grease remover, and apply new undercoating feathering 2-3 inches beyond the repair. For small chips, use a syringe applicator to inject coating under the existing film, preventing moisture from seeping behind the repair. Always recoat before rust becomes visible; once oxidation starts, it spreads under intact coating invisibly.
Inspection Checkpoints
Check your light bar quarterly using a borescope camera to examine hidden areas behind mounts. Look for chalking (rub your finger across the surface—if it comes away with white powder, the polymer is degrading), cracking at edges, and blistering that indicates moisture entrapment. Tap the coating with a coin; a hollow sound suggests delamination. Pay special attention to the bottom edge of horizontal light bars where water pools. Catching failures early allows spot repairs rather than complete stripping and reapplication.
Cost-Benefit Analysis
Initial Investment vs. Long-Term Protection
A DIY undercoating job costs $50-100 in materials and 3-4 hours of labor. Professional application runs $200-400 but includes warranty and proper booth conditions. Compare this to light bar replacement costs: $300-1,500 for the unit plus installation. If undercoating extends life from 3 years to 8 years, your annual cost drops from $100-500/year to $20-80/year. The math is clear—protection pays for itself if you keep the vehicle more than two years. For leased vehicles or short-term ownership, the calculation changes, but resale value often compensates.
Warranty Implications
Here’s a critical detail: many light bar manufacturers explicitly state that aftermarket coatings void warranties if they cause issues like overheating or lens discoloration. However, they cannot void warranties for unrelated failures. Document your application process with photos, and use only products rated for electronic enclosures. Some coating manufacturers offer “repair warranties” that cover damage to the protected component—a form of insurance worth considering on expensive light bars. Always check both your light bar and undercoating warranties for compatibility clauses.
Resale Value Impact
A properly undercoated light bar tells prospective buyers you maintained the entire vehicle meticulously. In harsh climates, this can add $100-200 to resale value on a $500 light bar. More importantly, it prevents the “rust discount” buyers demand when they see corrosion on accessories. For commercial vehicles, documented undercoating maintenance can reduce depreciation by 5-10% on the entire lighting system. Keep receipts and application dates—a maintenance log proves the work was done correctly.
Common Application Mistakes to Avoid
Inadequate Surface Prep
The number one failure mode is insufficient cleaning. Even finger oils from installation can cause delamination months later. The “two-towel method” works best: one towel with degreaser, one clean dry towel. Wipe in one direction only, flipping to a fresh section each pass. When you think it’s clean, clean it again. New light bars have mold release agents from manufacturing that must be removed. Test prep quality by applying a small test patch of undercoating on an inconspicuous area; if you can peel it off after 24 hours, your prep failed.
Applying Too Thick or Thin
Amateurs think thicker is better, but excessive film thickness traps solvents that later outgas, creating bubbles and soft spots. Follow the manufacturer’s recommended wet film thickness using a wet mil gauge—a $10 tool that prevents costly mistakes. Conversely, applying too thin leaves pinholes that allow moisture penetration. The “rule of thirds” helps: apply three thin coats rather than one heavy coat, building to the target thickness gradually. Each coat should be just thick enough to hide the underlying surface.
Ignoring Temperature Guidelines
Applying undercoating at 50°F when the product requires 70°F minimum extends cure time from hours to days and prevents proper cross-linking. The coating may feel dry but lack full strength, washing off in the first rain. Conversely, applying in 95°F heat causes solvents to flash off too quickly, creating a skin that traps solvents underneath. Check the substrate temperature, not just air temperature—metal surfaces in direct sun can be 30°F hotter than ambient. Early morning application in shade provides the most consistent conditions.
Frequently Asked Questions
How often should I reapply undercoating to my light bar?
In moderate climates with minimal salt exposure, a quality undercoating lasts 4-5 years. For vehicles driven on salted winter roads, inspect annually and plan reapplication every 2-3 years. The coating doesn’t disappear—it slowly thins and loses flexibility. Annual touch-ups of high-wear areas extend overall life. If you notice chalking when you wipe the surface, it’s time for a new coat regardless of age.
Can I undercoat a light bar that’s already showing rust?
Yes, but surface preparation becomes critical. Light surface rust requires complete removal via wire wheel or sandblasting to white metal, followed by a zinc-rich primer. Heavy pitting may be too far gone—the coating can’t restore structural integrity. In these cases, undercoating prevents further spread but won’t reverse damage. Always treat rust before coating; sealing it in just accelerates hidden corrosion.
What’s the difference between undercoating and regular paint?
Paint forms a hard, decorative film that cracks under flexing and offers minimal corrosion inhibition. Undercoating is engineered with flexible polymers, rust inhibitors, and self-healing properties. It remains slightly pliable to absorb impacts and bridge gaps. While paint measures thickness in mils, undercoating builds 10-20 times thicker and includes active anti-corrosion chemistry that paint lacks. Think of paint as sunscreen versus undercoating as a wetsuit—both protect, but in completely different ways.
Will undercoating affect my light bar’s heat dissipation?
Properly applied undercoating (15-25 mils) has negligible thermal impact on aluminum housings designed for convection cooling. In fact, by preventing oxidation buildup, it maintains thermal efficiency over time. However, coating cooling fins or filling air gaps around them blocks airflow and causes overheating. Always mask finned surfaces and apply thin coats to heat sink areas. Products with ceramic microspheres can actually improve heat transfer by filling microscopic surface irregularities.
Is DIY undercoating as effective as professional application?
With proper technique and environment control, DIY results match professional quality. The professional advantage is equipment—heated spray systems, booth filtration, and experienced technicians who know how to avoid runs. For new light bars, DIY saves money with equivalent protection. For units with existing corrosion, professionals have media blasting equipment and specialized primers that justify the cost. Your prep work determines success more than who pulls the trigger.
How long does undercoating take to cure fully?
Touch-dry times range from 30 minutes to 4 hours, but full chemical cure takes 7-14 days depending on product chemistry and thickness. Polyurethanes cure through moisture reaction and may feel soft for 48 hours before hardening. Asphalt-based products skin quickly but remain tacky underneath for weeks. Avoid heavy washing or extreme heat for the first week. The coating reaches 90% of final properties in 72 hours, making it safe for normal use, but chemical resistance continues improving for two weeks.
Can I use automotive undercoating on LED light bars?
Most automotive undercoatings are suitable, but verify compatibility with polycarbonate lenses and electronic components. Avoid products containing strong solvents like xylene or toluene that can craze plastic lenses. Look for “plastic-safe” or “electronic enclosure” ratings. Some heavy-duty truck undercoatings are too thick and may block breather valves. When in doubt, test on the light bar’s mounting bracket first—if it doesn’t attack the finish after 24 hours, it’s likely safe for the housing.
Will undercoating void my light bar’s warranty?
Manufacturers cannot void warranties for unrelated failures simply because you applied undercoating. However, if the coating causes overheating or lens damage, that specific claim may be denied. Document everything—photos of the product label showing temperature ratings, application process, and before/after shots. Some light bar brands now offer their own protective coatings and may deny warranty if you use aftermarket products. Check your warranty terms before applying anything.
What’s the best time of year to apply undercoating?
Late spring or early fall provides ideal temperatures (65-80°F) and moderate humidity. Avoid summer’s high heat and winter’s cold, which prevent proper curing. Application humidity of 40-60% is optimal—too dry slows solvent-based products, too wet interferes with adhesion. Plan for a 24-hour dry period without rain. In garage applications, use a space heater and dehumidifier to create microclimate control. Never apply in direct sunlight, even in cool weather—the substrate temperature will be too high.
How do I know if my undercoating is failing?
Perform the quarterly “coin tap test”—a solid thud indicates good adhesion, while a hollow sound signals delamination. Look for chalking (white powder when rubbed), cracking at edges, or blistering. Check behind mounting brackets with a borescope for hidden rust bleed-through. If water no longer beads on the surface, the hydrophobic properties have degraded. Catching these signs early allows spot repairs. Once you see visible rust streaks, the failure is advanced and requires complete stripping.