When winter road salt turns your vehicle’s undercarriage into a rusted skeleton, or when off-road adventures leave factory undercoating peeling like sunburned skin, savvy car enthusiasts turn to a solution that’s revolutionized automotive protection. U-Pol Raptor liner, long celebrated for its brutal durability in truck beds, has emerged as the underground champion of professional-grade undercoating—and for good reason. This two-part polyurethane coating doesn’t just mask existing problems; it creates an impenetrable, textured armor that laughs at corrosion, absorbs road noise, and outlasts traditional underseal by years, not months.
But here’s the catch: not all Raptor kits are created equal, and the difference between a bulletproof undercarriage and a peeling disaster often comes down to understanding what you’re buying before you pull the trigger. Whether you’re a weekend warrior looking to protect your daily driver or a restoration fanatic chasing concours-level preservation, this deep dive will equip you with everything you need to know about selecting and applying the right Raptor configuration for your specific undercoating project—without getting lost in marketing hype or one-size-fits-all recommendations.
Top 10 U-pol Raptor Undercoating Kit
Detailed Product Reviews
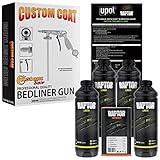
1. U-POL Raptor Black Urethane Spray-On Truck Bed Liner Kit, Protective Paint with Spray Gun, for Tailgates & Trucks, Vehicle Undercoating, 4 Quart Kit

Overview:
The U-POL Raptor Black Urethane Spray-On Truck Bed Liner Kit delivers professional-grade protection in a convenient 4-quart package. This comprehensive kit includes four 750ml bottles of black base coating, one liter of hardener, and a dedicated spray gun designed for 8 CFM at 50-60 PSI. Engineered to cover standard 6-8 foot truck beds, the 2K urethane formula creates a robust barrier against stains, scratches, rust, and extreme temperatures while maintaining flexibility to dampen road noise and vibration.
What Makes It Stand Out:
This kit’s ready-to-spray black formulation eliminates color-mixing guesswork, making it ideal for users seeking immediate results. The UV-resistant properties ensure the finish won’t fade under harsh sunlight, while the rapid-drying chemistry allows multiple coats within an hour. The system’s versatility extends beyond truck beds to trailers, boats, and undercarriages, bonding securely to OEM paint and self-etching primers.
Value for Money:
At $142.90 for complete bed coverage, this kit offers substantial savings compared to professional application services costing $400-600. The included spray gun and precise 4:1 mixing ratio minimize waste, while the quart-sized containers suit single-vehicle projects perfectly. DIY enthusiasts achieve showroom results without recurring rental fees or shop time charges.
Strengths and Weaknesses:
Strengths include professional-grade durability, straightforward application, rapid curing, and comprehensive kit contents. The UV-stable black finish maintains appearance long-term. Weaknesses involve requiring a substantial air compressor (8 CFM), potential overspray concerns in uncontrolled environments, and limited color customization compared to tintable versions. Novices may face a learning curve with spray gun technique.
Bottom Line:
An exceptional choice for truck owners wanting durable, professional bed liner protection without premium shop prices. The black formula provides immediate, reliable results for standard applications.
2. Raptor Tintable Urethane Spray-On Truck Bed Liner Kit, Protective Paint With Spray Gun, For Tailgates & Trucks, Vehicle Undercoating, 8 Quart Kit

Overview:
The Raptor Tintable Urethane Spray-On Truck Bed Liner Kit in an 8-quart configuration doubles the capacity for larger projects or multiple vehicle applications. This substantial kit contains eight 750ml bottles of tintable base, two liters of hardener, and a professional spray gun, providing enough material for extended truck beds, full-size trailers, or comprehensive undercoating jobs. The 2K urethane technology maintains the same robust protection against environmental damage while offering custom color flexibility.
What Makes It Stand Out:
The tintable formula represents this kit’s primary advantage, allowing users to match factory paint codes or create unique color schemes. With double the material of standard kits, it’s perfect for contractors, fleet operators, or enthusiasts tackling multiple installations. The expanded volume reduces per-ounce costs and eliminates mid-project supply shortages.
Value for Money:
Priced at $282.99 ($1.05 per ounce), this 8-quart kit delivers superior economies of scale. Professional bed liner services for larger trucks can exceed $800, making this DIY solution highly cost-effective. The bulk packaging suits serious DIYers or small shop operators, spreading the initial investment across several applications.
Strengths and Weaknesses:
Strengths include generous volume, color customization options, professional-grade durability, and reduced per-project cost. The rapid-dry formula maintains productivity. Weaknesses center on higher upfront investment, requiring adequate storage space, and the tinting process adds complexity and additional pigment costs. The substantial air compressor requirement remains, and inexperienced users may struggle with color consistency across batches.
Bottom Line:
Ideal for ambitious projects or multiple applications where color matching is essential. The volume discount and customization options justify the premium for serious users.
3. Custom Shop U-Pol Raptor Black Urethane Spray-On Truck Bed Liner Kit w/Free Custom Coat Spray Gun with Regulator, 4 Quarts
Overview:
The Custom Shop U-Pol Raptor Black Urethane Spray-On Truck Bed Liner Kit packages the trusted 4-quart Raptor system with an upgraded Custom Coat Spray Gun featuring integrated regulator and gauge. This variant includes the same four 750ml bottles of black base coating and hardener as standard kits, but enhances user control through superior spray equipment. The formulation provides comprehensive protection against abrasion, rust, corrosion, salt, and temperature extremes while delivering waterproof, sound-dampening properties.
What Makes It Stand Out:
The included Custom Coat Spray Gun distinguishes this kit, offering adjustable nozzle patterns and real-time pressure monitoring via the built-in regulator and gauge. This precision equipment eliminates guesswork in air pressure adjustment, resulting in more consistent texture and coverage. The simplified “add hardener, shake, spray” workflow appeals to first-time users intimidated by complex mixing procedures.
Value for Money:
At $139.99, this represents the most economical entry point into professional-grade bed liner application, undercutting standard kits while providing superior spray equipment. The enhanced gun alone would retail for $30-50 separately, making this package exceptional value. DIYers gain professional control features without additional investment.
Strengths and Weaknesses:
Strengths include upgraded spray gun with regulator, competitive pricing, straightforward application process, and comprehensive protection properties. The black formula ensures consistent results. Weaknesses involve the same air compressor demands (8 CFM), potential overspray management needs, and limited coverage documentation compared to official U-POL marketing materials. The Custom Shop branding may confuse buyers seeking direct manufacturer kits.
Bottom Line:
Outstanding value for budget-conscious buyers wanting premium spray control. The enhanced gun makes this the smartest entry-level choice for quality results.
4. Raptor Tintable Urethane Spray-On Truck Bed Liner Kit, Protective Paint With Spray Gun, For Tailgates & Trucks, Vehicle Undercoating, 4 Quart Kit

Overview:
The Raptor Tintable Urethane Spray-On Truck Bed Liner Kit in a 4-quart configuration offers the same professional-grade protection as the black version, but with complete color customization capability. This kit includes four 750ml bottles of tintable base, one liter of hardener, and a standard spray gun, providing adequate material for standard 6-8 foot truck beds. The 2K urethane chemistry delivers robust defense against stains, scratches, rust, and temperature extremes while maintaining flexibility for noise reduction.
What Makes It Stand Out:
The tintable formula provides ultimate aesthetic flexibility, allowing users to integrate the bed liner seamlessly with vehicle color schemes or create contrasting accent finishes. This is particularly valuable for show vehicles, restorations, or custom builds where standard black appears incongruous. The same rapid-dry technology and versatile application methods (spray, roll, or brush) enable professional results regardless of color choice.
Value for Money:
At $143.49 ($1.06 per ounce), this kit commands only a slight premium over pre-mixed black versions, making color customization remarkably accessible. Professional custom-colored bed liner applications can cost $600-900, positioning this DIY option as exceptional value. The minimal price difference from black kits makes tinting a logical upgrade for most projects.
Strengths and Weaknesses:
Strengths include unlimited color options, UV-resistant tintable formula, professional durability, and flexible application. The rapid curing maintains project momentum. Weaknesses involve requiring separate pigment purchase and mixing precision to achieve desired colors. Batch-to-batch color consistency demands careful measurement. The standard spray gun lacks pressure regulation, and the substantial compressor requirement persists.
Bottom Line:
Perfect for custom builds or color-conscious owners. The negligible price premium makes tinting capability an easy choice for personalized protection.
5. CUSTOM SHOP U-Pol Raptor Black Urethane Spray-On Truck Bed Liner 6 Quart Kit and Custom Coat Spray Gun with Regulator

Overview:
The CUSTOM SHOP U-Pol Raptor Black Urethane Spray-On Truck Bed Liner 6 Quart Kit bridges the gap between standard and bulk packages, offering middle-ground capacity with premium equipment. This kit includes six 750ml bottles of black base coating, proportionate hardener, and the desirable Custom Coat Spray Gun with integrated regulator and gauge. The expanded volume suits larger truck beds, complete undercoating jobs, or multiple smaller applications while maintaining the proven 2K urethane protection against abrasion, corrosion, and environmental damage.
What Makes It Stand Out:
The 6-quart capacity hits the sweet spot for owners of full-size trucks or those wanting extra material for rocker panels and undercarriage protection. The included Custom Coat Spray Gun with regulator provides professional-grade control typically absent in mid-tier kits, enabling precise texture adjustment and consistent application pressure. This combination of expanded volume and superior equipment is unique in the Raptor lineup.
Value for Money:
At $219.99, this kit offers compelling per-ounce economics without requiring massive bulk purchase. The Custom Coat gun adds $30-50 value while the extra two quarts over standard kits provide flexibility for touch-ups or secondary projects. Professional application of this scope would exceed $700, making the DIY approach highly economical for serious enthusiasts.
Strengths and Weaknesses:
Strengths include optimal volume for most trucks, upgraded spray gun with regulator, comprehensive protection properties, and sound-dampening flexibility. The black formula ensures consistency. Weaknesses involve intermediate pricing that may exceed casual user budgets, still requiring substantial air compressor capacity, and potential material waste on smaller projects. Storage of unused components requires planning.
Bottom Line:
The ideal mid-tier choice for truck owners wanting both extra material and professional spray control. Volume and equipment upgrades justify the moderate price increase.
6. CUSTOM SHOP U-Pol Raptor Tintable Urethane Spray-On Truck Bed Liner Kit and Custom Coat Spray Gun with Regulator, 8 Quart Kit

Overview: This 8-quart tintable urethane truck bed liner kit from CUSTOM SHOP features the U-Pol Raptor formula and includes a Custom Coat spray gun with regulator and gauge. The kit provides professional-grade protection for truck beds with a straightforward application process that delivers durable, long-lasting results.
What Makes It Stand Out: The complete package includes everything needed for application, notably the professional-grade spray gun with regulator and gauge for precise control. The tintable formula allows for color customization to match your vehicle. The adjustable nozzle enables different texture finishes, from smooth to aggressive grip.
Value for Money: At $269.99 ($1.40/fl oz), it’s competitively priced for an 8-quart kit with included spray gun. Comparable professional kits often cost $300+ without a gun. The integrated system saves money over buying components separately and eliminates compatibility guesswork.
Strengths and Weaknesses: Pros: Complete kit with quality spray gun; tintable for custom colors; excellent abrasion and stain resistance; protects against rust, corrosion, and extreme temperatures; waterproof and sound-dampening. Cons: Requires compressor capable of delivering proper CFM/PSI; tinting adds cost and complexity; may be overkill for casual users.
Bottom Line: An excellent choice for DIY enthusiasts wanting professional results with color customization. The included spray gun and regulator justify the price, making it a solid investment for truck owners seeking durable, personalized bed protection.
7. Raptor Black Urethane Spray-On Truck Bed Liner Kit, Protective Paint With Spray Gun, For Tailgates & Trucks, Vehicle Undercoating, 8 Quart Kit

Overview: This 8-quart black urethane spray-on bed liner kit from Raptor delivers professional-grade protection for truck beds and beyond. The 2K urethane formula provides durable, flexible coating that resists stains, scratches, and environmental damage while reducing road noise and vibration for improved comfort.
What Makes It Stand Out: The comprehensive kit includes eight 750ml bottles of black base, two 1-liter hardeners, and a spray gun requiring 8 CFM at 50-60 PSI. The UV-resistant formula won’t fade, and its rapid-drying property allows multiple coats within an hour. The coating bonds directly to OEM paint and self-etching primer for superior adhesion.
Value for Money: At $277.99 ($1.03/fl oz), this represents strong value for an 8-quart black kit with spray gun included. The per-ounce cost is lower than tintable versions, and the complete package eliminates separate purchasing needs while ensuring component compatibility.
Strengths and Weaknesses: Pros: Complete kit with spray gun; UV-resistant black finish won’t fade; rapid drying enables quick project completion; versatile application (spray, roll, brush); excellent adhesion; professional-grade durability. Cons: Requires substantial air compressor (8 CFM); black color limits customization; higher upfront cost may deter occasional users.
Bottom Line: Ideal for truck owners wanting a proven black bed liner solution with professional results. The included spray gun and rapid-dry formula make it perfect for serious DIYers with adequate compressor capacity seeking durable, lasting protection.
8. U-POL Products 0820 Raptor Black Truck Bed Liner Kit - 4 Liter

Overview: This 4-liter Raptor Black truck bed liner kit from U-POL offers a mid-sized solution for average truck beds. Formulated to be ten times tougher than conventional bedliners, it provides robust protection against abrasion, impact, and environmental damage on various surfaces, making it a versatile protective coating option.
What Makes It Stand Out: The kit’s versatility stands out, adhering to metal, plastic, wood, and concrete surfaces. Its 2K urethane formula delivers professional results with multiple finish options. The availability of 2K aerosols for touch-ups and smaller areas makes it a flexible system for varied projects beyond just truck beds.
Value for Money: At $133.89 for 4 liters, this kit offers excellent mid-range value. It’s sized appropriately for single truck bed applications without excessive waste. The cost per volume is competitive, and the multi-surface capability extends its utility, essentially providing multiple product applications in one purchase.
Strengths and Weaknesses: Pros: Ten times tougher than standard bedliners; applies to diverse surfaces; easy application process; variety of texture finishes available; cost-effective for average truck beds; aerosol option for detail work. Cons: Does not include spray gun or accessories; smaller coverage than 8-quart kits; black only (not tintable); requires separate purchase of application equipment.
Bottom Line: A smart choice for budget-conscious buyers needing reliable protection for standard truck beds. Purchase this kit if you already own a suitable spray gun or prefer rolling/brushing application for a versatile, durable coating solution.
9. Raptor Tintable Urethane Spray-On Truck Bed Liner Kit, Protective, Durable Paint, For Tailgates & Trucks, Vehicle Undercoating, 2 Quart Kit

Overview: This compact 2-quart tintable urethane kit from Raptor provides professional-grade protection in a smaller package. The 2K urethane coating resists stains, scratches, rust, and extreme temperatures while remaining flexible to reduce noise and vibration, delivering premium performance for limited applications.
What Makes It Stand Out: As a tintable kit, it allows color customization to match or complement your vehicle’s finish. The rapid-drying formula enables multiple coats within an hour, speeding up project completion. It bonds to OEM paint and self-etching primer for superior adhesion across various applications including tailgates and undercoating.
Value for Money: At $89.99, this entry-level kit offers an affordable way to access Raptor’s professional formula. While it doesn’t include a spray gun, the low price point makes it accessible for small projects, touch-ups, or first-time users wanting to test the product before committing to larger investments.
Strengths and Weaknesses: Pros: Affordable entry point; tintable for custom colors; rapid drying; versatile application methods; professional-grade durability; suitable for small projects and touch-ups. Cons: No spray gun included; limited coverage (best for small beds or partial applications); requires compressor or separate application tools; tinting adds extra cost and complexity.
Bottom Line: Perfect for small truck beds, tailgates, or touch-up work where color matching matters. Ideal for budget-minded DIYers who own spray equipment or prefer brush/roller application and need premium protection without buying a large kit.
10. Raptor 821 products RAPTOR Tintable Truck Bed Liner Kit - 4 Liter
Overview: This 4-liter tintable truck bed liner kit from Raptor provides a middle-ground solution between small touch-up kits and large professional quantities. Formulated to be ten times tougher than standard bedliners, it delivers exceptional protection with customizable color options for personalized vehicle protection.
What Makes It Stand Out: The tintable formula allows for complete color customization while maintaining the same durability as pre-colored versions. Its versatility extends beyond truck beds to metal, plastic, wood, and concrete surfaces. The availability of complementary 2K aerosols enables seamless touch-ups and detail work for comprehensive projects.
Value for Money: At $139.99 for 4 liters of tintable formula, this kit offers strong value for those wanting color customization without committing to an 8-quart system. The price per volume is reasonable, and the ability to tint eliminates the need to purchase multiple colored kits for different projects, saving money long-term.
Strengths and Weaknesses: Pros: Tintable for custom color matching; ten times tougher than conventional liners; multi-surface application; easy to apply with various finishes; appropriately sized for average truck beds; aerosol companion products available. Cons: Spray gun not included; requires separate hardener purchase (implied by kit description); tinting process adds complexity; needs proper mixing equipment for best results.
Bottom Line: An excellent mid-tier option for DIYers wanting color flexibility and professional durability. Best suited for those with spray equipment or willing to roll/brush, providing Raptor’s legendary toughness with personalized color choice.
What Makes U-Pol Raptor the Gold Standard for Undercoating?
The Science Behind Raptor’s Durability
U-Pol Raptor isn’t your grandfather’s tar-based undercoating. This two-part polyurethane system chemically cross-links during curing, creating a molecular structure that’s both flexible and incredibly dense. Unlike single-component rubberized undercoatings that remain thermoplastic (softening in heat and becoming brittle in cold), Raptor achieves thermoset properties—meaning once cured, it won’t revert regardless of temperature extremes. The coating’s signature texture comes from carefully controlled particle distribution within the resin, providing a finish that’s abrasive-resistant while still allowing for self-cleaning through normal driving conditions. For undercarriage applications, this translates to a barrier that resists chipping from road debris, withstands constant exposure to moisture and chemicals, and maintains its protective integrity even when flexed over frame rails and body contours.
Comparative Advantages Over Traditional Underseal
Traditional asphalt-based undercoatings create a false sense of security. They trap moisture against metal surfaces, crack within 18-24 months, and require complete removal before reapplication—turning maintenance into a nightmare. Raptor eliminates these pitfalls entirely. Its adhesion promoters bond directly to properly prepared metal, creating a waterproof yet breathable membrane that won’t harbor rust. The coating’s thickness (typically 15-20 mils per coat) provides genuine impact absorption, while its UV stability prevents the degradation common in rubberized products. Perhaps most importantly, Raptor’s chemical resistance stands up to modern road de-icers like magnesium chloride and calcium chloride, which eat through conventional underseal like acid. For vehicles in the Salt Belt, this isn’t just an upgrade—it’s an entirely different category of protection.
Deconstructing the Perfect Raptor Kit: What to Look For
Essential Components Every Kit Must Include
A legitimate Raptor undercoating kit contains more than just resin and hardener. The foundation is the two-part polyurethane base, typically supplied in a tin or bottle, matched with a specific hardener formulation. Quality kits include detailed technical data sheets specifying exact mixing ratios—usually 3:1 or 4:1 by volume, never guesswork. Look for packaging that provides separate measuring containers or pre-marked mixing bottles, as even 5% ratio errors can compromise cure and durability. Professional-grade kits also include adhesion promoter wipes or spray for critical areas like weld seams and bare metal spots. The best configurations feature a non-slip additive pre-mixed in controlled concentrations, ensuring consistent texture without clogging application equipment. Avoid any kit that suggests thinning the product or using “universal” hardeners—these are red flags indicating either counterfeit product or outdated formulations.
Application Equipment: Schutz Gun vs. HVLP Spray Gun
Your application method fundamentally affects finish quality and material efficiency. Schutz gun kits, featuring the distinctive textured spray pattern, offer foolproof application for beginners. These guns operate at lower pressure (25-40 PSI) and create Raptor’s signature rugged texture automatically through internal mixing chambers. HVLP (High Volume Low Pressure) configurations, requiring 10-15 PSI at the gun, provide more control over texture and material build but demand greater operator skill. For undercoating specifically, Schutz-style application often proves superior—the aggressive texture creates channels that allow water to drain rather than pool, and the thicker deposition rate builds protection faster in hard-to-reach frame sections. However, HVLP excels for detailed work around suspension components where precision matters. Some hybrid kits include both gun types, allowing you to switch between methods based on the specific undercarriage area you’re coating.
Understanding Volume Options: Liters vs. Gallons
Raptor kits typically come in 1-liter, 750ml, or 1-gallon configurations, but the math gets tricky when calculating undercoating needs. A full-size pickup truck undercarriage requires 2-3 liters for adequate coverage, while a compact sedan might need only 1-1.5 liters. The key is understanding that undercoating demands 30-40% more material than bed liner applications due to overspray losses and the need for complete coverage in complex geometries. Professional installers often purchase separate base and hardener components in bulk, mixing only what’s needed per job. For DIYers, multi-liter kits with separate hardener bottles offer better value than pre-packaged single-use containers, allowing you to coat your daily driver now and save remaining material for touch-ups or a second vehicle. Always factor in 20% waste when estimating—running short mid-project creates visible lap lines and adhesion problems that are nearly impossible to fix.
Pre-Purchase Considerations: Matching Kits to Your Needs
Vehicle Type and Size Calculations
The difference between coating a 1980s body-on-frame truck and a modern unibody crossover is massive. Body-on-frame vehicles expose substantial surface area—frame rails, crossmembers, and brackets—requiring aggressive texture for self-cleaning and noise damping. Unibody platforms demand more finesse; their complex sheet metal structures and integrated crash zones need thinner, more flexible applications that won’t interfere with factory drainage channels. Calculate your vehicle’s undercarriage square footage by measuring length × width and adding 40% for complexity. A mid-size SUV typically runs 120-150 square feet. Cross-reference this with the kit’s coverage rate—usually 35-40 square feet per liter at recommended thickness—but remember these numbers assume ideal conditions and experienced application. For vehicles with extensive factory undercoating that needs removal, double your material estimate; bare metal applications consume more product than recoating over sound existing material.
Climate-Specific Formulation Requirements
Raptor formulations aren’t universally identical across global markets. European-spec Raptor complies with stricter VOC regulations, resulting in slightly different cure profiles and temperature ranges. North American formulations offer more aggressive solvents for better cold-weather application down to 50°F, while Australian variants include enhanced UV blockers for intense sun exposure. If you’re in the Salt Belt, prioritize kits with maximum chemical resistance ratings. Desert dwellers should seek formulations with higher heat deflection temperatures (HDT) to prevent softening on 120°F+ pavement. Coastal regions demand enhanced salt-fog resistance—look for ASTM B117 testing data on the technical sheet. The hardener selection also varies; fast hardeners cure in 1-2 hours but shrink more, while slow hardeners take 4-6 hours but provide better flow and leveling in intricate undercarriage areas.
Professional-Grade vs. DIY-Friendly Packaging
The professional market uses Raptor differently than the weekend warrior. Professional kits often ship with unlabeled metal containers, minimal instructions, and assume access to industrial-grade equipment. DIY kits feature consumer-friendly packaging with detailed guides, video QR codes, and sometimes include basic application guns. The material inside is often identical, but the professional versions may have higher solids content for faster build, while DIY formulations include more flow agents to forgive amateur application errors. For undercoating specifically, professional-grade kits typically exclude texture additives, allowing installers to customize aggregate size based on vehicle type. DIY kits come pre-textured, limiting flexibility but ensuring consistent results. Consider your skill level honestly—spending 20% more on a “pro” kit you can’t apply properly wastes money compared to a forgiving DIY formulation applied correctly.
Surface Preparation: The Non-Negotiable First Step
Degreasing and Decontamination Protocols
Undercoating failure almost always traces back to inadequate cleaning. Start with a pressure washer capable of at least 3,000 PSI, using a 15-degree nozzle to blast loose scale and mud from every nook. Follow with a dedicated automotive degreaser—not household cleaners—applied liberally to frame rails, crossmembers, and body seams. Let it dwell for 10-15 minutes, then pressure wash again. The critical step is chemical decontamination: use an iron fallout remover (the same type used on paint) to dissolve embedded brake dust and rail particles that embed in metal pores. These contaminants prevent adhesion and act as rust seeds. After rinsing, wipe all surfaces with wax and grease remover using lint-free cloths, changing cloths frequently. For vehicles previously coated with rubberized underseal, you’ll need a specialized remover gel—never attempt to apply Raptor over failing undercoating, as the bond will be superficial and short-lived.
Rust Conversion vs. Rust Removal Strategies
The debate between converting rust versus removing it completely depends on severity and location. Surface flash rust (orange powder) demands removal via wire wheel or media blasting down to clean metal. Pitted rust on frame rails requires more aggressive treatment—needle scaling or sandblasting to white metal standards (SSPC-SP10). However, some pitted areas in non-structural locations can be treated with phosphoric acid-based converters that chemically transform iron oxide into iron phosphate, creating a stable base for Raptor. The key is honesty: converters work on rust, not scale. If you can flake it off with a screwdriver, it’s scale and must be removed. After rust treatment, immediately apply a zinc-rich weld-through primer to bare metal areas—this prevents flash rusting and provides a galvanic protection layer that Raptor’s polyurethane matrix will encapsulate permanently.
Masking and Protection Techniques
Undercoating overspray is brutally difficult to remove once cured. Use 3M Fine Line tape for precise edges around suspension mounting points and brake line brackets. Cover brake rotors, calipers, and rubber bushings with heavy-duty aluminum foil—it’s moldable and withstands coating solvents better than plastic. For drivetrain components and sensors, use purpose-made masking bags secured with tape. Don’t forget the exhaust: wrap headers and catalytic converters with high-temperature tape, leaving at least 6 inches of clearance from coating areas. Raptor can withstand 250°F continuous, but exhaust components exceed this rapidly. Remove wheel well liners and plastic shields entirely—coating behind them is pointless and complicates future maintenance. Finally, mask the body pinch welds where undercoating shouldn’t extend above the rocker panels; a crisp line here separates professional results from amateur hour.
Mastering the Application Process
Mixing Ratios: Getting It Right Every Time
Precision mixing separates successful applications from costly failures. Raptor’s typical 3:1 ratio means three parts base to one part hardener by volume, but this varies by formulation. Use graduated mixing cups with clear markings—never eyeball ratios. Mix thoroughly for a full two minutes, scraping the sides and bottom of the container repeatedly. Incomplete mixing leaves soft spots that won’t cure properly, creating weak points vulnerable to moisture intrusion. For undercoating, consider mixing smaller batches (500ml at a time) rather than the entire kit. This prevents material from thickening in the cup during application, which changes spray pattern and texture. Temperature affects viscosity; in weather below 60°F, warm the base component in hot water (not boiling) to 75-80°F before mixing. This ensures proper flow and atomization without altering the chemical ratio. Always mix hardener into base—never reverse the order—as this prevents incomplete blending.
Spray Pattern and Distance Optimization
Undercoating demands different technique than bed liners. Hold the Schutz gun 12-16 inches from surface for broad coverage on flat areas like floor pans, but close to 8-10 inches for complex frame sections to ensure material wraps around edges. Keep the gun perpendicular to surfaces; angling creates uneven texture and thin spots. Move in overlapping passes with 50% pattern overlap—this builds consistent thickness without runs. For inside frame rails, use an extension wand with 360-degree spray tip, moving slowly to allow material to reach all interior surfaces. The goal is 15-20 mils dry film thickness, which requires two coats of 8-10 mils wet thickness each. Test your technique on cardboard first: proper application creates a uniform, slightly rough texture without dry spots or sagging. If you see “tiger striping,” you’re moving too fast or holding the gun too far away.
Multi-Layer Application Strategies
Two coats are mandatory for undercoating; one coat simply doesn’t provide adequate thickness or protection. Apply the first coat relatively thin (6-8 mils), focusing on complete coverage and adhesion. Let it flash for 60-90 minutes until tack-free—this creates a mechanical tooth for the second coat to grip. The second coat builds the protective thickness, applied at 10-12 mils. For extreme environments, a third coat on high-wear areas like rocker panels and forward frame sections adds insurance. Between coats, inspect for pinholes or thin spots; these must be addressed immediately as they become rust highways. Use a brush to work material into seams and welds before it skins over—this is critical on modern vehicles where panels are laser-welded and factory coatings are thin. The final coat should have a uniform eggshell-to-satin sheen when dry; glossy spots indicate too much material (sagging risk), while flat spots show insufficient coverage.
Curing and Drying: What to Expect
Environmental Conditions That Make or Break Your Coating
Raptor’s cure chemistry is exquisitely sensitive to temperature and humidity. The sweet spot is 70-75°F with 40-50% relative humidity. Below 60°F, cure time extends exponentially, and the coating may never achieve full hardness. Above 85°F, the coating skins over too fast, trapping solvents and creating a weak, bubbly finish. Humidity above 70% introduces moisture into the curing film, causing hazing and potential adhesion failure. If you’re coating in a garage, use a space heater and dehumidifier to control conditions—this isn’t optional, it’s fundamental. Air movement helps: a box fan set to low speed (not blowing directly on the vehicle) removes solvent vapors and promotes even cure. Never force-cure with heat lamps or infrared heaters; the rapid surface cure locks in solvents underneath, creating a ticking time bomb of delamination. Plan for 24 hours before light handling and 72 hours before exposing to moisture or road grime.
Post-Application Inspection Points
After the recommended cure time, conduct a thorough inspection before considering the job complete. Use a thickness gauge on multiple points—frame rails, floor pans, wheel wells—to verify you’ve achieved 15-20 mils minimum. Check edges and seams with a dental pick; any lifting indicates contamination or inadequate prep. The coating should be uniformly textured without glossy patches (uncured) or chalky areas (under-mixed). Press firmly with your thumbnail; properly cured Raptor won’t dent or mark. Inspect for pinholes by spraying a light mist of water—any penetration suggests incomplete coverage. Pay special attention to areas where you masked; if you see a ridge of material, you applied too thick and created a stress point that may crack. Finally, smell the coating; any solvent odor after 48 hours indicates incomplete cure, usually from applying too thick or low temperatures. Address any issues now, as fixing them later requires sanding through the tough coating—a miserable task.
Longevity and Performance Expectations
Real-World Testing in Salt Belt Regions
Independent testing in Michigan and Minnesota shows properly applied Raptor undercoating maintains integrity beyond 7 years in daily-driver conditions, while rubberized undercoatings typically fail within 2-3 years. The difference is stark: Raptor samples showed zero corrosion creep after 5,000 hours of salt spray testing (ASTM B117), whereas traditional underseal allowed rust to advance 2-3mm beyond scribe lines within 500 hours. Field reports from plow truck operators—perhaps the harshest real-world test—indicate Raptor survives 4-5 seasons before needing touch-ups, compared to annual reapplication of conventional products. The coating’s flexibility proves crucial: it expands and contracts with metal through freeze-thaw cycles without cracking, maintaining a continuous barrier. However, longevity depends heavily on edge retention; areas where the coating terminates must be sealed perfectly, or moisture wicks underneath. This is why professional installations always extend Raptor 1-2 inches up into body panels and frame rails, creating a water-shedding lip rather than a blunt edge.
Maintenance and Touch-Up Procedures
Raptor isn’t maintenance-free, but upkeep is refreshingly simple. Annual undercarriage washings with a pressure washer remove accumulated salt and grime—something you should never do aggressively with rubberized undercoating as it peels off. Inspect yearly for rock chips, especially after winter. Small chips are easily repaired: clean the area with wax/grease remover, scuff with 180-grit paper, and dab on mixed Raptor using a small brush. The new material chemically bonds to the old, creating an invisible repair. For larger damaged sections (rare, but possible from severe impact), feather-edge the surrounding coating with a DA sander, clean thoroughly, and apply a thin tie-coat of pure epoxy primer before recoating with Raptor. Never apply touch-up material over rust—if you see corrosion, you must remove the surrounding coating, treat the rust properly, and rebuild the area. Keep leftover mixed material for exactly 30 minutes in a sealed container; after that, it begins curing and won’t bond correctly.
Economic Analysis: True Cost of Ownership
Material Costs vs. Professional Application Fees
A comprehensive DIY Raptor undercoating on a full-size truck runs $200-300 in materials: 2-3 liters of Raptor ($120-180), cleaning supplies ($40), masking materials ($30), and incidentals. Professional shops charge $800-1,500 for the same service, primarily reflecting labor for meticulous prep work. The break-even point is your time and skill. Professionals complete the job in 4-6 hours; a first-timer needs 12-16 hours spread over a weekend. However, the real value proposition emerges over time: Raptor’s 7+ year lifespan means amortized annual cost of $30-40 DIY versus $100-150/year for professional rubberized undercoating that requires reapplication every 2-3 years. For collectors and enthusiasts, the DIY route offers something money can’t buy: intimate knowledge of every inch of your vehicle’s undercarriage, allowing you to spot issues before they become expensive problems.
Longevity Comparisons with Rubberized Undercoatings
Rubberized undercoating costs $50-80 for a DIY application and $200-400 professionally installed. However, its 2-3 year lifespan makes it significantly more expensive long-term. The hidden cost is removal: when rubberized undercoating fails, it must be completely stripped—often requiring 8-10 hours of labor with heat guns and scrapers—before reapplication. Raptor’s superior adhesion means it can be recoated directly after cleaning and light scuffing, saving massive labor on subsequent applications. Additionally, rubberized coatings provide negligible sound deadening compared to Raptor’s dense polyurethane matrix, which noticeably reduces road noise and stone impact racket. Factor in Raptor’s impact resistance preventing costly damage to fuel lines, brake lines, and EV battery packs on modern vehicles, and the total cost of ownership heavily favors the higher initial investment.
Troubleshooting Common Application Issues
Fixing Orange Peel and Texture Inconsistencies
Orange peel—uneven, bumpy texture resembling the fruit’s skin—results from improper gun distance, fast movement, or cold material. If you catch it while the coating is still wet, immediately back-roll the area with a foam roller to level the texture. For dried orange peel, you must sand the affected area flat with 320-grit wet/dry paper, clean thoroughly, and reapply a thin corrective coat. Texture inconsistencies often stem from pressure fluctuations; use a pressure regulator with gauge at the gun, not just at the compressor. If some areas look smooth while others are heavily textured, you’re varying distance or speed unconsciously. Mark reference lines on the floor with tape to maintain consistent gun-to-surface distance. For undercoating, some texture variation is acceptable—even desirable—as long as coverage is uniform. But wild swings from smooth to extreme texture create stress points and collect dirt unevenly.
Addressing Adhesion Failures
When Raptor peels in sheets, contamination is the culprit. Oil, silicone, or wax residue prevents chemical bonding. The only fix is removal: strip the failing coating with a plastic scraper (to avoid metal gouging), sand the underlying surface to 180-grit, and re-clean with wax/grease remover. Spot-prime with epoxy before recoating. If adhesion fails only in isolated spots, it’s likely localized contamination—perhaps a drip of brake fluid or power steering fluid you missed during prep. These areas will show as bubbles or lifts within days. The solution is to remove only the failing spots, treat the contamination source (replace the leaking component!), and repair as described. Never apply Raptor over factory undercoating unless you’ve verified its integrity by cross-hatch testing—cutting a grid pattern, applying tape, and ripping it off. If any factory coating lifts, it all must come off.
Managing Cure Time Discrepancies
When some areas cure rock-hard while others remain tacky after 24 hours, you’ve encountered a mixing issue or environmental gradient. Tacky spots indicate insufficient hardener—perhaps you didn’t scrape the bottom of the mixing cup, leaving hardener pooled there. Alternatively, these areas may be colder, perhaps from concrete floor contact or shade. Move the vehicle to a uniformly heated space and extend cure time by 48 hours; often, the coating will eventually cure fully. If areas remain soft after 72 hours, they must be removed and recoated, as they’ve been under-catalyzed and will never achieve proper hardness. To prevent this, mix small batches, use a mixing paddle on a drill for 2 full minutes, and ensure your workspace maintains consistent temperature within 5°F across the entire vehicle. infrared thermometers help identify cold spots before they become problems.
Safety and Environmental Compliance
VOC Regulations by Region
Raptor’s solvent content triggers VOC (Volatile Organic Compound) regulations that vary dramatically. In California and several Northeast states, only compliant formulations (typically <420 g/L VOC) are legal for sale. These versions cure slower and may require additional coats to achieve thickness. Federal EPA regulations allow higher VOC content, which professionals prefer for faster cure and better flow. If purchasing online, verify the kit meets your local standards—using non-compliant product can void insurance and create liability. For DIYers in regulated states, water-based undercoating alternatives exist, but they don’t match Raptor’s performance. The loophole: many regulations exempt “bed liner” applications, and Raptor marketed as bed liner material is often VOC-compliant for that use. However, applying it as undercoating technically changes the regulatory category. Enforcement is rare for personal use, but commercial shops face steep fines. Always check current regulations on your state EPA website before buying.
Proper Ventilation and Disposal Procedures
Raptor’s isocyanate hardener is a respiratory sensitizer—exposure can trigger permanent asthma-like reactions. This isn’t hype; it’s documented occupational health data. Your workspace requires active ventilation: minimum 10 air changes per hour. Use a respirator with organic vapor cartridges and P100 particulate filters, not just a dust mask. Disposable coveralls prevent skin contact; isocyanates absorb through skin and can cause sensitization. For cleanup, never wash solvents down drains. Contaminated rags, mixing cups, and masking materials are hazardous waste. Store them in sealed metal containers and dispose through your local household hazardous waste facility—typically free but requires drop-off. Leftover mixed material must cure completely in the cup before disposal; spread it on cardboard to accelerate curing. Never pour liquid coating into trash. The empty base containers can be recycled once thoroughly dry, but hardener tins require hazardous waste disposal due to residual isocyanate.
Frequently Asked Questions
How much Raptor liner do I need for a full-size truck undercoating?
For a typical crew cab, short-bed pickup, plan on 2.5 to 3 liters of mixed Raptor. This assumes you’re coating the entire frame, inner wheel wells, floor pans, and rocker panels. If your truck has extensive factory undercoating in good condition that you’re simply top-coating, you might get away with 2 liters. However, it’s always better to have extra—running out mid-project creates visible texture differences and weak adhesion at overlap points. The general formula is: (vehicle length × width) × 1.4 for complexity, divided by 35 sq ft per liter coverage. Add 20% for waste and overspray. Buy a 3-liter kit with separate hardener bottles; you can mix only what you need and save the rest.
Can I apply Raptor over existing rust?
Only if that rust is converted to a stable, non-active state. Flash rust (surface oxidation) must be removed completely down to shiny metal. Pitted rust requires either sandblasting to white metal or treatment with a phosphoric acid converter that transforms iron oxide into iron phosphate. Simply painting over active rust encapsulates moisture and accelerates corrosion. The proper process: remove all scale, treat with converter if appropriate, prime with zinc-rich epoxy, then apply Raptor. For severe rust compromising structural integrity, Raptor is not a fix—replace the metal first. Raptor prevents rust; it doesn’t reverse structural rust damage.
How long does Raptor undercoating last in harsh winter conditions?
In Salt Belt states with heavy road salt and brine application, expect 5-7 years of effective protection before needing touch-ups. The coating itself doesn’t fail; rather, rock chips and physical abrasion create breach points that require maintenance. Vehicles driven primarily on highways may see 8-10 years, while off-road rigs constantly bombarded with debris might need attention after 3-4 years. The key is annual inspections and prompt chip repair. Unlike rubberized undercoating that degrades uniformly and requires complete replacement, Raptor’s modular repairability extends its functional life indefinitely. Many enthusiasts report 10+ year lifespans with minimal touch-up work.
Is Raptor better than rubberized undercoating for sound deadening?
Significantly. Raptor’s dense polyurethane matrix reduces road noise and stone impact sound by 6-8 decibels in controlled tests, while rubberized undercoating provides negligible acoustic benefit. The textured surface diffuses sound waves rather than transmitting them, and the material’s mass dampens panel resonance. For maximum noise reduction, apply Raptor at the upper thickness limit (20+ mils) and consider adding a dedicated sound deadening mat underneath on large flat panels. The combination transforms cabin noise levels, especially on older trucks and SUVs. Rubberized undercoating’s primary function is rust prevention; Raptor delivers that plus genuine acoustic improvement.
Can I apply Raptor myself or do I need a professional?
DIY application is absolutely achievable with proper preparation and realistic expectations. The learning curve is steep for the first 30 minutes, but technique improves rapidly. Key requirements: ability to safely lift and support the vehicle, access to a compressor delivering 5+ CFM at 90 PSI, and patience for meticulous prep work. If you can paint a wall with a spray gun, you can apply Raptor. The critical difference is prep time: professionals spend 60% of the job on cleaning and masking. Amateurs often rush this phase, causing failures. Budget an entire weekend: Saturday for prep, Sunday for application and initial cure. Your first attempt may not be cosmetically perfect, but it will be functional. Professional application makes sense for exotic vehicles or if you lack workspace and equipment.
What’s the ideal temperature and humidity for applying Raptor undercoating?
Target 70-75°F ambient temperature with 40-50% relative humidity. The coating can be applied as low as 55°F, but cure time triples and adhesion suffers. Above 85°F, the coating skins too quickly, trapping solvents. Humidity above 65% introduces moisture into the film, causing hazing and potential cure inhibition. If conditions are marginal, control your micro-environment: use space heaters, dehumidifiers, and fans. Never apply in direct sunlight—the surface temperature can be 30°F hotter than ambient, causing catastrophic solvent popping. Ideal conditions exist inside a garage with climate control. Check surface temperature with an infrared thermometer; it should be within 5°F of air temperature. Cold concrete floors suck heat from the vehicle underside—insulate with cardboard or use supplemental floor heating.
How long before I can drive my vehicle after applying Raptor?
Minimum 24 hours before gentle street driving, 72 hours before exposing to rain, snow, or heavy road grime. Full chemical cure takes 7 days, during which time avoid aggressive off-roading or pressure washing. The coating is dry to touch in 1-2 hours, tack-free in 4-6 hours, and hard enough to handle in 12-24 hours, but the final cross-linking continues for a week. Driving too early risks embedding dirt in the still-curing surface and can cause premature wear on high-stress areas. If you must drive sooner (emergency situations), keep speeds under 45 mph, avoid dirt roads, and don’t park on grass or dirt that could stick to the coating. Plan application timing for a dry weather window; rain within 12 hours can cause whitening and adhesion issues.
Will Raptor undercoating affect my vehicle’s resale value?
Properly applied, it increases value on trucks, off-road vehicles, and classics in rust-prone regions. Dealers recognize Raptor as a premium upgrade, often listing it as a selling point. However, sloppy application with overspray on components or visible texture inconsistencies can detract value. The key is professional-quality prep and masking. For collector cars, opinions vary: concourse purists prefer factory-correct finishes, but knowledgeable buyers in the vintage 4x4 market specifically seek Raptor-protected vehicles. Document your work with photos showing the prep process and final result; this proves professional-grade application. On leased vehicles, check your lease agreement—most allow undercoating if it’s professionally applied or documented as maintenance, but some prohibit modifications.
Can I paint over Raptor undercoating later if I want to change colors?
Yes, but with important caveats. Raptor’s texture requires aggressive scuffing with 180-220 grit paper to create a mechanical bond for topcoats. Use a high-build epoxy primer to fill texture before applying color coats. For small color changes (touch-ups), Raptor can be tinted up to 10% with compatible urethane toner during mixing, but this alters cure properties. Many users apply black Raptor for undercoating regardless of vehicle color, as it’s invisible unless you’re crawling underneath. If you want color-matched undercoating for show purposes, consider applying standard Raptor for protection, then top-coating with a matching single-stage urethane in a smoother texture. Never apply paint directly over uncured Raptor; wait the full 7-day cure period.
Is Raptor undercoating safe for all vehicle types, including hybrids and EVs?
Generally yes, but modern vehicles require extra caution. Avoid coating high-voltage battery pack housings on EVs and hybrids—these have specific thermal management requirements, and adding insulation could cause overheating. Don’t coat aluminum suspension components or magnesium parts without verifying compatibility; while Raptor adheres well, some manufacturers prohibit aftermarket coatings on these parts for corrosion warranty reasons. On vehicles with active aerodynamics or underbody panels, ensure coating thickness won’t interfere with panel fitment. Electric vehicles often have sensitive electromagnetic components underneath; avoid coating these areas. When in doubt, consult your vehicle’s service manual or contact the manufacturer. For most body-on-frame trucks and older vehicles, Raptor is completely safe and highly beneficial.