A pristine windshield isn’t just about aesthetics—it’s a critical safety component that affects visibility, structural integrity, and your vehicle’s overall value. Over time, road debris, wiper wear, and environmental contaminants leave behind micro-scratches, water spots, and oxidation that can turn glass hazy even after cleaning. glass polishing starter kits offer enthusiasts and detailing newcomers a controlled entry point into professional-grade restoration without requiring years of experience or a garage full of specialized equipment. This guide breaks down everything you need to know to evaluate these kits intelligently, ensuring you invest in a system that matches your skill level, vehicle needs, and long-term car care goals.
Why Glass Polishing Matters for Your Vehicle
Top 10 glass polishing starter kit
Detailed Product Reviews
1. Cerium Oxide Glass Polishing Kit - Remove Scratches, Water Spots & Restore Clarity | Windshield Scratch Remover with Polish & Sealant | Complete DIY Kit
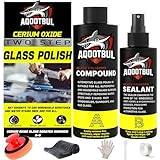
Overview: The Cerium Oxide Glass Polishing Kit positions itself as a comprehensive solution for DIY glass restoration. This $25.99 package targets stubborn scratches, water spots, and wiper marks on automotive glass, headlights, and household windows. The kit centers on a professional-grade cerium oxide compound designed to deliver pro-level results without damaging surfaces.
What Makes It Stand Out: This kit’s completeness sets it apart. Unlike competitors requiring separate purchases, it bundles everything: cerium oxide polish, protective sealant, manual polishing tool, microfiber cloth, gloves, scraper, and protective tape. The three-step process (Clean → Polish → Seal) simplifies what could be an intimidating task. The included hydrophobic sealant offers up to six months of protection against water, bird droppings, and grime, which most kits omit.
Value for Money: At $25.99, this kit represents solid mid-range value. While drill-powered systems work faster, this manual approach eliminates the need for expensive power tools. The inclusion of sealant and protective accessories makes it more complete than similarly priced alternatives that only provide polishing compounds and pads.
Strengths and Weaknesses: Strengths include the all-in-one package, beginner-friendly manual application, protective sealant, and clear instructions. The manual polisher offers precise control without risking heat damage. Weaknesses: manual polishing requires significantly more elbow grease and time than drill-powered alternatives. The kit may struggle with deep scratches, and results depend heavily on user patience and technique.
Bottom Line: Ideal for beginners tackling light to moderate glass imperfections without investing in power tools. The comprehensive kit and protective sealant justify the price, making it a smart choice for occasional DIYers prioritizing convenience over speed.
2. Glass Polish (3’’) Glass Scratch Removal Kit for use with a Drill on All Glass Surfaces

Overview: The Glass Polish 3" Scratch Removal Kit is a drill-powered solution for serious glass restoration. Priced at $39.97, this kit targets scratches, scuffs, graffiti damage, and acid etching across all glass surfaces including automotive, laminated, and tempered glass. It’s designed as a DIY version of professional systems.
What Makes It Stand Out: Speed is this kit’s primary advantage. The manufacturer claims it’s three times faster than their xNet PRO system, making it appealing for larger jobs. The 3-inch drill attachment provides professional-grade power without the cost of dedicated polishing machines. Its versatility across all glass types, including mirrors, makes it more flexible than automotive-only kits.
Value for Money: At nearly $40, this is a premium DIY option. The price is justified if you already own a drill and need to tackle extensive damage or multiple vehicles. Compared to manual kits, the time savings are substantial. However, the price point approaches professional service costs for minor scratches, making it better suited for users with frequent restoration needs.
Strengths and Weaknesses: Strengths include rapid material removal, professional-level results, comprehensive damage coverage (including graffiti), and clear visual instructions. The drill-powered system dramatically reduces labor. Weaknesses: requires a drill, higher price point, potential for heat buildup and glass damage if misused, and may be overkill for light scratches. The kit appears to lack protective sealant or extensive accessories.
Bottom Line: Best for experienced DIYers with drill access who need to tackle moderate to severe glass damage efficiently. The speed and power justify the higher cost for those with multiple projects, but beginners should consider the learning curve.
3. GLASS POLISH DIY 3” Windshield Polishing Kit for Car Glass Restoration, Remove Wiper Blade Damage, Fine Scratches, Haziness, and Water Spots, Restore Glass Clarity and Shine - GP21005

Overview: The GLASS POLISH DIY 3" Windshield Polishing Kit (GP21005) is a drill-powered system focused specifically on automotive glass restoration. At $24.95, it targets wiper blade damage, fine scratches, haziness, and water spots, emphasizing safety and visibility improvements for drivers.
What Makes It Stand Out: This kit’s honesty about limitations is refreshing—it explicitly states it’s for fine scratches only, managing expectations realistically. The universal drill attachment ensures compatibility with most household drills. Its automotive-specific design addresses common windshield issues like wiper streaks and road haze that directly impact driver safety, making it purpose-built rather than generic.
Value for Money: This kit offers excellent value for car owners dealing with specific windshield clarity issues. The sub-$25 price point makes it accessible while still providing drill-powered efficiency. It’s cheaper than Product 2 while offering similar functionality for automotive use. The focus on fine scratches prevents users from wasting money on a kit too aggressive for their needs.
Strengths and Weaknesses: Strengths include honest marketing, automotive-specific design, affordable price, drill-powered efficiency, and safety-focused outcomes. The universal attachment adds convenience. Weaknesses: not suitable for deeper scratches, limited to automotive applications, lacks protective sealant, and doesn’t include the comprehensive accessories of all-in-one kits. Users with varied glass restoration needs may find it too specialized.
Bottom Line: Perfect for car owners with lightly scratched or hazy windshields seeking an affordable, effective solution. The honest approach and targeted design make it a smart purchase for automotive-specific fine scratch removal.
4. ZFE 5Inch Glass polishing Pads, 10Pcs Wool Felt Disc Glass Polishing Kit Buffing Pads Sanding Discs with Backing Pad and M14 Drill Adapter for Rotary Tools Polish Glass and Metal
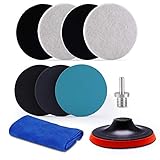
Overview: The ZFE 5-Inch Glass Polishing Pads kit is a versatile, pad-focused system priced at $19.99. This package includes ten wool felt discs, a backing pad, and M14 drill adapter, designed for rotary tools. Unlike compound-focused kits, this emphasizes reusable pads compatible with various polishing compounds for glass, metal, plastic, and stone.
What Makes It Stand Out: Versatility and quantity define this kit. Ten durable, washable wool pads offer exceptional longevity and value. The 5-inch size covers more area than standard 3-inch kits, speeding up large-surface work. Its multi-surface capability extends beyond glass to metal and stone, making it a workshop multitasker rather than a single-purpose automotive tool.
Value for Money: At under $20, this kit delivers outstanding value for those who already own polishing compounds. The reusable pads can last through dozens of projects, spreading the cost effectively. However, it’s incomplete—you’ll need to purchase cerium oxide or other compounds separately, potentially negating initial savings if starting from scratch.
Strengths and Weaknesses: Strengths include excellent value, reusable durable pads, multi-surface versatility, larger 5-inch size for efficiency, and M14 adapter compatibility with many rotary tools. Weaknesses: no polishing compound included, lacks instructions or guidance for beginners, requires separate purchase of materials, and wool pads may shed initially. It’s a component kit, not a complete solution.
Bottom Line: Ideal for experienced users who already have polishing compounds and need quality, reusable pads for multiple materials. Beginners should look for complete kits, but DIY veterans will appreciate the durability and versatility at this price point.
5. SHMZK Glass Polishing Kit, Windscreen Glass Scratch Removal Kit with 100g Cerium Oxide Powder, Felt Buffing Pad Wool Polishing Wheel Scratch Repair Kit for Glass Window Windshield

Overview: The SHMZK Glass Polishing Kit is a budget-friendly cerium oxide-based solution at $17.49. This kit includes 100g of cerium oxide powder, multiple wool polishing pads, a polishing disk, wool wheel, and soft towel. It’s designed for minor scratches, abrasions, and water damage on automotive and household glass.
What Makes It Stand Out: This kit’s comprehensive accessory package at a low price point is impressive. It includes various pad types (pads, wheel, disk) giving users options for different scratch patterns and surface contours. The generous 100g of cerium oxide powder provides ample material for multiple projects, and the versatile design works for both car windshields and home glass surfaces.
Value for Money: At $17.49, this is the most budget-friendly complete kit. The inclusion of multiple pad types and generous compound quantity makes it exceptional value for occasional users. While cheaper than most competitors, it doesn’t skimp on components. The powder format allows custom mixing ratios, potentially extending product life compared to pre-mixed compounds.
Strengths and Weaknesses: Strengths include unbeatable price, comprehensive accessory variety, generous compound quantity, multi-surface versatility, and powder format for customization. Weaknesses: powder requires mixing (messier), no protective sealant included, lacks detailed instructions, quality control concerns at this price point, and manual application may be labor-intensive without drill adapter.
Bottom Line: An excellent entry-level choice for budget-conscious DIYers tackling minor scratches on various glass surfaces. The variety of accessories and generous compound amount make it a value leader, though users should expect a more hands-on process.
6. GLASS POLISH DIY 3” Windshield Polishing Kit with Enhanced Cerium Oxide Formula – Remove Wiper Blade Damage, Fine Scratches, Haziness, Water Spots – Restore Glass Clarity and Shine - GP21007
Overview: This specialized windshield polishing kit targets common glass imperfections using an enhanced cerium oxide formula. Designed for DIY users, it addresses wiper blade streaks, light scratches, haziness, and water spots. The 3-inch system works with standard power tools, making professional-level glass restoration accessible for home garage use.
What Makes It Stand Out: The kit’s premium cerium oxide compound offers superior cutting power while remaining safe for automotive glass. Its universal compatibility stands out—working seamlessly with both rotary polishers (5/8"-11 thread) and electric drills via an included adapter. The manufacturer clearly sets realistic expectations by explicitly stating it’s for fine scratches only, preventing user disappointment.
Value for Money: At $24.25, this kit positions itself in the mid-range segment, offering excellent value for the specialized formulation and tool compatibility. Comparable professional services cost $75-$150 per windshield, making this a cost-effective solution for multiple vehicles. The enhanced formula requires less product per application than generic alternatives.
Strengths and Weaknesses: Strengths: High-grade cerium oxide removes fine imperfections effectively; versatile drill/polisher compatibility saves tool investment; clear usage guidelines prevent misuse; restores optical clarity significantly; compact size reaches tight corners.
Weaknesses: Not suitable for deep scratches or chips; requires power tool ownership; learning curve for proper pressure and speed; limited to 3-inch working area extends large windshield jobs; no sealant included for post-polish protection.
Bottom Line: This kit excels for car owners battling wiper streaks and light scratches. While it won’t fix rock chips or deep gouges, it delivers impressive clarity restoration for common windshield blemishes. A smart investment if you own a drill or polisher and follow instructions carefully.
7. Nu Finish Glass Restore & Repel Kit, Two Step Regimen for Car Windshield, Includes Polishing Compound, Ceramic Sealant, Precision Applicator Tool, and 2 Reusable Sponges

Overview: Nu Finish offers a complete two-step windshield restoration system that goes beyond simple polishing. The kit combines a cutting glass polishing compound with a durable ceramic sealant, providing both immediate defect removal and long-term protection. It’s designed as an all-in-one solution for drivers seeking lasting results.
What Makes It Stand Out: The integrated approach distinguishes this kit—most competitors sell polish and sealant separately. The ceramic coating promises up to two years of water repellency and contaminant protection. The precision applicator tool ensures even distribution, while reusable sponges reduce waste. Nu Finish claims 100% visibility improvement on rainy nights.
Value for Money: Priced at $23.99, this two-step system undercuts buying separate polish ($15) and ceramic coating ($20) products. The included applicator and sponges eliminate extra purchases. Considering professional ceramic glass treatments cost $100+, this kit offers substantial savings for DIY enthusiasts willing to invest 90 minutes of curing time.
Strengths and Weaknesses: Strengths: Complete restoration-to-protection system; reputable automotive brand; long-lasting ceramic sealant; reusable sponges reduce environmental impact; improves wet-weather visibility significantly; strips stubborn road grime effectively.
Weaknesses: Multi-step process demands more time and effort; 90-minute cure time requires planning; temporary cloudiness during curing may alarm users; sealant must be applied sparingly to avoid streaking; not designed for deep scratch removal.
Bottom Line: This kit is ideal for drivers wanting both cosmetic improvement and functional protection. While the process is more involved than simple polishing, the two-year repellency benefit justifies the effort. Perfect for those prioritizing long-term windshield performance over quick fixes.
8. 34Pcs Glass Polishing Kit, Multifunctional Scratch Remover Window Repair Tool for Window Repair, with Felt Polishing Wheel Polishing Disc Wool Polishing Pad and Cerium Oxide Polishing Powder

Overview: This comprehensive 34-piece kit provides extensive tools for glass restoration, combining cerium oxide powder with multiple polishing attachments. Designed for versatility, it includes wool felt wheels, polishing discs, backing pads, and sandpaper. The kit targets light scratches on various glass surfaces beyond just automotive applications.
What Makes It Stand Out: The sheer component variety sets this apart—most kits include 5-10 pieces maximum. With 25 sandpaper discs, users can tackle graduated smoothing before polishing. The inclusion of both 2-inch wheels and pads offers flexibility for different surface areas. Bendable, washable wool pads promise extended reusability across multiple projects.
Value for Money: At $19.99, this kit delivers exceptional component-per-dollar value. Purchasing these items individually would exceed $40. The 8-ounce cerium oxide quantity matches premium standalone products. For DIYers needing glass restoration for vehicles, home windows, and other applications, this all-in-one approach eliminates multiple purchases.
Strengths and Weaknesses: Strengths: Unmatched component variety; reusable washable pads; includes sandpaper for graduated repair; works on multiple glass surfaces; economical for frequent use; sufficient cerium oxide quantity for several jobs.
Weaknesses: Confusing marketing mixes crack repair and scratch removal claims; quality control concerns with high piece count; overwhelming for beginners; no dedicated storage solution; requires separate power tool; sandpaper grits not specified.
Bottom Line: This kit suits experienced DIYers who value quantity and versatility. While the marketing is muddled, the actual components effectively address light scratches when used properly. Avoid if you want a simple, guided experience, but embrace if you appreciate having options for various glass restoration projects.
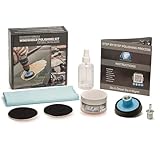
9. Cerium Oxide Glass Polishing Kit, Glass and Windshield Scratch Removal Kit, 8 Oz of Gordon Glass Cerium Oxide Polishing Powder, 3 inch Felt Polishing Buffing Wheel

Overview: This professional-focused kit from Gordon Glass centers on high-quality cerium oxide powder paired with a durable felt buffing wheel. Targeting fine scratches, scuff marks, and stubborn stains, it emphasizes the reusability of its polishing slurry. The 3-inch wheel works with any drill or grinder for straightforward application.
What Makes It Stand Out: Gordon Glass’s reputation for professional-grade products lends credibility. The standout feature is the reusable polishing slurry—it can dry between uses and be reactivated with water, making it economical over time. The zinc-free formula is environmentally preferable. This focused approach prioritizes compound quality over unnecessary accessories.
Value for Money: At $24.95, the price reflects the professional-grade compound rather than accessory quantity. Eight ounces of premium cerium oxide typically retails for $18-$22 alone, making the included felt wheel a valuable addition. For users prioritizing results over frills, this offers better long-term value than cheaper, lower-grade alternatives.
Strengths and Weaknesses: Strengths: Professional-quality cerium oxide; reusable slurry reduces waste; zinc-free eco-friendly formula; compatible with any drill/grinder; focused kit prevents unnecessary purchases; effective on stubborn stains; clear professional positioning.
Weaknesses: Minimal accessories (requires separate pad purchases); no instructions included for beginners; single buffing wheel limits backup options; not for deep scratches or chips; higher upfront cost than budget kits.
Bottom Line: This kit serves serious DIYers and professionals who understand glass polishing fundamentals. The high-quality, reusable compound justifies the price for frequent users. Skip if you need hand-holding, but choose if you want professional-grade results and appreciate compound economy over gadgetry.
10. SPTA 5 Pcs 5’’(125mm) Car Glass Polishing Discs Microfiber Polishing Buffing Pad - Glass Scratch Removal Kit for Correcting Damaged Windows, Removing Stubborn Waterspots

Overview: SPTA’s microfiber polishing discs offer a modern alternative to traditional felt pads for glass restoration. This five-piece set of 5-inch pads features unique fiber construction designed to reduce friction while polishing. The kit focuses solely on the buffing interface, requiring separate polishing compound purchase.
What Makes It Stand Out: The microfiber material represents a technological shift from standard felt—its high elasticity and flexibility prevent breakage while the surface fiber structure polishes to a high shine. The friction-reducing design protects glass from heat buildup. These pads work on multiple surfaces beyond glass, including lenses and phone panels.
Value for Money: Priced at $14.39, this is an affordable entry point for those already owning polishing compounds. Five large 5-inch pads provide good coverage for multiple vehicles. Compared to single-use pads or expensive felt replacements, these washable, reusable microfiber discs offer solid long-term economy, though the need for separate compound purchase must be factored in.
Strengths and Weaknesses: Strengths: Advanced microfiber technology; larger 5-inch size covers area quickly; highly elastic and durable; multi-surface versatility; reduces friction and heat; washable and reusable; excellent supplement to existing compounds.
Weaknesses: Does not include polishing compound; microfiber may wear faster than dense felt on heavy defects; limited to five pads (no variety pack); requires hook-and-loop backing plate (not included); not suitable as standalone scratch removal solution.
Bottom Line: These pads excel as an upgrade or supplement to your existing glass polishing setup. The microfiber construction offers genuine advantages over traditional materials for fine polishing stages. However, this is not a complete kit—purchase only if you already own cerium oxide compound and a compatible polisher. Ideal for experienced users seeking better finishing results.
Automotive glass faces constant assault from silica sand, road salt, bug acids, and windshield wiper grit that etch microscopic trenches into the surface. These imperfections diffract light, creating dangerous glare during night driving and reducing wiper blade effectiveness. Unlike paint correction that addresses cosmetic issues, glass polishing directly impacts driver safety by restoring optical clarity. A proper starter kit doesn’t just make windows look better—it removes the physical defects that compromise visibility and weakens the glass structure over time. Regular polishing also extends the life of your wiper blades and improves the performance of hydrophobic coatings by creating a smooth, receptive surface.
What Is a Glass Polishing Starter Kit?
A glass polishing starter kit is a curated collection of tools and compounds designed to work synergistically for automotive glass restoration. Unlike all-purpose polishing kits, these systems address the unique hardness and thermal properties of silica-based glass. Quality kits include graduated abrasives that remove damage progressively without introducing new scratches, plus application tools engineered to maintain consistent pressure and temperature. The “starter” designation means the kit includes educational resources, clearly labeled components, and forgiving formulations that allow beginners to achieve professional results while building proper technique. These systems bridge the gap between ineffective consumer products and professional equipment that requires specialized training.
Key Components Every Kit Should Include
The Polishing Compound
The heart of any kit is its glass polishing compound, which uses engineered aluminum oxide or cerium oxide particles to physically level the glass surface. Look for water-based formulations that include lubricants to prevent dry polishing, which generates excessive heat and can cause thermal fractures. The compound’s particle size distribution matters more than its advertised “grit”—premium options feature narrow size ranges that create consistent scratch patterns easier to remove in subsequent steps. Avoid oil-based compounds that leave residues interfering with coating adhesion and create cleanup headaches on trim and paint.
Polishing Pads and Applicators
Glass-specific pads differ dramatically from paint polishing pads in density and composition. Foam pads for glass feature closed-cell structures that won’t absorb compound, ensuring abrasive particles stay on the surface where they’re needed. Quality kits include multiple pad types: cutting pads with firm composition for defect removal, polishing pads with medium density for refinement, and finishing pads for final clarity. The backing material should be hook-and-loop compatible with standard dual-action polishers, but starter kits should also include hand applicator blocks for spot repairs and edge work where machines can’t safely reach.
Microfiber Towels and Buffing Cloths
Standard microfiber towels scratch glass during residue removal because their fibers trap spent abrasive particles. Glass polishing kits must include edgeless, high-GSM (grams per square meter) microfiber specifically woven for glass work. These towels feature shorter, denser loops that lift compound residue without redistributing abrasives. Look for kits providing color-coded towels for different stages—using your finishing towel to remove cutting compound guarantees reintroducing scratches. The best kits include at least six towels: two for compound removal, two for polish removal, and two for final cleaning.
Protective Accessories
Professional-grade kits include painter’s tape for masking trim and paint edges, plus plastic sheeting to protect dashboards from drips. Quality masking tape should be automotive-grade with clean removal properties that won’t damage adjacent surfaces. Some comprehensive kits add spray bottles for pre-misting glass and detailing brushes for cleaning cracks and corners before polishing begins. These accessories separate amateur results from professional outcomes by preventing compound contamination and protecting vehicle interiors.
Understanding Glass Damage Types
Before selecting a kit, you must identify the damage you’re addressing. Hard water spots represent mineral deposits sitting on the surface, requiring mild acidic cleaners rather than aggressive polishing. Wiper haze consists of fine, uniform scratches in the wiping pattern, needing light polishing with fine abrasives. Deep scratches from sand or debris require multi-stage correction with progressively finer compounds. Pits and chips can’t be polished out—they need resin repair before polishing. Starter kits excel at removing wiper haze and light scratches but can’t fix structural damage. Understanding this prevents purchasing an overkill system or expecting miracles from inadequate tools.
Essential Features to Evaluate
Abrasive Grade and Progression System
Premium kits use a three-stage abrasive system: cutting (removing defects), polishing (refining the surface), and finishing (restoring optical clarity). Each stage should reduce the previous step’s scratch depth by at least 60%. Avoid kits advertising a “single-step miracle compound”—these either don’t remove significant defects or leave holograms visible in direct sunlight. The progression should be clearly labeled with recommended working speeds and pressure ranges. Look for kits that include enough product volume to complete multiple vehicles, allowing practice without fear of running out mid-job.
Pad Material and Compatibility
Foam density directly impacts cutting ability—firmer pads transfer more energy to the glass but generate more heat. Quality kits specify pad durometer ratings (firmness measurement) and temperature thresholds. The backing plate material matters too: plastic plates flex, creating uneven pressure distribution, while aluminum plates maintain flat contact but cost more. For manual work, ergonomic foam blocks with finger grooves reduce fatigue during extended polishing sessions. Ensure pads are compatible with both rotary and dual-action polishers if you plan to upgrade tools later.
Compound Formulation
Beyond abrasives, compounds contain lubricants, suspending agents, and sometimes chemical cleaners. Water-based formulas with glycerin-based lubricants prevent drying and allow longer working times. Suspension agents keep abrasives evenly distributed, preventing settling that creates inconsistent cutting. Some advanced formulations include chelating agents that dissolve embedded metal particles from rail dust or brake dust. The compound should smell mild—not like harsh solvents indicating aggressive chemicals that could damage window tint or rubber seals.
Ergonomic Tool Design
If the kit includes a manual applicator tool, evaluate its ergonomics. Handles should accommodate grip styles for both vertical windshield work and horizontal rear window polishing. Weight distribution matters—top-heavy tools cause uneven pressure on overhead glass. Look for textured grips that remain secure when hands become wet or compound-covered. Some premium manual tools feature adjustable pressure plates that conform to curved glass, essential for modern vehicles with complex windshield geometries.
Manual vs. Machine Polishing Approaches
Manual polishing offers ultimate control for beginners, eliminating the risk of heat buildup and allowing tactile feedback for defect detection. However, it requires significant physical effort and time—expect 45-60 minutes for a single windshield. Machine polishing with a dual-action polisher cuts that time to 15-20 minutes and produces more consistent results once technique is mastered. Starter kits should accommodate both methods, including backing plates for machine use and hand applicators for learning. The ideal progression: master manual technique on small side windows, then graduate to machine polishing for large windshields while retaining manual tools for edges and tight spaces.
Safety Considerations and Protective Gear
Glass polishing generates silica dust when dry polishing occurs, creating respiratory hazards. Always work wet and wear N95-rated masks. The compounds themselves contain fine abrasives that irritate eyes—safety glasses are non-negotiable. Long sleeves and gloves prevent skin irritation and protect against glass splinters if a crack propagates during polishing. Work in well-ventilated areas, as even water-based compounds release mild fumes. Keep a fire extinguisher nearby—while rare, sparks from metal polishers can ignite flammable vapors if working near the engine bay. Never polish glass below 50°F (10°C) as thermal shock risks increase dramatically.
Step-by-Step Glass Polishing Process Overview
Start with a thorough cleaning using a clay bar to remove bonded contaminants. Mask all trim and paint edges with two layers of tape, extending at least one inch onto glass. Apply cutting compound to the pad, not directly to glass, using an X-pattern for even distribution. Work in 2x2 foot sections with overlapping passes, maintaining consistent speed and light pressure. Check progress frequently with a bright LED light at a low angle. After cutting, remove residue with a clean microfiber and inspect—if defects remain, repeat rather than applying more pressure. Follow with polishing compound using slower speeds and less pressure, then finish with ultra-fine polish. Remove all tape and clean edges with isopropyl alcohol before applying a glass sealant.
Common Mistakes Beginners Make
Applying too much pressure is the cardinal sin—let the abrasives do the work. Excessive force generates heat, causes pad deformation, and creates deeper scratches. Working too large an area prevents monitoring progress and leads to uneven removal. Skipping the cleaning step guarantees grinding dirt into the glass, creating new damage. Using paint polishing compounds on glass fails because the softer abrasives glaze over without cutting the harder glass surface. Polishing in direct sunlight causes compounds to dry prematurely, reducing working time and creating dust. Perhaps most critically, beginners often stop too soon—glass polishing requires patience, and defects that disappear when wet will reappear once dry if not fully removed.
Maintenance and Care for Your Kit
Proper kit maintenance extends component life and ensures consistent results. After each use, wash foam pads in warm water with mild detergent, kneading them to release trapped compound. Air dry pads standing on edge—never use heat, which melts foam structures. Store compounds in climate-controlled environments; temperature extremes cause separation and hardening. Microfiber towels require separate washing from other laundry using fragrance-free detergent and no fabric softener, which coats fibers and reduces absorbency. Inspect backing plates for wear—hook material loses grip over time, causing pad separation during use. Label compounds with purchase dates; most have 2-3 year shelf lives before abrasive settling becomes irreversible.
Cost vs. Value Analysis
Budget kits ($30-50) typically include minimal product volume and generic components suitable for single small jobs but lack the durability for ongoing learning. Mid-range kits ($75-150) offer professional-grade compounds, adequate pad selection, and protective accessories—the sweet spot for most enthusiasts. Premium kits ($200+) include specialized tools, larger product volumes, and advanced formulations but may exceed beginner needs. Consider cost per use rather than upfront price: a $120 kit that polishes ten vehicles costs $12 per use, while a $50 single-use kit costs $50 per use. Factor in replacement component availability; proprietary systems lock you into expensive refills, while kits using standard sizes allow competitive purchasing.
Skill Level Matching
True starter kits include detailed instructions with photos, video QR codes, and troubleshooting guides. They feature forgiving compounds that provide longer working times, allowing beginners to correct mistakes before compounds dry. Advanced kits assume users understand speed settings, pressure techniques, and defect identification—using these prematurely leads to frustration and potential damage. Look for kits advertising “progressive learning” with separate practice glass samples, allowing technique development without risking your vehicle. The best kits include a laminated quick-reference card with speed settings, pressure guidelines, and common problem solutions that stays clean in a garage environment.
Storage and Organization Tips
Glass polishing compounds are heavy; store them in their original containers with lids tightly sealed to prevent evaporation. Use clear plastic bins with dividers to separate pads by grade, preventing cross-contamination. Hang microfiber towels on a rack rather than stuffing them in drawers—compression damages fiber structure. Create a dedicated “glass polishing” toolbox containing tape, spray bottles, and brushes to avoid searching for components before each job. Label everything with a label maker; compounds in similar containers are easily confused mid-job. Store kits at room temperature; garage heat above 90°F degrades foam pads and separates compound formulations.
When to Upgrade Your Starter Kit
You’ll know it’s time to upgrade when you consistently achieve defect-free results and seek faster completion times. If you find yourself purchasing individual replacement components frequently, a professional bulk system becomes economical. Upgrading makes sense when tackling fleet vehicles or starting a side business—starter kits lack the efficiency for volume work. However, keep your starter kit even after upgrading; its manual tools remain invaluable for spot repairs, edge work, and teaching others. The compounds in starter kits often serve as excellent finishing polishes in a professional multi-stage system, so they never truly become obsolete.
Environmental Factors and Working Conditions
Humidity above 70% extends compound drying times, requiring adjusted work speeds and more frequent reapplication. Cold temperatures make glass more brittle—increase working times and reduce pressure when polishing below 60°F. Wind introduces dust and debris that contaminate pads; work in a garage or use portable shelters. Direct sunlight heats glass unevenly, causing compounds to flash-dry in spots—always work in shade or during overcast conditions. Indoor lighting matters: standard fluorescent lights hide defects; use 5000K LED task lighting to reveal true progress. Consider your water quality—hard water leaves spots that interfere with polishing; use distilled water for final rinses and diluting compounds if recommended.
Frequently Asked Questions
How long does a typical glass polishing job take with a starter kit?
Expect 2-3 hours for your first complete vehicle, including windshield, side windows, and rear glass. Manual polishing adds 30-45 minutes compared to machine methods. This time investment drops by 40% after completing 3-4 vehicles as you develop rhythm and technique.
Can I use glass polishing compounds on my headlights or paint?
Absolutely not. Glass compounds are far too aggressive for polycarbonate headlights and will severely scratch automotive clear coat. The Mohs hardness scale positions glass at 5.5-7, while paint hovers around 3-4. Always use materials specifically formulated for each substrate.
Will polishing remove my windshield’s factory tint or UV coating?
Factory tint is embedded within the glass layers and cannot be polished off. However, some windshields have hydrophobic or UV coatings applied to the exterior surface. Light polishing may reduce their effectiveness; aggressive cutting compounds will remove them entirely. Check your vehicle’s glass specifications before polishing.
How often should I polish my vehicle’s glass?
For daily drivers, every 12-18 months maintains optimal clarity. Garage-kept vehicles may need polishing only every 2-3 years. Over-polishing thins glass over decades, though this is rarely a concern with modern automotive glass thickness. Polish when defects become visible in direct sunlight or cause noticeable glare.
What’s the difference between glass polish and glass cleaner?
Glass cleaners remove surface dirt, oils, and some water spots using detergents and solvents. Glass polishes contain physical abrasives that level the glass surface itself, removing microscopic layers to eliminate embedded defects. Think of cleaners as washing your face versus polishing as microdermabrasion.
Can starter kits fix rock chips or deep scratches?
No. Chips require resin injection repair before polishing. Deep scratches exceeding 0.004 inches (roughly the thickness of a human hair) often can’t be fully removed without creating noticeable glass distortion. Starter kits excel at removing wiper haze, light scratches, and surface etching.
Why does my glass look worse immediately after polishing?
This is normal and temporary. Residual polishing oils and microscopic compound particles fill the fine scratches, creating a hazy appearance until completely removed. Clean the glass thoroughly with isopropyl alcohol and inspect under direct light. If haze persists after cleaning, you may need a finer finishing polish.
Do I need a special polisher, or can I use my paint correction machine?
Your dual-action paint polisher works perfectly if it accepts standard backing plates. However, never use paint polishing pads on glass—transferring paint residue causes contamination. Invest in dedicated glass pads and thoroughly clean your polisher’s backing plate before switching between paint and glass work.
Will polishing remove water spots permanently?
Polishing removes etched water spots by leveling the surrounding glass. However, new water spots will form if you continue parking under sprinklers or washing with hard water. Always follow polishing with a protective coating and address the water source to prevent recurrence.
Is it possible to polish glass too much?
Theoretically yes, but practically no for automotive applications. You’d need to remove over 0.5mm of glass thickness to cause structural concerns, requiring thousands of polishing sessions. The real risk is creating optical distortion through uneven removal, not thinning the glass dangerously.