When rust starts devouring your frame rails or wheel wells from the inside out, no amount of wax or surface coating will save you. That’s where epoxy primers earn their reputation as the unsung heroes of automotive preservation. Unlike conventional primers that simply provide a base for paint, epoxy formulations create a chemical bond with bare metal, forming an impermeable barrier that locks out moisture, salt, and oxygen—the trifecta that turns solid steel into flaky orange dust. Whether you’re restoring a classic muscle car, protecting a daily driver from winter road chemicals, or building a rock crawler that sees more mud than pavement, understanding epoxy primer technology separates weekend warriors from craftsmen who build vehicles that last decades.
The undercoating world has evolved far beyond the thick, tar-based sprays of the 1980s. Modern epoxy primers offer sophisticated chemistry that adheres directly to metal while remaining flexible enough to handle chassis flex and temperature swings. But here’s the reality: not all epoxy primers perform equally, and the difference between success and failure rarely comes down to the product alone. It lives in the preparation, application environment, and understanding how these materials actually work once they leave the spray gun. This guide cuts through marketing claims to focus on what professionals actually evaluate when specifying undercoating systems that need to survive real-world abuse.
Top 10 Epoxy Primers
Detailed Product Reviews
1. Speedokote Epoxy Fast Dry 2.1 low voc DTM Primer & Sealer Gray Gallon Kit, SMR-260G/261
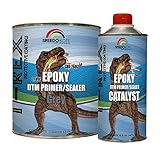
Overview: The Speedokote Epoxy Fast Dry 2.1 Low VOC DTM Primer & Sealer Gray Gallon Kit is a professional-grade solution designed for serious automotive refinishing projects. This two-component epoxy system comes as a complete kit, offering a versatile 4:1 mixing ratio that can be reduced further with a zero-VOC reducer for enhanced flow and application. Engineered for direct-to-metal application, it delivers exceptional performance on steel, aluminum, fiberglass, body fillers, and existing finishes.
What Makes It Stand Out: This product excels in its dual-functionality as both a primer and sealer, streamlining your workflow by eliminating the need for separate products. The low VOC formulation (2.1 lbs/gal) ensures compliance with stringent environmental regulations while maintaining professional performance. Its ability to lay down super smooth at the standard 4:1 ratio—or with optional reduction—gives users flexibility based on their specific application needs and environmental conditions. The excellent adhesion and corrosion resistance properties make it ideal for restoration projects and professional body shops.
Value for Money: At $149.00 per gallon ($0.93/fl oz), this kit represents solid value for professionals and serious DIY enthusiasts. When compared to purchasing separate primer and sealer products, or competitor gallon kits that often exceed $180, the Speedokote offers competitive pricing without sacrificing quality. The coverage area and professional results justify the investment for projects where durability and finish quality matter.
Strengths and Weaknesses: Strengths include exceptional adhesion to multiple substrates, low VOC compliance, versatile application as primer or sealer, smooth leveling properties, and excellent corrosion resistance. The fast-dry formula accelerates project timelines. Weaknesses include the need for proper mixing equipment and spray gun setup, making it less suitable for casual DIYers. The initial cost may deter those with small, one-off projects, and improper mixing can lead to curing issues.
Bottom Line: Ideal for automotive professionals and serious hobbyists undertaking extensive restoration or repair work. The Speedokote gallon kit delivers professional-grade results with environmental compliance, making it a smart choice for those with the equipment and expertise to maximize its potential.
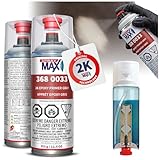
2. Spray max 3680033, 2K Epoxy Rust-Cure Primer, Gray, Aerosol (2)

Overview: The Spray Max 3680033 2K Epoxy Rust-Cure Primer comes as a convenient two-pack of aerosol cans, offering a user-friendly approach to professional-grade corrosion protection. This two-component epoxy system activates upon use, delivering excellent adhesion and rust prevention even on challenging surfaces like aluminum. Designed for cleaned and sanded substrates, it provides outstanding insulating and sealing properties before topcoat application.
What Makes It Stand Out: The twin-pack configuration provides immediate value for multi-panel projects or future touch-ups. Its critical surface adhesion capabilities set it apart from standard aerosol primers, making it suitable for aluminum and other difficult substrates where typical primers fail. The outstanding insulating properties prevent moisture migration and isolate existing finishes from new topcoats, reducing compatibility issues. Being recoatable with both solvent-borne and water-borne systems adds versatility.
Value for Money: At $54.89 for two cans ($27.44 each), this offering strikes a balance between convenience and cost-effectiveness. Single cans of comparable 2K epoxy primers typically retail for $30-35, making the two-pack economically attractive. While significantly more expensive per ounce than gallon kits, the elimination of equipment costs and mixing waste justifies the premium for small to medium projects.
Strengths and Weaknesses: Strengths include exceptional convenience, no equipment requirements, critical surface compatibility, excellent corrosion protection, and true 2K performance in aerosol form. The two-pack offers storage flexibility. Weaknesses include limited coverage per can, higher per-ounce cost versus bulk alternatives, and potential for nozzle clogging if not used properly. Aerosol overspray requires careful masking.
Bottom Line: Perfect for DIY enthusiasts and professionals needing targeted corrosion protection without investing in spray equipment. The two-pack delivers genuine 2K epoxy performance with maximum convenience for spot repairs, small panels, and hard-to-reach areas.
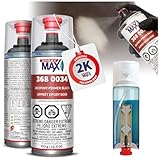
3. SprayMax 2K Epoxy Primer Gray | 2K Primer Automotive | Epoxy Spray Paint for Metal, Aluminum & Steel | Corrosion-Resistant, Fast-Drying, High Adhesion & Professional Grade 12.5 oz
Overview: The SprayMax 2K Epoxy Primer Gray is a professional-grade, single-can aerosol solution that brings true two-component epoxy technology to DIY automotive applications. This 12.5-ounce can activates internally, delivering superior corrosion protection on steel, aluminum, and galvanized metal surfaces. Engineered for cars, motorcycles, and restoration projects, it provides a high-adhesion foundation that ensures lasting topcoat performance.
What Makes It Stand Out: This primer’s advanced 2K technology offers professional bonding strength with an impressively long pot life after activation—something rarely achieved in aerosol format. The variable nozzle provides precise control over spray pattern and material flow, allowing users to achieve results comparable to conventional spray guns. Its rapid drying capability (dust-dry in 15 minutes) significantly accelerates project timelines, while the sandable formulation enables flawless surface preparation within hours rather than days.
Value for Money: Priced at $29.50 ($2.19/ounce), this single-can offering sits at the premium end of aerosol primers but delivers genuine professional performance. While more expensive per ounce than gallon kits, it eliminates the need for compressors, spray guns, and mixing equipment that can cost hundreds of dollars. For projects requiring less than a quart of primer, it’s more economical than investing in a full gallon kit.
Strengths and Weaknesses: Strengths include true 2K epoxy chemistry, exceptional corrosion resistance, fast drying times, professional spray control, and sandability within hours. The no-equipment-needed approach democratizes professional results. Weaknesses include limited quantity for large projects, higher cost per ounce than bulk alternatives, and the one-time-use nature once activated. Proper surface preparation remains critical.
Bottom Line: An excellent choice for DIY automotive enthusiasts and professionals seeking spot-repair capabilities. The SprayMax 2K delivers genuine professional results with unmatched convenience, making it ideal for small to medium projects where equipment investment isn’t justified.
4. SprayMax 2K Epoxy Primer Black | 2K Primer Automotive | Epoxy Spray Paint for Metal, Aluminum & Steel | Corrosion-Resistant, Fast-Drying, High Adhesion & Professional Grade 12.5 oz
Overview: The SprayMax 2K Epoxy Primer Black offers identical professional performance to its gray counterpart, providing a dark foundation for automotive refinishing projects. This 12.5-ounce aerosol delivers true two-component epoxy chemistry with exceptional corrosion protection on steel, aluminum, and galvanized metals. The black formulation is particularly valuable when topcoating with dark colors, reducing the number of color coats needed for complete coverage.
What Makes It Stand Out: Beyond sharing the same advanced 2K technology as the gray version, the black primer excels at providing superior hide and color saturation for dark topcoat applications. This can significantly reduce material costs and application time when painting black, navy, or other deep colors. The same variable nozzle technology ensures precise application control, while the fast-drying formula maintains workflow efficiency. Its ability to create a uniform dark base eliminates the common problem of uneven color coverage over light primers.
Value for Money: At $28.48 ($2.11/ounce), this black variant is slightly more economical than the gray version while delivering identical performance characteristics. For projects involving dark color schemes, the value extends beyond the purchase price—reduced topcoat consumption can save significantly on expensive basecoats and clearcoats. The same equipment-free convenience applies, making it cost-effective for targeted applications.
Strengths and Weaknesses: Strengths include optimal color base for dark topcoats, true 2K epoxy performance, rapid 15-minute dust-free time, excellent corrosion resistance, and professional spray control. The black color provides superior hide. Weaknesses mirror the gray version: limited coverage for large projects, higher per-ounce cost than bulk systems, and single-use activation. Not ideal for light-colored finishes.
Bottom Line: Choose the black version for any dark-color automotive project to maximize efficiency and reduce topcoat costs. It delivers the same professional-grade performance as the gray variant while providing strategic advantages for specific color applications, making it a smart choice for restoration and repair work.
5. Stone Coat Countertops Epoxy Undercoat 1 Quart (32 Fl Oz White) High-Bond Epoxy Primer for MDF, Plywood, and Porous Surfaces – Essential for DIY Epoxy Countertop Kits

Overview: Stone Coat Countertops Epoxy Undercoat is a specialized primer designed specifically for porous surfaces in epoxy countertop applications. This 32-fluid-ounce white formulation creates a sealed, firm foundation on MDF, plywood, and other absorbent materials, preventing air bubbles and ensuring a uniform epoxy topcoat. Unlike automotive primers, this product prioritizes safety for indoor residential use.
What Makes It Stand Out: This undercoat is uniquely formulated to work synergistically with Stone Coat’s epoxy systems, addressing the specific challenges of porous substrate sealing. The non-toxic, titanium dioxide-based composition makes it safe for kitchen and bathroom environments where food contact and ventilation concerns are paramount. Its ability to be applied with a simple microfiber roller kit eliminates the need for spray equipment, making it exceptionally DIY-friendly. The product’s design focus on extending countertop lifespan through proper substrate preparation sets it apart from general-purpose primers.
Value for Money: At $13.59 per quart ($0.42/fl oz), this undercoat offers exceptional value for its specialized application. Covering up to 40 square feet with two coats, it’s sufficient for most kitchen projects when paired with a 2-gallon epoxy kit. Compared to improperly prepared substrates that can ruin hundreds of dollars worth of epoxy, this undercoat is an inexpensive insurance policy. Generic alternatives may cost less but lack the formulation compatibility and safety certifications.
Strengths and Weaknesses: Strengths include non-toxic indoor-safe formulation, excellent porous surface sealing, roller application simplicity, Stone Coat system compatibility, and generous coverage area. The white color enhances epoxy vibrancy. Weaknesses include limited to non-metallic surfaces, requires two-coat application for optimal results, and is specifically designed for Stone Coat products (may not perform optimally with other epoxy brands). Not suitable for automotive or outdoor metal applications.
Bottom Line: Essential for anyone undertaking a Stone Coat countertop project. This specialized undercoat ensures professional results while maintaining indoor air quality and safety. Its modest price and application simplicity make it a non-negotiable foundation for successful DIY epoxy countertop installations.
6. Custom Shop -White Epoxy Primer/Sealer 2.1 VOC (1 Quart Kit) Anti-Corrosive DTM High-Performance Primer for Automotive and Industrial use Kit = 1 Pint Epoxy Primer +1 Pint. Epoxy HDR. (1-1 Mix)

Overview:
The Custom Shop KEP Series White Epoxy Primer is a professional-grade, anti-corrosive DTM (Direct to Metal) primer designed for automotive and industrial applications. This 1-quart kit features a simple 1:1 mixing ratio and 2.1 VOC compliance, making it suitable for use nationwide. Formulated without lead or chromate, it delivers robust rust prevention through advanced resin technology that adheres tenaciously to bare metal, steel, aluminum, fiberglass, gelcoat, body fillers, and properly prepared plastics.
What Makes It Stand Out:
The standout feature is its exceptional versatility as both a DTM primer and a sealer for urethane and basecoat-clearcoat systems. When used as a sealer, simply add reducer and you can topcoat in just 30 minutes. The four-hour pot life provides ample working time for projects, while the fast-dry formula accelerates workflow. Compatibility with major paint brands like PPG, House of Kolor, and Valspar eliminates brand loyalty concerns.
Value for Money:
At $1.81 per fluid ounce, this kit offers excellent value for serious DIYers and professionals. The quart kit provides sufficient material for multiple panels, and the 1:1 ratio minimizes waste from mixing errors. Compared to aerosol alternatives, the liquid format delivers superior coverage per dollar and professional results that justify the investment.
Strengths and Weaknesses:
Pros include versatile DTM capability, excellent corrosion resistance, broad compatibility, generous pot life, and fast drying. The 1:1 ratio simplifies mixing significantly. Cons are the need for spray equipment, additional reducer purchase for sealing applications, and white color may not suit all topcoat needs.
Bottom Line:
This is an outstanding choice for enthusiasts seeking professional-grade corrosion protection with maximum flexibility. The Custom Shop KEP primer delivers exceptional performance and value for automotive restoration and industrial projects.
7. Eastwood 2K Epoxy Gray Primer | AeroSpray Catalyzed Technology | Durable Direct to Metal Epoxy Automotive | Performance Primer on Car Body Filler | 10-16 Sq Ft Coverage | 12 oz | 2 Pack

Overview:
Eastwood’s 2K Epoxy Gray Primer in AeroSpray format brings catalyzed epoxy technology to the convenience of an aerosol can. This two-pack system includes a 12-ounce can with integrated activator, delivering professional-grade rust prevention and adhesion directly to metal, aluminum, steel, or fiberglass surfaces. The innovative German-engineered nozzle creates a wide fan pattern that mimics HVLP spray gun results without the equipment investment.
What Makes It Stand Out:
The three-year shelf life before activation is remarkable for a 2K product, and the 48-hour pot life after mixing provides exceptional flexibility for multi-day projects. The catalyzed formula ensures durability that far exceeds standard rattle-can primers. Eastwood’s reputation for quality and lifetime technical support adds significant value for both novice and experienced users tackling body filler applications and panel preparation.
Value for Money:
At $74.99 for a two-pack ($37.50 per can), this premium aerosol commands a higher price point at $3.12 per ounce. However, the catalyzed 2K technology, extended pot life, and professional results justify the cost for those lacking spray equipment. Coverage of 10-16 square feet per can makes it suitable for small to medium panels, though larger projects become expensive compared to quart kits.
Strengths and Weaknesses:
Pros include true 2K catalyzed performance, excellent nozzle design, impressive shelf and pot life, no equipment needed, and strong technical support. Cons are higher cost per square foot, limited coverage per can, and aerosol overspray concerns in confined spaces.
Bottom Line:
Perfect for DIYers without spray equipment, this delivers genuine 2K performance in a convenient package. Ideal for spot repairs and small projects where professional results are mandatory.
8. Eastwood Gray Epoxy Primer and Sealer Quart 1:1 | Epoxy Primer Sealant for Steel Fibreglass Aluminium | Automotive Car Body Filler for Car Restoration | Rust Proofing Underseal for Anti Corrosion

Overview:
Eastwood’s Gray Epoxy Primer and Sealer is a USA-made, two-component system designed for serious automotive restoration. This quart kit mixes 1:1 with the included activator, creating a high-performance barrier against rust and corrosion on steel, aluminum, fiberglass, and body filler. The formulation achieves a robust 1mm dry film thickness with just one or two medium wet coats, providing exceptional protection and substrate leveling.
What Makes It Stand Out:
The product’s sanding characteristics are particularly impressive—wet sanding possible the next day and dry sanding after just 2-3 days. This accelerates project timelines significantly compared to slower-curing epoxies. As a dedicated sealer, it excels at providing a uniform foundation that enhances topcoat gloss holdout. Eastwood’s lifetime technical support and strong brand reputation in the restoration community provide additional confidence.
Value for Money:
Priced at $2.19 per fluid ounce, this quart kit offers competitive value for a premium USA-manufactured product. The efficient coverage and rapid cure time translate to labor savings that offset the initial cost. For restoration projects requiring multiple panels, the bulk format proves more economical than aerosols while delivering superior film build and protection.
Strengths and Weaknesses:
Pros include fast sanding turnaround, excellent corrosion resistance, USA manufacturing, strong technical support, and efficient film build. Cons are the need for proper spray equipment, limited pot life (not specified but typical for epoxies), and gray color may require additional sealer coats for light topcoats.
Bottom Line:
An excellent choice for dedicated restorers prioritizing quality and speed. The Eastwood epoxy primer delivers professional results with the backing of superior technical support and a brand trusted by the automotive community.
9. SprayMax 2K Epoxy Rust Cure Primer Beige | 2K Primer Automotive | Epoxy Spray Paint for Metal, Aluminum & Steel | Corrosion-Resistant, Fast-Drying, High Adhesion & Professional Grade 12.7 oz

Overview:
SprayMax 2K Epoxy Rust Cure Primer brings professional-grade, two-component epoxy technology to a convenient aerosol format. This 12.7-ounce beige primer delivers exceptional corrosion protection and adhesion to steel, aluminum, and galvanized metal surfaces. The advanced 2K system activates internally, providing catalyzed performance that surpasses conventional spray primers without requiring mixing equipment or spray guns.
What Makes It Stand Out:
The 15-minute dust-dry time and rapid sandability dramatically accelerate workflow, making it ideal for time-sensitive repairs. The variable nozzle offers precise control over spray pattern, allowing users to adapt from broad panels to detailed areas seamlessly. Engineered for professional repair shops but accessible to DIYers, it provides the strong adhesion and corrosion resistance needed for lasting automotive refinishing results.
Value for Money:
At $1.82 per ounce, this single can offers exceptional value for small to medium touch-up work. The price point makes professional 2K technology accessible without investing in equipment or dealing with mixing ratios. While coverage is limited compared to quart kits, the convenience and performance per dollar are outstanding for spot repairs, motorcycle parts, or localized rust treatment.
Strengths and Weaknesses:
Pros include true 2K catalyzed chemistry, rapid drying, excellent sandability, professional-grade corrosion resistance, and precise spray control. Cons are limited coverage per can, higher cost per square foot than bulk options, and aerosol format may not suit large panel work.
Bottom Line:
The best value in 2K aerosol primers for targeted applications. SprayMax delivers professional performance with unmatched convenience for rust repair and spot priming where speed and quality are essential.
10. Speedokote Epoxy Fast Dry 2.1 low voc DTM Primer & Sealer Gray Quart Kit, SMR-260G-Q/261-8
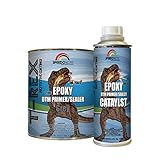
Overview:
Speedokote’s Epoxy Fast Dry DTM Primer is a low-VOC, high-performance solution for professional and DIY automotive refinishing. This gray quart kit features a 4:1 mixing ratio, providing excellent adhesion and corrosion resistance directly to metal, aluminum, fiberglass, body filler, and existing finishes. The 2.1 VOC formulation ensures compliance across all states while delivering fast-drying characteristics that accelerate project completion.
What Makes It Stand Out:
The flexible mixing protocol sets this product apart—use it straight at 4:1 or reduce 5-10% with zero-VOC reducer for customized application properties. This adaptability allows users to fine-tune flow and leveling based on environmental conditions or specific application requirements. The fast-dry formula lays down exceptionally smooth, reducing sanding time and effort while providing a solid foundation for topcoats.
Value for Money:
At $1.62 per fluid ounce, this is the most economical quart-kit option among competitors. The competitive pricing, combined with professional-grade performance and low-VOC compliance, creates compelling value. The optional reduction capability extends coverage and provides application flexibility that maximizes the return on investment for both single projects and ongoing shop use.
Strengths and Weaknesses:
Pros include lowest cost per ounce, flexible mixing options, fast drying, excellent adhesion, low VOC compliance, and smooth application. Cons are the less common 4:1 ratio requires careful measurement, Speedokote brand has smaller recognition than established competitors, and reducer sold separately for optimal performance.
Bottom Line:
The budget-conscious professional’s choice for high-performance epoxy priming. Speedokote delivers excellent quality and application flexibility at an unbeatable price point for those comfortable with mixing ratios.
Why Epoxy Primers Dominate Modern Undercoating Applications
Epoxy primers have become the gold standard for undercoating because they address the fundamental flaw in traditional automotive coating systems: they don’t rely on mechanical adhesion alone. When properly applied to a prepared substrate, the epoxide groups in the resin chemically react with amine hardeners, creating a three-dimensional polymer network that literally becomes part of the metal surface. This cross-linked structure provides three critical advantages for undercoating applications: exceptional resistance to water permeability, superior adhesion that won’t delaminate when stone chips occur, and the ability to maintain flexibility without sacrificing hardness.
For undercarriage protection specifically, this matters because your vehicle’s underside experiences constant thermal cycling, vibration, and impact from road debris. A coating that simply sits on top of the metal will eventually crack and allow moisture intrusion. Epoxy primers, by contrast, create a monolithic layer that moves with the substrate while maintaining its protective properties. The result is a foundation that can realistically provide 10-15 years of corrosion protection in harsh environments when properly maintained.
The Science Behind Epoxy Adhesion on Automotive Metals
Understanding Cross-Linking Chemistry
The magic of epoxy primers happens during the cure cycle when resin and hardener components mix. Unlike air-dry primers that cure through solvent evaporation, epoxies undergo an exothermic chemical reaction where polymer chains form covalent bonds both within the coating and with the metal substrate. This process, called cross-linking, creates a thermoset plastic that won’t redissolve in solvents—a crucial feature when you’re applying subsequent undercoating layers or sound deadening materials.
The degree of cross-linking directly impacts performance metrics you’ll see on technical data sheets. Higher cross-link density typically translates to better chemical resistance but can reduce flexibility. For undercoating applications, you want a balanced formulation that achieves at least 70% cross-linking within the first 24 hours while retaining enough elongation to handle frame flex without cracking.
Metal Surface Interaction at the Molecular Level
Bare steel isn’t actually bare—it’s covered with a microscopic layer of iron oxide and manufacturing oils. Quality epoxy primers contain wetting agents and adhesion promoters that displace contaminants and establish molecular contact with the metal surface. This is why surface energy matters more than roughness alone. A properly cleaned and degreased surface allows the epoxy to spread and penetrate microscopic pores, creating thousands of anchor points per square inch. The primer literally grabs the metal at a molecular level, which is why even a thin epoxy coating often outperforms thicker traditional primers.
Essential Characteristics of High-Performance Epoxy Primers
Solids Content: The Hidden Performance Indicator
When evaluating epoxy primers for undercoating, the percentage of solids by volume tells you more than the price tag. Professional-grade epoxies typically contain 50-65% solids, meaning that after solvents evaporate, more than half the applied material remains as protective film. Consumer products might advertise 30-40% solids, requiring multiple coats to achieve the same dry film thickness.
For undercarriage work, target a minimum of 3-4 mils (thousandths of an inch) of dry film thickness per coat. A 60% solids epoxy applied at 6-7 mils wet will achieve this in one pass, while a 35% solids product might need three coats. This isn’t just about efficiency—each coat introduces potential application errors and extends your project timeline. Higher solids also mean fewer solvents that can become trapped in thick applications, reducing the risk of solvent popping or incomplete cure.
Viscosity Ratings and Application Realities
Viscosity, measured in Krebs units or seconds through a Ford #4 cup, determines how the material flows through your spray equipment and levels on the substrate. For undercoating, you want a viscosity between 18-22 seconds, which provides enough body to build film thickness without sagging on vertical surfaces like frame rails. Thicker isn’t better—high-viscosity epoxies can trap air, create orange peel, and obscure surface details you need to inspect for rust.
Temperature dramatically affects viscosity. A primer that sprays perfectly at 70°F might become unworkable at 55°F. Reputable manufacturers provide temperature adjustment charts, but the rule of thumb is that for every 10°F drop in temperature, viscosity increases by approximately 15%. This is why professionals keep their materials in temperature-controlled storage and use inline heaters for cold shop conditions.
Pot Life: Maximizing Your Working Window
Pot life—the time between mixing and when the product becomes too viscous to spray—separates shop-friendly formulations from frustrating ones. A 45-60 minute pot life at 70°F gives you enough time to thoroughly mix, strain, and apply a full batch without rushing. Shorter pot lives create waste and pressure, leading to sloppy application.
But here’s what data sheets don’t tell you: pot life is dramatically affected by mass and temperature. Mixing a full gallon generates more exothermic heat than a quart, accelerating cure. In practice, mix only what you can spray in 30 minutes, even if the technical data sheet claims 90 minutes. For DIYers working in home garages, this means buying quart kits rather than gallons, even if the per-ounce cost is higher.
Cure Schedules: From Tack-Free to Full Chemical Cure
Understanding cure terminology prevents catastrophic recoating mistakes. “Tack-free time” means you can touch it without fingerprints, typically 1-4 hours. “Dry to handle” means you can carefully move the part, usually 6-8 hours. But “full chemical cure”—when the coating reaches maximum hardness and chemical resistance—can take 7-14 days depending on formulation and conditions.
For undercoating applications, you can typically apply seam sealers or undercoating topcoats after 24 hours, but the epoxy continues gaining strength for weeks. Rushing this process is the number one cause of intercoat adhesion failure. If you need to accelerate cure, infrared lamps work better than forced air heat, which can skin over the surface and trap solvents.
Surface Preparation Protocols for Lasting Results
Substrate Assessment: New Metal vs. Rust Repairs
Before opening a can of primer, honestly evaluate what you’re coating. Brand new, clean metal requires minimal preparation—just degreasing and a light scuff. But most undercoating projects involve some degree of corrosion. For flash rust or light surface oxidation, mechanical removal with 180-grit abrasive followed by immediate priming works fine. Deep pitting requires more aggressive treatment.
The critical mistake is treating all metal the same. Previously coated surfaces need all old paint removed because you don’t know what’s underneath. A bubble in the old coating becomes a failure point for your new system. When in doubt, strip to bare metal. The time spent on complete removal pays dividends in longevity.
Degreasing and Contaminant Removal
Even invisible fingerprints contain oils that cause fisheyes and adhesion failure. Use a two-step cleaning process: first, wash with a detergent-based cleaner to remove water-soluble contaminants, then follow with a solvent wipe using wax and grease remover. Always use clean, lint-free cloths and wipe in one direction, folding to a fresh surface with each pass.
For undercarriage work, pay special attention to seam sealer residue, undercoating overspray, and road tar. These contaminants require specific removers—general-purpose thinners just spread them around. A dedicated undercoating remover applied with a brush, allowed to soften, then scraped off prevents these materials from contaminating your entire surface.
Mechanical Abrasion Techniques
The goal of sanding isn’t to create a rough surface—it’s to create a uniform surface profile that promotes mechanical interlocking. For epoxy primers, a P180-P220 grit scratch pattern provides the ideal profile. Coarser grits (like P120) can leave deep scratches that telegraph through the primer and require excess material to fill.
Use dual-action sanders for flat areas, but hand-sand complex geometries like frame curves and weld seams. These areas are prone to rust and need the most attention. After sanding, remove all dust with a vacuum followed by a tack cloth. Compressed air blows dust into crevices where it will cause defects.
Professional Application Methods
Equipment Selection: HVLP vs. Conventional Spray
High Volume Low Pressure (HVLP) spray guns have become standard for epoxy application due to their transfer efficiency and reduced overspray. For undercoating, a 1.7-2.0mm fluid tip provides the right balance of material flow and atomization. Conventional guns can work but waste 30-40% more material and create excessive bounce-back in confined areas like wheel wells.
Gravity-feed guns offer better control for detail work, while suction-feed (siphon) guns work better for large panels and underbody sections. Whichever you choose, invest in a quality gun with stainless steel fluid passages—epoxy is corrosive to aluminum and mild steel components, leading to premature wear and contamination.
Mixing Precision: Ratio Accuracy Matters
Epoxy primers typically mix 4:1 or 2:1 by volume (resin to hardener). Deviation from the specified ratio doesn’t just affect cure time—it fundamentally compromises the chemical reaction. Too much hardener creates a brittle film prone to cracking. Too little results in incomplete cross-linking and soft, permeable coating that fails prematurely.
Use graduated mixing cups with ratio markings, but verify accuracy by measuring each component separately. Mix thoroughly for at least two minutes, scraping the sides and bottom of the container. Then strain through a 125-micron filter to remove any unmixed resin or hardener particles that will cause defects.
Flash Times and Recoat Windows
Flash time—the period between coats when solvents evaporate—varies by product and conditions. Typical epoxy primers require 15-30 minutes between coats at 70°F. Rushing this traps solvents, leading to bubbling or poor adhesion. Waiting too long can exceed the recoat window, requiring scuffing before additional coats.
The recoat window is critical for undercoating because you often need multiple coats to achieve proper thickness. Most epoxies allow recoating within 24 hours without sanding. After that, you must scuff with P320-P400 grit to create a mechanical bond. Missing this window and failing to scuff is a guaranteed failure point that won’t show up for months.
Environmental Variables That Make or Break Your Job
Temperature Fluctuations and Material Response
Epoxy primers perform best between 65-75°F during application and cure. Below 55°F, the chemical reaction slows dramatically, potentially preventing full cure entirely. Above 85°F, solvents flash too quickly, causing dry spray and poor leveling. For undercarriage work in unheated garages, plan your projects for spring and fall, or use auxiliary heating to maintain stable temperatures for at least 48 hours post-application.
Metal temperature matters more than ambient air temperature. Cold metal draws heat from the coating, slowing cure and potentially causing condensation. Use an infrared thermometer to verify the substrate is at least 60°F before spraying. Warming the metal with a heat gun (not torch) eliminates this variable.
Humidity’s Role in Cure Quality
Relative humidity above 70% can cause blush—a waxy, greasy film on the surface caused by amine hardeners reacting with atmospheric moisture. This blush prevents adhesion of subsequent coats and must be removed by washing with warm water and detergent. In humid climates, use epoxy formulations specifically designed with low-blush hardeners.
Conversely, extremely low humidity (below 30%) accelerates solvent flash, reducing flow and leveling. This is less problematic for undercoating than show-quality bodywork but still affects film build consistency. A simple hygrometer in your workspace helps you anticipate these issues before they ruin your work.
Avoiding Critical Application Errors
The most common undercoating failure isn’t product-related—it’s operator error. Applying epoxy too thick in a single coat causes solvent entrapment, leading to soft spots that never fully cure. The maximum recommended wet film thickness is typically 5-6 mils per coat. Use a wet film thickness gauge to verify—this $15 tool prevents thousand-dollar do-overs.
Another frequent mistake is inadequate coverage on edges and corners. These areas corrode first but receive the least coating due to electrostatic effects during spraying. Apply a light “tack coat” first, which dries quickly and provides a conductive surface for the full wet coat to adhere to. Then, aim directly at edges during the main application, holding the gun closer (6-8 inches) to ensure material wraps around the corner.
Topcoat Compatibility: Building a Cohesive System
Direct-to-Metal vs. Sealed Systems
Some epoxy primers are marketed as “direct-to-metal” (DTM) and can be topcoated with undercoating materials without a sealer. Others require an epoxy sealer or intermediate coat to prevent topcoat solvents from attacking the primer. Check the technical data sheet for “topcoat window” specifications. Using incompatible products creates lifting, wrinkling, or delamination that appears weeks after you thought the job was finished.
For maximum corrosion protection, many professionals use a two-stage approach: a high-solids epoxy primer followed by a catalyzed epoxy sealer. The sealer provides additional barrier properties and creates a perfectly uniform surface for undercoating. While this adds cost and time, it extends service life by 30-50% in severe environments.
Intercoat Adhesion Testing
Before committing to a full undercoating system, perform a cross-hatch adhesion test on a test panel. Apply your epoxy primer, allow proper cure, then apply the undercoating topcoat. After full cure, use a sharp razor blade to scribe a grid pattern (ten cuts each direction), press adhesive tape firmly over the area, then rip it off quickly. If more than 5% of the coating removes, you have an adhesion problem that will manifest as premature failure.
This test seems excessive until you’ve spent 40 hours prepping and coating a chassis, only to have the undercoating peel off in sheets after the first winter. The cost of a test panel and an hour of time is negligible insurance.
Budget Considerations: Value vs. Price
Professional-grade epoxy primers cost $80-150 per gallon kit, while consumer products sit at $40-60. The price difference reflects solids content, resin quality, and consistency. However, the real cost calculation includes coverage rate, number of required coats, and longevity. A $120 epoxy that covers 400 sq ft in two coats and lasts 12 years costs less per year of protection than a $50 product requiring four coats and failing in five years.
Factor in your time value. If you’re spending 20 hours on surface preparation, saving $70 on materials makes no sense. The labor investment far exceeds material costs. Buy the best product your budget allows, but prioritize proper preparation and application over premium products applied poorly.
Expected Service Life and Durability Expectations
In moderate climates with minimal salt exposure, a properly applied epoxy undercoating system should last 8-10 years before requiring touch-up. In heavy salt regions or coastal environments, expect 5-7 years of solid protection before you see failure at stone chip points. These timelines assume you applied 6-8 mils dry film thickness and addressed all rust before coating.
The reality is that no coating is permanent. Stone chips create breach points where moisture penetrates. The advantage of epoxy is that when it fails, it typically fails at the chip point and doesn’t spread. Traditional primers allow rust to creep underneath the coating, causing widespread delamination. Regular inspection and spot repair of damaged areas extends the system life indefinitely.
Health and Safety Protocols
Respiratory Protection Requirements
Epoxy primer vapors contain isocyanates and amines that cause sensitization—once you develop an allergy, you’re permanently reactive. A NIOSH-approved respirator with organic vapor cartridges is non-negotiable. The cheap paper masks provide zero protection against these chemicals. Replace cartridges after 40 hours of use or when you detect any odor breakthrough.
For undercarriage work where you’re spraying overhead in confined spaces, consider a supplied-air respirator. The initial cost seems high until you factor in long-term health consequences. Spray booth operators who develop isocyanate sensitivity can no longer work in the industry—protect your lungs like your career depends on it, because it does.
Skin and Eye Protection
Amine hardeners cause severe dermatitis and chemical burns. Wear nitrile gloves (not latex) and a full tyvek suit when spraying. If epoxy contacts skin, wash immediately with soap and water—not solvent, which drives chemicals deeper into pores. Safety glasses with side shields prevent overspray from reaching eyes, but a full face shield provides better protection during mixing and gun cleaning.
Keep a bottle of vinegar in your shop. Amine hardeners are alkaline, and vinegar’s mild acid neutralizes them on skin or surfaces. This old pro trick can prevent a trip to the emergency room if you get splashed.
Proper Storage and Inventory Management
Unmixed epoxy components have shelf lives, but storage conditions dramatically affect longevity. Store resin and hardener in a climate-controlled environment between 60-75°F. Temperatures below 50°F can cause crystallization in the resin, while heat above 90°F accelerates hardener degradation.
Once opened, purge the container with argon or use a product like Bloxygen before resealing. Oxygen exposure begins the slow cure process even without mixing. Write the opening date on the lid with a permanent marker. Most manufacturers warranty unopened product for 12 months, but opened containers should be used within 30 days for reliable performance. If the resin appears cloudy or the hardener has darkened significantly, dispose of it properly—don’t risk your project on compromised materials.
Diagnostic Approach to Common Failures
When undercoating fails, the pattern tells the story. Small blisters indicate solvent entrapment from applying too thick. Large blisters or peeling suggest contamination or exceeding the recoat window. Fine cracking (crazing) points to over-catalyzation or applying subsequent coats before full flash.
Rust bleeding through the coating appears as orange staining without film failure. This means you didn’t fully remove active corrosion before priming. The epoxy sealed in moisture, accelerating rust formation underneath. The only fix is removal and starting over, which is why thorough rust conversion or removal is critical.
Document failures with photos. If you followed manufacturer instructions and the product still failed, reputable companies will often refund materials or provide technical support. But be honest—most failures trace back to preparation or application errors, not product defects.
Frequently Asked Questions
Can I apply epoxy primer directly over light surface rust, or must I remove every speck?
Light surface rust (flash rust that appears within hours of cleaning) can be primed over after aggressive scuffing with 180-grit abrasive. However, established rust that has pitted the metal must be completely removed via blasting or chemical rust remover. Epoxy seals moisture in as effectively as it keeps it out, so trapping active rust guarantees continued corrosion. When in doubt, remove it completely.
How long should I wait before applying seam sealer or undercoating over fresh epoxy primer?
Most epoxy primers require 24 hours at 70°F before topcoating with undercoating materials. Some fast-cure formulas allow recoat in 4-6 hours, but rushing risks solvent entrapment. Test by pressing your thumbnail into an inconspicuous area—if it leaves a significant dent, wait longer. Always consult the technical data sheet, as recoat windows vary significantly between formulations.
What’s the difference between epoxy primer and etch primer for undercoating applications?
Etch primers contain phosphoric acid that chemically etches the metal surface, providing excellent adhesion on clean bare steel but offering minimal corrosion protection. Epoxy primers provide superior barrier protection and flexibility but require better surface preparation. For undercoating, epoxy is the clear winner because the underside needs moisture exclusion more than maximum adhesion on pristine metal. Some professionals use etch primer as a first step on bare metal, then epoxy over it, but this adds complexity most DIYers should avoid.
Can I use epoxy primer on plastic underbody components like inner fender liners?
Standard epoxy primers adhere poorly to most plastics and can cause embrittlement. For plastic components, use a dedicated plastic adhesion promoter first, then apply a flexible epoxy specifically formulated for multi-substrate use. Check the technical data sheet for “plastic compatible” designation. When in doubt, mask off plastic parts and use a rubberized undercoating designed for those materials.
Do I need to sand between epoxy primer coats if I’m within the recoat window?
No, sanding between coats is unnecessary and counterproductive if you’re within the specified recoat window (typically 4-24 hours). The chemical bond between coats is stronger than any mechanical bond sanding creates. Sanding only risks contaminating the surface and introduces more variables. If you exceed the recoat window, you must scuff with P320-P400 grit to reactivate the surface for proper adhesion.
What happens if I accidentally exceed the recoat window and forget to scuff?
The subsequent coat may appear to adhere initially but will delaminate over time, especially when exposed to moisture and temperature cycling. The only reliable fix is to remove the improperly adhered coating completely and reapply. Attempting to scuff after the fact is ineffective because the intercoat contamination is microscopic and widespread. Prevention through project planning is far easier than correction.
Is a standard N95 respirator sufficient protection when spraying epoxy primer?
Absolutely not. N95 masks filter particulates but provide zero protection against epoxy vapors containing isocyanates and amines. You need a NIOSH-approved respirator with organic vapor cartridges (NIOSH TC-23C approval). For spray applications, a full-face respirator is recommended as eye protection. The long-term health risks of isocyanate exposure include permanent respiratory damage and chemical sensitization that can end your ability to work with coatings.
Can I apply epoxy primer in my unheated garage during winter?
Only if you can maintain the metal substrate, air temperature, and product temperature above 60°F for at least 48 hours. Below 55°F, the chemical reaction essentially stops, and the primer may never achieve full cure. Use space heaters to warm the area 24 hours before starting, and keep them running continuously. Infrared heaters work well because they warm objects rather than just air. Never use propane heaters—they introduce moisture and combustion byproducts that contaminate the surface.
How can I tell if my epoxy primer has expired or gone bad before I start the job?
Inspect both components before mixing. The resin should be clear to light amber with no crystallization or cloudiness. The hardener should be light yellow; dark brown or orange indicates oxidation and reduced activity. If the resin has thickened significantly or the hardener smells strongly of ammonia, dispose of them properly. Always mix a small test batch on cardboard first—properly catalyzed epoxy should begin warming within 5-10 minutes and become tack-free in the time specified on the data sheet.
Will epoxy primer stop existing rust from spreading, or just seal it in?
Epoxy primer stops rust only if the rust is completely removed or converted to an inert state first. If you seal active rust, you’ve created a perfect environment for continued corrosion—moisture trapped against steel with no oxygen exchange. For areas with pitting rust, use a phosphoric acid-based rust converter that chemically transforms iron oxide into iron phosphate, then rinse, dry thoroughly, and apply epoxy. For severe rust, removal via media blasting is the only reliable method. Epoxy is a preventative coating, not a rust treatment.