Your vehicle’s undercarriage battles a constant war against corrosion that you rarely see. Every winter storm, coastal breeze, and muddy backroad delivers a fresh assault of moisture, salt, and abrasive debris to the unprotected metal components beneath your car. While factory coatings offer baseline protection, they degrade over time, leaving your investment vulnerable to the silent killer of automotive value: rust. This is where DIY undercoating kits step into the spotlight, empowering car enthusiasts and budget-conscious owners alike to take defensive action in their own driveways.
Wax and oil-based undercoating systems have revolutionized the home automotive care landscape, offering professional-grade protection without the professional-grade price tag. Unlike hard shell coatings that can crack and trap moisture, these self-healing barriers remain flexible, creeping into seams and repelling water continuously. Whether you’re prepping a classic car for its first winter or maintaining a daily driver through years of harsh road conditions, understanding the nuances of these DIY kits will determine whether your effort yields a bulletproof shield or a messy disappointment.
Top 10 Diy Undercoating Kit
Detailed Product Reviews
1. U-POL Raptor Black Urethane Spray-On Truck Bed Liner Kit, Protective Paint with Spray Gun, for Tailgates & Trucks, Vehicle Undercoating, 4 Quart Kit

Overview: The U-POL Raptor kit delivers professional-grade 2K urethane protection for truck beds and beyond. This comprehensive system includes four 750ml bottles of black base, one liter of hardener, and a dedicated spray gun, covering a full 6-8 foot truck bed with a durable, flexible coating that cures to a rock-hard finish.
What Makes It Stand Out: Unlike basic rubberized sprays, this two-component urethane chemically cures to create an impenetrable barrier that resists stains, scratches, and UV degradation while remaining flexible enough to reduce road noise. The included spray gun is specifically calibrated for the material, and the tintable formula allows custom color matching for integrated aesthetics.
Value for Money: At $142.98, this kit costs a fraction of professional spray-in liner jobs ($400-600). The 2K urethane chemistry provides decade-long protection versus annual reapplication of cheaper alternatives, making it exceptionally cost-effective for serious truck owners who demand permanent results.
Strengths and Weaknesses: Pros: Professional durability, complete all-in-one kit, UV-stable, fast-drying (recoat in 1 hour), versatile applications beyond truck beds, world-leading brand reputation. Cons: Requires substantial air compressor (8 CFM @ 50-60 PSI), involves hazardous chemical mixing, demands meticulous surface prep and PPE, potential for overspray, not beginner-friendly.
Bottom Line: For DIY enthusiasts with proper equipment and safety precautions, the U-POL Raptor kit offers unbeatable professional results and long-term value. It’s the gold standard for truck bed protection and worth every penny if you have the compressor and skills.
2. Gal NH Oil Undercoating, Pro Undercoating Gun, 2 Wands, 3 Quart Bottle, 50 Plugs

Overview: This NH Oil Undercoating kit provides professional-grade rust protection using proven oil-based chemistry. The system includes a specialized spray gun, two application wands, three quart bottles, and 50 rust plugs, targeting serious corrosion prevention for vehicle undercarriages in harsh salt-belt environments.
What Makes It Stand Out: Oil-based undercoating uniquely creeps into seams and crevices where rust begins, providing active protection that waxes and rubberized coatings can’t match. The dual-wand setup allows both broad coverage and pinpoint application in frame rails and boxed sections, reaching areas competitors miss for comprehensive protection.
Value for Money: Priced at $174.95, this is a premium investment focused on application equipment rather than bulk material. While expensive upfront, NH Oil’s reputation for halting existing rust justifies the cost for vehicles in northern climates requiring annual treatment, potentially saving thousands in future bodywork.
Strengths and Weaknesses: Pros: Superior penetration into rust-prone areas, professional-quality gun, comprehensive accessory kit, effective in harsh climates, reusable system for multiple vehicles, stops existing rust creep. Cons: Pricey for equipment-only kit, oil-based formula requires yearly reapplication, messy application with significant dripping, compressor required, no actual coating included in base price, storage can be problematic.
Bottom Line: Ideal for northern climate vehicle owners committed to long-term rust prevention. The professional tools deliver excellent results, but factor in recurring material costs and annual application time. Best for those treating multiple vehicles over several years.
3. Barrier Bond - Rubberized Undercoating Sound Deadener Kit, 28oz 4-Pack, Black Spray, Vehicle Undercoating, with Spray Gun
Overview: Barrier Bond offers a convenient rubberized undercoating solution focused on sound deadening and corrosion protection. This kit includes four 28oz aerosol-style cans and a spray gun adapter, designed for DIY undercarriage work on passenger vehicles and light trucks seeking moderate protection without professional equipment complexity.
What Makes It Stand Out: This kit’s paintable, VOC-compliant formula allows top-coating for custom finishes while meeting stringent environmental standards nationwide. The rubberized composition significantly reduces road noise and vibration, doubling as both undercoating and sound deadener in one application—a rare combination at this price point.
Value for Money: At $114.99 for four cans plus application gun, this sits in the mid-range. While more expensive than basic aerosols, the included spray gun provides better control and coverage than rattle cans, making it cost-effective for smaller projects like sedans or crossovers requiring just one kit for complete coverage.
Strengths and Weaknesses: Pros: 50-state VOC compliant, paintable finish, sound deadening properties, fast-drying formula, user-friendly spray gun included, no compressor needed for cans, good for beginners. Cons: Limited coverage (28oz cans), not suitable for heavy-duty truck beds, may require multiple kits for larger vehicles, less durable than 2K urethane systems, best for light to moderate protection only, aerosol pressure can vary.
Bottom Line: Perfect for DIYers seeking a balance between convenience and performance. Best suited for passenger vehicles needing sound dampening and rust protection, but underpowered for serious truck bed applications or harsh commercial use. A solid middle-ground choice.
4. Pro Undercoating Spray Gun Kit with 2 Wands, 3 Empty Quart Bottles, and 50 Rust Plugs

Overview: This professional-grade spray gun kit provides the essential tools for undercoating application without the coating material itself. The package includes a specialized undercoating gun, two extension wands, three empty quart bottles, and 50 rust plugs—everything needed except the protective compound for your vehicle restoration project.
What Makes It Stand Out: The dual-wand configuration offers both broad-coverage spraying and precision application for hard-to-reach frame rails and body cavities. The inclusion of 50 rust plugs demonstrates attention to detail, allowing users to seal drainage holes before application for a thorough, professional finish that prevents coating from entering unwanted areas.
Value for Money: At $96.49, this kit positions itself as an affordable entry into professional application methods. However, buyers must factor in an additional $50-100 for undercoating material, making the total investment comparable to all-in-one kits. The reusable nature provides long-term value for multi-vehicle owners or shop environments.
Strengths and Weaknesses: Pros: Professional-quality spray gun, versatile wand options, reusable system, rust plugs included, works with various coating types, excellent for frequent users, straightforward maintenance. Cons: No coating material included, requires separate material purchase, needs compressor (specs not stated), learning curve for beginners, not cost-effective for single-use applications, bottles may need frequent refilling.
Bottom Line: A smart purchase for experienced DIYers or those with coating material on hand. For one-time users, all-in-one kits offer better convenience and value. The quality tools reward those who undercoat regularly and appreciate professional application control.
5. InoKraft Undercoating Spray Gun with Suction Feed Cup, 360° & Straight Spray Hoses, for Truck Bed Liner Coating, Rubberized Undercoat, Rust Proofing

Overview: InoKraft delivers a feature-rich undercoating spray gun at a budget-friendly price point. This tool-focused kit includes a suction-feed spray gun, 360-degree flexible wand, straight extension wand, pressure regulator, and cleaning brush—designed for DIYers who already have coating material and need professional application control without breaking the bank.
What Makes It Stand Out: The adjustable nozzle system delivers up to 60% increased flow for thick materials like truck bed liner, while also handling precise low-flow applications. The 360° wand provides exceptional reach into frame rails and boxed sections without requiring awkward gun positioning, a standout feature typically found in pricier professional units costing twice as much.
Value for Money: At just $49.99, this gun offers remarkable versatility. While lacking coating material, the included pressure regulator and dual wands provide capabilities exceeding many premium guns. For users with bulk coating, this represents exceptional value, though total project cost must include separate material purchase which can add $60-100.
Strengths and Weaknesses: Pros: Outstanding flow adjustability, 360° wand access, pressure regulator included, comfortable snap-lock cup, easy disassembly, excellent price point, comprehensive manual and videos, no specialized bottles needed. Cons: No coating included, suction cup capacity limited for large jobs, durability concerns for commercial daily use, requires separate compressor, plastic components may wear faster than professional metal guns, potential clogging with very thick materials.
Bottom Line: The best budget choice for knowledgeable DIYers who purchase coating separately. The innovative 360° wand and flow control rival professional tools costing twice as much, making it ideal for personal garage use and occasional projects where equipment cost matters.
6. Raptor Tintable Urethane Spray-On Truck Bed Liner Kit, Protective Paint With Spray Gun, For Tailgates & Trucks, Vehicle Undercoating, 4 Quart Kit

Overview:
The Raptor Tintable Urethane Spray-On Truck Bed Liner Kit represents professional-grade automotive protection in a DIY-friendly package. This 4-quart 2K urethane system delivers exceptional durability for truck beds, tailgates, and undercarriages. The tintable formula allows custom color matching while maintaining UV resistance, making it ideal for enthusiasts seeking both performance and personalization. With coverage for a standard 6-8 foot truck bed, this kit bridges the gap between expensive professional applications and inferior consumer alternatives.
What Makes It Stand Out:
The two-component urethane chemistry sets this apart from single-stage products, creating a flexible yet impact-proof barrier that actively reduces road noise and vibration. The included spray gun, specifically calibrated for thick coatings, ensures proper atomization without dilution. Its rapid-drying formula enables multiple coats within an hour, drastically reducing project time. The ability to tint the base allows integration with vehicle color schemes while retaining the same rugged protection Raptor is known for in the automotive refinishing industry.
Value for Money:
At $1.07 per fluid ounce, this kit positions itself as a premium DIY solution. While more expensive than basic undercoatings, it includes the spray gun ($30-50 value) and hardener, eliminating hidden costs. Professional spray-in liners cost $400-600, making this a substantial savings for those with basic equipment. The quart-sized bottles minimize waste for single-vehicle applications.
Strengths and Weaknesses:
Strengths include professional-quality 2K urethane durability, included application equipment, UV-stable tintable formula, rapid recoat times, and superior adhesion to OEM paint. Weaknesses involve requiring a substantial air compressor (8 CFM @ 50-60 PSI), critical surface prep requirements, and additional cost for tint. The price per ounce exceeds single-component alternatives.
Bottom Line:
For serious DIYers seeking professional results, this Raptor kit delivers exceptional value. The tintable feature and comprehensive package justify the premium, making it ideal for truck owners wanting durable, customized protection without professional installation costs.
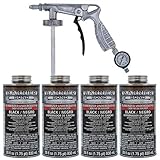
7. Rust-Oleum Black Undercoating 15 oz. (12 Pack)

Overview:
The Rust-Oleum Black Undercoating 12-Pack offers a straightforward, accessible solution for vehicle rust protection. As aerosol cans, these require no specialized equipment beyond basic preparation materials, making them ideal for casual DIYers or targeted touch-up work. Each 15-ounce can applies a rubberized barrier designed to deaden noise and prevent corrosion on undercarriages, wheel wells, and rocker panels. This bulk packaging addresses full-vehicle applications without the complexity of multi-component systems.
What Makes It Stand Out:
Rust-Oleum’s brand reputation for reliability stands as the primary differentiator. The aerosol format eliminates compressor requirements and cleanup, while the 12-can quantity provides adequate coverage for most passenger vehicles. For users intimidated by spray guns and mixing ratios, this represents the simplest path to undercarriage protection. The familiar spray pattern and consistent formulation make it approachable for first-time users.
Value for Money:
At $0.45 per ounce, this is the most economical option per unit volume among reviewed products. However, the true cost requires evaluating total project needs—12 cans may prove insufficient for larger trucks, and the thinner aerosol application often necessitates more product than estimated. While cheaper than professional applications, repeated purchases for maintenance may offset initial savings compared to more durable two-component systems.
Strengths and Weaknesses:
Strengths include exceptional ease of use, no equipment investment, trusted brand heritage, and suitability for small-area repairs. Weaknesses encompass significant overspray waste, thinner coating buildup requiring more frequent reapplication, limited durability versus 2K urethanes, and environmental concerns with aerosol propellants. The finish may not match professional texture or longevity.
Bottom Line:
Perfect for budget-conscious users or those seeking simple touch-up solutions, this Rust-Oleum pack delivers adequate protection with minimal hassle. It suits occasional DIYers but falls short for enthusiasts demanding maximum durability and professional aesthetics.
8. Tekton44 Undercoating for Vehicles, Automotive Black Undercoating Kit (8 Liter Cans + 1 Spray Gun + 1 Spray Wand)

Overview:
The Tekton44 Undercoating Kit provides substantial volume for comprehensive vehicle protection projects. This eight-liter system targets professional and serious DIY users with its high-build, corrosion-resistant formula designed for brush, dip, or spray application. The inclusion of a dedicated spray gun and extension wand demonstrates commitment to versatile, thorough coverage. Engineered to remain permanently tacky, this coating maintains flexibility in extreme cold while resisting cracking and peeling—critical for northern climates experiencing harsh winters and road salt exposure.
What Makes It Stand Out:
The “permanently tacky” characteristic, while unusual, ensures continuous flexibility and self-healing properties against stone chips. The massive eight-liter volume covers multiple vehicles or extensive commercial equipment. Tekton44 emphasizes anti-drip technology when spray-applied, reducing mess and improving transfer efficiency. The multi-application methods accommodate various project scales, from full dip tanks to precision brushing in tight frame rails.
Value for Money:
At $0.74 per fluid ounce, this kit offers middle-ground pricing with significant included value—the spray gun and wand alone represent $40-60 in equipment. For shops or clubs coordinating multiple vehicle treatments, the bulk sizing provides economies of scale impossible with smaller kits. The cost per vehicle drops substantially when utilized for several cars, outperforming purchasing individual aerosol cases.
Strengths and Weaknesses:
Strengths include exceptional volume value, cold-weather flexibility, versatile application options, included professional-style gun/wand, and strong corrosion resistance. Weaknesses involve the permanently tacky surface potentially attracting dirt and debris, lesser brand recognition compared to Raptor or Rust-Oleum, and possible compatibility issues with subsequent topcoats. The large quantity may expire before single-vehicle users consume it all.
Bottom Line:
Tekton44 excels for high-volume applications and cold-climate durability. Professional shops and DIY groups will appreciate the flexibility and equipment inclusion, making it a smart bulk purchase for serious rust-prevention efforts.
9. KCNKCN Undercoating Spray Gun with 1000ml Suction Feed Cup, 2 Wands - 360° & Straight Spray Hoses, Undercoat Gun for Truck Bed Liner Coating, Rubberized Undercoat, Rust Proofing
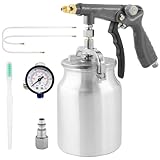
Overview:
The KCNKCN Undercoating Spray Gun is a specialized application tool rather than a coating itself, designed specifically for thick automotive protectants. Featuring a 1000ml suction-feed cup and two distinct extension wands, this gun addresses the challenge of accessing frame rails, rocker panels, and enclosed cavities where rust initiates. The tool’s engineering focuses on handling high-viscosity materials like truck bed liners and rubberized undercoatings without requiring thinning, preserving manufacturer-specified performance characteristics.
What Makes It Stand Out:
The dual-wand system provides unmatched versatility—the 360° multi-directional nozzle sprays in all directions for interior box sections, while the straight wand offers precision for open undercarriage areas. The claimed 60% flow rate increase over standard guns reduces application time significantly, and the adjustable pressure regulator allows on-the-fly tuning without returning to the compressor. The snap-lock cup design prevents leakage even when inverted, crucial for overhead spraying.
Value for Money:
At $32.59, this gun presents exceptional value for a task-specific tool. Comparable undercoating guns retail for $50-80, often without extension wands. For users who already own coatings or prefer purchasing separate materials, this eliminates the need for expensive kit upgrades. The durability and specialized design justify the investment over disposable aerosols or adapting improper HVLP guns that clog with thick materials.
Strengths and Weaknesses:
Strengths include specialized thick-material capability, innovative wand attachments, leak-proof cup design, flow rate efficiency, and ergonomic balance. Weaknesses involve requiring adequate compressor specifications (not stated but implied), no included coating necessitating separate purchase, and potential learning curve for spray pattern control. Quality control may vary with lesser-known brand status.
Bottom Line:
An indispensable tool for serious undercoating work, the KCNKCN gun delivers professional access and performance at a DIY price point. Purchase this if you own or plan to buy coatings separately—it’s a game-changer for thorough rust prevention.
10. Raptor Black Urethane Spray-On Truck Bed Liner Kit, Protective Paint With Spray Gun, For Tailgates & Trucks, Vehicle Undercoating, 8 Quart Kit

Overview:
The Raptor Black Urethane Spray-On Truck Bed Liner Kit scales the proven 2K urethane technology into an 8-quart package for larger applications. This kit duplicates the professional chemistry of its smaller sibling but provides pre-tinted black base for users prioritizing convenience over customization. Designed for full-size trucks, multiple vehicles, or commercial equipment, the doubled quantity includes eight 750ml bottles and two liters of hardener. The same demanding performance standards apply—stain resistance, UV stability, and flexible impact protection that dampens noise and vibration.
What Makes It Stand Out:
The eight-quart volume positions this as a commercial-grade solution while maintaining DIY accessibility. The pre-mixed black eliminates tinting variables, ensuring consistent color batch-to-batch. Raptor’s world-leading automotive refinishing expertise manifests in the rapid cure time—recoat within an hour—and superior adhesion to properly prepared surfaces. The included spray gun, identical to the 4-quart kit, handles the material without thinning, preserving the critical 2:1 mixing ratio for optimal crosslinking and durability.
Value for Money:
At $1.03 per ounce, this larger kit offers slightly better unit pricing than the 4-quart version while delivering double the coverage. Professional spray-in liners for heavy-duty trucks exceed $600, making this a compelling value for large-bed applications. The included gun and doubled hardener supply remove guesswork from large-project material planning. For shop environments, the cost per application drops significantly.
Strengths and Weaknesses:
Strengths encompass true 2K urethane durability, generous volume for large projects, included professional spray equipment, rapid application workflow, and Raptor’s industry reputation. Weaknesses include substantial upfront investment, requirement for high-CFM compressor, permanent black color limiting customization, and critical need for precise mixing across multiple batches. Storage space for unused material may challenge casual users.
Bottom Line:
For maximum coverage and proven performance, this 8-quart Raptor kit is the professional’s choice in DIY packaging. The premium cost is justified by commercial-grade durability and volume, making it ideal for large trucks, multiple vehicles, or serious enthusiasts.
Why Undercoating Matters for Modern Vehicles
The Hidden Enemy: Road Salt and Corrosion
Modern vehicles might feature advanced metallurgy and factory galvanization, but they’re not invincible. Road de-icing chemicals have evolved beyond simple rock salt into complex chlorides that aggressively attack metal, even reaching components like brake lines, fuel tanks, and subframes. These compounds don’t just sit on surfaces—they migrate into crevices, panel overlaps, and spot welds where they initiate corrosion cells that can spread unseen for years. By the time rust becomes visible on rocker panels, the structural integrity may already be compromised.
Beyond Rust: Protecting Your Investment
Comprehensive undercarriage protection extends far beyond preventing rust holes. Quality undercoating dampens road noise, reduces stone chip damage, and makes future maintenance easier by preventing bolts from seizing. For lease returns or resale value, a well-preserved undercarriage signals meticulous ownership. The cost of a DIY kit—typically one to two tanks of gas—pales compared to replacing a rusted subframe or prematurely trading in a vehicle that failed inspection.
Understanding Wax and Oil-Based Undercoating
The Chemistry Behind Barrier Protection
Wax and oil formulations operate on a simple principle: they create a hydrophobic barrier that physically blocks water and oxygen from reaching metal surfaces. Oil-based products use petroleum distillates that penetrate existing rust, displacing moisture and leaving behind a corrosion-inhibiting film. Wax-based systems combine petroleum oils with thixotropic agents that create a tacky, self-healing layer. When scratched, the material flows back into the damaged area, maintaining protection without intervention.
Penetrating Oils vs. Hardening Waxes
The distinction matters for your application strategy. Penetrating oils remain fluid, ideal for reaching inside boxed sections and traveling along seams, but they require annual reapplication. Hardening waxes build a thicker, more durable shell that can last 2-3 years but may not penetrate as deeply. Many premium DIY kits offer hybrid formulations that balance these properties, providing initial penetration followed by surface film formation.
DIY vs. Professional Application: Making the Right Choice
Cost-Benefit Analysis
Professional undercoating services charge $150-$500 depending on your region and vehicle size, often using products similar to consumer kits. The DIY approach requires a $50-$150 kit investment plus tool costs, but you gain several advantages: control over product choice, ability to focus on problem areas, and the option to reapply annually for the price of materials alone. Break-even occurs after your first reapplication, making DIY exponentially more economical for long-term vehicle ownership.
Skill Level Requirements
Don’t confuse DIY with effortless. Successful application demands methodical preparation, proper equipment operation, and attention to environmental conditions. However, the learning curve is gentle—most first-timers achieve satisfactory results by following instructions meticulously. The real differentiator isn’t technical skill but patience and willingness to invest 3-5 hours in proper execution.
Essential Components of a Quality DIY Kit
The Coating Formula Itself
Evaluate kits based on solids content and active ingredients. Higher solids percentages indicate more protective material remaining after carriers evaporate. Look for corrosion inhibitors like barium sulfonate or calcium compounds. Avoid products that rely solely on heavy petroleum oils without additives—they wash off faster and provide minimal active protection. The best formulas include both film-forming agents and penetrating carriers.
Application Equipment Included
Entry-level kits typically include a basic spray wand with 24-36 inches of reach, sufficient for most passenger vehicles. Premium options might feature angled tips for inside frame rails, multiple nozzle patterns, and extended hoses. Check whether the kit includes a pressure vessel or requires your own compressor. Aerosol-based systems offer convenience but rarely match the coverage or control of spray gun applications.
Preparation Materials
The best DIY undercoating kits bundle more than just the coating. Look for kits including surface prep spray, application wands, and detailed vehicle-specific guides. Some provide rust converter for treating existing oxidation before sealing. While you can source these separately, integrated kits ensure compatibility and eliminate guesswork.
Key Features to Evaluate Before Buying
Coverage Area and Yield
Manufacturers typically rate coverage in square feet or by vehicle size. A mid-size sedan requires approximately 1.5-2 quarts for adequate protection, while trucks and SUVs may need 3-4 quarts. Calculate your needs conservatively—it’s better to have coating left over than to run short mid-application. Factor in double-coating high-risk areas like wheel wells and frame sections.
Viscosity and Spray Pattern
Product viscosity determines application method and final film thickness. Thinner formulations spray easily through basic equipment but may require multiple coats. Thicker materials build protection faster but demand more powerful compressors and larger nozzle orifices. Check product specifications for recommended spray tip sizes and compressor CFM requirements before purchasing.
Drying Time and Curing Process
Oil-based coatings may remain tacky for 24-48 hours but are functional immediately. Wax-based products often skin over within hours but continue curing for days. Consider your climate and garage availability—applying a slow-curing product before a predicted rainstorm invites disaster. Some kits offer accelerated curing through solvent evaporation or chemical catalysts.
Application Tools: What You’ll Need Beyond the Kit
Compressor Requirements
Most spray systems require 5-9 CFM at 90 PSI minimum. Small pancake compressors will cycle constantly and may not maintain adequate pressure, leading to uneven application. A 20-gallon or larger compressor ensures consistent delivery. If you lack suitable equipment, consider battery-powered pump sprayers included in some premium kits—they trade some finish quality for compressor independence.
Spray Gun Options
Siphon-feed guns work but pressure-feed systems provide better control and reduce waste. Look for guns with adjustable fan patterns and fluid control. Undercoating-specific guns feature larger fluid passages to handle thick materials and include 18-24 inch wands for reaching deep into frame rails. A $30 gun upgrade can dramatically improve results and reduce application time.
Protective Gear Essentials
Chemical-resistant gloves and a respirator with organic vapor cartridges are non-negotiable. Overspray drifts surprisingly far, so wear disposable coveralls and eye protection. Masking tape and plastic sheeting protect brake components, exhaust systems, and drivetrain parts that shouldn’t be coated. Invest in quality masking materials—saving $5 on cheap tape can cost hours of cleanup.
Surface Preparation: The Foundation of Success
Cleaning Protocols
Effective undercoating starts with a pristine surface. Pressure wash the undercarriage thoroughly, using a degreaser on oily areas. For vehicles with existing undercoating, remove loose material with a wire brush or power washer. The goal isn’t bare metal everywhere—it’s a stable, clean surface. Any flaking material will take your new coating with it. Allow 24 hours of dry time in a garage; trapped moisture is worse than no coating at all.
Rust Treatment Strategies
Active rust requires intervention before sealing. Use a wire brush to remove loose scale, then apply rust converter to remaining oxidation. These phosphoric acid-based products chemically transform rust into an inert phosphate coating that provides a sound base for undercoating. Never encapsulate active rust—it continues spreading beneath your protective layer. For severe corrosion, consider professional repair before undercoating.
Masking and Protection
Strategic masking prevents coating critical components. Cover brake rotors, calipers, and lines completely. Mask off exhaust systems to prevent smoking and odor. Protect drivetrain CV joints and U-joints—their rubber boots must remain flexible. Use aluminum foil for complex shapes like suspension components; it’s faster and more effective than tape alone. Don’t forget to protect your driveway with a heavy-duty tarp.
Step-by-Step Application Guide
Environmental Conditions to Consider
Ideal application occurs in 60-80°F temperatures with low humidity and no precipitation forecast for 48 hours. Cold temperatures thicken material and slow curing; excessive heat causes rapid solvent loss and poor flow. Apply in a well-ventilated garage or shaded outdoor area. Wind carries overspray surprisingly far, potentially coating neighbor’s property or your own painted surfaces.
First Coat Techniques
Begin with frame rails and boxed sections, working from the center outward. Hold the spray gun 6-8 inches from surfaces, using a steady side-to-side motion with 50% overlap. Apply a medium-wet coat—enough to cover but not so heavy it runs. Work methodically around the entire vehicle before adding a second pass. For inside frame rails, insert the wand fully and spray while withdrawing slowly to ensure complete coverage.
Building Multiple Layers
Two medium coats outperform one heavy application. Allow the first coat to tack up (typically 30-60 minutes) before applying the second. Focus the second coat on high-impact areas: wheel wells, lower rocker panels, and forward-facing surfaces that take the brunt of road debris. Use the final 10% of product for touch-up and seam treatment. A quality application uses 60% of material on the first pass, 30% on the second, and 10% for details.
Common DIY Mistakes That Compromise Protection
Inadequate Preparation
The number one failure mode is insufficient cleaning. Undercoating applied over dirt, grease, or loose rust delaminates within months. Another critical error is applying to wet surfaces—even morning dew interferes with adhesion. Use a moisture meter if uncertain; surfaces should read below 15% moisture content. Rushing preparation turns a five-hour job into a complete do-over next season.
Over-application Issues
Thicker isn’t better. Excessive material runs off surfaces, wasting product and creating uneven protection. Heavy applications also take longer to cure, attracting dirt and debris that embed in the sticky surface. Runs that dry on visible surfaces are nearly impossible to remove without solvents. Follow manufacturer coverage rates precisely—most recommend 4-6 mils dry film thickness.
Missed Spots and Coverage Gaps
Systematic application prevents gaps. Work in a consistent pattern, section by section. Use a shop light and inspection mirror to verify coverage in hidden areas. Pay special attention to seam edges and spot welds—corrosion starts where water collects. After application, crawl under the vehicle with a flashlight to identify any thin or missed areas while the coating is still wet enough for touch-up.
Safety Protocols for Home Application
Ventilation Requirements
Even “low-VOC” products release fumes during application and curing. Work with garage doors open and use fans to create cross-ventilation. If applying outdoors, position yourself upwind and avoid enclosed spaces. The coating remains reactive for 24-48 hours; don’t park the vehicle in attached garages during this period if possible. Respirators must be NIOSH-approved for organic vapors—dust masks offer zero protection.
Personal Protective Equipment
Chemical exposure occurs through skin contact and inhalation. Nitrile gloves resist petroleum products better than latex. Wear long sleeves and pants, even in warm weather—these materials don’t wash out easily. Safety glasses with side shields prevent overspray from reaching eyes. Keep a bottle of baby oil and rags nearby for cleanup; it dissolves fresh coating better than soap and water.
Disposal Considerations
Used rags, masking materials, and empty containers contain hazardous waste. Check local regulations—many areas classify solvent-soaked materials as flammable waste requiring special disposal. Never pile oily rags together; they can spontaneously combust. Dry them flat outdoors before disposal. Empty aerosol cans belong in hazardous waste collections, not curbside recycling.
Environmental Impact and Eco-Friendly Options
VOC Content Explained
Volatile Organic Compounds (VOCs) contribute to smog and pose health risks. Traditional undercoating contains 400-600 g/L VOCs, but regulations are tightening. Low-VOC formulations (under 250 g/L) use water-based carriers or refined petroleum fractions. They cost more and may require longer cure times but reduce environmental impact and indoor air pollution significantly.
Biodegradable Formulations
Emerging bio-based undercoating uses lanolin (wool grease) and plant oils instead of petroleum. These products offer surprising durability—some lasting 18-24 months—and are genuinely biodegradable. Performance in extreme salt exposure may trail synthetic options slightly, but for moderate climates, they represent a sustainable choice. They’re also considerably safer to apply, with minimal fume concerns.
Cost Analysis: True Value of DIY Undercoating
Initial Kit Investment
Budget $75-$150 for a comprehensive kit covering an average vehicle. This includes coating, basic application equipment, and preparation materials. Compressor-dependent systems cost less upfront but require you to own or borrow suitable air supply. All-inclusive battery-powered kits command premium prices ($150-$250) but eliminate equipment barriers.
Long-Term Savings Calculation
Assuming a 5-year vehicle ownership period with annual professional applications at $200 each, you’d spend $1,000. DIY materials cost approximately $50 annually after initial tool investment, totaling $250-$350 over five years. The $650+ savings fund other maintenance or upgrades. For multi-vehicle households, savings multiply dramatically.
Hidden Costs to Consider
Factor in surface prep supplies (degreaser, wire brushes, masking materials) adding $20-$40 per application. Compressor electricity and respirator cartridge replacement are minor but real costs. Most significant is your time investment—value it realistically. However, many enthusiasts consider this therapeutic maintenance time, not lost labor.
Maintenance and Reapplication Timeline
Annual Inspection Checkpoints
Schedule undercarriage inspections each fall before winter sets in. Look for thin spots, damage from road debris, and coating separation. Pay attention to wheel wells and behind tires where sandblasting effect is worst. A flashlight and inspection mirror remain essential tools. Photograph problem areas to monitor progression year-over-year.
Touch-Up Strategies
Small chips and scrapes need immediate attention. Clean the area thoroughly and apply coating with a brush or aerosol can. Feather the edges to blend with existing coating. For best adhesion, scuff the surrounding coating lightly with a wire brush. Touch-ups take minutes but prevent corrosion from gaining a foothold.
When to Start Fresh
No undercoating lasts forever. When coverage drops below 70% or you notice widespread cracking and peeling, it’s time for complete removal and reapplication. This typically occurs every 3-5 years for oil-based systems and 5-7 years for wax formulations. Complete removal requires power washing, scraping, and solvent cleaning—a full weekend project, but necessary for lasting protection.
Regional Factors Influencing Your Choice
Northern Climates: Salt and Snow
In salt-belt states, prioritize maximum corrosion inhibition and easy reapplication. Oil-based systems that can be sprayed annually without removal make sense here. Look for products specifically tested against magnesium chloride and calcium chloride, the aggressive de-icers now common on winter roads. Application timing is critical—apply in early fall before first snow, not during spring cleanup.
Coastal Areas: Salt Air Challenges
Marine environments demand coatings resistant to constant humidity and salt aerosol. Wax-based formulations with high solids content provide better long-term barriers against airborne salt. Pay special attention to inside door bottoms and unsealed seams where salt fog accumulates. Reapplication every 18 months is prudent in these regions.
Southern Regions: Heat and Humidity
Extreme heat softens many undercoatings, causing them to attract dirt and potentially drip. Choose high-temperature formulations with melting points above 180°F. These products use synthetic waxes or polymer-modified oils that resist flowing in summer heat. Application is best in spring or fall—avoid summer’s intense heat that causes rapid solvent flash-off.
Troubleshooting Common Application Problems
Runs and Drips
Runs occur from excessive material application or improper gun angle. If you catch them while wet, brush them out immediately. Once dried, removal requires solvent and scraping, which defeats the purpose. Prevention beats correction—maintain proper gun distance and use multiple light passes rather than one heavy coat.
Uneven Coating Texture
Orange peel or rough texture typically indicates insufficient material flow, caused by low temperature, high viscosity, or inadequate air pressure. Warm the coating container in hot water (never open flame) to reduce viscosity. Increase air pressure within manufacturer limits. If texture issues appear, apply a light “flow coat” to level the surface while the previous coat is still tacky.
Adhesion Failures
Peeling or flaking stems from contamination or moisture trapped beneath the coating. Small failures require immediate attention—remove loose coating, clean the area thoroughly, and reapply. Widespread adhesion loss means starting over completely. Always test adhesion in an inconspicuous area before full application by applying a small patch and checking after 24 hours.
Frequently Asked Questions
How long does a DIY wax or oil undercoating typically last?
Oil-based systems generally provide 12-18 months of effective protection in harsh winter conditions, while wax-based formulations can last 2-3 years in moderate climates. Longevity depends on driving habits, climate severity, and application quality. Annual inspection and touch-up extend service life significantly.
Can I apply undercoating over existing rust?
You can apply over light surface rust after proper treatment, but never over flaking or scaling rust. Use a wire brush to remove loose oxidation, then apply rust converter to chemically stabilize remaining rust. Sealing active corrosion without treatment accelerates hidden deterioration.
What’s the minimum compressor size needed for spray application?
A 20-gallon compressor delivering 5-9 CFM at 90 PSI is the practical minimum for consistent results. Smaller compressors cycle excessively, creating pressure fluctuations that cause uneven spray patterns. For occasional use, borrowing or renting a suitable compressor beats buying inadequate equipment.
Is undercoating safe for all vehicle components?
No. Never coat brake components, exhaust systems (except when fully cooled and off), drivetrain U-joints/CV joints, or rubber bushings. Mask these areas thoroughly. Modern vehicles have plastic underbody panels—check manufacturer guidance before coating these, as some undercoatings can degrade certain plastics.
How much material do I need for a crew cab pickup truck?
Full-size trucks typically require 3-4 quarts for complete coverage, including inside frame rails and wheel wells. Buy a gallon kit to ensure adequate material. It’s more economical than purchasing multiple smaller containers, and leftover product stores well for touch-ups if sealed properly.
Can I drive my vehicle immediately after application?
Yes, but with caution. The coating remains tacky for 24-48 hours, attracting dirt and dust. Avoid dirt roads and puddles for two days. If you must drive sooner, limit travel and avoid highway speeds that generate significant road spray. Park on cardboard or tarps to prevent driveway stains.
What’s the difference between undercoating and rustproofing?
Undercoating creates a visible protective barrier on underbody surfaces, while rustproofing typically involves drilling access holes and injecting cavity wax into enclosed structures. Many DIY kits combine both approaches, providing sprayable coating for exposed areas and wands for internal frame application. True rustproofing often requires professional equipment for complete cavity coverage.
How do I remove undercoating if I need to make repairs?
Mechanical removal works best—scraping, wire brushing, and power washing. For thick wax buildup, heat guns soften material for easier removal. Chemical strippers exist but are messy and environmentally problematic. Always remove coating in the repair area and reapply afterward; attempting to work through the coating compromises repair quality.
Are there any vehicles that shouldn’t be undercoated?
Brand new vehicles (under 6 months) with intact factory coatings may not need immediate undercoating. Classic cars with concourse-level originality requirements might skip undercoating for authenticity. Some electric vehicles have specific battery cooling requirements—consult the manufacturer before coating any EV underbody components.
Can undercoating be applied in cold weather?
Application below 55°F is problematic. Material viscosity increases dramatically, spray patterns become uneven, and curing slows exponentially. Cold surfaces may condense moisture as temperatures drop, causing adhesion failure. Wait for a warm day or use heated garage space. If you must apply in cool weather, warm the product containers in hot water and work during the warmest part of the day.