A tiny starburst on your windshield might seem harmless—until a temperature swing turns it into a spiderweb crack across your entire field of vision. That’s where professional-grade windshield repair injector tools become the unsung heroes of automotive care. Whether you’re a mobile technician building a business or a dedicated DIY enthusiast tired of paying $100+ per chip, understanding what separates a flawless, invisible repair from a cloudy mess is critical. This guide dives deep into the engineering, features, and real-world performance factors that define the best injector systems on the market today.
Understanding Windshield Repair Injector Tools
Top 10 Windshield Repair Injector Tools
Detailed Product Reviews
1. Clearshield Professional Bridge Injector - Windshield Repair Resin Injector for Auto Glass Chip Repair - Durable, Easy to Use Windshield Repair Tool - Made In The USA - Use with Resin
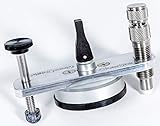
Overview: The Clearshield Professional Bridge Injector represents American craftsmanship in windshield repair technology. This professional-grade tool combines aluminum and stainless steel construction to deliver rapid, reliable rock chip repairs for both automotive technicians and dedicated DIY enthusiasts.
What Makes It Stand Out: Speed defines this tool—marketed as the fastest injector available, it dramatically reduces repair time through efficient resin injection. The dual o-ring system creates an exceptional vacuum seal, while the compact design facilitates mounting in tight spaces. Its “Made in USA” pedigree ensures quality control and durable construction built to withstand countless repairs without degradation.
Value for Money: At $131, this bridge occupies the mid-to-premium tier. The investment proves justified through near-infinite longevity and consistent professional results. Compared to disposable alternatives, this tool pays for itself after approximately 10-15 repairs versus professional shop fees, making it economical for frequent users.
Strengths and Weaknesses: Strengths include unmatched speed, robust construction, superior sealing capability, and intuitive operation suitable for all skill levels. The Clearshield brand reputation provides additional confidence. Weaknesses center on the price point, which may deter casual users, and limited documentation about compatibility with third-party resins.
Bottom Line: For professionals and serious DIYers prioritizing speed and durability, the Clearshield bridge delivers exceptional performance. It’s a buy-once, cry-once investment that eliminates equipment replacement concerns.
2. ZrAutomch Automotive Tool Windshield Repair Bridge-Cracked Glass Rock Chip Repair Tool (Red)
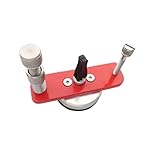
Overview: The ZrAutomch Windshield Repair Bridge positions itself as an accessible entry point into DIY glass repair. Constructed from high-quality aluminum with a distinctive red accent, this tool promises straightforward operation for addressing rock chips and minor cracks without professional intervention.
What Makes It Stand Out: Affordability remains this tool’s primary differentiator, costing roughly half of premium alternatives. The rugged, no-frills design emphasizes simplicity over complexity, while multiple color options provide aesthetic customization. Its universal compatibility claim suggests versatility across various windshield types.
Value for Money: Priced at $65.88, this represents the most budget-conscious option in the comparison. For occasional users tackling one or two repairs annually, the low investment risk makes financial sense. However, frequent users may find long-term costs higher due to potential wear and replacement needs compared to more durable alternatives.
Strengths and Weaknesses: Strengths include low cost, ease of use, minimal maintenance requirements, and lightweight portability. The straightforward design suits beginners. Weaknesses involve aluminum’s susceptibility to corrosion, lack of advanced features like inspection windows or precision adjustment, and potentially less reliable vacuum sealing compared to higher-end models.
Bottom Line: Ideal for budget-minded novices or those performing occasional repairs. While lacking professional-grade refinement, it competently handles basic rock chip repairs at an accessible price point.
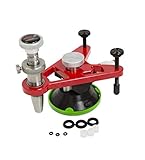
3. Stainless Steel Windshield Repair Kit, Professional Glass Repair Bridge Assembly Set with Injector, Automotive Tool for Injecting Resin Auto Glass and Rock Chip Star-Shaped Cracks Repair Red

Overview: This stainless steel windshield repair kit emphasizes durability and stability in glass restoration. Constructed from 304 stainless steel, the bridge assembly targets various damage types including star-shaped cracks, chips, and patterned fractures through precise resin injection.
What Makes It Stand Out: The all-stainless steel construction offers superior corrosion resistance compared to aluminum alternatives, ensuring longevity in humid environments. The three-point support system distributes pressure evenly across curved windshields, while the robust suction cup base eliminates manual holding requirements, providing hands-free stability during repairs.
Value for Money: At $76.88, this kit strikes a compelling balance between affordability and professional features. The stainless steel build justifies a slight premium over basic aluminum models, promising extended service life. It pays for itself after 2-3 successful repairs compared to replacement costs.
Strengths and Weaknesses: Strengths include exceptional material durability, strong suction stability, versatile damage repair capability, and even pressure distribution for quality results. The heavier weight enhances stability. Weaknesses involve potential compatibility issues with steeply curved windshields and the suction cup’s dependency on clean, smooth surfaces for optimal adhesion.
Bottom Line: An excellent choice for users prioritizing durability and hands-free operation. The stainless steel construction and suction design make it ideal for humid climates and frequent repairs.
4. Delta Kits Professional Windshield Repair Bridge + Injector for Rock Chip Repair in Auto Glass Blue

Overview: Delta Kits’ Professional Windshield Repair Bridge represents the premium tier of auto glass repair tools. Engineered for professional technicians, this blue anodized aluminum bridge incorporates advanced features for precision rock chip repairs with minimal effort.
What Makes It Stand Out: The oversized damage inspection window provides unparalleled visibility during repairs, while the slotted base enables infinite injector positioning without adapters—critical for edge-of-windshield repairs. The proprietary molded end seal and Sure-lock vacuum cup system deliver superior pressure retention and leak prevention. Its two-point design ensures rapid adjustments.
Value for Money: At $200, this is the most expensive option, targeting professional users who demand premium performance. For high-volume technicians, the time savings and superior results justify the cost through increased customer satisfaction and throughput. DIY users will find better value elsewhere.
Strengths and Weaknesses: Strengths include exceptional visibility, unmatched positioning flexibility, secure vacuum hold, durable anodized finish, and professional-grade sealing technology. Weaknesses center on the premium price point, which exceeds casual user budgets, and the two-point design may require more skill to level properly on complex curves.
Bottom Line: The ultimate tool for professional auto glass technicians. While overkill for occasional DIY use, its precision and reliability make it indispensable for commercial operations.
5. Centering Tool for Windshield Repair Bridge - Center Resin Injector Over Impact Point on Glass

Overview: This specialized centering tool serves as a precision accessory for Delta Kits I-100 and I-75 injector systems. Rather than a standalone repair tool, it ensures exact alignment of the resin injector over the impact point, eliminating guesswork and improving repair quality for professional results.
What Makes It Stand Out: The tool’s singular focus on alignment perfection sets it apart. Machined from stainless steel, it provides durable, consistent performance. By guaranteeing centered injector placement, it maximizes resin penetration and minimizes the risk of incomplete repairs, particularly valuable for complex star breaks and combination damage.
Value for Money: Priced at $11.03, this is an inexpensive upgrade for compatible Delta Kits systems. The modest investment can significantly improve repair success rates, paying for itself by preventing a single failed repair. However, its limited compatibility restricts value to specific Delta Kits users exclusively.
Strengths and Weaknesses: Strengths include precise alignment, robust stainless steel construction, low cost, and simplicity of use. It removes human error from positioning and works consistently. Weaknesses involve exclusive compatibility with only Delta Kits I-100 and I-75 models, rendering it useless for other systems, and it cannot function independently as a complete repair solution.
Bottom Line: An essential add-on for Delta Kits I-series owners seeking perfection. For others, it’s irrelevant. If you own the compatible system, this inexpensive tool measurably improves repair consistency and success rates.
6. Stainless Steel Glasses Bridge Repair Kit, Professional Windshield Repair Bridge Injector, Automotive Tool for Cracked Glass Rock Chip Repair, Black

Overview: This stainless steel bridge repair kit positions itself as a durable, professional-grade solution for fixing windshield chips and cracks. Designed to handle star-shaped and patterned fractures from stone impacts, it promises nearly invisible repairs while preventing further damage spread. The three-point support system aims to provide stability across various windshield curvatures for consistent results.
What Makes It Stand Out: The 304 stainless steel construction sets it apart from aluminum alternatives, offering superior corrosion resistance and longevity. The three-point design ensures even pressure distribution and stable mounting, while the high-quality rubber suction cup delivers firm attachment without additional tools. This combination suggests reliable performance for repeated professional use.
Value for Money: At $74.69, this kit sits in the mid-range category. It’s significantly cheaper than premium professional systems but costs more than basic DIY kits. The stainless steel build justifies the price over aluminum models, making it suitable for serious DIY enthusiasts or professionals starting out who need durability without breaking the bank.
Strengths and Weaknesses: Strengths include robust stainless steel construction, effective three-point stabilization, strong suction capability, and versatility in repairing multiple fracture types. Weaknesses may include less refined pressure control compared to spring-loaded models and limited brand recognition affecting long-term support availability.
Bottom Line: This is a solid choice for those seeking a balance between affordability and professional features. The stainless steel build ensures durability, making it ideal for regular use by mobile technicians or dedicated DIYers who prioritize tool longevity and consistent performance.
7. Professional Windshield Repair Bridge - Pump Style Vaccum Seal - Three Point Design - Spring Type Resin Injector - Auto Glass Rock Chip Repair Tool

Overview: This professional-grade windshield repair bridge represents the high-end segment with its pump-style vacuum seal and spring-loaded resin injector. Measuring just 3.75" x 4.5", it combines compact design with advanced functionality for tackling rock chips and cracks efficiently in demanding professional environments.
What Makes It Stand Out: The polished stainless steel spring-loaded injector enables lightning-fast pressure and vacuum cycling, dramatically reducing repair time. Its proprietary molded end seal creates a superior pressure-resistant barrier against glass surfaces. The three-point design maintains perfect leveling even on radically curved windshields, ensuring consistent results across all vehicle types.
Value for Money: Priced at $323.40, this is a significant investment. However, the limited lifetime warranty on the base and injector provides exceptional long-term value that cheaper alternatives cannot match. For professional technicians performing daily repairs, the time savings and reliability quickly offset the initial cost through increased productivity.
Strengths and Weaknesses: Strengths include rapid cycling capability, exceptional sealing, durable stainless construction, and comprehensive warranty coverage. The main weakness is the high price point, making it impractical for occasional users. Additionally, the specialized design may require a learning curve for those accustomed to traditional screw-type injectors.
Bottom Line: This tool is built for professionals who demand speed and consistency. While expensive, its performance and lifetime warranty make it a worthwhile investment for high-volume repair businesses where efficiency translates directly to profitability and customer satisfaction.
8. Delta Kits I-75 Aluminum Screw Style Windshield Repair Bridge Injector Plunger - Professional Automotive Windshield Repar Tool

Overview: The Delta Kits I-75 offers a more traditional approach with its screw-style injector plunger, targeting technicians who prioritize precision over speed. Made from clear anodized aluminum, this tool emphasizes controlled resin delivery for quality windshield repairs. Its straightforward design appeals to those who prefer mechanical simplicity over complex mechanisms.
What Makes It Stand Out: The screw-type vacuum and injection mechanism provides unparalleled control over pressure and resin flow, allowing technicians to make minute adjustments during the repair process. The ergonomic comfort grip lift knob reduces hand fatigue during extended use, while Delta Kits’ established reputation in the auto glass industry adds credibility and trustworthiness.
Value for Money: At $77.70, this injector strikes a balance between affordability and professional quality. It’s priced similarly to budget stainless steel models but offers the reliability of a known brand with proven support. The one-year warranty is modest but reflects confidence in the product’s durability for regular professional use.
Strengths and Weaknesses: Strengths include precise screw-type control, user-friendly ergonomic design, easy maintenance, and brand reputation. Weaknesses involve the aluminum construction, which is less durable than stainless steel alternatives, and the shorter warranty period. The manual operation is slower than spring-loaded systems, potentially reducing throughput.
Bottom Line: This is an excellent choice for technicians who value precision and control. While not the fastest option, its reliability and ease of use make it a dependable workhorse for professional shops focused on quality over quantity.
9. Glass Mechanix Daytona Bridge Injector Assembly Windshield Repair System Made in USA
Overview: The Glass Mechanix Daytona represents the pinnacle of windshield repair technology with its innovative dual-cycle vacuum pressure system. This USA-made tool promises maximum vacuum power and one-handed operation for ultimate professional efficiency and mobility.
What Makes It Stand Out: As the industry’s only true independent dual-cycle system, it achieves over 22 inches of vacuum pressure without extra hoses or complicated setup. This proprietary design ensures complete air removal and optimal resin penetration. The three-point mounting system with powerful suction cups provides exceptional stability on any windshield contour, including complex curves.
Value for Money: At $395.94, this is the most expensive option reviewed. The premium pricing reflects its American manufacturing and cutting-edge engineering. For high-volume professional operations, the time savings and superior repair quality justify the investment, though it’s excessive for DIY or low-volume use.
Strengths and Weaknesses: Strengths include unmatched vacuum power, innovative dual-cycle technology, ergonomic one-handed operation, and exceptional build quality. The primary weakness is the prohibitive cost for casual users. Additionally, its specialized design may limit compatibility with standard resins or accessories from other brands, creating potential vendor lock-in.
Bottom Line: This is the professional’s choice for those demanding the absolute best. If you run a dedicated auto glass business and want superior results with maximum efficiency, the Daytona is worth every penny. For others, more affordable options suffice.
10. Delta Kits Injector End Seals for Professional Auto Glass Repair Resin Injection Tools (1 Pkg of 5)

Overview: These Delta Kits injector end seals are essential maintenance components for professional auto glass repair tools. Specifically designed for Delta Kits metal injectors, this five-pack ensures consistent performance and prevents costly leaks during resin injection procedures.
What Makes It Stand Out: The precision-engineered design features a chamfered outer diameter for easy installation, flared inner diameter for smooth plunger movement, and tapered inner diameter on the glass end for enhanced pressure and leak resistance. The industry-leading chemical-resistant compound won’t shrink or swell, maintaining seal integrity over time and across temperature variations.
Value for Money: At $15.75 for a pack of five, these seals offer reasonable value for a consumable professional supply. Given that a compromised seal can ruin a repair, having quality replacements is cost-effective insurance. They’re priced competitively compared to generic alternatives that may not perform as reliably or last as long.
Strengths and Weaknesses: Strengths include perfect compatibility with Delta Kits metal injectors, superior chemical resistance, precision manufacturing, and easy installation. The only weakness is their brand-specific design, making them unsuitable for other injector brands. As consumables, they represent an ongoing operational cost that must be factored into business expenses.
Bottom Line: If you own Delta Kits metal injectors, these OEM seals are non-negotiable. Their precise fit and chemical resistance ensure reliable repairs, making them a smart investment for professionals who demand consistency. Don’t risk inferior seals for such a critical component.
What Is a Windshield Repair Injector?
At its core, a windshield repair injector is a precision-engineered device designed to remove air from a glass fracture and replace it with a specialized resin that restores structural integrity and optical clarity. Unlike simple syringe kits, professional injectors create controlled vacuum and pressure cycles that manipulate the internal geometry of the crack, ensuring complete penetration without overfilling. The tool itself is essentially a miniaturized pressure chamber that seals against the glass surface, creating an isolated environment where physics does the heavy lifting.
How Do These Tools Work?
The process follows a deliberate sequence: first, a vacuum cycle pulls air out of the crack’s micro-fissures. Then, pressure injection forces resin into those evacuated spaces. This vacuum-pressure-vacuum cycling often repeats 3-6 times per repair, with each cycle lasting 30 seconds to 2 minutes. The injector’s seal quality, pressure differential capability, and cycle control determine whether the resin reaches the crack’s extremities or merely fills the surface layer. Top-tier systems achieve pressure differentials of 25-30 PSI between vacuum and injection phases.
The Science Behind Resin Injection
Windshield glass is laminated—two layers of glass with a PVB (polyvinyl butyral) interlayer. When damaged, air infiltrates between these layers, creating that visible white haze. Resin must match the refractive index of glass (approximately 1.52) while curing to a hardness that bonds permanently with the surrounding material. The injector’s job isn’t just delivery; it’s manipulating capillary action, surface tension, and viscosity dynamics to achieve complete saturation without trapping micro-bubbles that cause repair failure.
Key Components of Professional-Grade Systems
The Injector Body Design
The injector body houses the piston mechanism that creates pressure and vacuum. Look for bodies machined from single blocks of aluminum rather than cast or composite materials. Single-piece construction eliminates leak points where air can compromise vacuum integrity. Internal bore polishing matters too—mirror finishes reduce friction and prevent resin buildup that can seize the piston over time. Thread pitch on adjustment screws should be fine (typically 0.5mm) for precise micro-control over injection volume.
Bridge Assembly and Suction Cup Technology
The bridge is the framework that holds the injector perpendicular to the glass while maintaining seal pressure. Professional bridges use three-point stabilization with adjustable feet to accommodate windshield curvature. Suction cups aren’t simple rubber pads—they’re engineered with durometer ratings between 40-50 Shore A for optimal grip without glass distortion. Some advanced systems employ vacuum-assisted suction cups that actively pull 15-20 inches of mercury, ensuring the bridge won’t shift during critical injection cycles.
Resin Formulations and Viscosity Grades
While not part of the injector itself, your tool must accommodate different resin viscosities. Thin resins (10-20 cP) flow into tight hairline cracks but cure slower. Thick resins (200-400 cP) fill pit damage and withstand higher pressure without leaking. Premium injector systems include viscosity compensation features—adjustable pressure relief valves and temperature-sensitive flow restrictors that automatically modify injection rates based on resin thickness and ambient temperature.
Essential Features to Evaluate Before Buying
Pressure Control Mechanisms
Avoid injectors with binary “on/off” pressure. Look for graduated pressure control that allows you to start at 5 PSI for initial penetration, ramp to 15 PSI for full saturation, then drop to 2 PSI for final curing. This prevents hydraulic pressure from extending the crack. The best systems feature micrometer-style dials with 0.1 PSI increments and pressure holding valves that maintain set pressure without constant adjustment.
Vacuum Creation Capability
Manual vacuum pumps require 15-20 vigorous pumps to achieve -25 PSI vacuum. That’s fine for occasional use but exhausting for daily technicians. Premium injectors integrate self-contained electric vacuum pumps or leverage pneumatic shop air to generate -28 PSI in seconds. More importantly, they maintain that vacuum without leakage—a quality injector should hold -25 PSI for at least 5 minutes with less than 1 PSI loss.
Seal Quality and Durability
The injector seal that contacts the glass is your repair’s success point. Silicone seals last longer than nitrile but can absorb resin and swell. Look for dual-durometer seals: a firm outer ring (60 Shore A) for stability and a soft inner lip (30 Shore A) for conformity. Seals should be replaceable without tools and cost under $15 each, since they require replacement every 50-75 repairs due to micro-scratches that compromise vacuum.
Material Quality and Construction Standards
Aircraft-Grade Aluminum vs. Composite Materials
6061-T6 aluminum offers the best strength-to-weight ratio and thermal stability. Composite injectors might be lighter, but they flex under pressure, causing seal leaks. Aluminum also dissipates heat from UV curing lamps better, preventing resin premature curing inside the injector. Check for anodized finishes—hard-anodized Type III coatings resist resin chemical attack and maintain smooth operation after hundreds of cycles.
Seal Materials: Silicone vs. Rubber Compounds
Fluorosilicone seals represent the gold standard, resisting both resin chemicals and ozone degradation from UV exposure. Standard silicone lasts 6-12 months in heavy use; fluorosilicone extends to 18-24 months. Avoid EPDM rubber entirely—it breaks down when exposed to acrylic resins. The seal’s compression set rating should be under 15% after 24 hours at 100°C, ensuring it rebounds to original shape after each repair.
Thread Precision and Longevity
The threads on your injector’s piston rod and pressure adjustment screws see constant torque. Class 3A threads (tight tolerance) prevent wobble and ensure smooth operation. Plastic threads are unacceptable—they strip within months. Even stainless steel threads require anti-seize compound quarterly to prevent galling. The best systems use brass inserts in aluminum bodies, providing self-lubricating threads that maintain precision for thousands of cycles.
Pressure Systems: Dual-Action vs. Single-Stage
Why Pressure Cycling Matters
Single-stage injectors apply constant pressure, which can force resin through the PVB layer into the interior glass surface, creating a permanent blemish. Dual-action systems alternate between high pressure (15 PSI) and low pressure (2 PSI) automatically, allowing resin to settle into crack branches without over-pressurization. This pulsing action mimics professional techniques used with manual syringes but with repeatable precision that eliminates human error.
Manual vs. Pneumatic Systems
Manual systems rely on screw pressure—turning a handle compresses a spring that applies force to the piston. These are reliable but slow. Pneumatic systems connect to shop air (60-90 PSI) and use regulators to dial in exact pressure. They’re faster and reduce technician fatigue, but require a compressor. For mobile operators, battery-powered electric systems offer middle ground, though they add 2-3 pounds of weight and need daily charging.
Precision Gauges and Monitoring
A quality pressure gauge is non-negotiable. Look for glycerin-filled gauges that dampen vibration and prevent needle flutter. The gauge should read 0-30 PSI with 0.5 PSI increments. Digital gauges offer better accuracy but can fail in extreme temperatures. Analog gauges with mirrored scales (to eliminate parallax error) provide reliable readings from -10°F to 120°F. The gauge must be isolated from resin contact—resin in the gauge ruins it permanently.
Vacuum Technology: The Key to Invisible Repairs
Manual Vacuum Pumps
Hand pumps should feature a double-action design that creates vacuum on both push and pull strokes, cutting pump count in half. The cylinder bore needs a honing pattern that holds lubrication without scoring. Check for rebuild kits—quality pumps allow seal replacement for $20 rather than requiring complete replacement. Pump handles should be ergonomically designed for repetitive use, with rubber grips that don’t slip when hands are resin-stained.
Integrated Vacuum Chambers
High-end injectors incorporate vacuum chambers separate from the injection cylinder. This design allows you to pull vacuum on the crack while simultaneously pressurizing the resin reservoir, creating a pressure differential that accelerates infusion. The chamber volume should be at least 3x the crack volume you’re treating—typically 5-10ml capacity. Transparent chambers let you visually confirm bubble evacuation, a crucial quality control step.
Vacuum Hold Duration and Release
The release valve’s design affects repair quality. Sudden vacuum release can cause resin to suck back out of the crack. Needle valves allow gradual pressure equalization over 10-15 seconds. Some systems include automatic sequencing that releases vacuum in stages: 75% release, hold 5 seconds for resin stabilization, then full release. This prevents the “suck-back” effect that leaves voids at the crack’s deepest points.
Resin Delivery and Injection Precision
Micrometer-Controlled Injection
Precision injectors feature micrometer thimbles that control piston travel in 0.01mm increments. This allows injection of 0.05ml per click—critical for filling star breaks where over-injection creates a visible resin pool. The micrometer should have a locking collar to prevent accidental adjustment during pressure cycles. Digital counters that track total resin delivered help estimate remaining resin in cartridges and prevent mid-repair emptying.
Drop-by-Drop vs. Continuous Flow
Continuous flow injectors work for long cracks but waste resin on small chips. Drop-by-drop systems use check valves that release resin only when pressure exceeds crack resistance, ensuring every drop penetrates. Advanced systems combine both: continuous flow for the initial fill, then switch to drop mode for the final 10% to eliminate overfill. This hybrid approach reduces resin waste by 30% while improving optical clarity.
Cure Time Optimization
Injector design influences cure time. Systems that maintain slight positive pressure (1-2 PSI) during UV curing prevent resin shrinkage and pull-away from crack walls. Some injectors include built-in UV LED rings that cure from the inside out while maintaining pressure, cutting total repair time from 30 minutes to under 10 minutes. The UV wavelength must be 365nm for proper resin polymerization—anything else is just a light show.
Portability and On-Site Repair Considerations
Kit Weight and Transport Cases
A complete professional kit shouldn’t exceed 12 pounds including injector, bridge, resins, and curing light. Look for injection-molded cases with custom foam cutouts that protect the injector from drops while organizing accessories. Cases should have IP67 ratings for water and dust resistance—mobile techs work in rain, snow, and construction sites. Wheels and telescoping handles matter when you’re carrying the kit across parking lots multiple times daily.
Power Requirements for Mobile Techs
If you choose an electric vacuum or curing system, understand its power draw. Most units run on 12V DC (cigarette lighter adapter) or 18V tool batteries. Battery life should exceed 50 repairs per charge. Systems that draw more than 5 amps will drain a car battery if the engine isn’t running. Smart chargers that condition batteries and prevent overcharging extend pack life from 1 year to 3+ years of daily use.
Weatherproofing and Field Durability
O-rings and seals must withstand temperature swings from 20°F to 110°F without hardening. Electronics need conformal coatings to resist moisture intrusion. Metal components should have passivation treatments that prevent rust when exposed to road salt and rain. The best field-tested injectors survive being dropped from 4 feet onto concrete—ask manufacturers for MIL-STD-810G test reports before investing.
Professional vs. DIY-Grade Equipment
Calibration Standards
Professional tools require annual calibration to maintain pressure and vacuum accuracy. Look for systems with traceable calibration certificates and accessible adjustment potentiometers. DIY-grade tools lack calibration features and drift significantly after 20-30 repairs. A quality injector maintains ±0.5 PSI accuracy over 500+ cycles; budget units can vary by ±3 PSI, causing inconsistent results that damage your reputation.
Warranty and Support Expectations
Professional-grade injectors should carry 2-3 year warranties covering all components except consumable seals. Manufacturers should offer loaner programs—if your tool fails, they overnight a replacement while yours is repaired. DIY kits typically have 30-90 day warranties and no repair service. Check for US-based technical support with technicians who actually use the tools, not just read scripts. Response time should be under 2 hours during business days.
Investment Return Calculations
A $500 professional injector seems expensive compared to $50 DIY kits until you calculate cost-per-repair. Professional tools last 2,000+ repairs ($0.25/tool cost) while DIY kits fail after 30-50 repairs ($1-1.67/tool cost). Factor in callback rates: professional tools achieve 95%+ first-time success, while DIY methods often require 2-3 attempts. At $75 per repair, one callback wipes out any initial savings.
Common Mistakes That Compromise Repairs
Over-Injection and Resin Waste
Injecting too much resin creates a visible “bulls-eye” effect where the repair area is optically denser than surrounding glass. This happens when technicians don’t understand crack volume calculation. A dime-sized star break holds approximately 0.3ml of resin. Injectors without precision metering often deliver 0.5-0.7ml, causing overflow. Learn to calculate crack volume: length × width × depth × 0.6 (fill factor). Your injector should allow setting a maximum delivery volume.
Insufficient Vacuum Cycles
One vacuum cycle isn’t enough for complex breaks. Multi-leg star breaks and combination cracks require 4-6 vacuum cycles with pressure pulses between each. Each cycle should last minimum 45 seconds to allow air to migrate out of micro-fissures. Rushing this step leaves micro-bubbles that expand with temperature changes, causing the repair to fail within weeks. Quality injectors have programmable cycle timers that enforce proper dwell times.
Temperature and Humidity Ignorance
Resin viscosity changes 5% per 10°F temperature shift. Injectors without temperature compensation deliver inconsistent results between morning and afternoon repairs. Work between 60-80°F when possible. Below 50°F, resin won’t flow properly; above 90°F, it cures prematurely in the injector. Use the windshield’s defroster to warm the glass to 70°F before starting. Some premium injectors include infrared thermometers that automatically adjust pressure based on glass temperature.
Maintenance and Care for Longevity
Cleaning Protocols After Each Use
Resin left in an injector cures and ruins precision components. Flush the system with acetone or proprietary cleaner after every repair—yes, every single one. Run 5ml of cleaner through the injector with the same pressure cycles used for resin. Disassemble the seal and soak it in cleaner for 2 minutes. Use lint-free swabs to clean the vacuum chamber walls. This 3-minute process extends tool life from months to years.
Seal Replacement Schedules
Track repairs per seal with a logbook or phone app. Replace seals every 50 repairs or immediately if you notice vacuum leaks (pressure gauge drops more than 2 PSI per minute). Keep a spare seal kit in your case—seals fail without warning. Inspect seals weekly for nicks, embedded glass particles, or compression set. A $12 seal is cheap insurance against a $200 windshield replacement callback.
Storage Best Practices
Never store injectors with resin inside. Remove resin cartridges and cap the injector tip. Store in the transport case with desiccant packs to prevent moisture absorption by seals. If storing longer than 2 weeks, apply a light coat of silicone grease to metal threads. Keep away from UV sources—sunlight through a window can cure residual resin inside the tool. Ideal storage: 65°F, 40% humidity, dark environment.
Safety Considerations and Best Practices
Personal Protective Equipment
Resin splashes are inevitable. Wear safety glasses with side shields—resin in an eye requires emergency room removal. Nitrile gloves (not latex) prevent skin sensitization that develops after repeated exposure. A long-sleeve shirt protects arms from UV curing light, which can cause sunburn in under 2 minutes of direct exposure. Keep a bottle of saline eye wash in your kit; water doesn’t effectively flush resin.
Chemical Handling and Disposal
Uncured resin is hazardous waste—don’t pour it down drains. Collect cleaning solvent and resin waste in sealed containers. Most jurisdictions allow disposal of cured resin in regular trash, but check local regulations. Keep Safety Data Sheets (SDS) for all resins in your vehicle; OSHA requires them for commercial operators. Spill kits with absorbent pads and neutralizing powder should be part of every mobile setup.
UV Exposure Management
UV curing lamps emit UVA at 365nm, which damages eyes and skin. Use lamps with automatic shutoffs when not positioned on glass. Never look directly at the LED array—reflected UV is just as dangerous. Position your body opposite the lamp; the glass itself blocks most UV transmission. UV-blocking face shields provide cheap insurance against cumulative exposure that leads to cataracts.
Cost Analysis: What Should You Budget?
Entry-Level Professional Expectations
Plan on $400-600 for a basic professional system including injector, bridge, manual vacuum pump, 1-year resin supply, and curing light. This gets you a tool capable of 500+ repairs with proper maintenance. Skip systems under $300—they’re DIY kits with professional branding. Entry-level means manual operation and fewer convenience features, but identical repair quality if you master technique.
Mid-Range System Value Propositions
The $800-1,200 range adds electric vacuum pumps, digital pressure control, and integrated UV curing. These systems reduce repair time from 30 to 15 minutes and cut technician fatigue significantly. ROI improves at 15+ repairs per week. Mid-range systems typically include training videos, extended warranties, and priority support. This is the sweet spot for full-time mobile operators.
Premium Feature Justifications
Systems exceeding $1,500 offer features like automatic cycle programming, built-in resin heating, crack mapping cameras, and cloud-based repair documentation. These are overkill for most operators unless you’re running multiple trucks and need standardized procedures. The repair quality isn’t necessarily better, but consistency across technicians and reduced training time justify the cost for high-volume operations.
Training and Skill Development
Learning Curve Expectations
Even the best injector won’t compensate for poor technique. Plan on 20-30 practice repairs before achieving professional results. Your first 10 repairs will likely have visible defects—use discarded windshields from salvage yards. Document each repair with photos; review failures to understand what went wrong. Most manufacturers offer video training libraries; watch them repeatedly. Expect 40-60 hours of hands-on practice to reach 90%+ success rates.
Practice Windshield Sources
Salvage yards sell damaged windshields for $10-20 each. Buy various crack types: bullseyes, stars, combos, long cracks. Practice on both hot and cold glass to understand temperature effects. Some training programs provide silicone glass simulators that can be repaired repeatedly—worth the $150 investment. Never practice on a customer’s vehicle until you’ve mastered the injector on scrap glass.
Certification Pathways
While not legally required, certification from organizations like the National Windshield Repair Association (NWRA) adds credibility. Their tests evaluate repair quality under magnification and stress testing. Many insurance companies require certification for direct billing. Certification courses cost $300-500 but include advanced techniques like edge crack repair and stress crack stabilization. The investment pays for itself in higher repair prices and customer confidence.
Frequently Asked Questions
How long should a professional windshield repair take using a quality injector tool?
A standard chip repair takes 15-20 minutes with a professional-grade injector, including setup and cleanup. Complex star breaks with multiple legs might require 25-30 minutes. The actual injection cycles account for only 6-8 minutes; the rest is cleaning, seal placement, and UV curing. Rushing below 12 minutes usually means insufficient vacuum cycles, leading to premature repair failure.
Can one injector tool handle all types of windshield damage?
No single injector excels at every damage type. Bullseyes and stars need high-pressure precision injection. Long cracks require continuous flow delivery with specialized slit seals. Edge cracks demand low-profile bridges that fit under moldings. Most professionals own two systems: a precision injector for chips and a crack-specific system for linear damage. Some modular systems accept different heads, but performance compromises exist.
What’s the difference between vacuum pressure and injection pressure?
Vacuum pressure (negative) removes air, typically -25 to -28 PSI. Injection pressure (positive) forces resin in, usually 10-20 PSI. The differential between them drives resin into micro-fissures. A 45 PSI swing (from -25 to +20) is ideal. Weak vacuum (-15 PSI) leaves air bubbles; excessive injection pressure (>25 PSI) can extend the crack. Quality injectors maintain this differential consistently across hundreds of cycles.
How often do injector seals need replacement?
Replace seals every 50-75 repairs or immediately after any vacuum leak. Professional technicians often replace them weekly as preventative maintenance. Seals cost $10-15 each—a cheap investment compared to a callback. Signs of seal failure: vacuum gauge dropping more than 2 PSI per minute, visible resin seepage around the seal, or difficulty maintaining pressure during injection.
Is pneumatic or manual vacuum better for mobile operations?
For mobile techs doing 5+ repairs daily, pneumatic vacuum saves 5-8 minutes per repair and reduces arm fatigue. However, it requires a portable compressor or vehicle-mounted air system. Manual pumps work fine for part-time operators but become tedious at volume. Battery-powered electric vacuum offers the best mobile compromise, though runtime and charging logistics must be managed.
What’s the optimal resin temperature for injection?
Resin performs best at 70-75°F. Below 60°F, viscosity increases 50%, requiring higher pressure and longer injection times. Above 85°F, resin begins premature polymerization inside the injector. Store resin in your vehicle’s cabin, not the trunk. Some premium injectors include heating elements that warm resin to optimal temperature in 2-3 minutes—a worthwhile feature for operators in variable climates.
Can injector tools repair cracks longer than 6 inches?
Most standard injectors are designed for damage under 6 inches. Longer cracks require specialized crack repair systems with extended bridges and continuous resin feed. However, some advanced injectors with modular extensions can handle cracks up to 12 inches by moving the injector along the crack in sections. These repairs demand advanced skill and often don’t qualify for insurance billing due to higher failure rates.
How do I know if my injector is maintaining proper vacuum?
Perform a dry test weekly: seal the injector to a clean piece of glass, pull vacuum to -25 PSI, then close the valve. The gauge should hold within 1 PSI for 5 minutes. If it drops faster, check the seal for debris or damage, inspect O-rings for cracks, and ensure all fittings are tight. A failing vacuum pump will show gradual pressure loss across multiple tests—rebuild kits are available for most quality pumps.
What’s the biggest mistake beginners make with injector tools?
Impulsiveness. Beginners rush vacuum cycles, apply excessive pressure, and over-inject resin. Each repair should follow a written checklist: clean, drill (if needed), seal, vacuum 2 minutes, inject 1 minute, repeat 4x, cure under pressure. Skipping steps or cutting times yields cloudy repairs that fail within months. The injector is precise, but it can’t compensate for poor protocol adherence.
Are UV curing lights included with injector purchases?
Most professional injectors are sold as complete kits including curing lights, but always verify. UV lights are not interchangeable—wavelength, intensity, and coverage area matter. A proper curing light outputs 12,000+ microwatts/cm² at 365nm and covers a 3-inch diameter. Cheaper lights require 10+ minute cure times versus 2-3 minutes with professional units. Factor $150-300 for a quality light if not included.