Your wheels are the unsung heroes of your vehicle’s appearance—constantly bombarded with brake dust, road grime, salt, and UV rays while facing extreme temperatures that would destroy lesser finishes. It’s no wonder they often look tired and neglected despite your best washing efforts. Enter the world of DIY wheel coating kits, a game-changing solution that’s transformed from a professional-only secret into an accessible weekend project for passionate car enthusiasts. But here’s the thing: not all coating kits are created equal, and the difference between a flawless, years-long protection and a streaky, short-lived disappointment lies in understanding what you’re actually buying.
Whether you’re a detailing novice looking to protect your daily driver or a seasoned enthusiast aiming for show-car perfection, navigating the maze of ceramic formulas, graphene additives, and polymer sealants can feel overwhelming. This comprehensive guide cuts through the marketing hype and technical jargon, giving you the expert knowledge to evaluate any wheel coating kit like a pro. We’ll explore the science behind these protective layers, walk through critical preparation steps that make or break your results, and help you identify the features that truly matter—so you can invest wisely and achieve that coveted, self-cleaning wheel finish that lasts.
Top 10 Wheel Coating Kit
Detailed Product Reviews
1. Gtechniq Wheel Coating Kit for Cars with Car Degreaser Panel Wipe, C5 Wheel Armor and Microfiber Cloth, Car Accessories for Car Cleaning Kit
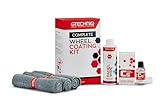
Overview: The Gtechniq Wheel Coating Kit represents a professional-grade three-step system designed to protect and maintain automotive wheels using advanced molecular nanotechnology. This comprehensive package includes a panel wipe degreaser, C5 Wheel Armor coating, and a premium microfiber cloth, providing everything needed for a complete wheel treatment.
What Makes It Stand Out: Founded by a quantum physicist, Gtechniq leverages genuine nanotechnology rather than marketing buzzwords. The C5 Wheel Armor creates an exceptionally slick surface that actively repels brake dust and road grime, while the specialized panel wipe ensures pristine surface preparation. With a 20-year track record serving 50 countries, this UK-based company has become the go-to choice for high-end vehicles.
Value for Money: At $64.95, this kit commands a premium price but delivers commensurate value. The included degreaser and microfiber cloth eliminate additional purchases, while the nanotechnology formulation provides durability that surpasses conventional sealants. For enthusiasts seeking professional results without paying shop rates, this investment pays dividends in reduced cleaning time and enhanced wheel appearance.
Strengths and Weaknesses: Strengths include genuine nanotechnology, comprehensive three-step system, exceptional dirt repellency, and professional-grade results. The fragrance-free, color-free formula is safe and effective. Weaknesses center on the steep price point for casual users and the meticulous preparation required. The coating demands careful application and curing time, making it less suitable for those wanting a quick solution.
Bottom Line: This kit excels for serious automotive enthusiasts who prioritize cutting-edge technology and long-lasting wheel protection. While the price and application process require commitment, the results justify the investment for those demanding professional-grade performance.
2. Meguiar’s Ultimate Ceramic Coating Kit - Premium Kit for Cars Delivers Ultra-Durable Ceramic Protection with High Water Beading Action, Increased Gloss and Slickness, and Premium Microfiber Towels

Overview: Meguiar’s Ultimate Ceramic Coating Kit democratizes professional-grade ceramic protection with an accessible spray formula. This budget-friendly kit delivers durable hydrophobic protection and enhanced gloss through a simple three-step process: spray, spread, and wipe.
What Makes It Stand Out: This kit borrows professional ceramic coating technology and packages it in an incredibly user-friendly format. The formula actively conceals minor paint defects while delivering exceptional water beading and slickness. Unlike many consumer-grade products, it works safely across multiple surfaces including paint, plastic trim, decals, and wheels.
Value for Money: At just $17.76, this kit represents exceptional value. Comparable professional ceramic coatings cost hundreds in application fees, while competing DIY products often exceed $40. The inclusion of two premium microfiber towels eliminates additional purchases, making this an unbeatable entry point into ceramic protection.
Strengths and Weaknesses: Major strengths include foolproof application, multi-surface compatibility, impressive water beading, defect-hiding capabilities, and outstanding affordability. The spray format makes coating entire vehicles efficient. Weaknesses include shorter durability compared to professional coatings and potential need for more frequent reapplication. The coating may not withstand harsh conditions as long as premium alternatives.
Bottom Line: This is the ideal starter kit for DIY enthusiasts wanting ceramic protection without complexity or expense. While durability may not match professional applications, the ease of use, versatility, and incredible price make it a must-have for maintaining daily drivers.
3. Gyeon Rim EVO Ceramic Wheel Coating Kit Brake Dust Repellent High‑Heat Resistant Hydrophobic Wheel Protectant Satin Finish Self‑Cleaning Ceramic Protection for Alloy Painted Rims

Overview: Gyeon Rim EVO targets performance enthusiasts with a ceramic wheel coating engineered for extreme conditions. This specialized formula withstands temperatures up to 1400°F while providing self-cleaning hydrophobic protection specifically designed for alloy and painted rims.
What Makes It Stand Out: The exceptional heat resistance sets this apart from standard wheel sealants, making it ideal for high-performance vehicles with heavy braking demands. The satin enhancement feature enriches wheel color depth without creating an artificial glossy appearance, preserving OEM aesthetics while delivering advanced protection.
Value for Money: Priced at $55.99, this kit sits in the premium tier but offers specialized performance worth the investment for targeted applications. While more expensive than general-purpose sealants, the extreme heat tolerance and brake dust repellency provide unique benefits that justify the cost for performance car owners.
Strengths and Weaknesses: Strengths include remarkable 1400°F heat resistance, superior brake dust repellency, authentic satin finish enhancement, and straightforward DIY application. The hydrophobic properties significantly reduce cleaning frequency. Weaknesses include the narrow focus on wheels only, premium pricing for a single-purpose product, and requirement for meticulous surface preparation to achieve advertised durability.
Bottom Line: Rim EVO excels for sports car and performance vehicle owners battling excessive brake dust and heat. The specialized formulation justifies its price for this niche, though casual drivers may find more value in versatile, lower-cost alternatives.
4. DURA-COATING TECHNOLOGY, Dressing Total Tire Kit, Single Car Kit - All Inclusive Tire Shine, and Cleaner Kit for a Lasting Shine and Brilliant Finish - 16 Ounce Tire Cleaning Spray - Made in The USA

Overview: Dura-Coating Technology’s Total Tire Kit offers a comprehensive solution for achieving long-lasting tire appearance. This all-inclusive system includes a permanent polymer coating, specialized cleaner, applicator pads, and accessories for complete tire transformation.
What Makes It Stand Out: The “permanent” polymer-based dressing delivers months of durability rather than weeks, resisting rain, washing, and high-speed driving up to 160 mph without sling. As a family-owned Florida business, the company includes professional-grade tools and detailed instructions, reflecting real detailing shop experience.
Value for Money: At $46.99, the kit seems pricey but includes everything needed for proper application: 16 oz cleaner, 4 oz dressing, scrub brush, applicators, gloves, and instructions. Compared to repeatedly buying monthly tire dressings, the long-term value becomes apparent for committed enthusiasts.
Strengths and Weaknesses: Strengths include exceptional longevity, professional non-greasy satin finish, complete all-in-one packaging, and impressive high-speed durability. The polymer coating prevents browning and remains waterproof. Weaknesses involve the complex multi-step process requiring significant prep time, the permanence leaving little room for error, and a price point that may deter casual users.
Bottom Line: This kit suits dedicated enthusiasts seeking show-car tire appearance with minimal maintenance. While demanding proper application, the results deliver professional-grade, long-lasting beauty that justifies the investment for those prioritizing tire aesthetics.
5. Adam’s Advanced Graphene Ceramic Spray Coating Kit - 18+ Months Sprayable Graphene Oxide Ceramic Coating for Cars, Boats, RV’s & Motorcycle - Adds Extreme Gloss, Depth, Shine & Protection

Overview: Adam’s Advanced Graphene Ceramic Spray Coating represents the next evolution in surface protection, utilizing legitimate graphene oxide technology rather than silica-infused alternatives. This kit delivers 18+ months of durable protection with enhanced gloss and depth across multiple vehicle surfaces.
What Makes It Stand Out: The patent-pending Ceramic Glow Technology incorporates UV tracers that illuminate under blue light, allowing users to visualize coverage and eliminate missed spots during application. As a true graphene coating in spray form, it offers professional-grade protection with unprecedented user-friendliness.
Value for Money: At $57.79, this premium product commands a higher price than traditional ceramic sprays but undercuts professional graphene applications costing hundreds. The 18+ month durability and multi-surface versatility provide strong value for serious enthusiasts wanting cutting-edge protection.
Strengths and Weaknesses: Strengths include genuine graphene technology, innovative UV tracing application, exceptional 18+ month durability, multi-surface versatility, and USA manufacturing. The spray format makes application efficient. Weaknesses include the premium price and the UV flashlight requirement sold separately. The advanced chemistry may intimidate beginners despite the user-friendly application.
Bottom Line: This is the top choice for tech-forward detailers wanting legitimate graphene protection without professional installation costs. While requiring a modest investment, the cutting-edge technology, visual application aid, and impressive durability make it a standout in the ceramic coating market.
6. Nano Bond Professional Ceramic Coating for Cars - High Gloss Paint Protection Kit, UV & Corrsion Resistant for, Wheels, Glass, Plastic, Easy Application, Ultra Hydrophobic, Long Lasting, Shine, 30ml

Overview: The Nano Bond Professional Ceramic Coating kit positions itself as an accessible entry point into DIY paint protection. This 30ml package promises professional-grade results with 80% pure SIO2 content, targeting both novice detailers and experienced enthusiasts seeking an affordable solution for multi-surface vehicle protection.
What Makes It Stand Out: Its exceptionally high SIO2 concentration at this price point is remarkable. The kit includes everything needed for application—ceramic coat, sponge, microfiber towel, microsuede applicator, and gloves—eliminating guesswork. The formula works on paint, wheels, glass, and plastic, offering true versatility. The brand emphasizes straightforward “wipe on, buff off” application, reducing the intimidation factor common with ceramic coatings.
Value for Money: At $37.90, this represents significant savings compared to professional applications costing $500+. While it claims three years of protection (optimistic for most climates), even 18-24 months of effective performance justifies the investment. Competing DIY kits with similar SIO2 percentages typically cost 50-100% more, making this an aggressive value play for budget-conscious enthusiasts.
Strengths and Weaknesses: Strengths include the high SIO2 concentration, comprehensive included accessories, multi-surface compatibility, and user-friendly application. Weaknesses involve the small 30ml volume (covering perhaps one sedan), potentially inflated longevity claims, unknown brand reputation versus established players, and the reality that surface preparation remains critical—user error can still compromise results.
Bottom Line: An excellent starter ceramic coating for DIYers willing to follow prep instructions meticulously. Manage expectations on durability and you’ll find impressive performance for the price.
7. Adam’s Advanced Graphene Ceramic Coating (Standard Kit) - 10H Graphene Coating for Auto Detailing, 9+ Years of Car Protection & Patented UV Technology

Overview: Adam’s Advanced Graphene Ceramic Coating represents the cutting edge of consumer-grade paint protection, leveraging graphene technology for enhanced performance. This Standard Kit delivers 10H hardness with a claimed 9+ year lifespan, positioning itself as a premium alternative to traditional SIO2-based ceramics.
What Makes It Stand Out: The patent-pending UV Glow Technology revolutionizes application by making the coating visible under UV light, virtually eliminating missed spots—a common amateur mistake. The graphene-infused formula promises superior heat dissipation and durability over silica-only coatings. With 50% more resin content than previous versions, it achieves exceptional gloss and depth of color while remaining versatile enough for paint, glass, chrome, and trim.
Value for Money: At $140.24, this isn’t cheap, but professional graphene coatings exceed $1,000. The nine-year protection claim means annual cost is under $16—even if it lasts only five years, you’re still ahead. The Standard Kit provides the coating and basic applicators, assuming you have prep materials. For vehicles you plan to keep long-term, this investment pays dividends in reduced washing time and maintained resale value.
Strengths and Weaknesses: Strengths include innovative UV tracer technology, genuine graphene formulation, extreme durability claims, multi-surface safety, made-in-USA quality, and an industry-leading satisfaction guarantee. Weaknesses center on the high upfront cost, requirement for meticulous paint correction beforehand, and the Standard Kit’s limited accessories (towels, prep chemicals sold separately).
Bottom Line: For serious enthusiasts protecting prized vehicles, this graphene coating justifies its premium price through innovative technology and exceptional longevity claims.
8. Chemical Guys HydroSpin Wheel & Rim Ceramic Coating and Quick Detailer - 16 oz Spray Protects Wheels, Rims, and Brake Parts with Hydrophobic Ceramic Shine - Safe for Cars, Trucks, SUVs, Motorcycles
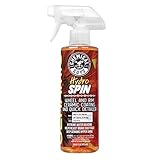
Overview: Chemical Guys HydroSpin offers a specialized approach to ceramic protection, focusing exclusively on wheels and rims in a convenient spray format. This 16oz hybrid product combines ceramic coating technology with quick detailer functionality, addressing the unique challenges brake dust and road grime present to wheel finishes.
What Makes It Stand Out: The spray-and-wipe application is dramatically simpler than traditional ceramic coatings, making it accessible to anyone. Its wheel-specific formulation targets the high-temperature, high-contamination environment wheels endure. The product cleans light dust while depositing ceramic polymers, serving dual purposes. Critically, it’s explicitly safe across all wheel finishes—painted, powder-coated, polished, anodized, and clear-coated—eliminating compatibility concerns.
Value for Money: At $19.97, this is an impulse-buy price point for car care enthusiasts. While it won’t replace a full ceramic coating’s durability, it offers 2-3 months of protection per application. Compared to wheel-specific sealants costing $30-40, HydroSpin provides ceramic technology at a bargain. For maintained vehicles, it extends time between deep cleanings, saving valuable time.
Strengths and Weaknesses: Strengths include foolproof spray application, wheel-specific engineering, universal finish compatibility, quick detailing capability, and exceptional affordability. Weaknesses involve significantly shorter durability than “real” ceramics, limitation to wheels only, requiring cool surfaces for application, and needing reapplication every few washes for optimal performance.
Bottom Line: Perfect maintenance product for coated or uncoated wheels. Use it bi-weekly to maintain protection and shine between major details—not as a standalone ceramic solution.
9. Adam’s Advanced Graphene Ceramic Coating (Complete Kit) - 10H Graphene Coating for Auto Detailing, 9+ Years of Car Protection & Patented UV Technology

Overview: Adam’s Advanced Graphene Ceramic Coating Complete Kit delivers the same revolutionary graphene protection as the Standard Kit, with enhanced accessories for a turnkey application experience. This package provides the identical 10H graphene formula with 9+ year durability claims, but includes additional tools for those starting from scratch.
What Makes It Stand Out: You get the same patent-pending UV Glow Technology that makes application foolproof by revealing coated areas under UV light. The graphene-infused formula offers superior heat resistance and gloss versus silica ceramics. The “Complete” designation means more microfiber towels, additional applicator pads, and likely prep solutions—crucial for buyers lacking a detailing arsenal. This eliminates the guesswork of sourcing compatible accessories separately.
Value for Money: At $148.74, it’s only $8.50 more than the Standard Kit—a negligible premium for $15-20 worth of additional quality accessories. For first-time ceramic coating users, this prevents incompatible towel purchases or applicator shortages mid-job. The value compounds when considering the graphene technology’s longevity; the accessory upcharge pays for itself in convenience alone. However, experienced detailers with stocked supplies should save money with the Standard Kit.
Strengths and Weaknesses: Strengths mirror the Standard Kit: UV tracer innovation, genuine graphene chemistry, extreme durability, multi-surface versatility, and USA manufacturing. Added benefits include comprehensive accessories and marginally better overall value. The sole weakness remains the high total investment, though the Complete Kit actually improves cost-effectiveness for novices.
Bottom Line: Choose the Complete Kit if you’re new to coatings or lack application supplies. Veterans with existing tools should opt for the Standard version.
10. Fantasticlean 7PCS Car Wheel Cleaning Pro Kit, Tire Brush, Soft-bristled Rim Brush, Microfiber Flat Wheel Brush, Double-Ended Detailing Brush, Detailing Pads, Scratch-Free & Multipurpose

Overview: The Fantasticlean 7PCS Car Wheel Cleaning Pro Kit provides physical cleaning tools essential for proper wheel maintenance and ceramic coating preparation. Unlike chemical coatings, this brush set tackles brake dust and grime mechanically, making it a critical companion product for any wheel care regimen.
What Makes It Stand Out: The metal-free, extra-soft bristle design across all five brush types ensures zero scratching on delicate wheel finishes—a non-negotiable feature for coated or high-end wheels. The flat-profile brush accesses narrow barrel areas unreachable by traditional designs. The double-ended detailing brush tackles lug nuts and crevices, while the tire brush handles rubber. The ergonomic grips prevent slippage during aggressive cleaning, and all materials rinse clean easily.
Value for Money: At $25.99, this sits in the mid-range for quality brush sets. Individual premium brushes often cost $8-12 each; this seven-piece kit averages under $4 per tool. The included one-year warranty against defects demonstrates manufacturer confidence uncommon at this price. For ceramic coating prep, these brushes pay for themselves by preventing scratches that would require costly correction before application.
Strengths and Weaknesses: Strengths include comprehensive brush variety, scratch-free design, ergonomic handles, easy maintenance, and warranty protection. Weaknesses involve brushes being only one part of the cleaning equation (quality chemicals still needed), potential durability concerns versus professional-grade tools costing twice as much, and the microfiber flat brush requiring careful drying to prevent mildew.
Bottom Line: An essential, cost-effective toolkit for anyone serious about wheel detailing. Pair these brushes with a quality wheel cleaner and ceramic coating for optimal results.
What Is Wheel Coating and Why Does It Matter?
Wheel coating is a semi-permanent protective layer that chemically bonds to your wheel’s surface, creating a hydrophobic, heat-resistant shield that repels contaminants and environmental damage. Unlike traditional waxes that simply sit on top of the finish, modern coatings form a covalent bond at the molecular level, essentially becoming an additional, sacrificial layer of clear protection. This matters because your wheels face harsher conditions than any other part of your vehicle—temperatures can exceed 500°F during aggressive braking, while corrosive brake dust particles embed themselves into unprotected surfaces within hours. A quality coating dramatically reduces maintenance frequency, prevents permanent etching from brake dust, and maintains that deep, wet-look gloss that makes wheels pop.
Types of Wheel Coating Technologies Explained
Ceramic Coatings
Ceramic coatings, based on silicon dioxide (SiO2) chemistry, represent the gold standard for DIY wheel protection. These formulations create a glass-like nano-ceramic shield that’s exceptionally hard, chemically resistant, and capable of withstanding extreme heat cycling. The best DIY ceramic kits typically contain 70-85% SiO2 concentration, with higher percentages offering greater durability but requiring more precise application. They cure through exposure to ambient moisture, forming a crystalline structure that can last 1-3 years on wheels depending on maintenance and driving conditions.
Graphene-Infused Coatings
The newest evolution in coating technology incorporates graphene nanoplatelets into ceramic formulas, creating a hybrid that claims enhanced slickness, anti-static properties, and improved water spot resistance. Graphene’s unique structure provides a more flexible coating that better accommodates wheel flex and thermal expansion, potentially reducing micro-cracking over time. While the technology is promising, it’s essential to understand that “graphene” has become a marketing buzzword—true graphene-infused coatings should demonstrate measurably lower water contact angles and improved durability over pure SiO2 formulas.
Sealants and Polymer-Based Coatings
For those seeking an entry-level solution, polymer sealants offer easier application and shorter cure times at the expense of longevity. These synthetic formulas create a strong physical barrier but lack the chemical bonding of true ceramics. They typically last 3-6 months on wheels and serve as an excellent stepping stone before committing to a full ceramic system. Some advanced polymer coatings incorporate ceramic additives, creating a “hybrid” that bridges the gap between traditional sealants and true ceramics.
Key Benefits of DIY Wheel Coating
The most immediate benefit you’ll notice is the dramatic reduction in brake dust adhesion. Coated wheels shed contaminants so effectively that a simple pressure rinse removes 80-90% of daily buildup. This self-cleaning effect means less aggressive washing, reducing swirl marks and preserving your wheel finish long-term. Additionally, these coatings provide UV protection that prevents clear coat yellowing and fading, especially crucial for custom-colored or powder-coated wheels. The hydrophobic properties also mean water beads and sheets off instantly, preventing mineral deposits and water spots that can permanently mar finishes. From a financial perspective, a quality DIY kit costing $50-100 can save you hundreds in professional reconditioning services over its lifespan.
How Long Do Wheel Coatings Last?
Durability expectations vary wildly based on coating type, preparation quality, and maintenance discipline. True ceramic coatings on properly prepared wheels typically deliver 12-24 months of solid protection before requiring a refresh layer. Graphene-ceramic hybrids may extend this to 24-36 months under ideal conditions. However, wheels see more abuse than paint—constant heat cycling, harsh wheel cleaners, and road salt all accelerate degradation. Realistically, plan on annual reapplication for daily drivers in harsh climates, while garage-kept show cars might see 3+ years. The coating doesn’t simply “stop working” overnight; instead, water beading gradually diminishes and contamination resistance decreases, signaling it’s time for a maintenance coat.
Essential Features to Look for in a Wheel Coating Kit
Durability Rating and Longevity Claims
When evaluating kits, look beyond bold marketing claims and seek specific durability metrics. Reputable manufacturers provide independent testing data showing performance after simulated wash cycles, salt spray tests, and heat exposure. A quality kit should explicitly state its expected lifespan under normal conditions and offer a clear maintenance schedule. Be wary of “lifetime” claims—these often require specific, impractical maintenance protocols that void the warranty if not followed precisely.
Chemical Resistance Properties
Your wheels encounter aggressive chemicals: acidic wheel cleaners, road salt, magnesium chloride, and brake fluid. A superior coating should demonstrate resistance to pH levels from 2-12. Check for mentions of “9H hardness” (a pencil hardness scale measurement) which indicates scratch resistance, but understand this refers to the coating’s resistance to marring, not impact protection. The best kits include chemical resistance data showing minimal degradation after exposure to common automotive chemicals.
Heat Resistance Capabilities
Standard ceramic coatings typically withstand sustained temperatures up to 750°F, with high-performance formulas rated to 1200°F or more. Since brake components can exceed 1000°F during track use, matching your coating to your driving style is critical. Daily drivers can safely use standard formulations, while performance enthusiasts should seek “track-rated” or “high-temp” variants that maintain integrity under extreme heat cycling.
Gloss and Finish Enhancement
While protection is paramount, the aesthetic improvement shouldn’t be overlooked. Premium coatings enhance wheel clarity, deepen metallic flakes, and create that coveted “wet look.” Look for kits that specify gloss enhancement percentages or provide gloss meter readings. Some formulas include optical enhancers that fill minor imperfections, making them ideal for older, slightly weathered wheels.
Understanding Surface Preparation Requirements
Cleaning and Decontamination Steps
Preparation determines 90% of your coating’s success. Start with a dedicated wheel cleaner that targets metallic contamination, not just general grime. Multiple cleaning passes are essential: first to remove loose dirt, second to dissolve embedded brake dust, and third to eliminate any remaining film. The surface must be surgically clean—any residue left behind gets sealed under the coating, creating weak points and visible high spots.
Iron Remover and Clay Bar Treatment
Iron fallout removers chemically dissolve embedded metallic particles that regular cleaners can’t touch. You’ll see these contaminants bleed purple as they dissolve—a clear sign they’re present. Follow this with a clay bar treatment using a fine-grade clay and dedicated lubricant. Wheels collect more embedded debris than paint, and skipping clay work virtually guarantees coating failure within months. This step removes industrial fallout, rail dust, and environmental contaminants that prevent proper bonding.
Proper Drying Techniques
Water spots are the enemy of perfect coating application. Use compressed air or a dedicated blower to remove water from lug holes, behind spokes, and other trapped areas. Follow with pristine microfiber towels that have never touched wax or sealants. Any residual moisture can cause “water spot etching” under the coating, visible as permanent rings or marks. For ultimate perfection, wipe down with isopropyl alcohol (IPA) solution (15% IPA to 85% distilled water) immediately before coating to remove any remaining oils or water spots.
Application Methods: Spray vs. Wipe vs. Wipe-On Cure
Spray coatings offer the easiest application, distributing product evenly across complex wheel designs with minimal effort. However, they typically contain lower active ingredient concentrations and may require multiple layers for adequate protection. Wipe-on formulas provide superior control and higher durability but demand meticulous technique to avoid streaking and high spots. The “wipe-on, cure, then buff” method—where you apply the coating, let it flash for 1-5 minutes, then level with a clean towel—remains the gold standard for DIYers. Some advanced kits include “flash time indicators” that change color when ready to level, removing guesswork for beginners.
Common Mistakes to Avoid When Coating Wheels
Applying coating in direct sunlight or on hot wheels is the fastest path to failure. The product flashes too quickly, creating an impossible-to-level sticky mess that requires aggressive polishing to remove. Another critical error is over-application—more product doesn’t mean more protection; it creates thick, uneven layers prone to cracking and premature failure. Using contaminated towels or applicators introduces debris that gets permanently sealed into the coating. Perhaps most overlooked is coating over imperfect surfaces—existing clear coat failure, oxidation, or scratches will be magnified, not hidden, by the coating’s glossy finish.
Professional vs. DIY: Cost-Benefit Analysis
Professional wheel coating services range from $400-800 for a complete job, including removal, stripping, and coating. A premium DIY kit costs $60-120, plus $30-50 in preparation supplies. The break-even point is clear, but time investment matters—plan on 3-6 hours for your first DIY attempt versus dropping your car off for a day. The hidden value in DIY is the learning experience; mastering coating application opens the door to protecting your entire vehicle. However, professionals offer warranties, have specialized equipment for wheel removal and tire masking, and can correct existing damage before coating—factors worth considering for high-value or show vehicles.
Maintaining Your Coated Wheels
Washing Techniques for Coated Wheels
Coated wheels demand a complete shift in washing philosophy. Ditch the harsh, acidic wheel cleaners—they’re unnecessary and can degrade the coating over time. Instead, use a pH-neutral shampoo and a dedicated wheel woolie or microfiber mitt. The coating’s slick surface means most contamination rinses away with plain water. When you do need more cleaning power, use iron removers specifically labeled as “coating-safe.” Always wash wheels when cool, and never use automatic car washes with abrasive brushes, which can create swirl marks even on coated surfaces.
Touch-Up Applications and Maintenance Sprays
Even the best coatings benefit from maintenance. Every 3-4 months, apply a silica-based maintenance spray or “booster” that replenishes the coating’s hydrophobic properties. These products contain lower concentrations of SiO2 that bond to the existing layer, extending its life and enhancing water beading. If you notice water no longer beads in certain areas, that’s your cue for a spot touch-up rather than waiting for complete failure. Keep a small amount of your original coating for these minor repairs—applying a thin layer to affected areas takes minutes and prevents widespread degradation.
Safety Considerations and Protective Gear
Most coating formulas contain volatile organic compounds (VOCs) and silicon-based polymers that require proper ventilation and skin protection. Always work in a well-ventilated area—outdoors or with active exhaust fans. Wear nitrile gloves (not latex, which some chemicals degrade) and safety glasses. The fine mist from spray coatings can irritate lungs, so a respirator with organic vapor cartridges is wise for extended application sessions. Keep coating chemicals away from painted surfaces and glass; while they’re safe for cured clear coat, uncured product can etch these surfaces permanently. Store all chemicals in a cool, dry place, as extreme temperatures can destabilize the formula.
How Weather Conditions Affect Application
Ideal application conditions are 60-75°F with humidity between 40-60% and no wind. High humidity accelerates flash time, potentially causing high spots before you can level the coating. Cold temperatures dramatically slow curing, extending the vulnerable “soft cure” period when the coating can be easily damaged. Wind introduces airborne contaminants that land on wet coating, creating permanent imperfections. If you must work in less-than-ideal conditions, adjust your technique—work smaller sections in high heat, extend flash times in cold, and create a temporary shelter in windy conditions. Never apply coating when rain is expected within 24 hours, as water droplets can create permanent etch marks in the uncured layer.
Wheel Types and Compatibility Considerations
Painted and Powder-Coated Wheels
These finishes offer the best canvas for coatings, with excellent bonding characteristics and uniform surfaces. Ensure the factory clear coat is intact—coating over failing clear coat simply seals in the damage and accelerates peeling. For powder-coated wheels, verify the coating is fully cured (most are, but fresh powder coat can outgas for weeks). The smooth, non-porous nature of quality powder coat means you can often skip aggressive claying, though decontamination remains essential.
Bare Aluminum and Polished Metal
Raw aluminum oxidizes rapidly, forming a powdery white corrosion that coatings can’t reverse. You must first polish the surface to a mirror finish and apply a dedicated metal sealant or specialized aluminum coating. Standard ceramic coatings may not bond effectively to bare metal without proper primers. Polished metal wheels benefit enormously from coating, as they prevent the constant re-tarnishing that makes maintenance a nightmare, but the preparation demands are significantly higher.
Chrome and PVD-Coated Wheels
Modern chrome wheels typically feature a clear coat layer that accepts ceramic coatings beautifully. However, traditional uncoated chrome plating is notoriously difficult to bond with and may require specialized adhesion promoters. PVD (Physical Vapor Deposition) coatings are ceramic-based themselves, creating a tricky situation—some ceramic wheel coatings bond perfectly, while others struggle with adhesion. Always test your chosen coating on a small, inconspicuous area first and consult the manufacturer about PVD compatibility.
Decoding Product Labels and Marketing Claims
“Professional grade,” “9H hardness,” and “lifetime protection” are largely unregulated terms that mean different things to different manufacturers. Focus on quantifiable claims: specific SiO2 percentages, documented longevity under real-world conditions, and independent lab testing results. “Made for wheels” should indicate enhanced heat resistance and chemical durability, not just a smaller bottle. Be skeptical of multi-year guarantees that require using the manufacturer’s entire product line—read the fine print, as these warranties often contain clauses that make claims nearly impossible to file successfully. Look for SDS (Safety Data Sheets) availability; reputable manufacturers provide these, revealing the actual chemical composition.
Budgeting for Your Wheel Coating Project
A realistic DIY budget includes more than just the coating kit. Plan for $60-120 for the coating itself, $20-30 for quality iron remover, $15-25 for clay bar and lubricant, $10-15 for IPA or panel prep solution, and $20-30 for fresh microfiber towels and applicators. Factor in optional but recommended items like a dedicated wheel brush set ($15-25) and a maintenance booster spray ($20-30). For a four-wheel job, you’re looking at $150-250 total investment. While this exceeds the cost of many entry-level kits, proper preparation supplies are non-negotiable—skimping here guarantees disappointing results. Consider this an investment in equipment you’ll reuse for future applications and other detailing projects.
Frequently Asked Questions
How long does the entire wheel coating process take from start to finish?
Plan on 4-6 hours for a first-time DIYer working on a standard four-wheel vehicle. This includes 1-2 hours for thorough cleaning and decontamination, 30 minutes for clay bar treatment, 1-2 hours for coating application (15-20 minutes per wheel plus flash time), and 1-2 hours for curing before the vehicle can be moved. Experienced detailers can complete the process in 2-3 hours, but rushing any step compromises results. The coating continues to harden over 24-48 hours, during which you should avoid washing or exposing wheels to harsh conditions.
Can I successfully apply wheel coating if I’ve never detailed a car before?
Absolutely, but success depends on following instructions meticulously rather than relying on experience. Wheel coating is actually more forgiving than paint coating because wheels are smaller, lower-profile surfaces where mistakes are less visible. The key is watching tutorial videos specific to your chosen kit, working in shade, and practicing your technique on a small test area first. Many kits now include “flash time indicators” that remove guesswork. Your first attempt might not be perfect, but it will still provide significant protection over uncoated wheels.
What’s the real difference between wheel coating and traditional wheel wax?
The fundamental difference lies in bonding and longevity. Wax forms a temporary physical layer that washes away within weeks, while ceramic coating chemically bonds to the surface for years. Wax offers minimal heat resistance and melts at temperatures above 180°F, making it useless for wheel applications. Coating creates a hardened, sacrificial layer that withstands brake heat, resists chemical etching, and provides genuine self-cleaning properties through extreme water repellency. Think of wax as makeup that washes off versus coating as semi-permanent skin protection.
Will a quality coating completely eliminate brake dust buildup?
No coating can prevent 100% of brake dust accumulation, but a proper ceramic coating reduces adhesion by 80-90%. Brake dust particles still land on the wheel, but they sit on top of the slick coating rather than embedding into the finish. This means they rinse away with plain water or light agitation instead of requiring harsh chemical cleaners. You’ll still need to wash your wheels, but the process becomes dramatically easier and less frequent. Performance driving with aggressive brake pads will still generate noticeable dust—it just won’t bond to the surface.
Is it possible to apply coating with the wheels still mounted on the car?
Yes, and most DIYers do, but it requires careful masking and technique. You’ll need to mask brake rotors and calipers with plastic bags and tape to prevent overspray. The downside is you can’t coat the inner barrel thoroughly, and tight spokes make application challenging. For best results, remove the wheels and lay them flat—this prevents coating from running, allows you to coat the entire wheel including the barrel, and ensures even coverage. If removing wheels isn’t feasible, invest in a quality wheel coating applicator with a long handle to reach tight spaces.
How long must I wait before driving the vehicle after application?
Most coatings require a minimum of 2-4 hours of dry time before the vehicle can be moved, but this varies by formula. During this period, the coating is vulnerable to water, dust, and touch marks. For full curing, avoid washing for 7 days and skip aggressive driving for 48-72 hours. Some high-performance coatings reach “touch-dry” status within 30 minutes but remain soft for 24 hours. Always check your specific product’s instructions—some require 12+ hours before exposure to moisture. Parking in a garage during the initial cure prevents contamination from dew or unexpected rain.
What should I do if it rains unexpectedly after I’ve applied the coating?
If rain hits within the first 2-4 hours (the critical cure window), the coating will likely develop water spot etching that requires polishing to remove. After 4-12 hours, light rain may just slow the cure without permanent damage—gently blot (never wipe) water droplets with a clean microfiber once the rain stops. Beyond 12 hours, most coatings have hardened enough that rain won’t cause issues. To avoid this stress, always check weather forecasts and apply coating in a garage or covered area when possible. Some detailers use portable pop-up canopies for outdoor applications.
Should I bother coating the inside of my wheels, or just the faces?
Coating the inner barrel provides the same protective benefits—easier cleaning, corrosion resistance, and maintained finish—but the visual return is minimal since it’s rarely seen. However, the inner barrel collects massive amounts of brake dust that can become a permanent, caked-on mess. If you remove your wheels for application, coating the barrel takes only an extra 10 minutes per wheel and makes future tire changes and brake work much cleaner. For daily drivers in winter climates, inner barrel coating prevents salt-induced corrosion that can lead to air leaks around the bead. It’s optional but highly recommended for complete protection.
Can wheel coating repair or hide existing curb rash, scratches, or clear coat damage?
Coating is a protective layer, not a corrective one—it will not fill scratches, fix curb rash, or restore failing clear coat. In fact, applying coating over damaged areas often makes imperfections more noticeable by adding gloss and clarity. You must address all physical damage first through polishing, wet sanding, or professional repair. For minor swirls and hazing, a light polish before coating will yield dramatically better results. Think of coating as a clear, hard shell that locks in whatever condition your wheels are currently in, good or bad.
How can I tell when it’s actually time to reapply the coating rather than just use a maintenance spray?
Perform the “water beading test” every 3-4 months. Spray water on the wheel surface—if it beads tightly and sheets off quickly, the coating is still active. When you notice water starting to “stick” or flatten out, it’s time for a maintenance booster. If water no longer beads at all and contamination begins sticking within days of washing, the base coating has failed and requires reapplication. Another indicator is brake dust adhesion—when dust starts bonding strongly again despite regular washing, the coating’s protective properties have diminished. Don’t wait for complete failure; it’s easier to apply a fresh layer over a weakened coating than to strip and start from scratch.