That persistent drone of tire hum, the roar of asphalt beneath your wheels, and the unsettling resonance of road vibrations can transform even the most luxurious vehicle into a noisy cabin on wheels. For automotive enthusiasts and daily commuters alike, road noise isn’t just an annoyance—it’s a relentless assault on comfort, conversation, and driving pleasure. While modern vehicles come with some factory sound dampening, the truth is that most could benefit significantly from strategic noise reduction treatments.
Undercoating represents one of the most effective yet misunderstood solutions in the car care arsenal. Far beyond simple rust prevention, the right undercoating system can dramatically transform your driving experience by interrupting noise pathways before they reach the cabin. This comprehensive guide cuts through the marketing hype to explore what actually matters when selecting undercoating materials for acoustic performance, helping you make an informed decision based on science rather than flashy packaging.
Top 10 Undercoating For Road Noise Reduction
Detailed Product Reviews
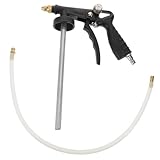
1. Colad Black Anti-Corrosion Noise Reducing Undercoating Paint (Undercoating Spray Gun Attachment)

Overview: The Colad Spray Gun is a specialized pneumatic tool designed for applying undercoating and cavity protection products with professional precision. Engineered to work seamlessly with standard 1 L tins, this attachment transforms messy underbody protection into a streamlined, controlled process for automotive enthusiasts and professional detailers alike.
What Makes It Stand Out: The adjustable nozzle system sets this tool apart, allowing users to create the perfect spray pattern from fine mist to textured “orange peel” finish. The direct 1 L tin compatibility eliminates transfer waste and cleanup time, while the precision air connection provides pressure control for consistent coverage in hard-to-reach chassis cavities and wheel wells.
Value for Money: At $33.24, this spray gun sits in the sweet spot between disposable aerosol cans (limited control, expensive long-term) and professional spray equipment (costing $100+). For DIY restorers or mobile technicians, the durability and versatility across multiple coating applications justify the investment within a single project.
Strengths and Weaknesses: Strengths: Exceptional pattern adjustability; direct tin mounting reduces waste; professional-grade results achievable; versatile for rustproofing, bed liners, and sound deadening applications. Weaknesses: Requires compatible air compressor; limited to 1 L tin size; initial learning curve for pressure adjustment; nozzle cleaning required for material changes.
Bottom Line: For serious DIY automotive protection projects, the Colad Spray Gun delivers professional results without professional pricing. The adjustable nozzle and tin compatibility make it a worthwhile upgrade from spray cans for anyone planning multiple undercoating applications.
2. Cabilock Pneumatic Spraying Tool with Quick Connector for Enhanced Chassis Protection Noise Reduction and Road Impact Defense Automotive Applications
Overview: The Cabilock Pneumatic Spraying Tool positions itself as an affordable entry point into professional-grade underbody protection. Featuring a quick-connect air fitting and robust construction, this sprayer targets budget-conscious enthusiasts seeking to apply chip guard, bed liner, and anti-corrosion coatings without relying on costly aerosol alternatives.
What Makes It Stand Out: The integrated quick connector simplifies compressor hookup, while the tool’s design emphasizes weatherproof coating performance that withstands extreme conditions. Its versatility across chip guard, bed liner, and undercoating applications makes it a multi-purpose solution for comprehensive vehicle protection projects.
Value for Money: Priced at $22.89, this sprayer undercuts most competitors by 30-50% while promising similar functionality. For occasional users or first-time undercoating attempts, the low financial risk makes it attractive. However, the unknown brand longevity means professionals should weigh replacement costs against established alternatives.
Strengths and Weaknesses: Strengths: Highly affordable entry price; quick connector saves setup time; supports multiple coating types; reduces noise and impact damage when paired with proper materials; weather-resistant finish claims. Weaknesses: Brand lacks established reputation; unclear nozzle adjustability; durability concerns with frequent use; requires separate compressor investment; limited documentation on maintenance.
Bottom Line: The Cabilock sprayer serves as a decent budget starter tool for DIY undercoating projects. While it may not match premium brands for longevity, the price point makes it a low-risk option for homeowners protecting a single vehicle or testing pneumatic application methods.
3. Fafeicy Sound Deadener, 7mm Thickness Car Soundproofing Mat, Noise Insulation for Van, Moistureproof Undercoating with Rubber & Aluminum Foil

Overview: The Fafeicy Sound Deadener is a self-adhesive damping mat combining rubber and aluminum foil layers to combat noise and thermal transfer in automotive applications. At 7mm thickness, it targets budget-minded builders seeking affordable soundproofing for doors, floors, and engine bays without investing in premium brands like Dynamat.
What Makes It Stand Out: This mat’s dual-material construction provides both vibration damping and radiant heat reflection in one product. The strong adhesive backing and easy-cut design enable straightforward installation across complex surfaces, while the 7mm profile offers substantial mass for the price point, making it suitable for vans, RVs, and recording spaces beyond just automotive use.
Value for Money: At $12.90, this deadener costs roughly 70% less than name-brand alternatives per square foot. For large-area coverage in budget restorations or work vehicles, the savings are substantial. While premium mats may offer better damping coefficients, the price-performance ratio makes this ideal for secondary applications or full-coverage projects where cost would otherwise be prohibitive.
Strengths and Weaknesses: Strengths: Exceptionally low price; 7mm thickness provides good mass; thermal insulation bonus; versatile beyond automotive use; easy DIY installation; moisture-resistant backing. Weaknesses: Adhesive longevity unproven in extreme heat; may require heat gun for optimal bonding; less effective than butyl-based premium mats; aluminum layer can tear during installation; odor during initial application.
Bottom Line: For budget builds and large-area coverage, the Fafeicy Sound Deadener delivers acceptable performance at an unbeatable price. Reserve it for doors and floors rather than critical firewall applications, and pair with a quality roller for best adhesion results.
Understanding Road Noise and Vehicle Acoustics
The Science Behind Cabin Noise
Road noise enters your vehicle through three primary pathways: airborne sound, structural vibration, and impact noise. Airborne sound consists of tire squeal and wind turbulence that penetrates floor pans and door panels. Structural vibration occurs when road irregularities cause your vehicle’s undercarriage to resonate, transmitting energy directly into the cabin. Impact noise results from stones and debris striking the underbody. Each type requires different damping strategies, which is why comprehensive undercoating approaches outperform single-layer solutions.
How Undercoating Interrupts Sound Transmission
Effective undercoating materials work through two mechanisms: mass loading and constrained layer damping. Mass loading adds weight to vibrating panels, raising their resonant frequency beyond the range of typical road noise. Constrained layer damping uses viscoelastic materials that convert vibrational energy into negligible heat through shear deformation. The most effective systems combine both approaches, creating a multi-stage defense against noise intrusion.
Types of Undercoating Materials
rubberized undercoatings
Rubberized formulations remain the most popular choice for DIY enthusiasts and professionals alike. These products typically contain asphalt or petroleum compounds suspended in a rubber polymer matrix. They cure to a flexible, textured finish that provides excellent impact resistance and moderate sound deadening. The key advantage lies in their ability to maintain flexibility across temperature ranges, preventing cracks that compromise both noise reduction and corrosion protection. However, not all rubberized coatings are created equal—higher solids content generally correlates with better acoustic performance.
Asphalt-Based Undercoatings
Traditional asphalt-based undercoatings offer superior thickness buildup and exceptional water resistance. Their dense composition provides significant mass-loading benefits, making them particularly effective for low-frequency rumble reduction. Modern formulations have evolved far beyond simple tar, incorporating polymers that improve adhesion and reduce the unpleasant odor associated with older products. The primary drawback is temperature sensitivity; these coatings can soften in extreme heat and become brittle in severe cold if not properly formulated.
Polyurethane Undercoatings
Polyurethane systems represent the premium tier for noise-conscious consumers. These two-component formulations cure to a tough, resilient coating with exceptional adhesion and chemical resistance. Their closed-cell structure provides inherent sound-dampening properties while maintaining a relatively lightweight profile. Polyurethane’s primary advantage is its ability to form a seamless membrane that doesn’t crack or peel, ensuring consistent performance over many years. The material’s higher cost reflects its professional-grade durability and superior acoustic properties.
Wax-Based Undercoatings
Wax-based undercoatings, often called “cosmoline” type products, offer a unique approach to underbody protection and noise reduction. These formulations penetrate seams and crevasses while providing a self-healing barrier against moisture. From an acoustic standpoint, they offer moderate damping but excel in cavity protection and existing rust encapsulation. Their softer consistency means they may require more frequent reapplication but make them ideal for vintage vehicles or as a supplemental layer beneath a primary sound-deadening coating.
Ceramic and Advanced Composite Undercoatings
Emerging ceramic-infused undercoatings leverage microsphere technology to create lightweight yet highly effective sound barriers. These advanced composites contain hollow ceramic spheres that disrupt sound wave transmission while adding minimal weight. Some formulations incorporate acoustic metamaterials designed to target specific frequency ranges. While promising, these products demand meticulous surface preparation and professional application to achieve advertised performance levels.
Key Performance Factors to Evaluate
Sound Deadening vs. Sound Absorption
Understanding the distinction between deadening and absorption proves crucial for setting realistic expectations. Sound deadening (or damping) reduces panel vibration, addressing structure-borne noise. Sound absorption deals with airborne noise by trapping sound waves in porous materials. Most undercoatings primarily function as deadeners, though some rubberized formulations offer limited absorption. For comprehensive noise reduction, undercoating should be part of a system that includes dedicated absorption materials in the cabin.
Thickness and Coverage Requirements
Acoustic performance correlates directly with material thickness, but only to a point. Most manufacturers specify an optimal thickness of 60-125 mils (1.5-3mm) for noise reduction. Beyond this, diminishing returns set in while weight increases linearly. Coverage rates vary dramatically by product type—rubberized coatings might cover 15-20 square feet per gallon, while dense asphalt formulations cover only 10-12 square feet. Calculate your vehicle’s underbody area carefully, accounting for wheel wells, frame rails, and floor pans.
Temperature Resistance and Climate Considerations
Your local climate should heavily influence material selection. In regions experiencing temperature extremes, prioritize products with documented performance from -40°F to 200°F. Rubberized and polyurethane coatings generally outperform asphalt-based products in thermal cycling tests. Consider also the “summer heat soak” phenomenon—dark undercoatings can reach surface temperatures exceeding 180°F in direct sunlight, potentially causing low-quality products to outgas or soften.
Flexibility and Crack Resistance
A coating that cracks has failed both acoustically and protectively. Evaluate flexibility through elongation-at-break specifications—quality products should exceed 200% elongation. Crack resistance becomes particularly important on vehicles with unibody construction where flexing is inherent to the design. Polyurethane coatings excel here, maintaining elasticity for 7-10 years, while budget rubberized products may crack within 2-3 years in harsh climates.
Application Methods: Professional vs. DIY
Professional Spray Application
Professional application using high-volume, low-pressure (HVLP) spray systems ensures uniform thickness and complete coverage of complex geometries. Shops equipped with lift bays can access every surface, applying material at optimal temperatures and humidity levels. Professional-grade equipment can handle higher-viscosity, high-solids formulations that outperform consumer products. The investment typically ranges from $500-$1,500 depending on vehicle size and material choice, but includes proper prep, application, and warranty.
DIY Roll-On and Brush-On Techniques
Roll-on application offers cost savings and control over the process for dedicated enthusiasts. This method works best with medium-viscosity rubberized coatings thinned appropriately. The technique demands meticulous surface preparation and multiple thin coats rather than a single heavy application. Plan on 6-8 hours of labor for a sedan, plus 2-3 days of curing time. The key advantage is the ability to apply extra material in known problem areas like transmission tunnels and rear wheel arches.
Aerosol Can Applications
Aerosol undercoatings serve best as touch-up products or for small areas rather than complete vehicle treatment. While convenient, they lack the solids content and thickness necessary for meaningful noise reduction. The propellant and solvent content often exceeds 60%, meaning most of what you pay for evaporates. If using aerosols for spot treatments, select products specifically labeled as “sound deadening” with higher solids content, and plan on 4-5 coats to achieve minimal effective thickness.
Surface Preparation Essentials
Cleaning and Degreasing Protocols
Acoustic performance depends entirely on adhesion, which requires surgical cleanliness. Begin with pressure washing to remove loose debris, followed by degreasing with a petroleum-based solvent or dedicated undercarriage cleaner. For existing vehicles, expect to spend 2-4 hours on cleaning alone. New vehicles require less intensive prep but still need wax and shipping coating removal. Perform a water-break test—if water sheets rather than beads, the surface is properly clean.
Rust Treatment and Conversion
Never apply undercoating over active rust if noise reduction is your goal. Rust creates a discontinuous layer that transmits vibration efficiently. Treat light surface rust with phosphoric acid-based converters that create a stable iron phosphate layer. For heavier rust, mechanical removal via wire wheel or blasting is necessary, followed by an epoxy primer. Some advanced undercoatings can be applied over firm, stable rust, but acoustic performance will be compromised.
Masking and Protection Strategies
Overspray can ruin brake components, exhaust sensors, and suspension bushings. Remove wheels for complete access, and mask brake rotors, calipers, and rubber components with heavy-duty aluminum foil and tape. Cover the exhaust system with fire-resistant blankets—most undercoatings can’t withstand continuous exhaust temperatures and will burn off, creating odor and failure points. Don’t forget to protect parking brake cables and any exposed wiring harnesses.
Layering Strategies for Maximum Noise Reduction
Combining Undercoating with Mass Loaded Vinyl
For luxury-car quiet, undercoating alone isn’t enough. The ultimate system pairs undercoating for impact and vibration with mass loaded vinyl (MLV) barriers inside the cabin. Apply undercoating to the underbody first, then install MLV on the interior side of floor pans. This creates a “mass-spring-mass” system that blocks a broad frequency range. The undercoating acts as the spring layer, decoupling the two mass layers for superior performance.
Vibration Damping Sheets Integration
Butyl-based vibration damping sheets work synergistically with spray undercoatings. Apply sheets to large, flat areas like floor pans and door skins where they can constrain panel vibration most effectively. Then spray undercoating on complex geometries and wheel wells where sheets can’t conform. This hybrid approach maximizes coverage while optimizing material properties—sheets provide high-efficiency damping where geometry allows, while undercoating protects and damps everywhere else.
Strategic Multi-Layer Applications
Professional installers often apply multiple thin layers of different materials. A typical system might start with a rust-encapsulating wax-based coating for penetration, followed by a thick asphalt-based layer for mass loading, and finished with a rubberized topcoat for flexibility and impact resistance. Each layer serves a distinct purpose, and the interfaces between layers actually enhance sound attenuation through impedance mismatching. This approach adds cost and weight but delivers measurable improvements in noise reduction.
Longevity and Durability Considerations
Expected Lifespan by Material Type
Realistic lifespan expectations prevent disappointment. Quality rubberized undercoatings typically last 3-5 years in moderate climates before requiring touch-ups. Asphalt-based products can last 5-7 years but may require annual inspection for cracks. Polyurethane systems often carry 10-year warranties and perform accordingly. Wax-based products need annual reapplication but serve as excellent maintenance coats over more permanent base layers. Environmental factors like road salt, gravel roads, and frequent car washes accelerate degradation.
Maintenance and Touch-Up Requirements
Even the best undercoating develops thin spots from road debris and flexing. Establish a seasonal inspection routine—spring is ideal for assessing winter damage. Touch-up problem areas promptly with compatible materials; mixing incompatible chemistries leads to delamination. Keep detailed records of products used and application dates. Some manufacturers offer compatible touch-up aerosols that match the original coating’s properties, ensuring consistent performance across the vehicle’s life.
Warranty Implications
Aftermarket undercoating can affect manufacturer corrosion warranties if applied incorrectly. Most automakers require that undercoating not trap moisture against metal surfaces and that it not be applied over factory coatings without approval. Professional installers familiar with OEM requirements can apply “warranty-safe” treatments that actually extend rather than compromise coverage. Always check your vehicle’s warranty documentation and consider having the dealership apply factory-approved undercoating if warranty preservation is paramount.
Cost Analysis and Value Assessment
Material Costs vs. Professional Installation
DIY material costs range from $100-$300 for a sedan, while professional application runs $500-$1,500. The price difference reflects labor, equipment, and often superior materials. However, the hidden costs of DIY include proper safety equipment (respirators, coveralls), prep materials, and the value of your time. Professional application becomes more economical for complex vehicles like trucks with extensive frame structures. For optimal noise reduction, budget $200-$400 for premium DIY materials or $800-$1,200 for professional treatment with acoustic-grade products.
Long-Term ROI Through Noise Reduction
Quantifying ROI on noise reduction is subjective but meaningful. Consider that luxury vehicles costing $10,000+ more than their standard counterparts often differ primarily in sound insulation. A $1,000 professional undercoating treatment can deliver 60-70% of the acoustic benefit at a fraction of the cost. For commuters driving 15,000+ miles annually, reduced fatigue and stress translate to tangible quality-of-life improvements. Resale value also benefits—documented professional undercoating with noise reduction as a stated goal appeals to discerning buyers.
Environmental and Safety Factors
VOC Content and Environmental Impact
Modern undercoatings have reduced volatile organic compounds (VOCs), but levels still vary significantly. Water-based undercoatings contain minimal VOCs but often sacrifice performance. Solvent-based products offer superior adhesion and durability but require careful handling. Look for products meeting CARB (California Air Resources Board) standards, which are the most stringent. Some manufacturers now offer low-VOC formulations that maintain performance through advanced polymer chemistry. Always check local regulations—some areas restrict professional application of high-VOC products.
Personal Protective Equipment Requirements
Undercoating application exposes you to chemicals, overspray, and fumes. Minimum PPE includes a NIOSH-approved respirator with organic vapor cartridges (not just a dust mask), chemical-resistant gloves, safety goggles, and disposable coveralls. Work in a well-ventilated area, preferably outdoors. Solvent-based products can cause neurological damage with chronic exposure—take this seriously. Keep a supply of mineral spirits or appropriate thinner for cleanup, and never smoke or introduce ignition sources during application.
Common Mistakes to Avoid
Inadequate Surface Prep Pitfalls
The number one cause of undercoating failure is poor preparation. Skipping degreasing, applying over loose rust, or failing to remove previous failing coatings guarantees disappointment. Undercoating is not a magic solution that adheres to anything—it requires a stable, clean substrate. The second most common mistake is applying in poor conditions: too cold (below 50°F), too humid (above 70% RH), or immediately before rain. Both conditions prevent proper curing and adhesion.
Overapplication Issues
More is not always better. Excessive thickness leads to cracking, peeling, and wasted money. Most products have optimal thickness ranges—exceeding these creates internal stress as the coating cures. Heavy application also adds unnecessary weight, impacting fuel economy and handling. Follow manufacturer coverage rates religiously. It’s better to apply two thin coats than one heavy coat, allowing proper flash time between applications for solvent evaporation and film formation.
Ignoring Manufacturer Specifications
Every undercoating product has specific requirements for surface prep, application temperature, humidity range, and recoat windows. Using a product outside these parameters voids warranties and compromises performance. For example, some polyurethane coatings require specific mixing ratios and have short pot lives—ignore these and you’ll have a ruined gun and wasted material. Read technical data sheets completely before starting, not just the marketing claims on the front label.
Vehicle-Specific Considerations
Cars vs. Trucks vs. SUVs
Vehicle architecture dictates undercoating strategy. Unibody cars benefit most from floor pan and wheel well treatment since the body itself acts as a resonator. Body-on-frame trucks require extensive frame coating—the hollow frame rails act as giant resonance chambers. SUVs, especially three-row models, need attention to cargo area floors and rear wheel arches where noise amplifies. Trucks used for towing should have extra material on transmission crossmembers and rear frame sections that experience increased vibration.
New vs. Used Vehicles
New vehicles offer the best canvas—clean metal, no rust, and intact factory coatings. The ideal window is within the first year of ownership, before road salt and debris compromise the underbody. Used vehicles require realistic expectations—existing rust and previous repairs limit what undercoating can achieve acoustically. However, even heavily used vehicles benefit from treatment; focus on stabilizing existing conditions first, then building a noise-reducing layer. Never undercoat a used vehicle without addressing existing rust, as you’re simply preserving the problem.
Electric Vehicles and Unique Requirements
Electric vehicles present unique challenges and opportunities. Without engine noise masking road sounds, EV owners are hyper-aware of tire and wind noise. The heavy battery pack often damps floor pan vibration, but motor whine and inverter noise create new frequencies to address. Additionally, some EVs use aluminum-intensive construction, requiring specialized primers for undercoating adhesion. Always verify that undercoating won’t interfere with battery thermal management systems or sensor calibration.
Legal and Insurance Aspects
Compliance with Local Regulations
Some jurisdictions regulate undercoating application due to environmental concerns. Professional shops may require permits for spray operations, and DIY application might be restricted in certain areas. California’s Prop 65 warnings on many products indicate potential chemical exposures. If you live in an area with vehicle inspections, ensure undercoating doesn’t obscure VIN numbers, safety inspection stickers, or frame serial numbers—technically required to remain visible in many states.
Impact on Vehicle Warranty
Aftermarket undercoating can void portions of your manufacturer’s warranty if it causes damage or interferes with factory systems. However, the Magnuson-Moss Warranty Act protects consumers—dealers must prove the aftermarket product caused the failure. To stay safe, use professional installers who offer warranty-safe procedures, or have the dealership apply treatments using OEM-approved materials. Document everything with photos and receipts. Some manufacturers offer their own noise-reduction undercoating packages that preserve full warranty coverage.
Insurance Considerations
Comprehensive documentation of professional undercoating can positively affect insurance claims for rust damage. Conversely, poorly applied undercoating that traps moisture and accelerates rust could lead to claim denial. Notify your insurance company of significant investments in undercoating—they may allow you to schedule the treatment as additional equipment coverage. Keep all documentation, including product specifications and professional installation certificates, with your insurance records.
Performance Testing and Verification
Decibel Reduction Measurements
Objective measurement validates your investment. Use a calibrated sound level meter (Type 2 or better) measuring A-weighted decibels (dBA). Establish baseline measurements at consistent speeds (30, 50, 70 mph) on the same road surface before application. Repeat measurements under identical conditions after curing. Expect 3-6 dBA reduction on most vehicles—a seemingly small number that represents a 50-75% reduction in perceived loudness. Frequency analysis reveals more detail, showing where the treatment was most effective.
Real-World Testing Protocols
Laboratory measurements don’t capture the full experience. Develop a subjective testing route that includes smooth highway, coarse concrete, expansion joints, and rough pavement. Note specific noise characteristics: tire whine, impact harshness, and low-frequency booming. Record audio clips for before/after comparison. Pay attention to noise quality, not just quantity—a 3 dBA reduction that eliminates a harsh 200Hz drone provides more satisfaction than a 5 dBA reduction spread across frequencies. Test after a 500-mile break-in period, as materials settle and cure fully.
Integration with Overall Soundproofing Strategy
Door Panel Treatments
Undercoating addresses underbody noise, but doors are major sound leaks. Apply vibration damping sheets to the interior door skin, then install closed-cell foam or MLV barriers over openings. Seal speaker openings with dedicated baffles. The combination of underbody treatment and door treatment often yields better results than doubling down on either area alone. Doors benefit from both damping and absorption, making them ideal for hybrid approaches.
Floor and Firewall Applications
The floor pan transmits noise from both the road and engine bay. After undercoating the exterior, remove interior carpeting and apply vibration damping to the interior floor pan. Add a layer of MLV for airborne noise blocking, then reinstall insulation and carpet. The firewall deserves special attention—engine noise penetrates through thin metal and unsealed penetrations. Apply damping material to the interior firewall, then seal all wiring and HVAC penetrations with acoustic caulk before adding a barrier layer.
Wheel Well and Trunk Treatments
Wheel wells are primary noise entry points. Apply thick undercoating to the outer wheel well, then install a dedicated wheel well liner if your vehicle didn’t come with them. The trunk area often acts as a resonance chamber, amplifying road noise. Undercoat the trunk floor and spare tire well, then apply damping sheets to the trunk lid and interior panels. Don’t forget the rear quarter panels—noise enters here and travels forward through the cabin.
Seasonal Application Timing
Optimal Weather Conditions
Timing your application maximizes results and minimizes frustration. Ideal conditions are 70-85°F with low humidity (40-60%) and no precipitation for 24-48 hours. Spring and early fall typically offer these windows. Avoid application when temperatures will drop below 50°F within 24 hours, as this prevents proper film formation. High summer heat can cause solvents to flash too quickly, resulting in porous, weak films. Check extended forecasts—unexpected rain within the curing window can ruin fresh undercoating.
Curing Time Considerations
Curing isn’t just drying—it’s the chemical process of film formation and property development. While most undercoatings are dry to touch within 2-4 hours, they continue curing for 7-14 days. Avoid heavy rain, car washes, and off-road use during this period. Full acoustic properties may not develop until after 500-1,000 miles of driving as the material fully settles and any residual solvents outgas. Schedule application when you can afford to park the vehicle for several days and drive gently for the first few weeks.
Frequently Asked Questions
How much noise reduction can I realistically expect from undercoating alone?
Most vehicles experience a 3-6 decibel reduction in cabin noise after proper undercoating application, with the greatest improvements in impact harshness and low-frequency rumble. This represents a 50-75% reduction in perceived loudness. However, undercoating addresses primarily structure-borne and impact noise. For comprehensive quieting, combine undercoating with interior treatments like mass loaded vinyl and vibration damping sheets.
Will undercoating add significant weight to my vehicle?
A complete professional undercoating treatment adds 15-30 pounds to a typical sedan, depending on material type and thickness. Rubberized coatings are lighter (15-20 lbs), while asphalt-based systems are heavier (25-35 lbs). This modest weight increase has negligible impact on fuel economy (typically less than 0.5%) but provides substantial noise reduction benefits. The weight is strategically distributed low on the vehicle, potentially even improving the center of gravity slightly.
Can I apply undercoating over existing rust?
Light surface rust can be treated with rust converter and primed before undercoating, but heavy, scaly rust must be mechanically removed. Applying undercoating over active rust traps moisture and accelerates corrosion while doing nothing for noise reduction. The coating will delaminate as rust expands beneath it. For acoustic performance, you need clean, stable metal. Think of undercoating as a protective and sound-deadening layer, not a rust repair solution.
How long does undercoating last before needing reapplication?
Quality rubberized undercoatings last 3-5 years in moderate climates, while premium polyurethane systems can exceed 10 years. Lifespan depends on climate, driving conditions, and material quality. Vehicles in road-salt regions or those frequently driven on gravel need annual inspections and touch-ups. Look for cracking, peeling, or thin spots during seasonal maintenance. A maintenance coat every 2-3 years extends the life of the base layer significantly.
Is professional application worth the extra cost over DIY?
Professional application justifies its cost through superior surface prep, uniform thickness, access to commercial-grade materials, and warranties. Professionals can achieve 20-30% better coverage efficiency and use HVLP systems that create better adhesion. The $500-$1,500 investment typically includes a warranty and uses products not available to consumers. DIY saves money but demands 8-12 hours of labor, equipment costs, and carries the risk of improper application that could require complete removal and reapplication.
Will undercoating void my vehicle’s warranty?
Aftermarket undercoating can void warranty coverage if it causes damage or interferes with factory systems, but dealers must prove causation under the Magnuson-Moss Warranty Act. To protect yourself, use professional installers who follow OEM guidelines or have dealership-applied treatments using manufacturer-approved materials. Document everything with photos and receipts. Some manufacturers offer their own noise-reduction undercoating packages that preserve full warranty coverage.
Can undercoating be removed if I change my mind?
Removing undercoating is labor-intensive and rarely done completely. Mechanical removal with scrapers, wire wheels, and media blasting works but is time-consuming. Chemical strippers exist but are harsh and environmentally problematic. Some shops offer removal services costing $500-$1,000 for a complete job. It’s far easier to apply correctly the first time than to remove later. Consider starting with less visible test areas if you’re uncertain about the results.
Does undercoating help with heat insulation as well as noise?
Most undercoatings provide modest thermal insulation benefits, reducing heat transfer from exhaust systems and road surfaces into the cabin. Rubberized and asphalt-based coatings offer the best thermal resistance. However, dedicated thermal barriers perform significantly better for heat management. Some undercoatings can actually retain heat if applied too thickly, potentially affecting component cooling. For exhaust-related heat, use dedicated heat shields in conjunction with undercoating.
What’s the difference between undercoating and bedliner material?
While both are protective coatings, they’re formulated for different purposes. Bedliners prioritize abrasion resistance and cargo protection, using high-hardness polyurethane or polyurea chemistries. Undercoatings prioritize flexibility, sound damping, and corrosion protection. Some DIYers use bedliner for undercoating, but it often cracks on flexible panels and provides inferior noise reduction. Conversely, undercoating lacks the impact resistance needed for truck bed duty. Use products designed for their intended purpose.
How do I know if my undercoating is actually working for noise reduction?
Conduct before-and-after decibel measurements using a calibrated sound level meter at consistent speeds on the same road. More subjectively, pay attention to specific noise characteristics—effective undercoating eliminates the sharp “ping” of road debris and reduces low-frequency booming over expansion joints. If you can still clearly hear individual tire impacts and high-frequency hiss, the application may be inadequate or focused on the wrong frequency range. Quality undercoating should make the cabin feel more “solid” and isolated from the road surface.