When you’re pouring hundreds of hours and thousands of dollars into a custom automotive build, every detail matters. The perfect paint, the throaty exhaust note, the precisely tuned suspension—each element reflects your vision. Yet one of the most critical preservation steps often gets treated as an afterthought: undercoating. For custom builds, this isn’t just about rust prevention; it’s about protecting your investment, maintaining structural integrity, and ensuring your creation looks as stunning underneath as it does on top. The right undercoating strategy can mean the difference between a showpiece that lasts decades and a garage queen that secretly succumbs to corrosion.
Choosing the ideal undercoating product for your custom project requires more than grabbing the first can off the shelf. Custom vehicles present unique challenges—modified frames, mixed materials, extreme performance demands, and show-quality expectations that stock restorations never face. This comprehensive guide walks you through everything you need to know to make an informed decision, from understanding formulation chemistry to mastering application techniques that professional builders swear by.
Top 10 Undercoating Products
Detailed Product Reviews
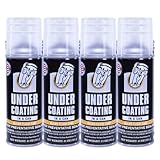
1. Undercoating In A Can - Black Wax Coating (12) 12oz. Case

Overview: The Undercoating In A Can Black Wax Coating case provides twelve 12-ounce aerosol cans of military-grade undercarriage protection. Meeting stringent MIL-PRF-62218B specifications, this wax-based formula prevents rust and corrosion while halting existing oxidation from spreading. Each can delivers comprehensive sound-deadening benefits and exceptional durability for vehicle undercarriages exposed to harsh conditions.
What Makes It Stand Out: Military approval distinguishes this product from typical consumer-grade alternatives. The wax formulation actively encapsulates existing rust rather than merely covering it, creating a lasting barrier. Its longevity claim—lasting four times longer than conventional asphalt or rubberized coatings—represents significant technological advancement. The aerosol delivery system enables precise application in hard-to-reach areas without requiring professional equipment investment, making advanced protection accessible to DIY enthusiasts.
Value for Money: At $74.18 for 144 total ounces, pricing remains competitive at approximately $0.52 per ounce. Bulk packaging saves 15-20% versus individual can purchases. For enthusiasts maintaining multiple vehicles or performing restoration work, the case quantity eliminates repeat purchases and shipping costs. The extended service life claim reduces long-term expenses compared to products requiring annual reapplication, making it economically advantageous over time.
Strengths and Weaknesses: Pros:
- MIL-SPEC certified performance standard
- Convenient aerosol application for DIY use
- Encapsulates existing rust effectively
- Multi-vehicle quantity efficiency
Cons:
- Premium price point for casual users
- Requires extensive surface masking preparation
- Overspray cleanup challenges
Bottom Line: This military-spec undercoating case suits serious DIY enthusiasts and small shops prioritizing long-term protection. The convenience and proven performance justify the investment for those committed to comprehensive vehicle preservation.
2. woolwax Pro Undercoating Gun by Kellsport
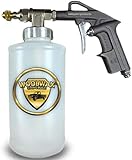
Overview: The woolwax Pro Undercoating Gun by Kellsport represents a specialized application system engineered specifically for lanolin-based corrosion inhibitors. This professional-grade spray gun includes comprehensive accessories designed for thorough undercarriage coverage. It delivers significant upgrades over basic spray equipment for dedicated vehicle protection enthusiasts seeking precision results.
What Makes It Stand Out: Purpose-built design ensures optimal flow characteristics for lanolin-based products like woolwax. The included 18-inch 360-degree wand and 24-inch flexible extension provide access to frame rails, rocker panels, and enclosed cavities unreachable with standard equipment. Three empty quart bottles facilitate custom mixing ratios and bulk container transfers. The adjustable nozzle fine-tunes spray patterns from broad coverage to targeted streams for different surface areas and component configurations.
Value for Money: At $119.50, the system demands commitment to regular undercoating applications for cost justification. For vehicle collectors, restoration professionals, or fleet maintainers, precision and efficiency gains quickly offset initial expense. The gun pays for itself after three to four applications compared to disposable aerosol cans. Durable construction ensures years of reliable service, making it a sound long-term investment for frequent users.
Strengths and Weaknesses: Pros:
- Purpose-built for lanolin-based products
- Superior reach with dual extension wands
- Reusable system reduces environmental waste
- Professional-grade metal construction
Cons:
- Requires separate coating purchase
- Learning curve for optimal pressure settings
- Initial investment exceeds casual user needs
Bottom Line: This application system serves dedicated enthusiasts and professionals using lanolin-based undercoatings regularly. The precision and efficiency make it worthwhile for multiple-vehicle applications but overkill for occasional single-vehicle use.
3. POR-15 Semi-Gloss Black Stop Rust Undercoating System, 3 Products, 32 fluid ounces each
Overview: The POR-15 Semi-Gloss Black Stop Rust Undercoating System provides a complete three-step solution in 32-ounce quantities for comprehensive rust prevention. This professional-grade kit addresses surface preparation, rust conversion, and final protective coating. POR-15’s industrial reputation ensures maximum corrosion resistance for restoration projects demanding proven results.
What Makes It Stand Out: The three-product approach guarantees proper surface preparation—a critical factor determining coating longevity. The semi-gloss black finish provides professional appearance while maintaining flexibility on metal substrates. POR-15’s moisture-cured urethane technology creates an impermeable barrier that withstands extreme environmental conditions. The systematic process includes cleaner, metal prep, and topcoat for complete treatment protocol.
Value for Money: At $125.87 for 96 total ounces, the per-ounce cost of $1.31 reflects premium positioning consistent with industrial-grade performance. For restoration projects where preparation quality determines ultimate success, the systematic approach prevents costly coating failures. The brand’s proven industrial heritage justifies the premium for critical applications where compromise proves more expensive long-term.
Strengths and Weaknesses: Pros:
- Complete three-step system included
- Professional semi-gloss finish quality
- Industrial-grade durability reputation
- Comprehensive rust conversion technology
Cons:
- Higher cost per ounce than competitors
- Multi-step process requires significant time commitment
- Limited quantity for large truck or SUV applications
Bottom Line: This POR-15 system suits restoration professionals and enthusiasts demanding proven industrial-grade protection. The systematic approach and brand reputation justify the premium for vehicles requiring maximum corrosion prevention.
4. Undercoating In A Can - Black Wax Coating (5 Gallon Pail)
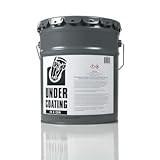
Overview: The Undercoating In A Can Black Wax Coating five-gallon pail delivers bulk quantities of the same MIL-PRF-62218B approved formula for professional applications. This industrial-sized container provides 640 ounces of military-grade rust prevention for extensive shop use or serious enthusiast projects requiring maximum coverage. The pail format serves high-volume users efficiently.
What Makes It Stand Out: The substantial five-gallon quantity eliminates repeated reordering for restoration shops and collector garages. The identical military specification approval ensures performance consistency with the convenient aerosol version. Bulk packaging reduces per-ounce costs significantly while providing material optimized for spray equipment application. The wax-based formula maintains all protective benefits—rust encapsulation, sound deadening, and extended longevity claims in a professional format.
Value for Money: At $223.91 for 640 ounces, the per-ounce cost drops to approximately $0.35—representing 30% savings versus aerosol cans. For restoration shops or serious collectors, this pricing structure makes professional-grade protection economically viable for multiple vehicle treatments. Extended shelf life ensures product viability across numerous project cycles, maximizing return on investment and reducing material waste from expired products that plague smaller containers.
Strengths and Weaknesses: Pros:
- Lowest per-ounce cost in entire product line
- Consistent MIL-SPEC performance standard
- Economical for multiple vehicle applications
- Reduces packaging waste significantly
Cons:
- Requires separate spray equipment purchase
- Substantial upfront investment for casual users
- Demands adequate storage space and conditions
Bottom Line: This five-gallon pail serves professional shops and dedicated enthusiasts with multiple vehicles. The substantial cost savings and proven performance make it the economical choice for high-volume undercoating applications.
5. Undercoating in a Can Clear Wax Coating - 12/12oz. Case

Overview: Undercoating in a Can Clear Wax Coating provides identical protective benefits as its black counterpart in a transparent formula. This case includes twelve 12-ounce aerosol cans for comprehensive undercarriage protection. The clear finish preserves original component appearance while delivering military-grade corrosion prevention for restoration purists and show car owners.
What Makes It Stand Out: The transparent formulation allows application on visible components without altering factory aesthetics. This versatility extends to suspension parts, frame sections, and engine bays where visual authenticity matters most. The same corrosion-resistant properties protect against moisture and salt damage. The aerosol delivery maintains convenience for precise application in tight spaces while remaining invisible after curing, making it ideal for concours-quality vehicles.
Value for Money: Priced identically to the black version at $74.18 for 144 ounces, this clear formula offers equivalent value proposition. For restorers seeking original appearance preservation, the transparent option proves invaluable. The per-can cost remains competitive with premium automotive protectants. Bulk packaging ensures adequate supply for comprehensive vehicle treatment without multiple purchases, saving shipping costs and time.
Strengths and Weaknesses: Pros:
- Preserves original component appearance perfectly
- Versatile application across multiple vehicle areas
- Same protection level as pigmented version
- Convenient aerosol format for DIY use
Cons:
- Clear finish shows dirt accumulation over time
- Requires more careful application monitoring
- Same premium pricing as black version
Bottom Line: This clear undercoating case suits restorers and enthusiasts prioritizing original appearance preservation. The transparent protection delivers military-grade performance without compromising visual authenticity.
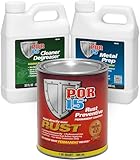
6. POR-15 Gray Stop Rust Undercoating System, 3 Products, 32 fluid ounces each

Overview: The POR-15 Gray Stop Rust Undercoating System delivers a comprehensive three-step solution for permanent corrosion protection. This kit includes 32-ounce containers of Cleaner Degreaser, Metal Prep, and Rust Preventive Coating, designed to work synergistically on stable rust or seasoned metal surfaces. The system creates a hammer-tough finish that chemically bonds with metal, offering professional-grade results for automotive undercarriages, frames, and industrial applications where rust is already established.
What Makes It Stand Out: The three-stage process represents a complete chemistry-based approach rather than simple paint coverage. The Cleaner Degreaser removes contaminants without toxic fumes, while Metal Prep etches the surface for optimal adhesion. The final coating applies directly to rust, encapsulating it permanently instead of merely covering it. Its resistance to acids, alkalis, oils, and fuels makes it exceptionally durable in harsh environments where conventional undercoatings fail.
Value for Money: While price information is unavailable, this professional system typically represents significant savings compared to shop-applied treatments costing hundreds of dollars. The 32-ounce quantities provide substantial coverage for multiple vehicle frames or extensive projects, making it economical for serious DIY restorers who would otherwise pay premium labor costs.
Strengths and Weaknesses: Strengths include permanent rust encapsulation, chemical resistance, and professional-grade durability. The multi-step process ensures maximum adhesion and longevity. Weaknesses involve the mandatory three-step application requiring time and attention to detail. The gray finish may not suit all aesthetic preferences, and proper surface preparation is non-negotiable for success.
Bottom Line: For enthusiasts tackling rust on frames or undercarriages, this system offers professional results that outperform conventional paints. The permanent protection justifies the effort.
7. POR-15 Semi-Gloss Black Stop Rust Undercoating System, 3 Products, 32 fluid ounces each

Overview: The POR-15 Semi-Gloss Black Stop Rust Undercoating System provides a scientifically-tested three-step solution for permanent corrosion protection. This $118.05 kit includes three 32-ounce containers that work together to create a military-grade barrier against rust on automotive frames and industrial metal surfaces. The semi-gloss black finish offers a professional appearance while delivering documented performance metrics.
What Makes It Stand Out: This system boasts impressive certified testing results, exceeding Mil-D-3134J impact resistance standards and surviving 250 hours of ASTM B-117 salt spray testing without rust formation. The NACE certification confirms its non-porous nature, while ASTM C-501 testing demonstrates zero loss after 1,000 abrasion cycles. Temperature resistance up to 450°F for ten hours makes it suitable for high-heat applications.
Value for Money: At $118.05 for 96 total ounces, this kit costs approximately $1.23 per ounce—competitive with professional undercoating services that charge $300-800 per vehicle. The quantified performance data provides assurance that cheaper alternatives cannot match, making it a smart investment for restoration projects where documented durability matters.
Strengths and Weaknesses: Strengths include certified test results, high-temperature tolerance, impact resistance, and permanent adhesion. The semi-gloss finish provides a factory appearance. Weaknesses include the premium price point and the labor-intensive three-step process. Application requires precise timing and conditions, making it less forgiving for beginners than spray-can alternatives.
Bottom Line: For serious restorers needing proven, documented performance, this system justifies its cost through certified testing and permanent protection. Professional results demand professional products.
8. Undercoating In A Can Clear Fluid Coat 12/11oz Case
Overview: Undercoating In A Can Clear Fluid Coat offers a straightforward oil-based rust protection solution in a convenient spray format. This $76.48 case includes twelve 11-ounce cans, providing 132 total ounces of clear penetrating fluid designed to displace moisture from tight joints and crevices. The transparent formula allows for annual reapplication without affecting the vehicle’s appearance.
What Makes It Stand Out: The clear, creeping fluid formulation actively pushes out existing moisture and corrosion from hard-to-reach areas where rust typically originates. Unlike pigmented coatings that can mask developing problems, the transparent nature allows for visual inspection of metal conditions. The oil-based chemistry provides self-healing properties, continuously migrating to protect exposed areas.
Value for Money: At $76.48 for 132 ounces, this costs roughly $0.58 per ounce—significantly cheaper than professional applications. The twelve-can case provides enough product for multiple vehicles or several years of annual treatments. For maintenance-focused users preferring regular reapplication over permanent solutions, this represents exceptional economy compared to $100+ shop services.
Strengths and Weaknesses: Strengths include easy spray application, excellent penetration into seams, affordability, and visual inspection capability. The annual reapplication schedule encourages regular maintenance. Weaknesses include the limited one-year protection span, potential messiness from oil-based formula, and clear finish that may appear greasy or uneven on visible surfaces.
Bottom Line: Ideal for budget-conscious owners prioritizing maintenance over permanent fixes. Best for hidden undercarriage areas requiring regular inspection and touch-ups rather than show-quality finishes.
9. Bedliner/Undercoating Gun
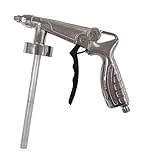
Overview: The Bedliner/Undercoating Gun provides a basic pneumatic application tool for DIY automotive protection projects. Priced at $24.15, this spray gun focuses on essential functionality for applying bedliners and undercoatings. Its simplified design targets hobbyists seeking an affordable entry point into professional-style coating application without investing in high-end equipment.
What Makes It Stand Out: The adjustable fan control distinguishes this budget tool from disposable spray cans, allowing users to customize spray patterns from narrow streams to wide fans. This versatility enables precise application in tight frame rails or broad coverage on floor pans. The dedicated undercoating design suggests optimized nozzle geometry for thick, textured materials that standard paint guns struggle to atomize properly.
Value for Money: At $24.15, this represents one of the most affordable pneumatic application tools available. Comparable guns typically start at $40-60, making this an economical choice for one-time projects or occasional use. The cost savings versus professional application services quickly offset the investment after a single vehicle treatment.
Strengths and Weaknesses: Strengths include low price point, adjustable fan control, and purpose-built design for thick coatings. The pneumatic operation provides consistent pressure versus aerosol cans. Weaknesses include unspecified build quality, lack of included accessories like hoses or connectors, and minimal feature set. Durability concerns arise with intensive use, and cleaning requirements may challenge beginners.
Bottom Line: A functional starter tool for occasional DIY undercoating jobs. Worth the minimal investment for those comfortable with pneumatic equipment limitations.
10. NDNCZDHC Air Undercoating Spray Gun with Stainless Steel Tube, Pneumatic Automotive Undercoating Gun Kit with 53cm Quick Connector Hose

Overview: The NDNCZDHC Air Undercoating Spray Gun offers a feature-rich pneumatic application solution for automotive and industrial coatings. At $23.79, this kit includes a stainless steel tube and 53cm quick connector hose, providing everything needed for immediate use. The tool handles rubber undercoating, truck bed liners, rustproofing, and standard coatings with professional versatility.
What Makes It Stand Out: The copper-aluminum-stainless steel construction delivers durability uncommon in sub-$25 tools, while the ergonomic trigger handle reduces fatigue during extended applications. The industrial quick connect system ensures compatibility with standard air compressor fittings. Multi-material compatibility supports both oil-based and water-based products, expanding its utility beyond single-purpose guns.
Value for Money: At $23.79 including a hose and quick connector, this kit undercuts competitors by $10-20 while offering superior materials and ergonomics. The included accessories eliminate additional purchases, providing immediate out-of-box functionality. For DIY enthusiasts and light professional use, the build quality and feature set exceed price expectations.
Strengths and Weaknesses: Strengths include excellent material construction, ergonomic design, quick-connect convenience, versatile material compatibility, and included hose. The 53cm stainless tube reaches deep into frame rails. Weaknesses include unknown brand reputation, potentially limited parts availability, and unspecified air consumption requirements that may challenge smaller compressors.
Bottom Line: Exceptional value for serious DIYers needing a durable, versatile undercoating gun. The included accessories and quality materials make it a smart purchase over bare-bones alternatives.
Why Undercoating is Non-Negotiable for Custom Builds
Custom builds represent a unique vulnerability when it comes to corrosion. Unlike factory vehicles with uniform steel construction and standardized coating processes, your project likely features welded seams, modified frame sections, and bare metal exposed during fabrication. Every grinding mark, weld bead, and custom-fabricated panel creates a potential entry point for moisture and road salt. Quality undercoating forms a flexible, impenetrable barrier that seals these vulnerable areas while providing impact resistance against rocks and debris.
Beyond protection, modern undercoatings contribute to the overall driving experience. Premium formulations offer substantial sound-dampening properties, reducing road noise and creating a more refined cabin environment. For pro-touring builds where performance meets luxury, this dual benefit is invaluable. The product you select becomes a permanent part of your vehicle’s ecosystem—choose wisely, and it enhances; choose poorly, and it can trap moisture, add unnecessary weight, or even crack and peel, compromising both appearance and protection.
Understanding Different Undercoating Formulations
Not all undercoatings are created equal, and each chemical formulation brings distinct advantages and trade-offs. Understanding these differences is fundamental to matching a product to your specific build requirements.
rubberized undercoatings
Rubberized formulations remain the most popular choice for general automotive applications, combining asphalt or petroleum resins with rubber polymers. These products create a thick, textured finish that excels at sound deadening and impact resistance. For custom builds, rubberized coatings work exceptionally well on daily drivers and restomods where maximum protection is priority number one. The flexible nature allows it to expand and contract with temperature changes without cracking, making it ideal for vehicles that will see varied climates.
However, the thickness can be a double-edged sword. Rubberized coatings add measurable weight—typically 10-15 pounds for a complete vehicle application. They also tend to have a matte, utilitarian appearance that may not suit show cars where underside aesthetics matter. Application requires careful attention to avoid sagging on vertical surfaces, and once cured, removal for repairs becomes extremely difficult.
Asphalt-Based Undercoatings
Traditional asphalt-based products offer the most economical path to rust protection. These solvent-based coatings dry to a hard, durable finish that repels water effectively and provides excellent abrasion resistance. For budget-conscious builds or vehicles destined for harsh winter environments, asphalt undercoating delivers proven protection at a fraction of the cost of premium alternatives.
The downside? Asphalt coatings lack flexibility and become brittle in extreme cold, potentially cracking after several freeze-thaw cycles. They offer minimal sound-dampening qualities compared to rubberized options, and the strong odor during application can linger for weeks. For show vehicles, the rough, uneven texture and potential for surface blooming (a white, powdery residue) make asphalt coatings less desirable.
Wax and Paraffin-Based Undercoatings
Wax-based formulations represent the old-school approach, favored by concours restorers and vintage European car specialists. These products penetrate seams and crevices deeply, creating a self-healing barrier that remains soft and pliable indefinitely. For custom builds featuring complex fabrication or numerous welded joints, wax undercoating provides unmatched crevice penetration and easy reapplication.
The primary limitation is durability. Wax coatings wash away over time, requiring annual reapplication in harsh climates. They attract dirt and dust, creating a grimy appearance, and offer virtually no impact protection. Modern synthetic waxes have improved longevity, but these remain best suited for garage-kept show cars or trailers that rarely see wet conditions.
Polyurethane and Polyurea Coatings
The premium tier for custom builds belongs to two-part polyurethane and polyurea systems. These professional-grade coatings cure through chemical reaction, creating a rock-hard yet flexible membrane that’s impervious to chemicals, abrasion, and moisture. For high-end pro-touring builds, restomods with six-figure investments, or vehicles with extreme underbody temperatures, polyurea coatings provide lifetime protection that won’t crack, peel, or degrade.
The investment is substantial—both in product cost and application equipment. These coatings require specialized spray guns, proper ventilation, and meticulous surface preparation. The application window is unforgiving; once mixed, you have limited time before the product sets in the gun. However, the results justify the effort: a showroom-quality underbody finish that enhances rather than hides your fabrication work.
Key Performance Metrics That Matter
Evaluating undercoating products requires looking beyond marketing claims to quantifiable performance indicators. Dry time matters significantly for project scheduling—some products skin over in 30 minutes while others require 24 hours between coats. Full cure time affects when you can safely handle or drive the vehicle; premium polyureas may cure in hours, while rubberized coatings need days to reach maximum hardness.
Film thickness directly correlates with protection level but impacts weight and appearance. Measure wet mils versus dry mils—most quality products specify a target thickness of 15-25 dry mils for optimal protection. Flexibility testing (often expressed as elongation percentage) predicts how well the coating will handle chassis flex and thermal expansion. For custom builds with modified suspension geometry or stiffer frames, aim for products with at least 200% elongation.
Chemical resistance is crucial if your build features modern fluids (synthetic oils, aggressive brake fluids) or sees track time where hot oil and fuel spills occur. Request technical data sheets and look for specific resistance ratings against automotive chemicals. Salt spray testing (ASTM B117) provides standardized corrosion protection metrics—quality products should exceed 1,000 hours without failure.
Application Methods: Spray, Brush, or Roll?
Your application technique influences product selection as much as the formulation itself. Airless spray systems deliver professional results with most rubberized and asphalt coatings, providing uniform coverage and efficient material usage. For custom builds, this method excels at coating complex surfaces like modified frame rails, custom crossmembers, and fabricated control arms. The downside is overspray management and the need for proper PPE and ventilation.
Brush application offers maximum control for detailed work, allowing you to work the coating into seams, weld beads, and hard-to-reach areas. This method is mandatory for wax-based products and preferred for two-part polyureas where precision matters. The trade-off is time investment and potential for brush marks or uneven thickness. For show builds where underside appearance counts, brush application lets you create a smoother, more uniform finish.
Roller application strikes a balance between speed and control, working well on flat surfaces like floor pans and trunk areas. Some builders use a combination approach—spray for coverage, then back-brush for penetration and appearance. Whatever method you choose, ensure the product specifications support it; some formulations are too thick for spraying without thinning, while others can’t be brushed without leaving streaks.
Surface Preparation: The Foundation of Success
The best undercoating in the world will fail if applied over contaminated or improperly prepared metal. For custom builds, this step is even more critical because fabrication generates scale, weld spatter, and oxidation that must be completely removed. Start with aggressive cleaning—pressure wash the underside, then degrease with a wax-and-grease remover that’s compatible with your substrate.
Media blasting offers the gold standard for preparation, removing rust, old coatings, and surface impurities while creating an ideal texture for coating adhesion. For bare steel custom fabrication, aim for a 2-3 mil profile. If blasting isn’t feasible, mechanical abrasion with 80-grit sandpaper on a dual-action sander provides a suitable alternative. Pay special attention to welded seams—grind flush any high spots, but don’t polish the metal smooth; undercoating needs some tooth to grip.
After abrasion, treat bare metal with an etching primer or conversion coating specifically designed for underbody use. These products prevent flash rusting and improve adhesion. For mixed-material builds (steel frame with aluminum panels), use a primer compatible with both substrates. Finally, wipe down with a tack cloth and apply your undercoating within the primer’s recoat window—typically 24-48 hours.
Curing Time and Temperature Considerations
Custom builds often happen in home garages where climate control is limited, making cure dynamics critically important. Most undercoatings require temperatures between 60-90°F and relative humidity below 65% for proper curing. Cold-weather formulas exist that cure at temperatures as low as 40°F, but they sacrifice long-term durability and flexibility.
Two-part polyurea systems are particularly sensitive—apply them below recommended temperatures and they may never achieve full hardness, remaining tacky or soft indefinitely. Conversely, apply them in excessive heat and the pot life becomes dangerously short. For garage builders, consider warming the product in hot water before application and using infrared lamps to maintain substrate temperature during cure.
Humidity affects water-based formulations more than solvent-based, but even rubberized coatings can blush or develop solvent pop in high moisture conditions. If you’re building in a humid climate, extend flash-off times between coats and consider forced-air ventilation. Some premium products offer forced-cure schedules using heat lamps—follow these precisely, as under-cured coating performance degrades substantially.
Custom Build-Specific Factors
Show Car vs. Daily Driver Undercoating
The fundamental divide in custom builds is intended use, and this should drive your product selection. Show cars demand undercoating that enhances appearance while providing adequate protection for limited exposure. For these builds, consider thinner, smoother formulations that can be color-matched or top-coated with a satin black chassis paint. The goal is a concours-ready underbody that looks as good as the exterior.
Daily drivers, pro-touring builds, and vehicles seeing regular road use need maximum protection first, aesthetics second. Here, thicker rubberized or polyurea coatings make sense, prioritizing impact resistance and long-term durability. These builds benefit from two-stage approaches—a base layer of rust encapsulator followed by a topcoat of sound-deadening undercoating. The combination provides both active rust conversion and passive barrier protection.
Modified Frames and Custom Fabrication
Any welding, grinding, or frame modification creates heat-affected zones and bare metal that are hyper-susceptible to rust. For these areas, use a weldable primer immediately after fabrication, then follow with a penetrating rust inhibitor before final undercoating. Custom fishplates, gussets, and boxing plates trap moisture between layers—address these by coating each component separately before final assembly, using a cavity wax injection afterward.
Boxed frames present a unique challenge—moisture enters through seams and cannot escape, leading to internal rust. The solution is internal frame coating, a thin, waxy product applied through access holes that flows into every crevice. For completely custom tube frames, consider powder coating individual tubes before welding, then touching up weld areas with ceramic coating and undercoating the completed assembly.
Mixed Material Substrates
Modern custom builds increasingly combine steel, aluminum, stainless, and even carbon fiber. Each material expands and contracts at different rates and has different corrosion mechanisms. Steel requires barrier protection against moisture and oxygen. Aluminum needs protection from galvanic corrosion when contacting steel hardware. Carbon fiber is inert but can delaminate if moisture wicks into the resin.
Select undercoating products specifically rated for multi-metal applications. Avoid coatings containing high levels of metal oxides that could accelerate galvanic corrosion. For aluminum-intensive builds, consider ceramic-based coatings that provide thermal insulation in addition to corrosion protection. Always isolate dissimilar metals with appropriate fasteners and barrier coatings before applying the final undercoating layer.
Sound Deadening vs. Rust Protection
While most undercoatings provide both benefits, the balance varies dramatically by formulation. Sound deadening requires mass and damping—heavy, viscoelastic materials that convert vibration into heat. Rust protection demands impermeability and chemical resistance, often achieved through harder, less flexible films. Understanding this trade-off helps you select the right product for your priorities.
For luxury-oriented builds where NVH (noise, vibration, harshness) reduction is paramount, prioritize rubberized undercoatings with high mass per mil thickness. These typically contain butyl rubber or asphaltic compounds that deaden sheet metal resonance effectively. Apply them in multiple thin layers rather than one thick coat—this layering technique, called constrained layer damping, outperforms single heavy applications.
For performance builds where weight is critical, choose hard-shell polyurea coatings that provide excellent rust protection with minimal sound damping. Supplement with dedicated sound-deadening mats in the cabin area where it matters most. This targeted approach saves weight while addressing both concerns appropriately. Some builders even use different products in different areas—heavy damping on floor pans, lightweight protection on frame rails.
Weight Considerations for Performance Builds
Every pound matters in a pro-touring or track-focused custom build. Undercoating can add anywhere from 8 pounds (thin polyurea) to 25 pounds (thick rubberized) to your vehicle. Calculate this into your total weight budget, especially if you’re chasing specific power-to-weight ratios or class compliance.
Two-part polyurea systems offer the best strength-to-weight ratio, achieving maximum protection at just 8-10 mils thickness versus 25-40 mils for traditional rubberized coatings. Ceramic coatings are even lighter, though they sacrifice some impact resistance. For extreme weight savings, consider epoxy-based rust encapsulators that cure to a thin, hard film under 5 mils thick, then supplement with strategically placed stone guard tape in high-impact areas.
Remember that weight distribution matters as much as total weight. Undercoating adds mass low in the chassis, potentially lowering your center of gravity—a minor benefit for handling. However, excessive buildup on control arms or suspension components adds unsprung weight, negatively affecting ride quality and responsiveness. Mask these areas or use minimal coating thickness on suspension parts.
Heat Resistance and Exhaust Proximity
Custom exhaust systems, particularly headers and side-pipes, generate intense underbody heat that can soften or degrade standard undercoatings. Products not rated for high temperatures may bubble, discolor, or even ignite near exhaust components. This is especially critical for forced-induction builds and V8 swaps into smaller engine bays where heat management becomes a primary concern.
Look for undercoatings with specific temperature ratings—quality products specify continuous and intermittent temperature limits. For areas within 12 inches of exhaust components, consider ceramic thermal barrier coatings instead of traditional undercoating. These products reflect heat while providing corrosion protection, often rated to 1,800°F or higher.
Create heat shields using aluminum or stainless steel where undercoating alone is insufficient. Apply undercoating to the backside of these shields for corrosion protection while keeping the reflective face clean. For turbocharged builds, extend undercoating further forward in the chassis to protect against heat soak, and consider using gold heat-reflective tape under the coating for maximum thermal management.
UV Stability and Longevity
While UV exposure seems irrelevant for underbody coatings, modern custom builds often feature open wheel designs, lifted suspensions, or underbody lighting that exposes these areas to sunlight. UV radiation breaks down organic binders in undercoatings, causing chalking, cracking, and loss of adhesion over time.
Premium undercoatings include UV stabilizers and hindered amine light stabilizers (HALS) that extend service life in exposed areas. For builds with visible undercarriages, select products specifically marketed as “UV-resistant” or “non-chalking.” These typically use aliphatic polyurethane chemistry rather than aromatic, providing inherent UV stability.
Even with UV-stable products, consider a topcoat of chassis black or ceramic coating for areas that will be visible. This sacrificial layer takes the UV hit while maintaining the undercoating’s integrity beneath. For show cars, some builders apply a final layer of clear ceramic coating over the undercoating, creating a glossy, washable surface that highlights custom fabrication work while providing ultimate protection.
Professional Application vs. DIY
The complexity of your custom build may dictate application method. Professional shops with downdraft booths and plural-component spray equipment can apply two-part polyurea systems that are virtually impossible to spray correctly in a home garage. The investment—typically $800-$1,500 for a complete undercoating—buys you warranty coverage, perfect finish quality, and access to commercial-grade products not sold to consumers.
DIY application saves money but demands meticulous preparation and technique. A quality HVLP spray gun ($150-$300) handles most single-component undercoatings effectively. The key is creating a temporary spray booth in your garage using plastic sheeting and box fans for ventilation. Temperature control remains the biggest challenge; consider renting a propane heater for the application day.
For complex custom builds, a hybrid approach often makes sense: professionally coat the main chassis and frame, then DIY the removable panels, inner fenders, and detail areas. This strategy controls costs while ensuring critical structural components receive optimal protection. Many professional shops will accommodate this, coating the bare frame before you complete final assembly.
Cost Analysis: Budgeting for Quality Protection
Undercoating represents a tiny fraction of your total build budget but protects your entire investment. Product costs range from $30 per gallon for basic asphalt undercoating to $300+ per gallon for two-part polyurea systems. A typical custom build requires 2-3 gallons of product, plus preparation materials, masking supplies, and application equipment.
Calculate total cost of ownership, not just initial price. A $90 gallon of premium rubberized undercoating that lasts 10 years costs less annually than a $30 gallon requiring reapplication every two years. Factor in your time value—DIY reapplication every few years versus a one-time professional application with lifetime warranty.
For six-figure custom builds, undercoating is not where to economize. The cost of repairing rust on a custom-fabricated frame far exceeds the price difference between economy and premium products. Budget 1-2% of your total build cost for undercoating and application. This typically translates to $500-$2,000 depending on build complexity, which is insignificant compared to the protection provided.
Common Application Mistakes to Avoid
Even experienced builders make critical errors when applying undercoating. The most devastating mistake is applying over moisture—whether from inadequate drying after washing or condensation in a cold garage. Moisture trapped under the coating creates a corrosion cell that rusts metal from beneath the protection. Always use a moisture meter on bare metal before coating; readings above 15% require additional drying time.
Inadequate masking leads to overspray on visible surfaces, brake components, and suspension parts. Use quality automotive masking tape and paper, not newspaper that allows bleed-through. Remove masking while the coating is still tacky—approximately 2-4 hours after application—to prevent peeling cured edges. Mask exhaust studs, bolt threads, and grounding points completely; coating these creates future maintenance nightmares.
Applying too thick a coat in one pass causes solvent entrapment, leading to bubbling, cracking, and poor adhesion. Follow manufacturer wet mil thickness recommendations, typically 10-15 mils per coat. Multiple thin coats outperform one heavy coat every time. Pay attention to recoat windows—coat too soon and you disturb the previous layer; wait too long and you lose intercoat adhesion.
Maintenance and Inspection Protocols
Undercoating is not a “set it and forget it” solution, even for premium products. Establish an annual inspection routine, preferably in spring after winter exposure. Use a bright LED light and inspection mirror to check for cracks, chips, or separation, paying particular attention to areas near wheels and behind tires where impact damage is most likely.
Touch-up procedures vary by product type. Rubberized and asphalt coatings accept patch repairs easily—simply wire brush the damaged area, clean thoroughly, and apply new material overlapping the old by 2-3 inches. Polyurea systems require more meticulous feather edging and sometimes abrasive scoring to ensure adhesion. Keep leftover product properly sealed for touch-ups; most undercoatings have a 1-2 year shelf life.
For show cars, annual cleaning with a gentle degreaser and soft brush maintains appearance. Avoid pressure washing, which can force water under the coating at edges. Instead, use a garden sprayer with warm soapy water, then air blow dry. Apply a fresh coat of cavity wax to internal frame sections every 2-3 years, using access holes drilled specifically for this purpose.
Environmental and VOC Regulations
Modern undercoating products face increasing regulatory scrutiny, particularly in California and the Northeast. Volatile Organic Compound (VOC) limits affect both product availability and application requirements. Water-based undercoatings offer compliant solutions but require longer cure times and more careful application to achieve equivalent protection.
If you’re building in a regulated area, research compliant products before purchasing. Many manufacturers produce low-VOC versions of popular formulations specifically for these markets. The performance gap has narrowed significantly, though cost remains higher. For DIY builders, VOC regulations may limit the size of containers you can purchase—gallon cans might only be available to licensed professionals.
Disposal of waste material and cleanup solvents also falls under environmental regulations. Never pour leftover undercoating or thinners down drains or into the ground. Collect waste in sealed containers and take to hazardous waste collection facilities. Professional shops must maintain waste manifests; while not required for DIY, responsible disposal protects local water supplies and keeps you compliant with the law.
Frequently Asked Questions
How long does undercoating last on a custom build?
Lifespan varies dramatically by product type and driving conditions. Premium polyurea coatings can last the vehicle’s lifetime with proper application. Rubberized undercoatings typically provide 5-10 years of protection, while asphalt-based products need reapplication every 3-5 years in harsh climates. Show cars with minimal exposure may see 15+ years from any quality product.
Can I undercoat over existing rust?
Never apply undercoating over active rust. The coating will seal in moisture and accelerate corrosion. Remove loose rust with a wire wheel or media blasting, then apply a rust converter that chemically transforms remaining oxidation into a stable compound. Once converted and primed, undercoating can be applied safely. For severe pitting, consider cutting out and replacing the affected metal.
What’s the best undercoating for show cars?
Show cars benefit from thin, smooth formulations that can be topcoated for appearance. Two-part polyurethane or epoxy-based rust encapsulators provide excellent protection with minimal buildup. Topcoat with satin or gloss chassis black for a concours-ready finish. Avoid heavy rubberized coatings that hide custom fabrication details and create a utilitarian appearance.
Will undercoating add significant weight?
Complete undercoating adds 8-25 pounds depending on product type and thickness. Polyurea systems are lightest (8-10 lbs), rubberized coatings heaviest (20-25 lbs). While not insignificant, this weight sits low in the chassis, potentially improving center of gravity. For performance builds, consider ceramic coatings or targeted application only in critical areas to minimize weight gain.
Can I apply undercoating myself?
DIY application is feasible with proper preparation and equipment. Single-component rubberized and asphalt coatings spray effectively with HVLP guns. Two-part polyurea systems require plural-component equipment and experience, making professional application advisable. The critical factor is surface preparation and environmental control—garage temperature and humidity must meet product specifications.
How soon after painting can I undercoat?
Wait a minimum of 30 days for fresh paint to fully cure before applying undercoating. Solvents escaping from uncured paint can cause undercoating adhesion failure. For powder-coated frames, undercoating can be applied immediately after cool-down. Always verify paint hardness by pressing a fingernail into an inconspicuous area—if it leaves a mark, wait longer.
Is rubberized undercoating better than asphalt?
“Better” depends on your priorities. Rubberized coatings offer superior flexibility and sound deadening but add more weight and cost. Asphalt coatings provide excellent moisture barrier and impact resistance at lower cost but become brittle in extreme cold. For most custom builds, rubberized formulations provide the best balance of protection and durability.
Will undercoating affect my custom exhaust?
Undercoating won’t harm exhaust components but can be damaged by proximity heat. Maintain a 12-inch clearance from exhaust pipes and headers. For closer applications, use thermal barrier coatings rated for high temperatures. Never apply undercoating directly to exhaust systems—it will burn off immediately and potentially emit toxic fumes.
Can I touch up undercoating later?
Touch-ups are straightforward with most undercoatings. Clean the damaged area thoroughly, scuff the surrounding coating with sandpaper, and apply new material overlapping the old by several inches. Color matching may be imperfect with aged coatings, but protection is restored. Keep leftover product properly sealed for future repairs.
Do I need to undercoat aluminum components?
Pure aluminum forms a protective oxide layer and doesn’t rust like steel, but it still corrodes, especially when in contact with steel hardware or exposed to road salt. Undercoating aluminum control arms, suspension components, and custom brackets prevents galvanic corrosion and pitting. Use products specifically rated for aluminum to avoid adhesion issues.