Your vehicle’s undercarriage battles a constant war against moisture, salt, and debris. While factory undercoating provides excellent initial protection, time and terrain inevitably create vulnerabilities that demand attention. undercoating patch repair kits have evolved from simple tar-based solutions into sophisticated chemical formulations that can extend your vehicle’s lifespan by decades when applied correctly.
Understanding what separates an effective patch kit from a disappointing waste of money requires more than reading marketing claims. This comprehensive guide dives deep into the science, application techniques, and critical decision factors that professionals consider when selecting undercoating solutions for everything from daily drivers to classic car restorations.
Top 10 undercoating patch repair kit
Detailed Product Reviews
1. Breliter Inflatable Patch Repair Kit - Waterproof TPU Pool Repair Tape, Heavy Duty Repair Patch for Air Mattress, Bounce House, Inflatable Toys, Tent, Swimming Ring - 10 Packs of 4in x 4in, Square

Overview: The Breliter Inflatable Patch Repair Kit offers a practical solution for fixing punctures across a wide range of inflatable products and outdoor equipment. This 10-pack of 4x4-inch squares provides waterproof TPU patches designed to handle everything from air mattresses and pool floats to tents and bounce houses.
What Makes It Stand Out: Unlike traditional vinyl patches that can peel when stretched, these TPU-based patches offer superior flexibility and high-temperature resistance. The self-adhesive design eliminates the need for messy glues or complicated application processes. The material’s excellent ductility ensures it moves with your inflatable items rather than against them, creating a durable seal that withstands summer heat and water exposure.
Value for Money: At $7.99 for ten patches, each repair costs less than a dollar—a fraction of replacing a damaged air mattress or pool toy. Considering the broad application range and professional-grade TPU material, this kit delivers exceptional economy for households with multiple inflatables or frequent outdoor activities.
Strengths and Weaknesses: Pros include effortless peel-and-stick application, waterproof and weather-resistant performance, versatility across numerous materials, and the ability to withstand expansion without detaching. Cons involve the limited 4x4-inch size, which may be insufficient for larger tears, and the absolute necessity of proper surface preparation—any moisture or dust compromises adhesion.
Bottom Line: This kit is an essential addition to any household that regularly uses inflatable products. While it won’t replace professional repairs for major damage, it excels at quick, reliable fixes for small punctures and leaks, saving both money and frustration.
2. Bondo Body Repair Kit Ready Mix Pouches, Repairs One Large Hole Up to 3" with Patch, 1 Original Filler & Hardener, 1 Fiberglass Filler & Hardener, 1 Self-Adhesive Body Patch, 1 Spreader (BRKIT-2PK-ES)

Overview: The Bondo Body Repair Kit provides a comprehensive DIY solution for automotive rust-outs and holes up to three inches wide. This ready-to-use package includes everything needed for professional-looking repairs: original filler with hardener, fiberglass filler with hardener, a self-adhesive body patch, and a spreader.
What Makes It Stand Out: The revolutionary ready-mix pouches eliminate the guesswork and mess traditionally associated with two-part fillers. Each pouch contains the precise ratio of filler to hardener, ensuring consistent curing and optimal strength. The inclusion of fiberglass filler adds structural integrity for larger repairs, while the two-part technology chemically bonds to surfaces for permanent results.
Value for Money: Priced at $15.25, this kit costs less than a single hour of professional body shop labor. For vehicle owners dealing with rust spots or small holes, it represents significant savings compared to the hundreds of dollars a shop would charge. The two-pouch design also allows for multiple repairs or practice attempts.
Strengths and Weaknesses: Pros include the foolproof ready-mix format, complete accessory set, permanent chemical bonding, and versatility for both metal and fiberglass surfaces. Cons involve a learning curve for first-time users, strong chemical odors requiring proper ventilation, and the limitation to three-inch holes—larger damage needs additional materials.
Bottom Line: This kit empowers DIY enthusiasts to tackle minor automotive body damage confidently. While it demands careful surface preparation and safety precautions, the ready-mix convenience and professional-grade results make it an outstanding value for budget-conscious car owners.
3. Canvas Repair Patch 5.5 x 8 Inches 6Pcs Self-Adhesive Waterproof Canvas Patch Kit for Repairing Tents,Sofas,Boat Covers,Camping Chair,Awnings,Car Seats. (Black)

Overview: This Canvas Repair Patch Kit delivers six generous 5.5x8-inch self-adhesive patches designed for heavy-duty fabric repairs. Engineered for outdoor equipment and furniture, these patches address damage on tents, boat covers, camping chairs, awnings, and even car seats with a professional finish.
What Makes It Stand Out: The high-density canvas construction provides exceptional abrasion and tear resistance while maintaining flexibility. Unlike clear adhesive patches that look temporary, these fabric-based patches blend seamlessly with original materials. The specialized adhesive formulation bonds effectively with linen, velvet, cotton, leather, and nylon, ensuring reliable adhesion across diverse fabric types.
Value for Money: At $9.99 for six large patches, each repair costs approximately $1.66—dramatically less than replacing a tent, boat cover, or piece of furniture. The waterproof coating adds longevity to repairs, making this kit economical for outdoor enthusiasts and homeowners alike.
Strengths and Weaknesses: Pros include the substantial patch size, professional fabric-to-fabric adhesion, waterproof performance, quick one-minute application, and excellent blending with original materials. The primary con is the black color option only, which may be conspicuous on lighter-colored items. Additionally, heavily textured or dirty surfaces require thorough cleaning for optimal bonding.
Bottom Line: For anyone maintaining canvas-based outdoor gear or furniture, this kit offers professional-quality repairs at a consumer price point. The large patch size and durable construction make it superior to generic alternatives, though color matching remains a consideration.
4. Barrier Bond - Rubberized Undercoating Sound Deadener Kit, 28oz 4-Pack, Black Spray, Vehicle Undercoating, with Spray Gun
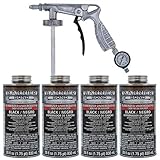
Overview: The Barrier Bond Rubberized Undercoating Sound Deadener Kit provides professional-grade vehicle protection in a convenient DIY package. This 28-ounce four-pack, complete with spray applicator gun, delivers comprehensive undercarriage coverage for trucks, cars, and recreational vehicles.
What Makes It Stand Out: This kit’s paintable formula allows for seamless integration with existing finishes, while the fast-drying composition accelerates project completion. The 50-state VOC compliance ensures legal application anywhere in the US, a critical feature often missing in competing products. The included spray gun provides professional application control, reducing waste and overspray.
Value for Money: At $114.99 for 112 total ounces, this kit undercuts professional undercoating services that typically cost $150-$300 per vehicle. For DIY enthusiasts maintaining multiple vehicles or performing restoration projects, the four-pack configuration offers substantial long-term savings.
Strengths and Weaknesses: Pros include the complete application system, regulatory compliance, sound-deadening properties, paint compatibility, and fast curing time. Cons involve significant upfront cost, requirement for proper surface preparation and safety equipment, and potential for uneven application by inexperienced users. Overspray can be problematic without adequate masking.
Bottom Line: This kit justifies its premium price for serious DIYers and multi-vehicle owners. While novices may face a learning curve, the professional results, regulatory compliance, and cost savings over shop services make it a worthwhile investment for long-term vehicle protection.
5. Pirelli Smartube Patch Repair Kit (10pcs + Glue)

Overview: The Pirelli Smartube Patch Repair Kit addresses a highly specific need: repairing punctures in Pirelli’s proprietary Smartube inner tubes. This specialized kit includes ten patches—five large and five small—plus dedicated adhesive formulated for these unique butyl tubes.
What Makes It Stand Out: Unlike universal patch kits that may compromise Smartube integrity, these purpose-built patches match the tube’s specific composition and curvature. The dual-size assortment handles everything from pinhole leaks to larger punctures, while the included glue ensures optimal bonding without the compatibility issues generic adhesives can cause.
Value for Money: At $13.21 for ten patches, the per-patch cost is reasonable, but the kit’s value is limited by its narrow application. For cyclists using Pirelli Smartubes, it prevents premature tube replacement at $15-$25 each. However, it offers no utility for standard tubes or other tubeless systems.
Strengths and Weaknesses: Pros include perfect compatibility with Smartubes, professional-grade patch quality, two size options, and included specialized adhesive. Cons are the extremely limited use case, requirement for glue application (not self-adhesive), and redundancy for riders using multiple tube brands. The glue tube may dry out before all patches are used.
Bottom Line: This kit is essential equipment for dedicated Pirelli Smartube users, delivering reliable repairs that maintain tube performance. For general cyclists or those with mixed tube inventories, a universal patch kit offers better versatility and value.
6. 3 in x 7 ft Roll TPU Pool Patch Repair Kit for Air Mattress, Swimming Pool, Bounce House, Tent, Canvas, Canopy, Pool Floats, Tubes Air Bed and Inflatable Toys

Overview: This versatile TPU repair roll offers a practical solution for fixing punctures across a wide range of inflatable products. Measuring 3 inches by 7 feet, the transparent patch material provides ample coverage for multiple repairs on air mattresses, pool floats, bounce houses, and even canvas items. The peel-and-stick design eliminates the need for messy adhesives, making it accessible for quick fixes without specialized tools or skills.
What Makes It Stand Out: The high-strength TPU construction sets this apart from traditional vinyl patches, delivering superior waterproofing and temperature resistance. The roll format provides exceptional flexibility—cut precisely what you need for tiny pinholes or larger tears without wasting pre-cut patches. Its transparent appearance blends seamlessly with most inflatables, maintaining aesthetics while providing durable protection that won’t peel during expansion.
Value for Money: At $9.99 for 21 square feet of premium TPU material, this kit offers remarkable economy compared to single-use patches or replacement products. One roll can salvage multiple items, from a $50 air mattress to a $300 bounce house, making it a cost-effective addition to any household’s maintenance toolkit. The ability to customize patch sizes prevents material waste.
Strengths and Weaknesses:
- Strengths: Superior TPU durability; generous roll length; easy peel-and-stick application; transparent finish; multi-surface versatility
- Weaknesses: Requires meticulous surface preparation (clean, dry, dust-free); roll format may be inconvenient for single small repairs; no included application tool
Bottom Line: An excellent investment for families with multiple inflatables. The roll format and TPU quality make it ideal for both emergency repairs and planned maintenance, though users should ensure surfaces are properly prepared for optimal adhesion.
7. Wonshine Pool Liner Patch Repair Kit, Air Mattress Patch Kit, Waterproof for Inflatable Toys, Bounce House, Swimming Pool, Boat, Raft, Kayak, Tent, Hot Tub, PVC Glue 60 ML
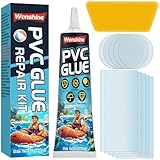
Overview: This traditional repair kit uses a solvent-based PVC glue and patch system to create permanent repairs on vinyl and PVC inflatables. The 60ml adhesive bottle paired with clear patches offers a professional-grade solution for punctures, tears, and leaks across pools, boats, air mattresses, and hot tubs. The clear-drying formula maintains the original appearance of repaired items while creating an airtight, flexible bond.
What Makes It Stand Out: The ultra-strong chemical bond created by the PVC glue provides a more permanent solution than self-adhesive patches, actually welding the patch to the material. The clear patches dry transparently, preserving the visual appeal of your inflatable. At just $3.99, it’s the most budget-friendly option for those willing to invest curing time for professional results that stand the test of time.
Value for Money: This kit delivers professional repair capability at a fraction of replacement cost. The 60ml glue quantity allows for numerous repairs, and the included patches provide immediate application. While requiring more effort than peel-and-stick alternatives, the permanent results justify the minimal investment for valuable inflatables. The sub-$4 price point makes it accessible for any household.
Strengths and Weaknesses:
- Strengths: Creates permanent airtight bonds; clear aesthetic finish; extremely affordable; versatile material compatibility; professional-grade results
- Weaknesses: Requires 24-hour curing time; solvent odor during application; demands careful glue spreading technique; not as convenient for quick fixes
Bottom Line: Perfect for users seeking durable, long-lasting repairs who don’t mind the wait. The exceptionally low price and permanent results make it ideal for high-value inflatables, though the curing time and application technique require patience and precision.
8. Canvas Patch 5.5 x 8 Inches 6Pcs Self-Adhesive Waterproof Canvas Patch Kit for Repairing Tents,Sofas,Boat Covers,Camping Chair,Awnings,Car Seats.(Gray)
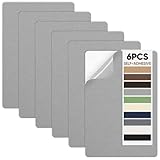
Overview: Specifically designed for fabric repairs, this kit includes six self-adhesive canvas patches measuring 5.5 by 8 inches each. The high-density canvas construction with waterproof coating targets outdoor gear and furniture, including tents, boat covers, camping chairs, and car seats. The gray color blends naturally with most canvas materials while providing robust tear and abrasion resistance for long-term durability.
What Makes It Stand Out: Unlike generic repair tapes, this kit uses fabric-optimized adhesive engineered specifically for canvas and similar textiles. The professional-grade backing creates stronger bonds on fabric surfaces than standard clear adhesives. The generous six-pack quantity ensures you have multiple patches ready for various repairs without reordering, making it convenient for active outdoor enthusiasts.
Value for Money: At $9.99 for six substantial patches ($1.66 each), this kit offers excellent value for fabric-specific repairs. Replacing a damaged tent or boat cover can cost hundreds, while reupholstering furniture runs even higher. These patches provide a cost-effective alternative that extends the life of expensive outdoor equipment and furniture with minimal investment.
Strengths and Weaknesses:
- Strengths: Fabric-specific adhesive formulation; waterproof coating; abrasion-resistant canvas; six-patch quantity; quick one-minute application
- Weaknesses: Gray color may not match all materials; limited to fabric surfaces; not suitable for vinyl inflatables; adhesive may weaken with repeated flexing
Bottom Line: An essential kit for campers and boat owners dealing with fabric damage. While unsuitable for inflatable repairs, its fabric-optimized design and multiple patches make it invaluable for maintaining tents, covers, and canvas furniture. The waterproof coating adds durability for outdoor use.
9. Birllaid Inflatable Patch Repair Kit Waterproof Heavy Duty, Clear TPU Repair Tape for Bounce House, Tent, Canvas, Canopy, Pool Floats, Swimming Ring

Overview: This heavy-duty TPU repair tape provides a robust solution for larger inflatable repairs. The 3.15-inch by 7-foot roll offers slightly more width than standard options, allowing coverage of bigger punctures and longer tears. Designed for bounce houses, pool floats, tents, and canvas items, the clear tape delivers waterproof, weather-resistant sealing that maintains flexibility even in summer heat without peeling during expansion cycles.
What Makes It Stand Out: The tape’s exceptional weatherability allows water exposure just 12 hours after application—faster than many competitors requiring 24 hours. Its TPU composition provides superior elasticity, preventing peeling during inflation and deflation cycles. The generous roll length combined with free-cutting capability accommodates both extensive damage and multiple small repairs with equal effectiveness.
Value for Money: Priced at $9.99, this kit competes directly with similar TPU rolls while offering enhanced weather resistance claims. The ability to repair larger areas without purchasing multiple pre-cut patches makes it economical for maintaining expensive items like bounce houses and boats. One roll can potentially save several hundred dollars in replacements, delivering strong return on investment.
Strengths and Weaknesses:
- Strengths: Heavy-duty TPU construction; 12-hour water readiness; flexible sizing; weather-resistant; works on smooth surfaces
- Weaknesses: Ineffective on uneven seams and grooves; requires 12-hour wait before inflation; demands clean, dry surface preparation; slightly narrower than some alternatives
Bottom Line: A reliable choice for urgent inflatable repairs where weather resistance matters. The 12-hour cure time is reasonable, though users must ensure smooth surface application. Ideal for pool floats and bounce houses, but not suitable for textured or seamed areas.
10. KING MOUNTAIN Canvas Repair Patch 9 x11 Inch 2 Pcs Self-Adhesive Waterproof Fabric Patch for Sofas, Tents, Furniture,Tote Bags, Car Seats (Black)

Overview: These oversized canvas patches measure 9 by 11 inches, providing substantial coverage for large tears and damage on fabric items. The two-pack kit uses 100% cotton canvas with a specialized fabric adhesive, targeting furniture, tents, tote bags, and car seats. At 0.6mm thickness, the patches offer serious durability while remaining pliable enough to integrate with existing fabric without adding excessive rigidity.
What Makes It Stand Out: The generous dimensions allow repair of major damage that would typically require professional reupholstering. The lifetime warranty demonstrates exceptional manufacturer confidence. Unlike smaller patches, these can cover extensive pet scratches, burns, or tears in a single application. The black color provides a neutral option for many items, while the thick canvas ensures long-term durability.
Value for Money: At $9.98 for two large patches, the per-patch cost is higher than smaller alternatives, but the coverage area justifies the price. Professional fabric repair often exceeds $50 per item, making this kit economical for valuable furniture or equipment. The lifetime warranty adds significant value, ensuring replacement if adhesion fails, effectively guaranteeing your investment.
Strengths and Weaknesses:
- Strengths: Extra-large coverage area; thick 0.6mm durable canvas; lifetime warranty; specialized fabric adhesive; no sewing required
- Weaknesses: Only two patches per pack; black color may not suit all items; overkill for small pinholes; limited flexibility on highly curved surfaces
Bottom Line: Best suited for significant fabric damage where coverage and durability are priorities. The lifetime warranty and oversized format make it ideal for repairing expensive furniture or large tent tears. For minor repairs, smaller patch kits offer better economy, but for major damage, this is unmatched.
What Is Undercoating and Why Does It Need Patching?
Undercoating is your vehicle’s first line of defense against the elements that attack from below. This protective barrier shields critical components like floor pans, frame rails, and suspension parts from moisture, road salt, and abrasive debris. Even the most durable factory applications develop weaknesses over time.
The Science Behind Undercoating Degradation
Undercoating doesn’t fail overnight. The breakdown follows a predictable pattern starting with micro-cracking caused by thermal cycling—repeated heating and cooling that makes the coating expand and contract. These microscopic fissures allow moisture intrusion, which leads to delamination where the coating separates from the metal surface. Once this bond fails, oxygen reaches the bare metal, and oxidation begins its destructive work.
Common Causes of Undercoating Damage
Beyond simple age, specific threats accelerate undercoating failure. Gravel bombardment creates impact chips that expose bare metal. Chemical deicers, particularly magnesium chloride used in modern road treatments, are more aggressive than traditional rock salt and can chemically break down older undercoating formulations. Off-road adventures subject the undercarriage to flexing stress and abrasion from rocks and branches that factory coatings weren’t designed to withstand.
Understanding Undercoating Patch Repair Kits
Modern patch repair kits represent a far cry from the brush-on tar buckets of decades past. Today’s formulations are engineered with specific polymers, corrosion inhibitors, and application technologies that create durable, lasting repairs when used properly.
Key Components of a Quality Kit
A comprehensive kit should include more than just the coating material. Surface preparation solutions like rust converters or etching primers are essential for proper adhesion. Quality applicators—whether spray wands, specialized brushes, or texture rollers—make the difference between a professional-looking finish and a messy disappointment. The best kits also provide detailed temperature and humidity guidelines, because application conditions dramatically affect curing and performance.
Different Formulations Explained
The chemistry inside the can determines real-world performance. Solvent-based formulations typically offer superior penetration into existing cracks and better adhesion to weathered surfaces, but they carry stronger fumes and longer cure times. Water-based options have improved dramatically, offering faster drying and easier cleanup, though they may require more meticulous surface preparation. The resin system—whether asphalt, rubber, polyurethane, or hybrid—dictates flexibility, hardness, and chemical resistance.
Why DIY Undercoating Repair Makes Sense
Professional undercoating services charge premium prices for labor, often $150-$300 for patch repairs alone. For enthusiasts willing to invest a Saturday afternoon, DIY kits deliver comparable results at a fraction of the cost, typically $30-$80 for materials covering an entire vehicle’s touch-up needs.
Cost Savings vs Professional Services
The financial advantage extends beyond initial savings. Learning proper patch techniques means you can address new damage immediately rather than waiting for an appointment. This proactive approach prevents small chips from becoming rust holes that require welding and major repairs. The tools you acquire—spray guns, preparation equipment—become assets for future maintenance.
When to DIY and When to Call a Pro
DIY patching excels at addressing localized damage, touch-ups, and preventive maintenance on vehicles with solid structural integrity. However, if you’re dealing with extensive rust perforation, structural frame damage, or need complete undercoating removal and replacement, professional equipment and expertise justify the investment. A good rule: if you can see through the metal, it’s time for professional help.
Essential Features to Evaluate Before Buying
Not all patch kits deliver on their promises. Understanding which specifications actually matter helps you cut through marketing hype and select a solution that will protect your vehicle for years.
Viscosity and Coverage Rate
Viscosity determines how the material flows and builds thickness. Too thin, and you’ll need multiple coats to achieve adequate protection. Too thick, and it won’t penetrate existing cracks properly. Coverage rates stated in square feet per gallon can be misleading—they often assume ideal conditions and thin application. Real-world coverage typically runs 60-70% of advertised rates when building proper thickness on rough, pitted surfaces.
Curing Time and Temperature Requirements
Cure chemistry varies significantly between formulations. Some kits cure tack-free in 30 minutes but require 7-10 days to reach full hardness and chemical resistance. Temperature windows are critical—apply below the minimum, and the coating may never properly cross-link, remaining soft and vulnerable. The best kits provide a realistic temperature range (typically 50-90°F) and explicit warnings about application outside those parameters.
Adhesion Technology
Look for kits mentioning specific adhesion promoters or primer requirements. “Self-etching” formulations contain mild acids that chemically bond to bare metal, while others rely on mechanical adhesion to a roughened surface. The most advanced options use silane coupling agents that create molecular bridges between the metal and polymer coating, providing superior wet adhesion even when applied over trace moisture.
Flexibility and Crack Resistance
Your undercarriage flexes constantly as you drive. A coating that’s too brittle will crack within months. Quality formulations specify elongation-at-break percentages—look for values above 200% for rubberized products, which means the coating can stretch to three times its original length before tearing. This flexibility ensures the patch moves with the metal rather than cracking under stress.
Corrosion Inhibitors and Rust Converters
The best patch kits don’t just cover rust—they chemically neutralize it. Rust converters containing tannic acid or phosphoric acid transform iron oxide into stable iron tannate or phosphate, creating a passive layer that prevents further oxidation. Corrosion inhibitors like zinc or aluminum flakes provide sacrificial protection, similar to galvanizing. These additives are crucial when patching over areas where rust has already begun.
Types of Undercoating Patch Repair Kits
Understanding the fundamental categories helps match the formulation to your specific vehicle, climate, and driving conditions.
Rubberized Asphalt-Based Kits
These traditional formulations combine asphalt with rubber polymers for enhanced flexibility. They excel at sound deadening and provide excellent moisture barrier properties. The asphalt base repels water effectively, while rubber additives improve adhesion and crack resistance. However, they can soften in extreme heat and may sag if applied too thickly in vertical areas. Best suited for moderate climates and daily drivers.
Wax and Paraffin-Based Options
Popular in restoration circles, these kits use wax formulations similar to original factory undercoating from the 1960s-80s. They penetrate seams beautifully and remain slightly pliable, allowing moisture to weep out rather than trapping it. The downside is reduced durability—they require more frequent reapplication, typically every 2-3 years. They’re ideal for trailer queens and fair-weather classics where originality matters.
Polyurethane and Polymer-Enhanced Formulas
The modern standard for performance, these kits use two-part polyurethane or single-part moisture-cured urethanes. They create a hard, durable shell that resists impacts and chemicals while remaining flexible enough to prevent cracking. Many include Kevlar or other reinforcing fibers for extreme durability. These are the go-to choice for off-road vehicles, winter beaters, and long-term daily drivers in harsh climates.
Lanolin-Based Natural Solutions
Derived from sheep’s wool wax, lanolin-based kits appeal to environmentally conscious users. They provide excellent creep properties, flowing into hidden crevices, and offer natural corrosion inhibition. While not as durable as synthetics, they’re non-toxic, biodegradable, and easy to reapply. Perfect for under-hood applications and areas near brake lines where chemical contamination is a concern.
Application Environment Considerations
Success or failure often depends more on where and when you apply the coating than on the product itself.
Indoor vs Outdoor Application Factors
Indoor application in a garage offers controlled temperature, protection from wind-blown debris, and shelter from unexpected rain. However, ventilation becomes critical—most quality formulations release significant VOCs during curing. Outdoor application requires calm, dry conditions and careful timing to avoid dew formation. If outdoors, create a temporary shelter with tarps to protect from falling leaves and dust while ensuring adequate airflow.
Seasonal Timing for Optimal Results
Early fall provides the sweet spot for undercoating work in most climates. Temperatures are moderate but rising, humidity is lower, and you’re applying protection before winter salt assault begins. Spring works second-best, but you’ll be repairing damage rather than preventing it. Avoid summer’s heat and humidity, which can cause solvent popping and improper curing, and skip winter when temperatures prevent proper adhesion.
Humidity and Moisture Concerns
Relative humidity above 70% can cause blush in moisture-cured urethanes, creating a cloudy, weak surface layer. Morning dew can contaminate surfaces you’re preparing, while curing coatings can absorb atmospheric moisture, leading to bubbling. Use a hygrometer to monitor conditions, and consider using a dehumidifier in your garage for critical applications. Never apply if rain is forecast within 24-48 hours, depending on the formulation.
Surface Preparation: The Foundation of Success
The best patch kit in the world will fail if applied over a poorly prepared surface. This step deserves more time and attention than the actual coating application.
Cleaning Protocols That Actually Work
Start with pressure washing at 2000+ PSI to remove loose scale and grime. Follow with a degreaser specifically formulated for undercarriage work—engine degreasers often contain silicone that interferes with adhesion. For stubborn areas, use a wire brush attachment on a drill, but stop short of polishing the metal. You want a profiled surface with “tooth” for mechanical adhesion. Final wipe-down with wax-and-grease remover on clean rags ensures no contaminants remain.
Dealing with Existing Rust
Surface rust requires conversion, not just coverage. Apply rust converter liberally and let it work for the full recommended time—usually 24 hours. It should turn black as it stabilizes the oxidation. For pitting rust, use a rust encapsulator that fills microscopic voids. Never patch over flaking rust or scale; it will continue expanding underneath and eventually push off your new coating. When in doubt, grind to bare metal and use an etching primer.
Masking and Protection Strategies
Protect brake lines, rubber bushings, and exhaust components with aluminum foil rather than plastic tape—it conforms to complex shapes and withstands overspray heat. Cover wheels and tires completely; overspray on tire sidewalls is nearly impossible to remove and can cause rubber degradation. Remove or thoroughly mask sensors, wiring harnesses, and ABS components. A little extra time masking prevents costly damage and ensures professional results.
Professional Application Techniques
How you apply the material determines its effectiveness and appearance. Professional results come from technique, not just equipment.
Spraying Methods for Even Coverage
For aerosol cans, maintain 8-12 inches distance and use overlapping passes with 50% overlap. Start each pass off the surface and sweep across to avoid heavy buildup at edges. For undercoating guns, adjust pressure to 40-60 PSI and use a fan pattern for large flat areas, switching to a round pattern for inside frame rails. Build thickness in 2-3 light coats rather than one heavy coat that may sag or trap solvents.
Brush and Roller Application Tips
Natural bristle brushes work better than synthetic for thick undercoatings—they hold more material and lay it down smoother. For detailed work around brackets and seams, use a small artist’s brush to work material into crevices before overall application. Texture rollers create a factory-like appearance and help achieve uniform thickness. Always brush or roll in multiple directions—first with the seam, then across it—to ensure complete coverage.
Building Proper Layer Thickness
Minimum effective thickness is typically 60-80 mils (1.5-2mm) for patch repairs. Use a wet-film thickness gauge to verify your work—it’s a cheap tool that prevents under-application. For severe areas, build in layers, allowing each to become tack-free before applying the next. This prevents solvent entrapment, which causes bubbling and soft spots. Pay special attention to edges and seams; these are failure points that need extra material.
Common Application Mistakes That Ruin Results
Learning from others’ failures saves you from repeating them. These are the most frequent errors that lead to premature patch failure.
Inadequate Surface Prep Pitfalls
The number one mistake is insufficient cleaning. Even invisible oil residue from your fingers can cause delamination. Another critical error is applying coating over moisture. Metal may look dry while microscopic moisture remains in pits and seams. Use a moisture meter or wait 24 hours after cleaning in humid conditions. Failing to remove loose original undercoating creates a weak foundation—if the old stuff is flaking, your patch will flake with it.
Temperature-Related Application Errors
Applying in direct sunlight heats the metal surface, causing solvents to flash off too quickly and creating a weak, porous coating. Conversely, applying in cool conditions without adequate cure time before exposure to moisture leads to whitening and softening. Metal temperature matters more than air temperature—use an infrared thermometer and ensure the substrate is within the product’s specified range.
Rushing the Curing Process
Impatience destroys more patch jobs than bad products. Driving the vehicle before full cure allows road spray to contaminate the surface. Waxing or undercarriage washing too soon can remove uncured coating. Most kits are “dry to touch” in hours but don’t reach full chemical resistance for 7-14 days. During this period, avoid heavy rain, car washes, and muddy conditions. Read the technical data sheet, not just the marketing claims on the can.
Performance Metrics That Matter
Marketing departments love vague claims like “heavy duty” and “professional grade.” Real performance data comes from standardized tests.
Salt Spray Test Ratings Explained
The ASTM B117 salt spray test measures corrosion resistance by exposing coated panels to a continuous salt fog. Quality patch kits should withstand 500+ hours without failure, with premium formulations exceeding 1000 hours. However, this test doesn’t account for flexing or impact damage. Look for kits that also publish cyclic corrosion test results, which alternate salt spray with drying periods and better simulate real-world conditions.
Impact Resistance Standards
The ASTM D2794 impact test measures how well a coating resists chipping from gravel strikes, reported in inch-pounds. For undercarriage use, look for ratings above 40 inch-pounds. Some premium kits incorporate Kevlar or ceramic microspheres to achieve 60+ inch-pound ratings. This matters enormously if you drive gravel roads or live in areas where winter sanding is common.
Sound Deadening Properties
While primarily for corrosion protection, undercoating significantly reduces road noise. The Sound Transmission Class (STC) rating indicates effectiveness, but few manufacturers publish this data. Instead, look for density specifications—heavier coatings generally dampen sound better. Rubberized and asphalt-based formulas typically outperform lightweight polymer coatings for noise reduction, though they trade some chemical resistance.
Longevity and Durability Factors
A patch repair should last years, not months. Understanding what affects longevity helps set realistic expectations and maintenance schedules.
Real-World Lifespan Expectations
In moderate climates with paved roads, a quality patch can last 5-7 years. Winter salt belt regions reduce this to 3-5 years for daily drivers. Off-road use may require annual touch-ups. The key is that patches don’t fail all at once—they thin gradually, especially on high-impact areas like wheel wells and frame edges. Annual inspections catch thinning areas before they become problems.
Warranty Considerations
Most patch kit warranties are limited to replacement of product, not labor or damage. Read the fine print—many require specific application procedures, thickness verification, and documentation to honor claims. Some professional-grade kits offer extended warranties when applied by certified installers. For DIY use, consider the warranty a quality indicator rather than true insurance.
Reapplication Schedules
Rather than waiting for failure, proactive maintenance extends overall protection. Inspect patches annually, focusing on edges and high-impact zones. Plan for touch-up applications every 2-3 years in harsh climates, 4-5 years in milder regions. When patches exceed 50% of the surface area, consider stripping and recoating the entire undercarriage for uniform protection and appearance.
Safety and Environmental Considerations
Undercoating work involves chemicals, fumes, and environmental responsibilities that demand proper precautions.
VOC Regulations and Compliance
Volatile Organic Compound (VOC) regulations vary by state, with California having the strictest limits (usually 250 g/L for undercoatings). Many traditional formulations exceed this, requiring special ordering or professional-only purchase in regulated areas. Water-based and low-VOC formulations have improved dramatically and now offer performance nearly equal to solvent-based products while keeping you compliant and reducing health risks.
Personal Protective Equipment Requirements
At minimum, use a NIOSH-approved respirator with organic vapor cartridges—not just a dust mask. Chemical-resistant gloves (nitrile, not latex) and eye protection are non-negotiable. Long sleeves and disposable coveralls protect skin from irritation. For spray applications, consider a supplied-air respirator if working in confined spaces. Remember: if you can smell the product, you’re inhaling chemicals your respirator isn’t capturing.
Proper Disposal Methods
Never pour leftover undercoating down drains or into soil. Cured material can go in regular trash, but liquid waste is hazardous. Collect solvent-soaked rags in approved containers—they can spontaneously combust. Check local regulations for hazardous waste collection days. Many auto parts stores accept used aerosol cans and chemical containers. The environmental cost of improper disposal far exceeds the price of proper disposal.
Budgeting for Your Undercoating Project
Cost considerations extend beyond the kit price. A realistic budget prevents mid-project surprises and ensures you don’t cut corners where it matters.
Cost Per Square Foot Analysis
Calculate true cost based on coverage at proper thickness, not marketing claims. A $50 kit covering 25 sq ft at 80 mils costs $2/sq ft. A $30 kit covering 15 sq ft costs the same but may require more coats. Factor in preparation materials—degreaser, rust converter, masking supplies typically add $15-25 to the project. Professional-grade spray equipment rentals run $40-60 per day if you don’t own a compressor and gun.
Hidden Expenses to Account For
Jack stands or ramp rental for safe undercarriage access. Replacement of corroded fasteners you discover during prep. Additional lighting for detailed work. Moisture meters and thickness gauges for quality control. These “invisible” costs can add $50-100 to your first project but become reusable assets for future maintenance.
Bulk vs Kit Value Proposition
If you own multiple vehicles or plan periodic touch-ups, buying components separately often saves money. Bulk undercoating by the gallon costs 40-60% less per ounce than aerosol kits. Professional-grade rust converter and primer in quart sizes reduce waste compared to kit-sized containers. However, kits ensure compatible components and include detailed instructions, making them worthwhile for one-time users or those new to undercoating work.
Maintaining Your Undercoating Repair
Proper maintenance transforms a simple patch into a long-term protection strategy. Regular care prevents small issues from becoming expensive problems.
Inspection Checkpoints
Inspect patches quarterly using a bright LED light and inspection mirror. Focus on edges where new material meets old—they tend to thin first. Check for cracking around weld seams and body mounts that flex. Use a screwdriver to gently probe suspicious areas; soft spots indicate moisture intrusion. Pay special attention to wheel wells and behind tires where road spray is most aggressive. Document your inspections with photos to track changes over time.
Touch-Up Strategies
Address chips and thin spots immediately—don’t wait for scheduled maintenance. Lightly scuff the area with 80-grit paper, clean thoroughly, and apply thin coats building to surrounding thickness. Feather the edges to blend with existing coating. For best results, apply touch-ups during the same temperature/humidity conditions as the original application. Keep detailed records of where and when you touch up; patterns reveal problem areas needing extra protection.
When to Strip and Start Over
If patches exceed 40% of the undercarriage surface, or if you find widespread delamination, stripping becomes more efficient than endless touch-ups. Signs it’s time: coating that peels off in sheets, widespread bubbling, or a “spongy” feel when probed. Chemical strippers work but are messy and environmentally problematic. Media blasting is fastest but requires professional equipment. For DIY, a combination of heat gun and scraper, followed by wire wheel cleaning, offers the best balance of effectiveness and control.
Frequently Asked Questions
How long does undercoating patch repair typically last before needing reapplication?
In moderate climates with minimal salt exposure, quality patches last 5-7 years. Winter salt belt regions reduce lifespan to 3-5 years for daily drivers. Off-road vehicles may need annual touch-ups. The key is annual inspection—catch thinning areas early and touch them up rather than waiting for complete failure. Proper surface preparation and application thickness have more impact on longevity than the specific brand.
Can I apply patch repair kits over existing rust, or must I remove it completely?
You must treat rust, not just cover it. Surface rust requires rust converter application to chemically stabilize the oxidation. Heavy scale and flaking rust need mechanical removal—wire wheel or sandblasting—until you reach solid metal. Never patch over loose rust; it continues expanding and will push off your repair. The exception is factory undercoating with light surface rust staining; clean and convert these areas before patching.
What’s the minimum temperature for applying undercoating patch kits?
Most formulations require substrate temperatures between 50-90°F, with 60-75°F being optimal. Below 50°F, curing slows dramatically and adhesion suffers. Some specialized low-temp formulas work down to 35°F but require extended cure times. Metal temperature matters more than air temperature—use an infrared thermometer. Avoid application in direct sun where metal surfaces can exceed 100°F even on cool days, causing solvents to flash off too quickly.
How thick should undercoating patch repairs be applied?
Target 60-80 mils (1.5-2mm) for effective protection. Thinner applications don’t provide adequate barrier protection or sound deadening. Thicker coats may sag on vertical surfaces and trap solvents, leading to soft spots. Build thickness in 2-3 layers rather than one heavy coat. Use a wet-film thickness gauge to verify your work—it’s an inexpensive tool that prevents costly under-application mistakes.
Are aerosol spray kits as durable as brush-on or spray gun applications?
Durability comes from the formulation, not the delivery method. However, aerosol cans struggle to build adequate thickness efficiently, often requiring 4-5 coats to achieve proper film build. They excel for touch-ups and hard-to-reach areas but are inefficient for large patches. Spray guns offer better control and faster application. Brush application provides maximum thickness per coat and works material into seams effectively. Many professionals use a combination—spray for coverage, brush for detail work.
Can I drive my vehicle immediately after applying undercoating patches?
No. While most kits are “dry to touch” in 1-4 hours, they require 24-48 hours before exposure to road spray and 7-14 days to reach full chemical resistance. Driving too soon allows water, dirt, and chemicals to contaminate the curing coating. Plan your application when the vehicle can remain stationary for at least 48 hours. If you must drive sooner, avoid wet roads, puddles, and car washes for the full cure period.
How do I choose between rubberized, polyurethane, and wax-based kits?
Match the formulation to your use case. Rubberized asphalt offers the best sound deadening and value for daily drivers in moderate climates. Polyurethane provides maximum durability and chemical resistance for harsh winters and off-road use. Wax-based suits restoration projects where originality and reversibility matter. Consider your climate, driving conditions, application frequency tolerance, and whether noise reduction is a priority.
Is undercoating patch repair safe to apply near brake lines and fuel system components?
Yes, with proper precautions. Mask brake lines, fittings, and rubber components thoroughly—undercoating can cause rubber to swell and degrade. Avoid coating fuel lines and tank straps, as some formulations may not be compatible with fuel vapors. Never spray directly onto exhaust components; they operate above coating temperature limits. Use a brush for precise application near sensitive parts, and choose low-VOC formulations to minimize fume exposure to rubber and plastic.
How do I remove undercoating if I need to weld or make repairs in a patched area?
Mechanical removal works best for small areas—use a heat gun to soften the coating, then scrape with a putty knife. For larger sections, a wire wheel on an angle grinder removes material efficiently. Chemical strippers are effective but messy and require extensive cleanup. Media blasting is fastest but demands professional equipment. Always remove coating 2-3 inches beyond your repair area to ensure clean welding surfaces and proper patch blending afterward.
Can undercoating patch kits be used on other vehicle areas besides the undercarriage?
Absolutely. These formulations work excellently inside doors, quarter panels, and rocker panels where moisture accumulates. They’re ideal for trunk floors and battery trays. Some users apply them to inner fender wells for extra protection. Avoid using them on visible exterior surfaces—they’re not designed for UV exposure and will degrade quickly. For engine bay applications, choose high-heat formulations specified for that purpose, as standard undercoating can’t withstand engine temperatures.