Removing interior trim panels used to be a nerve-wracking gamble. One wrong move with a flathead screwdriver and you’d be staring at a permanent gouge in your dashboard or a cracked door panel clip that rattles forever. Thankfully, modern trim removal tool kits have transformed this delicate operation from a risky art into a precise science. Whether you’re installing new speakers, troubleshooting electrical gremlins, or simply deep-cleaning years of grime from hidden crevices, the right set of tools can mean the difference between a factory-fresh finish and a costly mistake.
But here’s the thing: not all trim removal kits are created equal. Walk into any auto parts store or browse online marketplaces and you’ll find everything from flimsy $10 sets that snap on first use to professional-grade collections costing hundreds. The key isn’t just buying the most expensive kit—it’s understanding which features, materials, and tool configurations actually matter for your specific car care projects. Let’s dive deep into what separates professional-grade trim removal tools from the pretenders.
Top 10 interior trim removal tool kit
Detailed Product Reviews
1. GOOACC 5PCS Auto Trim Removal Tool Kit No-Scratch Pry Tool Kit for Car Door Clip Panel & Audio Dashboard Dismantle -5PCS
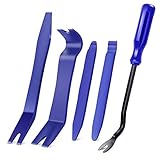
Overview: The GOOACC 5PCS kit delivers essential trim removal capabilities for budget-conscious DIY enthusiasts. This streamlined set includes four varied panel removal tools plus a specialized fastener remover, addressing the most common interior dismantling scenarios. Manufactured from impact-resistant nylon fiber, these tools provide the critical balance between flexibility and strength needed for automotive plastics. The ergonomic design accommodates prolonged use without causing hand strain, making it suitable for dashboard, door panel, and audio system projects.
What Makes It Stand Out: This kit excels in minimalist efficiency. Unlike bulky multi-piece sets that overwhelm casual users, the five-tool configuration covers 90% of typical trim tasks without redundancy. The dedicated fastener remover is a standout inclusion rarely found in budget sets, allowing precise clip extraction without damage. The tools’ slim profiles access tight gaps where bulkier pry bars fail, while the non-toxic, eco-friendly nylon ensures no surface marring on delicate finishes.
Value for Money: At $6.47, this represents exceptional entry-level value. Comparable individual tools retail for $3-4 each, making this set effectively half-price. While it lacks replacement clips, the core tools themselves match the quality of kits costing three times more. For homeowners, hobbyists, or one-time projects, this eliminates the risk of using metal tools that cause costly plastic damage. The durability ensures multiple uses, amortizing the minimal investment over several projects.
Strengths and Weaknesses: Pros: Unbeatable price point; genuine nylon construction prevents scratches; ergonomic grip reduces fatigue; lightweight portability; covers most common applications; no toxic materials. Cons: Limited tool variety for complex jobs; no spare clips or fasteners; nylon may flex under extreme pressure; not ideal for professional daily use; lacks storage case.
Bottom Line: An indispensable starter kit for occasional automotive work. This set delivers professional-grade protection at a disposable tool price, making it the smartest choice for DIYers who prioritize surface preservation over comprehensive capability.
2. GOOACC 238Pcs Trim Removal Tool, Auto Push Pin Bumper Retainer Clip Set Fastener Terminal Remover Tool Adhesive Cable Clips Pry Kit Car Panel Radio Removal Auto Clip Pliers (GRC-207)

Overview: The GOOACC 238-piece kit transforms trim removal from a guessing game into a systematic process. This comprehensive system combines 12 popular clip sizes with multiple removal tools, addressing virtually any automotive, marine, or furniture trim scenario. The impact-resistant nylon tools work alongside sturdy plastic fasteners compatible with major brands including GM, Ford, Toyota, and Chrysler. All components organize neatly in a portable bag, eliminating the chaotic scatter of loose clips that plagues lesser kits.
What Makes It Stand Out: This kit’s genius lies in its dual-focus approach: you get both removal tools and replacement hardware. The 12 clip varieties cover bumper, fender, engine cover, and interior panel applications, making it a mobile inventory rather than just a tool set. The inclusion of adhesive cable clips adds modern versatility for wiring projects. Each tool features high-level craftsmanship with reinforced stress points, preventing the breakage common in bulk sets.
Value for Money: Priced at $26.72, this kit delivers substantial savings versus purchasing components separately. Individual clip assortments cost $15-20 alone, while quality pry tools add another $20. You’re effectively getting the tools for free while gaining organized storage. For semi-professional mechanics or serious enthusiasts, the time saved hunting for correct clips justifies the entire purchase. The reusable nature of both tools and clips provides long-term value across multiple vehicles.
Strengths and Weaknesses: Pros: Massive 238-piece selection; includes replacement clips for major brands; durable nylon construction; organized portable storage; covers interior and exterior applications; excellent for frequent users. Cons: Overwhelming for beginners; higher initial investment; some clips may not fit niche applications; bag durability could be improved; limited metal tools for heavy-duty jobs.
Bottom Line: The ultimate solution for regular automotive tinkerers. This kit eliminates hardware store runs and provides everything needed for professional-grade trim work, making it worth every penny for those who work on cars monthly or more.
3. GOOACC 5 PCS Nylon Auto Trim Removal Tool Kit No-Scratch Removal Tool Kit for Car Panel & Audio Dashboard Dismantle Red

Overview: This GOOACC five-piece kit mirrors its sibling’s functionality while adding distinctive red coloration for enhanced visibility. The set comprises four panel removal tools and a fastener remover, all crafted from impact-resistant nylon fiber that resists bending and cracking under normal use. The vibrant red finish helps prevent tools from disappearing into engine bays or dark garage corners, while maintaining the same non-toxic, eco-friendly composition as the standard version.
What Makes It Stand Out: Color-coded convenience defines this kit’s appeal. The red nylon material provides the same scratch-free performance as black alternatives but with superior contrast against typical black or gray interior plastics. This visual distinction helps identify the correct tool angle during work and reduces loss. The ergonomic design maintains the lightweight, handheld profile that makes GOOACC tools comfortable for extended dashboard or door panel projects.
Value for Money: At $8.09, you pay a modest premium for the red colorway—approximately $1.60 more than the standard black version. For users prone to misplacing tools or working in dim conditions, this upcharge pays for itself in time saved searching. The underlying tool quality remains identical, offering the same durability and surface protection. For professional detailers or mobile technicians, the color differentiation could justify the cost through improved workflow efficiency.
Strengths and Weaknesses: Pros: High-visibility red color prevents loss; durable impact-resistant nylon; ergonomic lightweight design; fastener remover included; non-scratch material; good for furniture restoration. Cons: Price premium over identical black version; limited to five tools; no replacement clips; nylon flexibility limits prying force; lacks comprehensive storage solution.
Bottom Line: Choose this kit if you value tool visibility and frequently work in cluttered environments. Otherwise, the standard black version offers identical performance at a lower price point, making this a specialized rather than essential upgrade.
4. Tresalto Auto Trim Removal Tool Kit - 5 Piece Set for Dash, Door Panel, Clip Remover - Scratch-Resist Nylon Pry Tools for Interior Car Trims Work - Panel Prying Tools Included - Blue

Overview: Tresalto’s five-piece kit enters the budget trim tool market with a focus on balanced flexibility and strength. The blue nylon construction promises scratch-free operation across dashboards, door panels, and various interior clips. This set includes multiple pry tool profiles designed to handle different angles and access points within modern vehicle interiors. The tools strike a middle ground between rigid metal levers and overly flexible plastic alternatives, providing enough give to prevent breakage while maintaining sufficient stiffness for effective prying.
What Makes It Stand Out: The kit emphasizes universal application across car, SUV, and other vehicle types, with tools specifically shaped for contemporary automotive clips. The blue color provides reasonable visibility while distinguishing the brand from GOOACC’s offerings. Each tool features reinforced edges that resist chipping, addressing a common failure point in economy nylon tools. The compact design allows storage in glove boxes, making it accessible for emergency repairs or roadside trim fixes.
Value for Money: At $9.99, Tresalto positions itself as a mid-tier option—more expensive than basic GOOACC sets but cheaper than comprehensive clip-inclusive kits. The price reflects slightly improved edge reinforcement and brand differentiation rather than additional components. For users wanting proven tool durability without committing to a 200+ piece set, this offers a reasonable compromise. However, value-conscious buyers might prefer the nearly identical GOOACC kit at 35% less cost.
Strengths and Weaknesses: Pros: Reinforced tool edges resist wear; flexible yet sturdy nylon; compact glove-box storage; scratch-resistant performance; suitable for multiple vehicle types; good for tight angles. Cons: Higher price than comparable kits; only five tools included; no replacement hardware; blue color may show dirt; limited leverage for stubborn fasteners.
Bottom Line: A solid alternative to market leaders, best suited for users who prioritize edge durability and brand variety. Most DIYers will find equal performance at lower prices elsewhere, but quality-conscious buyers receive dependable tools with thoughtful engineering.
5. JNLK 352pcs Trim Removal Tool, Pry Tool, Door Panel Removal Tool Kit, Clip Tool, Fasteners Removal Tool with Car Retainer Body Clips Set, Blue

Overview: The JNLK 352-piece kit represents the pinnacle of comprehensive trim removal systems, dwarfing competitors with its sheer volume and variety. This professional-grade arsenal includes 120 retainer clips across 12 sizes, 11 distinct trim tools, precision hook picks, upholstery removers, stereo tools, terminal keys, adhesive cable clips, spongy cushions, and even tire valve caps. Every component serves a specific purpose in automotive, marine, RV, or furniture applications, creating a mobile trim department rather than a simple tool set.
What Makes It Stand Out: Unprecedented completeness defines this kit. The inclusion of 40 adhesive cable clips with two size options addresses modern wiring management needs often overlooked by traditional sets. The 120 spongy cushions provide vibration damping for reassembly, while the 11 trim tools offer specialized profiles for every conceivable panel type. This isn’t just a purchase—it’s a complete inventory solution that eliminates separate sourcing of clips, tools, and accessories.
Value for Money: At $29.59, the value proposition becomes clear when itemizing components separately. Quality clip assortments ($20), trim tools ($25), cable management ($10), and specialty picks ($15) would exceed $70 individually. Professionals recoup the investment on a single complex job, while serious enthusiasts gain lifetime supply status. The included portable bag maintains organization across hundreds of pieces, preventing the value erosion of lost components.
Strengths and Weaknesses: Pros: Massive 352-piece selection; includes cable management solutions; 12 popular clip sizes; professional-grade nylon tools; comprehensive storage bag; covers interior and exterior applications. Cons: Overwhelming for novices; highest price point; some components may remain unused; bag zipper durability concerns; requires storage space.
Bottom Line: The definitive choice for professional mechanics, restoration shops, or dedicated hobbyists. This kit eliminates all guesswork and hardware store trips, providing everything needed for any trim project imaginable. Casual users should opt for simpler sets.
6. Poraxy 19Pcs Trim Removal Tool, Car Panel Dashboard Door Audio Trim Removal Tool Kit, Auto Clip Pliers Fastener Remover Set, Plastic Pry Tool, Automotive Upholstery Removal Kit

Overview: The Poraxy 19-piece trim removal kit positions itself as a comprehensive solution for automotive interior work. This collection targets DIY enthusiasts and weekend mechanics who need professional-grade results without professional-grade prices. The kit covers everything from audio system installation to furniture restoration, making it versatile beyond just automotive applications.
What Makes It Stand Out: The toughened nylon fiber construction provides impressive strength while ensuring you won’t scratch or damage delicate surfaces. The ergonomic design helps you reach tight spaces that would otherwise require expensive specialized tools. The inclusion of a dedicated storage bag demonstrates thoughtful organization, preventing tool loss—a common frustration with piecemeal collections.
Value for Money: At $17.99 for 19 specialized tools, this kit delivers solid value. Individual trim tools often cost $3-5 each at retail, making this bundle economically attractive. While premium professional sets can run $50+, Poraxy hits the sweet spot for hobbyists who need reliability without overinvesting.
Strengths and Weaknesses: Strengths include comprehensive coverage for most trim jobs, durable nylon construction, ergonomic handles, and excellent organization. Weaknesses: Nylon may flex under extreme pressure on stubborn fasteners, and the 19 pieces might include some redundant shapes you’ll rarely use. The trim clip pliers, while useful, aren’t as robust as metal alternatives.
Bottom Line: This kit offers exceptional value for DIY car enthusiasts tackling interior modifications. It’s comprehensive enough for most projects while remaining affordable, though professionals might want to supplement with metal tools for heavy-duty work.
7. Auto Trim Removal Tool Set (No Scratch Plastic Pry Tool Kit) - Auto Trim Tool Kit Car Tools, Easy Door Panel Removal Tool, Fastener Removal, Clip, Molding, Dashboards, Interior Trim Tools
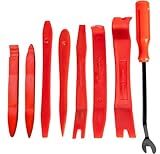
Overview: This 8-piece trim removal kit presents a budget-conscious entry point for basic automotive interior work. Designed for all vehicle types including cars, boats, and RVs, it focuses on essential tools without overwhelming novices. The universal application makes it an accessible choice for first-time DIYers testing the waters of car modification.
What Makes It Stand Out: The rock-bottom price point combined with high-quality nylon fiber construction creates immediate appeal. Unlike brittle ABS plastic alternatives, these tools resist bending and breaking under normal pressure. The variety of shapes addresses hard-to-reach areas, while the included fastener remover adds versatility beyond simple prying tasks.
Value for Money: At $9.99, this is among the most affordable legitimate trim kits available. You’re getting eight functional tools for roughly $1.25 each—cheaper than a single fast food meal. However, the limited piece count means you’ll eventually encounter situations requiring tools you don’t have, necessitating a second purchase.
Strengths and Weaknesses: Strengths include unbeatable affordability, decent nylon durability, and simplicity for beginners. Weaknesses are significant: only eight pieces limits versatility, lacks specialized tools for complex jobs, and offers no storage solution. The tools may wear faster than premium options, and you might need to improvise for certain fasteners.
Bottom Line: Perfect for occasional use and simple tasks like swapping a stereo or removing a door panel. Serious enthusiasts should invest in a more comprehensive set, but this kit admirably serves its purpose as an entry-level option for budget-minded DIYers.
8. GOOACC - GRC-49 19Pcs Trim Removal Tool Set & Clip Plier Upholstery Remover Nylon Car Panel Removal Set with Portable Storage Bag

Overview: The GOOACC GRC-49 19-piece kit mirrors the comprehensive approach of competitors like Poraxy, targeting automotive and marine applications. This set emphasizes protection and ergonomics, promising to safeguard your vehicle’s finish while reducing user fatigue. The inclusion of terminal removal tools and stereo keys broadens its utility beyond basic trim work.
What Makes It Stand Out: Impact-resistant nylon material ensures longevity while preventing paint damage—a critical feature for perfectionists. The ergonomic, lightweight design reduces hand strain during extended projects. Like its competitors, it includes a zippered storage pouch, but GOOACC’s reputation in the automotive tool space adds credibility. The variety spans interior trim tools, fastener removers, stereo keys, and terminal tools.
Value for Money: Priced at $19.99, this sits at the higher end for 19-piece nylon kits. You’re paying a slight premium for the GOOACC brand name and proven track record. While functional, similar kits offer comparable quality for less. The value proposition hinges on brand trust rather than raw component count.
Strengths and Weaknesses: Strengths include comprehensive tool variety, protective nylon construction, ergonomic design, and trusted brand name. The storage bag maintains organization. Weaknesses: marginally expensive compared to similar kits, nylon tools have inherent strength limitations versus metal, and some users may find tool overlap with other kits they own.
Bottom Line: A reliable, well-rounded kit from an established brand. Worth the small premium if you value brand reputation and proven quality. DIYers on tight budgets might find equal functionality elsewhere, but this remains a solid, dependable choice for most automotive interior projects.
9. BFXM 5PCS Auto Trim Removal Tool kit, Car Accessories Clip Pry Tools Kit No Scratch Plastic, Car Door Panel Rivet Pliers Tool Kit, Interior Fastener Puller Remover Body Repair Set for Car (Blue)

Overview: The BFXM 5-piece trim removal kit takes minimalism to the extreme, offering just the essentials for basic automotive tasks. Marketed as a ultra-budget solution, this set targets users who need occasional trim removal without committing to a larger investment. Despite the limited count, it promises high-strength nylon construction and ergonomic design.
What Makes It Stand Out: The matte finish nylon construction reportedly offers enhanced durability over standard plastic, while non-slip handles provide superior control. At this price point, including a fastener remover demonstrates efficiency—you’re getting the most commonly used tools without filler. The moderate bend angles prevent paint scratching, addressing a primary concern.
Value for Money: At $6.09, this is impulse-purchase territory. It’s hard to argue against the price-per-tool value, especially for hobbyists who might only remove a door panel once or twice. However, the extreme limitation to five pieces means you’ll quickly exhaust its capabilities on anything beyond the simplest jobs.
Strengths and Weaknesses: Strengths include incredible affordability, decent nylon quality, ergonomic non-slip grips, and focused utility. The matte finish adds a premium touch. Weaknesses: severely limited tool selection, no storage bag, inadequate for complex projects, and you’ll need to purchase additional tools for comprehensive work. The fastener remover is a basic version lacking leverage.
Bottom Line: Only purchase if you have one specific, simple task in mind. For stereo installation or single panel removal, it suffices. Anyone planning multiple modifications should spend more on a comprehensive kit. This is a single-use investment that quickly becomes redundant.
10. GOOACC 40Pcs Trim Removal Tool,Auto Terminal Removal Key Tool,Auto Clip Pliers Stereo Removal Tools,Car Upholstery Repair Removal Kit,Precision Hook and Pick Set,Wiring Threader,Car Film Scraper

Overview: The GOOACC 40-piece kit is the heavyweight champion of trim removal sets, offering unprecedented variety for serious DIYers and professionals. This comprehensive collection extends beyond standard trim tools to include precision hooks, picks, a wiring threader, and stainless steel components. It addresses automotive, marine, furniture, and aircraft applications, making it a true multi-purpose investment.
What Makes It Stand Out: The sheer component count is unmatched, but quality isn’t sacrificed. Impact-resistant nylon tools protect finishes, while stainless steel stereo removal keys and terminal tools handle tougher jobs. The inclusion of precision hooks and picks enables intricate work, and the wiring threader solves a common frustration. This kit anticipates nearly every interior modification scenario.
Value for Money: At $17.04 for 40 pieces, this represents exceptional value—roughly 43 cents per tool. Comparable professional sets cost significantly more. The blend of nylon and stainless steel tools provides versatility that single-material kits can’t match. You’re essentially getting three smaller kits combined at a discount.
Strengths and Weaknesses: Strengths include unmatched comprehensiveness, dual-material construction (nylon and steel), specialized precision tools, and outstanding value. The storage bag organizes a potentially overwhelming collection. Weaknesses: beginners may find 40 pieces daunting, quality control could vary across such a large set, and you might never use some specialized tools.
Bottom Line: The ultimate choice for serious enthusiasts, professionals, or anyone planning extensive modifications. The value is undeniable, and the comprehensive nature eliminates future purchases. Even if you outgrow some pieces, the core tools alone justify the price. This is the kit to buy if you’re committed to DIY automotive work.
Why Interior Trim Removal Tools Are Essential for Car Care
Your vehicle’s interior trim isn’t just decorative—it’s engineered with precise tolerances, hidden fastening systems, and fragile mounting points that factory technicians approach with specialized equipment. Using improvised tools doesn’t just risk cosmetic damage; it can compromise the structural integrity of clips, break retaining tabs, or create micro-fractures in plastic that worsen over time. Professional trim removal tools are specifically designed to distribute force evenly, access tight gaps without marring surfaces, and release fasteners without destruction. For the car care enthusiast, this means preserving your vehicle’s resale value while gaining the confidence to tackle everything from stereo upgrades to detail cleaning that requires panel removal.
Understanding the Anatomy of a Professional Trim Removal Kit
A truly comprehensive trim removal kit functions as a coordinated system rather than a random collection of pry bars. Each tool serves a distinct purpose, working in sequence to safely dismantle interior components. Understanding this ecosystem helps you evaluate kits based on completeness rather than just piece count.
The Core Prying Tools: Your First Line of Defense
The foundation of any kit rests on its prying implements. Look for wedge-shaped tools with graduated thicknesses—typically ranging from 2mm to 8mm at the working edge. These should feature slightly flexible bodies that allow you to rock them gently without snapping, while maintaining enough rigidity to transfer force effectively. The best designs include both flat profiles for seam separation and curved variants that match the contours of door panels and dashboard edges. Pay attention to the tool’s length; longer pry bars (8-12 inches) provide better leverage for stubborn panels, while shorter versions offer superior control in confined spaces.
Specialized Hooks and Pullers: Reaching the Unreachable
Beyond basic wedges, professional kits include an array of hook-tipped tools that serve as your precision instruments. These L-shaped, J-shaped, and S-shaped profiles can reach behind panels to release clip mechanisms that pry bars simply can’t access. Door panel clips, for instance, often require a hook tool to lift a retaining tab before the panel will separate. The most versatile kits include hooks with varying throat depths and tip diameters, allowing you to adapt to different fastener sizes without forcing the issue.
Fastener-Specific Tools: Screws, Clips, and Bolts
Modern interiors hide fasteners in plain sight. Your kit should include tools designed specifically for removing delicate screw covers, lifting center caps from bolts, and extracting push-pin retainers without destroying them. These tools often feature forked tips, notched blades, or cupped ends that cradle fasteners during removal. The difference between a generic pry bar and a purpose-built fastener tool is the difference between a reusable clip and one that shatters into three pieces.
Material Matters: Choosing the Right Tool Composition
The material composition of your trim tools directly impacts their effectiveness and safety for your vehicle’s interior. This isn’t just a matter of durability—it’s about matching the tool’s properties to the specific task and substrate you’re working with.
Nylon vs. Plastic: Breaking Down Polymer Options
Basic kits often feature tools stamped from generic polypropylene, which offers minimal flexibility and tends to develop sharp burrs after repeated use. Higher-grade nylon 6/6 tools provide superior tensile strength and maintain their edge geometry longer. The key specification to look for is the material’s Shore D hardness rating—ideally between 70D and 85D for optimal balance between rigidity and non-marring properties. Tools that are too soft will simply bend without releasing fasteners, while overly hard plastics can still scratch delicate piano black finishes or soft-touch coatings.
Reinforced Composite Tools: The Sweet Spot for Durability
The sweet spot for serious DIYers lies in glass-filled nylon or carbon-reinforced polymer tools. These materials incorporate microscopic fibers that dramatically increase tensile strength without significantly increasing hardness. A 30% glass-filled nylon tool can offer nearly double the strength of standard nylon while remaining safe for virtually all interior surfaces. The reinforcement also prevents the microscopic flaking that occurs when standard plastic tools degrade, eliminating the risk of leaving plastic residue embedded in your trim seams.
Metal Tools: When and Where to Use Them Safely
While polymer tools should handle 95% of interior work, professional kits often include a few select metal implements for specific scenarios. Stainless steel hook tools with polished, rounded edges can safely manipulate metal retaining clips or reach into engine bay areas where plastic tools would melt. The key is ensuring these metal tools have been de-burred and feature radius edges rather than sharp corners. Never use metal pry bars on visible interior surfaces—reserve them for structural work behind panels where contact occurs with metal fasteners only.
Ergonomics and Design: Features That Prevent Fatigue
A four-hour door panel and dashboard project will quickly reveal the difference between ergonomic excellence and poor design. Hand fatigue leads to sloppy technique, and sloppy technique leads to damage.
Handle Design: Comfort vs. Control
Look for handles with textured grips that prevent slipping when your hands become coated in interior cleaner residue. The best designs feature dual-durometer construction—a rigid core for force transfer with a softer outer layer for comfort. Handle diameter should accommodate various grip styles: power grip for initial separation and precision grip for detailed work. Avoid tools with smooth, cylindrical handles that rotate in your palm during twisting motions.
Tool Profiles: Angles, Curves, and Precision Tips
The working end geometry determines a tool’s effectiveness. Professional-grade tools feature mathematically calculated angles—typically 15 to 30 degrees at the tip—that provide optimal mechanical advantage without requiring excessive insertion depth. Curved profiles should match common interior radii, particularly the concave curves found along door panel edges and the convex curves around dashboard vents. The tip itself should taper to a precise edge no thicker than 0.5mm, allowing it to slip into factory gaps without widening them permanently.
Kit Size and Versatility: Finding Your Perfect Match
The ideal kit size depends entirely on your ambition level and the complexity of modern vehicle interiors you’ll be tackling.
Compact Kits: Minimalist Approach for Occasional Use
A well-curated 5-piece kit can handle most basic tasks like swapping radio head units or removing door panels for speaker upgrades. These minimalist sets typically include one large wedge, one precision pry bar, a medium hook tool, a clip remover, and a panel popper. The advantage lies in portability and lower cost, but the limitation becomes apparent when you encounter an unusual fastener or need multiple tool thicknesses for progressive panel separation. Consider these only if you work on a single vehicle model where you’ve already mapped the required tools.
Comprehensive Sets: The Professional’s Arsenal
Professional-grade kits expand to 20-40 pieces, offering duplicate tools in varying sizes and specialized implements for obscure fasteners. These sets recognize that modern luxury vehicles may require different approaches for each panel—even within the same interior. A comprehensive kit might include five different hook profiles, three wedge thicknesses, and dedicated tools for specific manufacturers’ clip designs. The investment pays dividends when you’re tackling a full interior detail removal or working on unfamiliar vehicles where you can’t predict what you’ll encounter.
Price vs. Value: Navigating the Cost Spectrum
Price points in trim removal kits correlate strongly with material quality, tool count, and brand reputation, but the relationship isn’t always linear. Understanding what you’re actually paying for helps avoid both false economies and unnecessary splurges.
Budget-Friendly Options: What to Expect Under $20
Sub-$20 kits typically contain 6-12 tools made from basic polypropylene. These can be serviceable for one or two projects but expect tips to deform and handles to crack under stress. The real cost emerges when a tool failure leads to a $300 dashboard replacement. If you choose this tier, inspect each tool upon arrival for molding flash (excess plastic along seams) and test flexibility by gently bending the tools—if they feel brittle or show white stress marks, return them immediately.
Mid-Range Investments: The $20-$50 Sweet Spot
This price range represents the value sweet spot for serious enthusiasts. Kits in this bracket typically offer reinforced nylon construction, 12-20 tools, and thoughtful inclusion of both common and specialized implements. You’ll find proper storage cases, decent ergonomics, and materials that withstand dozens of projects. Look for kits that specifically mention automotive-grade materials and include a tool reference chart showing which implement to use for various fasteners.
Premium Professional Kits: When to Splurge
Professional-grade kits exceeding $50 often include lifetime warranties, modular storage systems, and tools designed from the ground up for specific manufacturers. These sets frequently incorporate rare tools like headliner clip removers or B-pillar fastener tools that cheaper kits simply don’t address. The investment makes sense if you’re performing regular interior work, managing a fleet, or working on high-end vehicles where a single mistake could cost thousands. The peace of mind and time saved often justifies the premium.
Critical Features That Separate Good from Great
Beyond basic tool count and material, several nuanced features distinguish exceptional kits from merely adequate ones. These details separate the tools you’ll reach for repeatedly from those that languish in your toolbox.
Tool Thickness and Flexibility Ratings
Professional kits often specify tool thickness at the working edge with tolerances of ±0.1mm. This precision ensures consistent performance and predictable insertion depths. Flexibility ratings, sometimes expressed as deflection under load, indicate how much a tool will bend before transferring maximum force. The best kits include a mix: rigid tools for initial separation and flexible tools for working around curves without scratching underlying surfaces.
Non-Marring Guarantees: What They Really Mean
Manufacturers’ claims of “non-marring” require scrutiny. True non-marring tools undergo surface treatment to achieve a specific Ra (roughness average) value below 0.8 micrometers—smooth enough to prevent micro-scratches on piano black finishes. Some premium tools even feature color-coded coatings that serve as sacrificial layers, wearing away before the substrate contacts your trim. Be skeptical of uncoated tools claiming to be non-marring; even smooth nylon can trap grit that acts like sandpaper.
Storage Solutions: Cases, Rolls, and Organizers
A kit’s storage system affects tool longevity and workshop efficiency. Hard cases with custom-molded slots prevent tools from contacting each other, preserving their precision edges. Tool rolls offer portability but require careful cleaning to avoid embedding grit in the pockets. The best hybrid systems use magnetic panels or snap-in retention that keeps tools visible and accessible while protecting their working ends. Consider whether the storage solution fits your workspace and if it allows for easy inventory checks before starting a project.
Common DIY Mistakes That Damage Your Car’s Interior
Even the finest tools can’t compensate for poor technique. Understanding common errors helps you develop the patience and methodology that professionals employ.
Using Screwdrivers as Pry Bars: The Cardinal Sin
The temptation to grab a flathead screwdriver for “just one quick pry” has doomed countless interiors. Screwdrivers concentrate force along a sharp edge, creating line-load stress that cracks plastic and mars finishes. The steel hardness also exceeds that of interior plastics by orders of magnitude, guaranteeing damage. Professional technicians follow a simple rule: if it doesn’t have “trim tool” in its name, it doesn’t touch interior panels.
Ignoring Hidden Fasteners: The Snap and Crack Risk
Modern door panels alone may hide 8-12 fasteners—screws behind handle plugs, clips along the lower edge, and retaining tabs at the window seal. Rushing to pry without locating all fasteners transfers stress to the remaining attachments, causing them to fail catastrophically. Always consult factory service manuals or enthusiast forums for your specific model’s fastener map. The 15 minutes spent researching can save hours sourcing replacement clips.
Applying Excessive Force: When Patience Pays Off
Interior trim is designed for assembly-line efficiency, not brute-force removal. If a panel requires more than moderate hand pressure, you’re missing a fastener or using the wrong tool angle. Professional technique involves progressive tool insertion—start with the thinnest tool to create a gap, then step up to thicker tools to maintain the opening while working along the seam. This method distributes stress and prevents localized failure.
Pro Techniques for Flawless Trim Removal
Mastering a few advanced techniques elevates your work from amateur to professional grade, ensuring clean removal and perfect reinstallation.
The Wiggle-and-Pull Method: Mastering the Rhythm
Rather than steady pressure, professionals use a rhythmic wiggling motion that alternates between tension and relaxation. This technique exploits the elastic properties of plastic clips, gradually walking them out of their retainers without exceeding their yield strength. Practice on a junkyard panel first: insert your tool, apply gentle outward pressure, then oscillate the tool tip in a 5mm side-to-side motion while maintaining steady pull. You’ll feel the clip release in stages rather than snapping free.
Working with Temperature: Cold Weather Challenges
Interior plastics become brittle below 60°F, dramatically increasing failure risk. In cold conditions, warm your tools and the target panel with a hair dryer set to low heat before starting. Never use a heat gun on interior plastics—the temperature gradient can cause warping. The goal is gentle warming to around 80°F, where plastics regain their designed flexibility. Conversely, in extreme heat, some trim adhesives become overly pliable; chill your tools in a freezer for 10 minutes to prevent them from sticking to softened adhesive.
Protecting Adjacent Surfaces: Tape and Padding Strategies
Even non-marring tools can damage finishes if grit becomes trapped between the tool and trim. Before starting, wrap adjacent glossy surfaces (like infotainment screens or piano black trim) with blue painter’s tape. For extra protection, apply a single layer of 3M protective film to tool edges when working on ultra-soft coatings or Alcantara-wrapped panels. This creates a sacrificial barrier that prevents any microscopic contaminants from marring surfaces.
Project-Specific Considerations: Matching Tools to Tasks
Different interior components present unique challenges that demand specific tool configurations. Tailoring your approach to the project prevents improvisation that leads to damage.
Door Panel Removal: The Most Common DIY Project
Door panels typically require a three-tool approach: a wide wedge to pop the initial clip, a medium hook to release the door handle cable, and a panel popper with a 90-degree bend to access lower clips near the speaker grille. The critical technique involves starting at the bottom rear corner where clips are most accessible, then working upward and forward along the panel edge. Always disconnect the window switch harness before full removal to prevent strain on the wiring.
Dashboard Disassembly: Precision Tools for Tight Spaces
Dashboard work demands your thinnest, most flexible tools due to the tight tolerances and numerous hidden clips around vents and instrument clusters. A set of angled picks becomes invaluable for releasing climate control module clips without removing the entire dash. The golden rule: never pry against the dashboard face itself. Instead, insert tools from behind or below, using the structural mounting points as leverage surfaces.
Headliner and Pillar Trim: Overhead Challenges
Overhead work introduces gravity as an enemy. Headliner clips often require upward pressure while simultaneously sliding a tool along the seam. Specialized headliner tools feature T-handles that allow two-handed operation and hooks with 180-degree bends to reach behind the fabric-covered board. A-pillar trim demands extreme caution due to airbag deployment paths—always disconnect the battery and wait 15 minutes before attempting removal.
Safety First: Protecting Yourself and Your Vehicle
Trim removal presents unique safety considerations that extend beyond simple hand protection. Modern vehicles integrate sensitive electronics and explosive safety devices throughout the interior.
Eye Protection and Gloves: Non-Negotiable Gear
When clips release suddenly, they can become projectiles traveling at surprising velocity. Safety glasses with side shields are mandatory, not optional. Cut-resistant gloves protect against sharp metal stampings behind panels and prevent oils from your skin from contaminating trim surfaces. Choose gloves with touchscreen-compatible fingertips so you can reference digital service manuals without removal.
Electrical Safety: Disconnecting Batteries for Airbag Work
Any trim removal near A-pillars, B-pillars, steering wheels, or dashboard modules requires battery disconnection and a 15-minute capacitor discharge wait. Airbag connectors feature shorting bars that can deploy if shorted during removal. After disconnecting the negative terminal, touch a grounded metal surface to discharge static before handling any connectors. Keep a note on the steering wheel reminding yourself (and others) that the airbag system is disabled.
Maintenance and Longevity: Caring for Your Investment
Quality trim tools can last decades with proper care, while neglected tools become liabilities that cause more damage than they prevent.
Cleaning and Storage Best Practices
After each project, clean tools with isopropyl alcohol to remove plastic residue and embedded grit. Inspect tips under magnification for burrs or cracks. Store tools in their designated slots to prevent contact damage. For tool rolls, brush out pockets monthly with a soft brush. Never leave tools in direct sunlight—UV degradation weakens polymer bonds, making tools brittle over time.
When to Replace Worn Tools
Replace any tool that shows stress whitening at flex points, as this indicates polymer chain damage that precedes catastrophic failure. Tools with rounded tips thicker than 1mm lose their precision edge and can widen gaps unnecessarily. A good rule: if you can’t slip the tool into a factory seam without forcing it, the tip has worn beyond serviceability. Most pros replace their most-used tools every 2-3 years, even if they appear functional.
Warranty and Support: What to Look for in a Manufacturer
A manufacturer’s warranty reveals their confidence in product quality. Lifetime warranties against manufacturing defects are standard for professional-grade tools, but read the fine print—some exclude normal wear, while others cover any failure including tip wear. The best manufacturers offer no-questions-asked replacement and maintain detailed online resources showing proper tool usage for specific vehicle applications. Check whether the company provides exploded diagrams or video tutorials for common trim removal procedures.
Where to Buy: Retail vs. Online Marketplaces
Purchasing decisions affect not just price but your ability to inspect tools before buying and access support afterward.
Physical auto parts stores allow hands-on evaluation—flex the tools, check for molding defects, and assess handle comfort. Store staff often have practical experience and can advise on kit selection. However, selection tends toward mid-range consumer kits rather than professional-grade options.
Online marketplaces offer the widest selection and competitive pricing but require careful vetting. Focus on sellers with detailed product photos showing tool thickness measurements and material specifications. Read reviews critically, looking for feedback from verified purchasers who mention specific vehicle models. Avoid listings with generic photos and vague descriptions like “professional quality” without material specifications.
Frequently Asked Questions
What’s the minimum number of tools I need for basic interior work?
For most basic tasks like swapping a radio or replacing door speakers, a 5-piece core set suffices: a large wedge, medium pry bar, hook tool, clip remover, and panel popper. This covers 80% of common fasteners while teaching you proper technique. You can expand later as projects become more ambitious.
Can I really use these tools on any car, or do I need brand-specific kits?
Quality universal kits work on 95% of vehicles, but European luxury brands and some newer models use proprietary fasteners that benefit from specialized tools. If you exclusively work on one brand, consider supplementing a universal kit with 2-3 brand-specific tools for common tasks like door handle removal.
How do I know if a tool is truly non-marring before buying?
Check for a specified surface finish (Ra value below 0.8 micrometers) or a sacrificial coating. In-store, run the tool across a CD case—if it leaves any mark on the polycarbonate, it will damage automotive trim. Online, look for close-up photos of the tool tip and reviews mentioning use on piano black finishes.
Why do some kits include metal tools? Are they safe?
Metal tools serve specific purposes: manipulating metal retaining clips, reaching into hot engine bay areas, or accessing structural fasteners behind interior panels. They’re safe only when used on metal components, never on visible interior plastics. Professional kits include them as specialty items, not for general trim removal.
What’s the best way to learn proper trim removal technique?
Start with a junkyard panel or inexpensive interior piece from a salvage yard. Practice the wiggle-and-pull method and progressive tool insertion on disposable parts. Watch video tutorials from professional installers, not just quick DIY demos. The rhythm and feel of proper technique can’t be learned from text alone.
How often should I replace my trim removal tools?
With proper care, quality tools last 5-10 years. Replace them immediately if you notice stress whitening, tip deformation thicker than 1mm, or any cracking. High-use tools like wedges may need replacement every 2-3 years. If a tool has saved you from damage once, it’s already paid for itself—don’t risk a failure.
Can I use trim tools on exterior trim and badges?
Exterior applications demand different considerations. Plastic tools may be too flexible for badge adhesive, while metal tools risk paint damage. Dedicated badge removal tools use sharp nylon fishing line or plastic razor blades. For exterior trim, use tools specifically rated for outdoor use, as UV exposure degrades standard interior-grade polymers.
What’s the difference between a panel popper and a pry bar?
Panel poppers feature a forked end that straddles fasteners, distributing force on both sides of a clip. Pry bars have a single blade that slides into seams. Use poppers where you can see or feel the fastener location; use pry bars for blind seam separation. Using the wrong type concentrates stress and risks breakage.
Are heated tools better for cold weather removal?
Never use heated tools on interior trim. The temperature differential can cause localized expansion and cracking. Instead, warm the entire panel with a hair dryer on low setting. Heated tools are a gimmick that solves the wrong problem and creates new risks.
How do I clean tools that have picked up adhesive residue?
Use isopropyl alcohol and a microfiber cloth for most residues. For stubborn adhesive, a citrus-based degreaser works, but thoroughly rinse and dry tools afterward. Avoid acetone or harsh solvents that can attack polymer bonds. After cleaning, inspect tools under bright light to ensure no grit remains embedded in the surface.