Removing undercoating from a vehicle’s undercarriage is one of those jobs that separates weekend warriors from serious automotive restoration enthusiasts. Whether you’re tackling surface rust, preparing for a full frame-off restoration, or simply refreshing aging protection, the right heat gun can transform this notoriously messy task from a chemical-soaked nightmare into a controlled, efficient process. The key isn’t just cranking up the heat—it’s understanding how temperature, airflow, and technique work together to soften stubborn coatings without warping metal or creating hazardous fumes.
In the world of automotive care, heat guns have become indispensable for undercoating removal because they offer precision that other methods simply can’t match. Unlike harsh chemical strippers that require extensive cleanup and pose environmental concerns, or mechanical methods like grinding that can thin metal and throw dangerous dust into the air, heat allows you to selectively soften coatings for clean scraping. But not all heat guns are created equal, and choosing the wrong tool can lead to frustration, damaged components, or even safety hazards. Let’s explore what makes a heat gun truly effective for this specific application.
Top 10 Heat Gun
Detailed Product Reviews
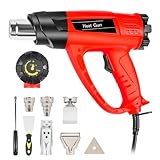
1. SEEKONE Heat Gun 1800W 122℉-1202℉(50℃- 650℃)Fast Heating Heavy Duty Hot Air Gun Kit Variable Temperature Control Overheat Protection with 4 Nozzles for Crafts, Shrinking PVC, Stripping Paint(5.2FT)

Overview:
The SEEKONE 1800W heat gun delivers professional-grade performance with an impressive temperature range from 122℉ to 1202℉. This versatile tool heats up in just 1.5 seconds, making it ideal for demanding DIY projects, crafts, paint stripping, and PVC shrinking. The kit includes four specialized nozzles and features variable temperature control rather than simple dual settings, offering precise heat management for sensitive applications.
What Makes It Stand Out:
Unlike basic dual-temp models, this unit provides rheostat-type temperature adjustment via a black dial, plus airflow control through a high/low switch. The scientific ergonomic design reduces repetitive strain injuries during extended use. Overload protection automatically prevents circuit damage, while the comprehensive four-nozzle set includes deflector, concentrator, and reflector attachments for specialized heat patterns.
Value for Money:
At $28.99, this heat gun punches well above its weight class. Comparable variable-temperature models from premium brands often cost $50-80, making this an exceptional value. The robust 1800W motor, extensive temperature range, and lifetime technical support justify every penny. You’re getting professional features at a hobbyist price point.
Strengths and Weaknesses:
Strengths: Variable temperature control (50-650℃), rapid 1.5-second heat-up, ergonomic injury-preventing design, comprehensive four-nozzle kit, overheat protection, lifetime technical support.
Weaknesses: 5.2FT cord may be short for large workspaces, initial learning curve for temperature dial, smoke during first use from anti-rust coating.
Bottom Line:
This SEEKONE model is the sweet spot for serious DIYers who need precision without breaking the bank. The variable temperature control and rapid heating make it far more versatile than budget dual-temp alternatives. Highly recommended for crafts, automotive work, and home renovation projects.
2. Genesis GHG1500A Dual Temperature Heat Gun Kit With Fast Heat High And Low Settings 572F/1000F, Air Reduction Nozzle, Reflector Nozzle, And Two Deflector Nozzles with 2 Year Warranty

Overview:
The Genesis GHG1500A is a budget-friendly workhorse delivering 750/1500 watts of power with two temperature settings at 572°F and 1000°F. This kit targets casual DIYers and homeowners tackling occasional projects like paint removal, pipe thawing, and shrink-wrapping. The 12.5-amp motor provides reliable performance, while the included four nozzles offer basic versatility for common household tasks.
What Makes It Stand Out:
The standout feature is the aggressive pricing combined with a rare 2-year warranty in this category. The 3-position rocker switch simplifies operation—high temp, low temp, and off—eliminating confusion. The dual deflector nozzles are particularly useful for protecting adjacent surfaces when stripping paint near glass or trim, a thoughtful inclusion for renovation work.
Value for Money:
At $16.77, this is one of the most affordable heat guns from a recognizable brand. While it lacks variable temperature control, the dual settings cover most basic needs. The 2-year warranty provides peace of mind that competitors don’t match at this price. For occasional use, it’s significantly cheaper than renting and outperforms dollar-store alternatives that lack safety certifications.
Strengths and Weaknesses:
Strengths: Unbeatable price, 2-year warranty, simple 3-position switch, four useful nozzles included, deflector nozzles protect adjacent surfaces, adequate power for household tasks.
Weaknesses: Only two fixed temperatures, no variable control, shorter lifespan with heavy use, basic ergonomics, louder operation than premium models.
Bottom Line:
Perfect for homeowners who need a heat gun for occasional projects without investing heavily. The Genesis GHG1500A won’t satisfy professionals, but it reliably handles shrink tubing, paint stripping, and thawing tasks. Buy it for the warranty and price; don’t expect precision temperature control.
3. ARLIGAADUO 861DW 1000W Hot Air Gun Soldering Station, Intelligent Digital Display, Automatic Sleep, Fast Desoldering Hot Air Rework Station, Heat Gun with 3 Nozzles For Phone PCB Chip Repair

Overview:
The ARLIGAADUO 861DW is a professional-grade hot air rework station engineered for precision electronics repair. This 1000W unit features a digital display, three programmable channels, and temperature range from 212°F to 932°F. Designed specifically for phone and PCB chip repair, it includes automatic sleep mode and password protection. The brushless turbo fan delivers consistent, gentle airflow crucial for delicate components.
What Makes It Stand Out:
Three customizable channels (CH1, CH2, CH3) allow instant switching between saved temperature/airflow settings—a massive time-saver for repetitive soldering work. The password protection and key lock prevent accidental setting changes mid-repair. Overheating protection combined with extensive heat dissipation holes ensures component safety. The intelligent digital display provides precise feedback unavailable in analog models.
Value for Money:
At $115.68, this professional tool offers exceptional value. Comparable Hakko or Weller stations cost $200-400 with similar features. The build quality using ABS, copper, galvanized steel, and 304 stainless steel ensures durability. For electronics professionals or serious hobbyists, the time saved through programmable channels and the precision digital control justifies the investment over consumer-grade heat guns.
Strengths and Weaknesses:
Strengths: Digital precision control, three programmable channels, automatic sleep function, password protection, brushless turbo fan, premium materials, overheating protection, ideal for electronics.
Weaknesses: Limited to 932°F max (unsuitable for paint stripping), complex for casual users, higher price point, only three nozzles, not designed for heavy-duty construction tasks.
Bottom Line:
Essential equipment for electronics repair professionals and serious DIYers working on PCBs. The programmable channels and digital precision make it worth every dollar. Skip this if you need a general-purpose heat gun for paint or PVC, but for soldering and chip work, it’s an outstanding value-priced professional station.
4. SEEKONE Heat Gun 1800W Heavy Duty Fast Heat Hot Air Gun Kit with 752℉&1112℉(400℃-600℃) Dual-Temperature Settings and 4 Nozzles with Overheat Protection for Crafts, Shrinking PVC, Stripping Paint

Overview:
This SEEKONE model offers simplified dual-temperature operation at 752°F and 1112°F, powered by a robust 1800W motor. UL-certified and built with fire-resistant PA6 nylon composite around the nozzle and TPE rubber grip, it prioritizes safety. The kit includes four nozzles and features a built-in stand and hanging hook for convenience. It’s designed for crafters and DIYers who need reliable high heat without complexity.
What Makes It Stand Out:
The UL certification and fire-resistant materials provide superior safety assurance compared to unbranded alternatives. The TPE rubber-wrapped handle offers excellent grip and reduces fatigue during extended use. The initial smoke warning demonstrates transparency about the anti-rust coating burn-off process. The integrated stand allows vertical positioning for hands-free operation, a feature often missing in sub-$20 heat guns.
Value for Money:
Priced at $19.99, this represents incredible value for a UL-certified, 1800W heat gun. The safety certifications and fire-resistant materials alone justify the minimal premium over no-name brands. While it lacks variable temperature control, the two settings cover most craft and DIY applications. You’re getting near-professional power and safety at a price point where most competitors cut corners on materials and testing.
Strengths and Weaknesses:
Strengths: UL certified, 1800W high power, fire-resistant PA6 nylon construction, ergonomic TPE grip, four nozzles included, built-in stand and hanging hook, overheat protection, transparent manufacturer warnings.
Weaknesses: Only two fixed temperatures, no variable control, smoke/odor during first use, less precise than variable models, limited to 600℃ max.
Bottom Line:
An excellent choice for safety-conscious DIYers who need powerful heat without fuss. The UL certification and fire-resistant materials make it worth the small premium over cheapest alternatives. Perfect for crafts, PVC shrinking, and occasional paint stripping where precise temperature control isn’t critical.
5. Wagner Spraytech 2417344 HT1000 Heat Gun Kit, 3 Nozzles Included, 2 Temp Settings 750ᵒF & 1000ᵒF, Great for Shrink Wrap, Soften Paint, Bend Plastic Pipes, Loosen Bolts and More

Overview:
The Wagner HT1000 leverages 50+ years of brand heritage to deliver a reliable dual-temperature heat gun for household projects. With settings at 750°F and 1000°F, this tool handles shrink wrapping, paint softening, pipe bending, and bolt loosening. The kit includes three nozzles and features a corrosion-resistant design with an integrated stand. ETL listing by Intertek ensures it meets rigorous UL and CSA safety standards.
What Makes It Stand Out:
Wagner’s long-standing reputation and U.S.-based customer service provide confidence that budget brands can’t match. The ETL listing (equivalent to UL) ensures third-party safety validation. The edge protector nozzle is specifically designed to shield delicate surfaces from heat damage—a thoughtful addition for window work. The corrosion-resistant nozzle extends lifespan in humid environments, addressing a common failure point in cheap heat guns.
Value for Money:
At $27.99, this sits in the mid-range but offers brand reliability worth the premium. You’re paying for Wagner’s quality control, safety testing, and accessible customer support. While less powerful than 1800W models, it’s perfectly matched to household tasks. The three-nozzle kit is slightly less generous than competitors, but the nozzle quality and thoughtful design offset this. For homeowners prioritizing safety and support over raw power, it’s fairly priced.
Strengths and Weaknesses:
Strengths: Reputable 50+ year brand, ETL safety certified, U.S. customer support, corrosion-resistant nozzle, integrated stand, edge protector nozzle for delicate surfaces, reliable for household tasks.
Weaknesses: Only two temperature settings, 1500W (less powerful than some competitors), only three nozzles, no variable control, premium price for power level.
Bottom Line:
The Wagner HT1000 is the safe, reliable choice for homeowners who value brand reputation and customer support. It won’t match variable-temp models for versatility, but it excels at typical household heat applications. Choose this for peace of mind and reliable performance on occasional projects.
6. QWORK Heat Gun, 110V 300W Hot Air Gun Tools Shrink Gun with Stand and Power Cord, for Shrinking Wrapping PVC, DIY Embossing and Drying Paint

Overview: The QWORK 300W Heat Gun is an ultra-budget entry-level tool designed for light-duty crafting and household tasks. This no-frills device focuses on essential functionality for beginners and occasional users who need basic heat application for shrink wrapping, embossing, and paint drying. Its low power output and simple design make it approachable for those intimidated by more complex power tools.
What Makes It Stand Out: At under $9, this heat gun democratizes access to heat-based crafting tools. The integrated stand and generous power cord length are surprising inclusions at this price point, enabling hands-free operation. The high-vent design helps manage internal temperatures despite its modest power rating. It’s specifically marketed for craft applications rather than industrial use, setting clear expectations.
Value for Money: Exceptional. No other heat gun delivers this level of functionality at such a low price point. While professional models offer more power and precision, this tool costs 70-80% less than mid-range alternatives. For hobbyists who use a heat gun a few times per year, the investment is negligible. However, frequent users will quickly outgrow its limitations.
Strengths and Weaknesses: Pros: Unbeatable price; simple operation; adequate for light crafts; includes stand; lightweight. Cons: Underpowered (300W) for demanding tasks; no temperature control; limited to basic applications; questionable long-term durability; longer heat-up times.
Bottom Line: Purchase this only if you’re a casual crafter on an extremely tight budget. For occasional shrink-wrapping or embossing projects, it delivers acceptable performance. Anyone planning regular use should invest $10-15 more for a significantly more capable model. It’s a disposable tool that serves a narrow niche admirably.
7. 【1800W・140℉~1112℉】Heat Gun (60℃-600℃) Fast Heating Heavy Duty Hot Air Gun Kit Variable Temp Control Overheat Protection with 5 Nozzle for Crafts, Shrink Tubing, Stripping Paint, Resin, Soldering
Overview: This professional-grade heat gun delivers serious power and precision for demanding applications. With 1800W of heating capacity and a wide temperature range from 140°F to 1112°F, it handles everything from delicate craft work to heavy-duty paint stripping. The variable temperature control and comprehensive accessory kit position it as a versatile workshop workhorse.
What Makes It Stand Out: True variable temperature control via rear dial sets this apart from basic dual-setting models, offering fine-tuned precision. The ceramic heater and pure copper motor ensure rapid heating and durability. Five specialized nozzles and two scrapers provide immediate versatility for diverse projects. The overheat protection circuit adds professional-grade safety, while the TPE rubber grip enhances comfort during extended use.
Value for Money: Strong value at $29.99. Comparable professional heat guns from brands like DeWalt or Milwaukee cost $50-100 more. You’re getting 90% of the performance at 40% of the price. The included accessories alone would cost $10-15 separately. For serious DIYers or professionals seeking a backup tool, the price-to-performance ratio is compelling.
Strengths and Weaknesses: Pros: Powerful 1800W heating; true variable temperature; excellent safety features; comprehensive accessory package; ergonomic grip; hands-free capability. Cons: Initial smoke/odor during first use; brand recognition concerns for professionals; may be overkill for casual users; heavier than budget models.
Bottom Line: This is the sweet spot for enthusiastic DIYers and professionals seeking capability without premium brand pricing. The variable control and robust power handle virtually any task. Skip this only if you need absolute maximum durability for daily professional use, in which case invest in a commercial brand. For everyone else, it’s an excellent primary tool.
8. DIAFIELD 1850W Heat Gun, Dual Temperature Settings, Fast Heat Hot Air Gun, Durable& Overload Protection, with 4 Nozzles for Shrink Wrap, Vinyl, Crafts, Epoxy Resin
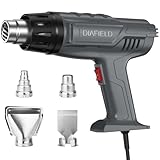
Overview: The DIAFIELD 1850W Heat Gun strikes an impressive balance between power, safety, and affordability. With near-instant heat-up (1.5 seconds) and dual temperature settings reaching 1202°F, it serves both quick craft projects and more demanding applications. The UL certification and comprehensive protection systems make it a safety-conscious choice for home workshops.
What Makes It Stand Out: The advertised 800-hour service life demonstrates confidence in component quality, featuring oxidation-resistant heating wire and an all-copper motor. UL certification across the entire unit (not just the cord) provides verified safety assurance. The rapid 1.5-second heat-up virtually eliminates waiting, while the anti-scalding sheath and temperature control switch prevent common failure modes. Four nozzles cover most applications without overwhelming casual users.
Value for Money: Outstanding at $16.99. You’re getting professional-level power (1850W) and certified safety at a budget price point. This undercuts many 1500W competitors while delivering more features. The durability claims suggest a longer replacement cycle than typical discount models. For users wanting power without premium pricing, it’s arguably the best value in its class.
Strengths and Weaknesses: Pros: High power output; UL certified; rapid heating; excellent safety features; durable construction; ergonomic design; hands-free operation. Cons: Only dual settings (no variable control); brand lacks long-term reputation; 800-hour claim is unverified; slightly heavier than lower-power models.
Bottom Line: This is the smart choice for safety-conscious buyers who need serious power on a budget. The UL certification and overload protection provide peace of mind that cheaper models lack. Ideal for home DIYers, crafters, and even light professional use. Unless you require precise temperature control, this delivers everything you need at an exceptional price.
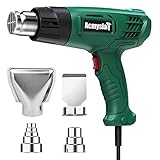
9. ROMECH 350W Heat Gun with 2 Nozzles, Dual Temp Heat Gun 400°F-660°F, Fast Heat Hot Air Gun with Overload Protection for DIY Craft Embossing Shrink Wrapping (Yellow)

Overview: The ROMECH 350W Heat Gun targets crafters and electronics hobbyists who prioritize precision and safety over raw power. Its pencil-grip design and lightweight construction enable detailed work in tight spaces, while dual temperature settings provide flexibility for various materials. The vibrant yellow color and compact form factor make it approachable for beginners and younger users.
What Makes It Stand Out: The impact-resistant PA6+GF30 body material offers superior durability compared to standard ABS plastic at this price point. UL/ETL certification for the power cord and built-in overheating protection demonstrate serious safety commitment. The pencil-shaped ergonomic design is genuinely unique among heat guns, providing surgeon-like precision for electronics repair and intricate craft work. Low noise operation makes it workshop-friendly.
Value for Money: Good value at $14.99. While more expensive than the QWORK 300W, it offers significantly better build quality, safety certification, and ergonomic design. For electronics hobbyists and precision crafters, the specialized form factor justifies the premium. However, general users needing more power should look at 1500W+ models in the same price range.
Strengths and Weaknesses: Pros: Excellent ergonomics; superior safety features; impact-resistant body; precise temperature control; lightweight; low noise; good for detail work. Cons: Underpowered for heavy tasks; only two temperature settings; limited to two nozzles; not suitable for paint stripping or large projects.
Bottom Line: Perfect for electronics repair, embossing, and detailed craft work where precision trumps power. The safety features and comfortable grip make it ideal for younger users or those with grip strength issues. Pass on this if you need to strip paint or shrink-wrap large objects. For its intended niche, it’s an excellent specialized tool.
10. Heat Gun, Heavy Duty Hot Air Gun Kit Dual Temperature Settings 572℉~932℉ (300℃-500℃), Overload Protection with 4 Nozzles for Crafts, Shrink Wrapping/Tubing, Paint Removing, Epoxy Resin
Overview: This generic-branded heat gun delivers heavy-duty performance at a budget-friendly price point. With dual temperature settings reaching 932°F and four versatile nozzles, it handles a wide range of applications from craft projects to paint removal. The straightforward design prioritizes functionality over branding, making it an accessible option for cost-conscious DIYers seeking professional capabilities.
What Makes It Stand Out: The transparent acknowledgment of initial smoke from mica paper drying demonstrates unusual honesty about manufacturing processes. High-quality ABS plastic and stainless steel construction with oxidation-resistant heating wire suggest durability beyond typical discount tools. The integrated stand and ergonomic handle provide professional convenience features. The overload protection system prevents motor burnout, addressing a common failure point in budget models.
Value for Money: Excellent at $16.99. You’re getting 1800W-equivalent performance and professional temperature ranges for the price of a basic craft gun. The four-nozzle kit adds immediate versatility. While lacking variable control, the two settings cover most common applications. For general-purpose home and workshop use, it offers near-professional capability at entry-level pricing.
Strengths and Weaknesses: Pros: High temperature capability; robust construction; overload protection; four useful nozzles; ergonomic design; honest manufacturer communication; hands-free operation. Cons: No variable temperature; generic brand limits support; initial smoke may concern users; unverified durability claims; lacks UL certification mention.
Bottom Line: A capable workhorse for general DIY and craft applications. The high temperature range handles tough jobs while remaining affordable. Ideal for homeowners needing occasional professional-level performance without the investment. Skip this only if you require precise temperature control or premium brand reliability for daily professional use. For everyone else, it’s a practical, powerful choice.
Why Heat Guns Are Essential for Undercoating Removal
The Science Behind Heat-Based Removal
Undercoatings—whether rubberized, asphalt-based, or wax—are designed to adhere tenaciously to metal surfaces while remaining flexible enough to absorb impacts. This durability is exactly what makes them so difficult to remove. Heat works by breaking down the polymer bonds within these coatings, reducing their adhesion and allowing them to be scraped away with minimal force. When you apply concentrated heat in the 500-1000°F range, the coating undergoes a phase change from a tough, rubbery solid to a pliable, almost tar-like consistency. This transformation happens without significantly heating the underlying metal, provided you maintain proper technique and keep the heat source moving.
Advantages Over Chemical and Mechanical Methods
Chemical strippers might seem convenient, but they introduce volatile organic compounds (VOCs) into your workspace and require neutralization before any new coating can be applied. They’re also notoriously ineffective on thick, built-up undercoatings that have been curing for decades. Mechanical methods like wire wheels or scrapers generate toxic dust (especially dangerous with older asphalt-based products that may contain asbestos) and can easily remove more than just the coating—taking precious metal thickness with it. A quality heat gun gives you surgical precision, allowing you to soften exactly what you need to remove while preserving the integrity of your vehicle’s frame and panels.
Key Features to Look for in a Heat Gun
Temperature Range and Control
For undercoating removal, you need a heat gun that can reach at least 1000°F, though many professional applications benefit from tools that can hit 1200°F or higher. More important than maximum temperature, however, is precise control. Look for models with digital temperature displays and incremental adjustment capabilities—ideally in 10-20°F increments. This level of control prevents you from overshooting the sweet spot where the coating releases without overheating the metal. Analog dials might seem simpler, but they lack the repeatability that makes complex restoration projects manageable.
Airflow Settings
Variable airflow is non-negotiable for automotive work. You’ll need both high-volume airflow for heating large, flat areas like floor pans, and concentrated, low-volume streams for working around brackets, fasteners, and complex geometries. The best heat guns offer at least two speed settings, though three or more gives you significantly more control. Some advanced models feature true variable speed control rather than preset stages, allowing you to fine-tune the air delivery based on the coating’s response in real-time.
Wattage and Power
Heat guns typically range from 1200 to 1800 watts for consumer and professional models. For undercoating removal, aim for 1500 watts minimum. Higher wattage translates to faster heat-up times and better temperature recovery when you’re working in cold conditions or moving quickly across large surfaces. However, more power also means more weight and higher electrical demands. A 15-amp circuit can handle most professional heat guns, but you’ll want to avoid running other high-draw tools on the same circuit to prevent tripping breakers mid-project.
Build Quality and Durability
Automotive restoration is hard on tools. Your heat gun will be exposed to falling debris, chemical residue, and extended run times that consumer-grade tools simply aren’t designed for. Look for models with metal or reinforced polymer housings, sealed switches to prevent dust infiltration, and ceramic heating elements rather than wire coils. Ceramic elements heat more evenly and last significantly longer under continuous use. The nozzle should be threaded metal, not plastic, as plastic threads will strip or melt when you switch attachments during a hot session.
Ergonomics and Weight
You’ll be holding this tool for hours, often at awkward angles underneath a vehicle. A well-balanced heat gun reduces fatigue and improves control. Models weighing under 2 pounds are ideal, but don’t sacrifice cooling capacity or motor quality for minimal weight. The handle should have a comfortable, non-slip grip, and the power cord should exit the bottom of the handle rather than the rear—this design prevents the cord from dragging across your work and keeps it out of your line of sight. Some professional models feature side handles or auxiliary grips that provide better control when working overhead.
Safety Features
Thermal overload protection is mandatory—this automatically shuts off the tool if internal temperatures exceed safe limits. Look for heat guns with cool-down modes that keep the fan running after you release the trigger, preventing heat buildup that can damage the element. A sturdy stand or integrated kickstand is invaluable for safely setting down a hot tool during work breaks. Some models include lock-on buttons for extended use, but these should always have secondary safety releases to prevent accidental activation.
Nozzle Attachments and Accessories
The included nozzle selection dramatically impacts versatility. At minimum, you want a wide flare nozzle for broad surfaces, a reducer nozzle for concentrated heat, and a reflector nozzle for working around pipes or tubes. Glass protection nozzles, which direct heat away from adjacent surfaces, are particularly useful when working near fuel lines, brake lines, or suspension components you want to protect. Check that the manufacturer offers a robust ecosystem of accessories—proprietary attachment systems limit your options down the road.
Cord Length and Mobility
A 6-foot cord is absolute minimum; 10 feet is far more practical for garage work. For professional shops, consider heat guns with detachable cords or those compatible with extension reels rated for high-current draw. Some cordless models have entered the market, but their limited run time and lower maximum temperatures make them unsuitable for extensive undercoating removal. If you must use an extension cord, choose a 12-gauge cord no longer than 25 feet to prevent voltage drop that can damage the heating element.
Understanding Temperature Requirements for Different Undercoatings
rubberized undercoatings
Modern rubberized undercoatings, often applied in aerosol cans, soften around 400-600°F. They tend to bubble and lift when heated correctly, making them relatively straightforward to remove. The challenge is their thickness—multiple layers can act as insulation, requiring you to work slowly from the edges inward. Overheating rubberized coatings can cause them to carbonize, creating a hard, black residue that’s even more difficult to remove than the original coating.
Asphalt-Based Coatings
Common on vehicles from the 1970s through the 1990s, asphalt-based undercoatings require higher temperatures—typically 600-800°F—to become pliable. These coatings often contain fibers and fillers that make them especially stubborn. They don’t lift cleanly like rubberized products; instead, they soften into a sticky, tar-like mass that requires immediate scraping. Working temperature is critical here—too cool and it won’t release, too hot and it becomes runny, dripping onto you and creating a fire hazard.
Wax-Based Underseals
Found on many European vehicles and some classic cars, wax-based underseals have the lowest melting point, often releasing around 250-400°F. While this seems easier, the low temperature makes it easy to overshoot and damage paint or seam sealer on the opposite side of the panel. These coatings often penetrate seams and crevices, requiring careful heat application to avoid trapping melted wax in areas you can’t clean. Multiple light passes are more effective than one heavy application.
Airflow Settings: Why They Matter
Low vs. High Airflow Applications
High airflow spreads heat over a larger area, perfect for warming broad sections of floor pan or frame rail before detailed work. It reduces the risk of overheating any single spot but requires more total heat output to achieve the same temperature. Low airflow concentrates heat intensely, ideal for spot removal around bolts, brackets, and in tight corners. Using high airflow in confined spaces can blow softened undercoating into areas you don’t want it, while low airflow on large flats makes the job tediously slow.
Variable Speed Control Benefits
True variable speed control allows you to find the exact airflow needed for the coating’s consistency at that moment. As undercoating heats, it changes viscosity—starting firm, becoming buttery, then potentially runny. Adjusting airflow in real-time lets you maintain optimal removal conditions without stopping to change nozzles or adjust temperature. This feature is particularly valuable when working on vehicles with multiple coating types or varying thicknesses across the undercarriage.
Safety Considerations When Using Heat Guns
Personal Protective Equipment (PPE)
Beyond basic safety glasses, you need a full face shield when working overhead—softened undercoating can and will drip. Heat-resistant gloves rated to at least 500°F are non-negotiable; standard work gloves will melt onto your skin. A respirator with organic vapor cartridges protects against fumes released when heating petroleum-based products. Wear long sleeves and natural fiber clothing (cotton or wool) that won’t melt like synthetics. Steel-toed boots prevent burns from dropped hot scrapings.
Fire Hazards and Prevention
Keep a Class B fire extinguisher (for flammable liquids) within arm’s reach. Remove or thoroughly wet down any flammable materials in your workspace—cardboard, paper, solvent rags. Hot undercoating can smolder for hours before igniting; collect scrapings in a metal container with a lid, not a plastic bucket that can melt through. Never point the heat gun at fuel lines, brake lines, or wiring harnesses, even briefly. The flash point of many undercoatings is surprisingly low—around 400°F—so constant vigilance is required.
Working in Ventilated Areas
Even with modern formulations, heating undercoating releases fumes that range from unpleasant to genuinely hazardous. Work with garage doors fully open and use box fans to create cross-ventilation. If you’re working in a professional shop, ensure your exhaust system is running at full capacity. Avoid working on humid days when fumes hang in the air longer. Take regular fresh air breaks, especially when working on older vehicles where the coating composition is unknown and may contain lead or asbestos.
Electrical Safety
Moisture and electricity don’t mix, and undercoating removal often involves wet rags for cleanup. Keep your work area dry, and never use a heat gun with a damaged cord. If your tool trips a breaker, don’t simply reset it—investigate the cause. Repeated tripping indicates an overloaded circuit or a failing heating element. Use GFCI protection when working in damp conditions or outdoors. Inspect the plug regularly for signs of overheating, which can indicate a poor connection.
Proper Technique for Undercoating Removal
Preparing the Work Area
Raise the vehicle securely on jack stands or a lift—never work under a vehicle supported only by a jack. Remove wheels for better access and to protect them from heat and falling debris. Cover brake components, suspension parts, and anything you don’t want coated with sticky residue using aluminum foil or welding blankets. Take “before” photos to document coating thickness and locations. Have all your scraping tools heated and ready—cold scrapers will instantly re-harden softened undercoating, making your work harder.
The Right Distance and Angle
Hold the heat gun 3-4 inches from the surface for most applications. At this distance, you can heat a 3-4 inch diameter area effectively. Keep the nozzle moving in slow, overlapping circles—never hold it stationary. Angle the heat gun 45 degrees to the surface rather than perpendicular; this directs heat along the coating layer rather than driving it straight into the metal, reducing warping risk. Watch the coating’s surface for visual cues: it will change from matte to glossy when approaching the optimal removal temperature.
Working in Sections
Divide the undercarriage into manageable sections roughly 1 square foot in size. Complete each section fully—heating, scraping, and cleanup—before moving to the next. This prevents you from losing track of partially heated areas that could cool and re-harden. On vertical surfaces like frame rails, work from the bottom up so softened material doesn’t drip onto areas you haven’t yet heated. Mark completed sections with chalk to maintain your place during long sessions.
Avoiding Substrate Damage
Thin sheet metal, especially on floor pans and wheel wells, can warp at temperatures as low as 400°F if heated unevenly. Keep the heat gun moving and never concentrate heat on one spot for more than 10-15 seconds. If you see the metal starting to discolor (straw yellow or blue tints), you’re overheating. For particularly thin areas, use a heat shield on the opposite side or apply heat to the coating side only in short bursts, allowing the metal to cool between passes.
Common Mistakes to Avoid
Overheating Metal Panels
The most common error is getting impatient and cranking the temperature to maximum. This doesn’t speed up the process—it creates problems. Overheated metal warps, paint on the opposite side blisters, and the undercoating can carbonize into a hard, black crust. Use the lowest effective temperature and be patient. If you’re not making progress after 30 seconds, increase temperature in 50°F increments rather than jumping straight to maximum.
Holding Too Close
Bringing the nozzle within an inch or two of the surface seems like it would concentrate heat, but it actually creates uneven heating and increases fire risk dramatically. The intense hot spot can flash-ignite the coating while leaving surrounding areas untouched. Maintain that 3-4 inch distance and let the heat gun do its job. If you need more intensity, switch to a reducer nozzle rather than moving closer.
Inconsistent Temperature Application
Waving the heat gun randomly or moving too quickly prevents the coating from reaching uniform temperature. This results in some areas releasing easily while others remain stubbornly adhered. Develop a systematic pattern—left to right, top to bottom—with consistent speed and overlap. Count your pace if needed: a slow “one-one-thousand, two-one-thousand” per pass helps maintain rhythm.
Maintenance and Care for Your Heat Gun
Cleaning the Tool
After each session, while the tool is still warm (but not hot), wipe down the housing with a dry cloth to remove overspray and dust. Never use solvents on the housing—they can damage internal seals. Clean nozzle threads with a wire brush to ensure accessories screw on smoothly. Compressed air blown through the intake vents removes dust from the motor brushes and cooling fins. Do this monthly if you use the tool frequently.
Storage Best Practices
Always run the cool-down cycle before storing. Store heat guns hanging by their handle, not sitting on their nozzles, which can deform over time. Keep them in a dry location; moisture can corrode heating elements. Remove attachments and store them separately to prevent thread galling. If you won’t use the tool for months, plug the intake with a cloth to prevent insects from nesting in the housing—a surprisingly common issue in seasonal garages.
When to Replace Your Heat Gun
If you notice temperature fluctuations, reduced airflow, or unusual smells during operation, the heating element may be failing. A professional-grade heat gun should last 5-10 years with regular use. Replacement is warranted when repair costs exceed 50% of a new tool’s price, or when safety features begin failing. Don’t wait for complete failure—an unreliable heat gun can damage your project or cause injury.
Cost vs. Quality: Finding the Sweet Spot
Budget Considerations
Entry-level heat guns ($30-60) can handle occasional light-duty work but typically lack the temperature control and durability needed for extensive undercoating removal. They often have plastic housings that crack under heat stress and elements that fail after 50-100 hours of use. Mid-range models ($80-150) offer the best value for most enthusiasts, providing digital controls, multiple airflow settings, and robust construction. Professional-grade tools ($200-400) justify their cost if you’re running a restoration shop or tackling multiple vehicles annually.
Professional-Grade Features Worth Investing In
Temperature memory functions let you store optimal settings for different coating types, saving time on multi-vehicle projects. Overheat protection with automatic shutdown prevents costly repairs. Swivel cords reduce fatigue and prevent cord damage. Some high-end models offer temperature feedback loops that adjust power output to maintain constant temperature regardless of airflow—a game-changer for consistent results. If you’re serious about restoration, these features pay for themselves in time saved and mistakes avoided.
Alternative Tools and When to Use Them
Infrared Paint Removers
Infrared (IR) heaters warm surfaces more gently and uniformly than heat guns, virtually eliminating warping risk. They’re excellent for large, flat panels but struggle with complex geometries and tight spaces. IR tools are also significantly more expensive and slower for thick undercoatings. Consider them for final cleanup or on rare, thin-gauge vehicles where heat gun risk is unacceptable.
Induction Heaters
Induction heating works by creating eddy currents in the metal itself, heating from the substrate up rather than from the surface down. This can be more efficient for certain applications but requires expensive equipment and doesn’t work well on non-metallic components. For pure undercoating removal, induction is overkill unless you’re already using it for rusted fastener removal.
When to Combine Methods
The most efficient approach often involves multiple tools: use a heat gun for detail work and edges, a chemical stripper for final film removal in crevices, and mechanical methods only for small touch-up areas. This hybrid approach minimizes each method’s weaknesses while maximizing their strengths. For example, heat can soften 90% of the coating, while a light chemical application dissolves the remaining residue without the environmental impact of full chemical stripping.
Environmental Factors to Consider
Working in Cold Weather
Cold metal acts as a massive heat sink, requiring significantly more time and energy to warm the coating to removal temperature. In unheated garages below 50°F, pre-warming the undercarriage with a space heater for an hour before starting can cut your work time in half. Be aware that cold undercoating becomes brittle and can chip off in hard pieces rather than softening—a phenomenon that seems helpful until you realize it’s taking the paint underneath with it.
Humidity Effects
High humidity (above 70%) makes undercoating removal more difficult. Moisture in the air condenses on cooler metal surfaces, creating a barrier that absorbs heat energy before it reaches the coating. This is especially problematic on vehicles that have been sitting outside. If possible, move the vehicle indoors and let it acclimate for 24 hours before starting. Dehumidifiers in your workspace help, but ensure they don’t blow directly on the work area.
Garage vs. Outdoor Use
Outdoor work introduces wind, which disperses heat and makes temperature control nearly impossible. It also exposes you to UV light that can make some undercoatings harder to remove. Garage work is preferable, but ensure your space has adequate ventilation—opening one door isn’t enough. Create a cross-breeze with fans positioned to draw fumes away from your breathing zone. In either location, never work alone; have someone check on you periodically, especially when working underneath a vehicle.
Professional Tips for Large-Scale Projects
Time Management Strategies
Plan for 2-4 hours per wheel well and 6-8 hours for a full floor pan on a moderately coated vehicle. Break the project into 2-hour sessions to maintain focus and prevent fatigue-related mistakes. Set up a systematic workflow: heat, scrape, wire brush, solvent wipe, then move to the next section. Batch similar areas together—do all four wheel wells before moving to center sections—to develop muscle memory and optimize your settings.
Team Coordination
If working with a partner, one person should handle heating while the other follows immediately with scraping. This “tag team” approach maintains optimal coating temperature and halves project time. Establish clear communication signals—simple hand gestures work best since hearing protection and ventilation fans make conversation difficult. Never have two heat guns operating in close proximity; the combined heat can warp panels and creates confusing airflow patterns.
Dealing with Contours and Hard-to-Reach Areas
Frame rails, crossmembers, and suspension mounting points require special attention. Use reducer nozzles to direct heat into crevices, and consider making custom scrapers from old putty knives ground to match specific contours. For areas you absolutely cannot reach with a scraper, heat the coating until it’s runny, then blast it out with compressed air (while wearing full face protection). Follow up with solvent on a long-reach brush to clean the last residue.
Frequently Asked Questions
What temperature should I set my heat gun for undercoating removal?
Start at 500°F for wax-based coatings, 700°F for rubberized products, and 800°F for asphalt-based undercoatings. Adjust in 50°F increments based on how the material responds. The coating should become glossy and pliable, not smoke or bubble aggressively.
Can I use a hair dryer instead of a heat gun?
Absolutely not. Hair dryers max out around 140°F, which is insufficient to soften any automotive undercoating. You’ll waste hours and potentially damage the hair dryer. Heat guns are specifically designed for high-temperature applications and have safety features for industrial use.
How do I know if I’m overheating the metal?
Watch for color changes in bare metal areas—straw yellow indicates 400°F, while blue means you’ve exceeded 550°F. If you see paint blistering on the opposite side of the panel, stop immediately and let it cool. The metal should remain cool enough to touch briefly (with gloves) even while the coating is softening.
Is it safe to use a heat gun near fuel lines?
Never direct heat toward fuel lines, brake lines, or electrical wiring. Use glass protection nozzles or fabricate heat shields from sheet metal to protect these components. If you must work near them, heat from the opposite side of the panel or use alternative removal methods in those specific areas.
How long should a heat gun last for this type of work?
A quality professional-grade heat gun should provide 5-10 years of regular use (several projects per year). Budget models may only last 1-2 years under the same workload. Signs of impending failure include temperature fluctuations, reduced airflow, and unusual odors during operation.
Can I remove undercoating in cold weather?
Yes, but it’s significantly harder. Pre-warm the garage to at least 60°F and consider using a space heater to warm the undercarriage before starting. Cold metal pulls heat away from the coating, requiring longer application times and increasing the risk of uneven heating.
What’s the best scraper to use with a heat gun?
Use rigid putty knives with sharpened edges for flat areas, and specialized coating removal scrapers with replaceable blades for contours. Keep scrapers warm during use—a cold blade will re-harden softened coating instantly. Some professionals prefer brass scrapers that won’t gouge metal if they slip.
How do I clean up the removed undercoating?
Collect scrapings in a metal container with a lid. Once cool, dispose of them according to local hazardous waste regulations—many undercoatings contain petroleum products. Never leave hot scrapings in a pile; they can smolder and ignite. Sweep the area frequently to prevent slipping hazards.
Will a heat gun damage factory seam sealer?
Yes, if you’re not careful. Factory seam sealer softens at similar temperatures to undercoating. Work around sealed seams with lower temperatures and keep the heat gun moving. If you must remove seam sealer, do it intentionally with appropriate tools rather than accidentally with excessive heat.
Can I use the same heat gun for paint stripping and undercoating removal?
Yes, though you may want different temperature settings and nozzles. Paint typically releases at lower temperatures (300-500°F) than undercoating. The same tool works for both tasks, but clean it thoroughly between uses to prevent cross-contamination of materials that could affect future finishes.