There’s nothing quite like the sinking feeling of realizing your headlights have transformed from crystal-clear lenses into hazy, yellowed orbs that barely cut through the darkness. Not only does this oxidation make your car look years older, but it’s also a genuine safety hazard, reducing light output by up to 80% and turning nighttime driving into a risky guessing game. While professional restoration services can cost hundreds of dollars, manual sanding headlight restoration kits have emerged as the DIY hero car enthusiasts swear by—offering professional-grade results for a fraction of the price.
The beauty of manual sanding kits lies in their simplicity and control. Unlike drill-attachment systems that can generate excessive heat and remove too much material, hand sanding gives you tactile feedback and precision that prevents costly mistakes. Whether you’re a weekend warrior or a complete novice, understanding what makes these kits effective is the difference between headlights that stay clear for years and ones that fog up again in three months. Let’s dive deep into everything you need to know to choose and use the perfect manual sanding restoration kit.
Top 10 Headlight Restoration Kit
Detailed Product Reviews
1. CERAKOTE® Ceramic Headlight Restoration Kit – Guaranteed To Last As Long As You Own Your Vehicle – Brings Headlights Back to Like New Condition - No Power Tools Required - 10 Wipe Kit

Overview: The CERAKOTE Ceramic Headlight Restoration Kit positions itself as a premium, long-term solution for cloudy headlights. This three-step system promises to restore headlights to factory clarity without requiring any power tools. The kit uses ceramic coating technology originally developed for aerospace applications, claiming to provide lifetime UV protection that chemically bonds to your headlight lenses.
What Makes It Stand Out: Unlike traditional kits that rely on temporary sealants, CERAKOTE’s ceramic coating creates a permanent chemical bond with the headlight surface. The wipe-based application eliminates the risk of drill-related damage, making it accessible for novices. The company backs its “lasts as long as you own your vehicle” claim with a warranty, which is virtually unheard of in this category. The three-step process (oxidation remover wipes, sanding kit, and ceramic coating wipes) is streamlined into a 30-minute operation.
Value for Money: At $17.95, this kit sits in the mid-range price point but offers premium features. The lifetime protection claim means you won’t need to reapply annually like budget options, potentially saving $10-15 per year on maintenance. Compared to professional restoration ($75-150) or headlight replacement ($200+ per lens), the value proposition is compelling if the ceramic coating performs as advertised.
Strengths and Weaknesses:
- Strengths: True ceramic coating for permanent protection; no power tools required reduces error risk; straightforward wipe-based application; lifetime warranty provides peace of mind; comprehensive three-step process ensures proper prep
- Weaknesses: Higher upfront cost than basic kits; sanding step still requires manual effort; ceramic coating application is unforgiving if prep work is incomplete; limited to two headlights per kit
Bottom Line: The CERAKOTE kit is ideal for DIYers seeking a one-and-done solution. If you follow instructions meticulously, you’ll get professional-grade, lasting results that justify the moderate price premium over conventional kits.
2. 3M Ultra Headlight Restoration Kit, Contains Masking Tape, Light Sanding Discs, Wax Protectant and More, Use on Plastic Lenses Headlights, Taillights and More, Easy Heavy-Duty Restoration (39195)

Overview: The 3M Ultra Headlight Restoration Kit is a comprehensive, drill-optional system from a trusted automotive brand. Designed for heavily oxidized headlights, this kit includes progressive sanding discs (500, 800, and 3000 grit) plus protective compounds. It’s engineered to tackle severe yellowing and haze on all plastic lenses including headlights, taillights, and fog lights.
What Makes It Stand Out: 3M’s proprietary abrasive technology ensures you won’t damage the plastic lens while effectively removing oxidation. The inclusion of masking tape shows attention to detail for protecting paintwork during sanding. The progressive grit system (coarse to ultra-fine) mirrors professional techniques, and the Trizact refining disc creates a smooth surface ready for the wax protectant. You can use it manually or with a household drill for faster results.
Value for Money: Priced at $14.50, this kit offers excellent value for a brand-name solution. It includes more components than most competitors (disc pad holder, multiple sanding discs, wax protectant). The drill compatibility accelerates the process significantly, saving time worth more than the price difference versus manual-only kits. Compared to professional services, it pays for itself on the first use.
Strengths and Weaknesses:
- Strengths: Trusted 3M quality and abrasive technology; versatile drill or hand operation; includes paint protection tape; progressive sanding system for professional results; works on all plastic lenses; comprehensive component kit
- Weaknesses: Requires drill for optimal efficiency (not included); more complex than wipe-only systems; wax protectant may need reapplication within 6-12 months; multiple steps can be intimidating for beginners
Bottom Line: For those comfortable with power tools or willing to put in manual elbow grease, the 3M Ultra delivers professional-grade restoration at a DIY price. It’s the best choice for severely damaged headlights.
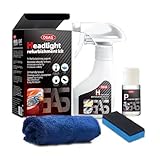
3. Botou 2026 New Headlight Restoration Polish, Automotive Headlight Cleaner Oxidized and Yellowed Head Light Restoring Kit, with Coating Agent, Towel and Sponge (1Set)

Overview: The Botou 2026 Headlight Restoration Kit takes a streamlined approach with its spray-and-wipe formula designed for rapid results. This budget-friendly option targets light to moderate oxidation with a two-part system: a restoration fluid and a protective coating agent. The kit promises visible improvement in minutes without requiring specialized tools or extensive sanding.
What Makes It Stand Out: The spray application method dramatically simplifies the restoration process, making it accessible to absolute beginners. At 180ml, the restoration fluid provides enough product for multiple applications across various vehicles. The kit’s versatility extends to both plastic and glass headlights—a rare feature in this category. The inclusion of a dedicated coating agent separate from the cleaning fluid shows a more thoughtful approach than single-step products.
Value for Money: At $16.99, this kit offers good value for those seeking a quick fix rather than a permanent solution. The larger fluid volume allows for touch-ups on multiple vehicles, effectively reducing per-use cost. While it won’t match the longevity of ceramic-based systems, it costs significantly less than professional services and provides a viable alternative to annual replacement of cheaper $5-8 kits.
Strengths and Weaknesses:
- Strengths: Extremely simple spray-and-wipe application; fast results visible in minutes; works on plastic and glass headlights; generous 180ml fluid volume; no power tools or sanding required; suitable for light to moderate oxidation
- Weaknesses: Lacks sanding components for severe oxidation; coating durability questionable beyond 3-6 months; brand recognition lower than competitors; limited instructions may confuse some users
Bottom Line: Perfect for quick cosmetic improvements or maintaining already decent headlights, the Botou kit excels in convenience but sacrifices long-term durability. Choose this for light restoration needs, not heavy damage.
4. Sylvania Headlight Restoration Kit - Long-Lasting Headlight Repair Kit for Restoring to Like-New Condition - Surface Activator, Exclusive UV Coating, Clarifying Compound & More - No Tools Required

Overview: Leveraging over a century of lighting expertise, the Sylvania Headlight Restoration Kit offers a complete no-tools solution for restoring headlight clarity. This all-in-one system includes a surface activator, premium sandpaper, clarifying compound, and an exclusive UV block clear coat. Designed to improve night driving visibility, the kit provides professional results without requiring mechanical expertise.
What Makes It Stand Out: Sylvania’s exclusive UV block clear coat is specifically engineered for optical clarity, drawing from their lighting manufacturing knowledge. The surface activator chemically prepares the lens for optimal coating adhesion—a step missing from most kits. The clarifying compound polishes to optical grade, ensuring maximum light transmission. As a no-tools kit, it’s accessible while still incorporating proper sanding steps for durability.
Value for Money: At $22.75, this is the premium-priced option, but Sylvania’s brand heritage and specialized UV coating justify the cost. The kit treats two headlights with materials engineered specifically for lighting applications, not generic abrasives. When compared to the safety benefits of improved night visibility and the cost of headlight replacement, the investment is reasonable for quality-conscious buyers.
Strengths and Weaknesses:
- Strengths: Sylvania’s lighting expertise ensures optical-quality results; exclusive UV block coating for longevity; surface activator improves adhesion; no power tools needed; improves actual light output not just appearance; comprehensive step-by-step process
- Weaknesses: Highest price point among reviewed kits; manual sanding requires significant effort; smaller sandpaper sheets may need replacement for heavily damaged lights; coating application requires careful timing
Bottom Line: For safety-focused drivers prioritizing optical clarity over quick fixes, Sylvania’s kit justifies its premium price. The brand’s lighting expertise translates to measurably better night visibility.
5. 3M Auto Restore and Protect Headlight Restoration Kit, Use On Plastic Lenses, Headlights, Taillight, Fog Lights and More, Includes Sanding Discs, Headlight Clear Coat Wipes, Foam Pad and Glove (39194)

Overview: The 3M Auto Restore and Protect Kit is a streamlined, budget-friendly offering from the trusted 3M brand. This simplified kit focuses on the essentials: Trizact sanding discs (1000 and 3000 grit), clear coat wipes, and a foam pad. Designed for plastic lenses, it provides a basic but effective restoration process that can be done by hand or with a drill, making it accessible for cost-conscious DIYers.
What Makes It Stand Out: As the most affordable 3M option, it delivers brand reliability without unnecessary frills. The Trizact abrasive technology ensures consistent cutting and polishing action even with manual application. The inclusion of a disposable glove and foam pad shows attention to user experience despite the low price point. The two-stage sanding process (1000 grit for removal, 3000 grit for refinement) is sufficient for moderate oxidation.
Value for Money: At $9.83, this is the best value for a name-brand kit. It includes the core components needed for effective restoration while omitting extras like masking tape that many users already own. The drill-compatible design adds versatility without increasing cost. For budget-minded shoppers who trust 3M quality, it’s nearly impossible to beat this price-performance ratio.
Strengths and Weaknesses:
- Strengths: Exceptional price from trusted brand; Trizact abrasive technology; versatile hand or drill use; includes protective glove; straightforward two-step sanding; clear coat wipes simplify final protection
- Weaknesses: Fewer sanding discs than premium kits; no masking tape included; clear coat durability limited compared to ceramic options; foam pad may wear out quickly; best for moderate oxidation only
Bottom Line: The 3M 39194 kit is the smart choice for first-timers or those on tight budgets. It delivers reliable 3M performance at a price point that rivals generic brands, making it ideal for moderate restoration needs.
6. Meguiar’s Ultimate Headlight Restoration Kit - The Perfect Headlight Repair Kit to Remove Yellowing and Cloudiness from Headlights - Easy to Use and Seals Headlights with 18 Plus Months of Protection
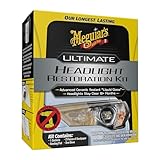
Overview: The Meguiar’s Ultimate Headlight Restoration Kit delivers professional-grade headlight restoration for DIY enthusiasts. Designed to tackle mild to severe yellowing and oxidation, this comprehensive kit restores optical clarity to neglected plastic headlights without requiring power tools. Meguiar’s reputation in automotive care lends credibility to this all-in-one solution that promises lasting results through a mechanical sanding and chemical sealing process.
What Makes It Stand Out: This kit’s standout feature is its 18+ month protective sealant that creates a durable UV barrier after restoration. Unlike basic polish kits, it includes both 1000-grit and 3000-grit sandpaper for progressive defect removal, followed by pre-saturated sealing wipes that cure crystal clear. The chemical bonding technology ensures the protective layer won’t peel or yellow prematurely, addressing the root cause of headlight degradation rather than just masking it.
Value for Money: At $22.56, this kit costs less than a single professional headlight restoration service while delivering comparable results. The inclusion of multiple sanding discs and sealant wipes provides enough material for at least two complete restorations, effectively halving the per-use cost. Compared to replacement headlights ($200+), the value proposition is undeniable.
Strengths and Weaknesses: Strengths include the trusted brand name, scientifically formulated UV protection, comprehensive instructions, and professional-grade materials. The multi-step sanding process ensures thorough restoration. Weaknesses involve the manual effort required—sanding by hand is time-consuming—and the potential for uneven results if instructions aren’t followed meticulously. The price is slightly higher than budget competitors.
Bottom Line: For drivers seeking durable, professional-quality headlight restoration without investing in power tools, this Meguiar’s kit is worth the modest premium. It requires patience but rewards with exceptional clarity and long-term protection.
7. WenFeng Headlight Restoration Kit – Automotive Headlamp Restoration Fluid Kit for Oxidized and Yellowed,Car Headlight Cleaner for All Vehicles That Restores Clarity
Overview: The WenFeng Headlight Restoration Kit offers a streamlined approach to headlight renewal with its spray-and-wipe system. Marketed as a quick solution for oxidized and yellowed headlights, this kit targets DIYers who prioritize convenience over intensive labor. The 180ml restoration fluid works on both plastic and glass lenses, making it versatile across vehicle types.
What Makes It Stand Out: This kit’s primary differentiator is its simplicity—shake, spray, and wipe with a microfiber towel, then apply the coating agent. The process takes minutes rather than hours, eliminating the intimidating sanding stage that deters many users. Its compatibility with both plastic and glass surfaces broadens its utility beyond typical headlight restoration kits.
Value for Money: Priced at $16.99, this kit sits in the budget-friendly category. For vehicles with mild to moderate oxidation, it provides acceptable results at a fraction of professional service costs. However, the lack of mechanical abrasion means severely damaged headlights may not respond well, potentially requiring reapplication or a more aggressive kit.
Strengths and Weaknesses: Strengths include rapid application, minimal effort, versatility across lens materials, and inclusion of all necessary components. The straightforward process makes it accessible to absolute beginners. Weaknesses include unspecified protection duration, potential ineffectiveness on heavy oxidation, and results that may not last as long as sanding-based systems. The chemical-only approach is less thorough than multi-stage restoration.
Bottom Line: Ideal for maintenance and light restoration, the WenFeng kit suits time-pressed users with mildly foggy headlights. For severe yellowing, invest in a sanding-based kit instead.
8. XPERTCHEMY Headlight Restoration Kit-Headlight Cleaner Removing The Heavy-Duty Yellowing, Clouding and Stains, Even Buffs Out Unsightly Hairline Scratches,No Power Tools Needed

Overview: The XPERTCHEMY Headlight Restoration Kit positions itself as a professional-grade solution for severely degraded headlights. This comprehensive package addresses heavy-duty yellowing, clouding, and even hairline scratches through a three-step manual process. The inclusion of ceramic coating technology distinguishes it from conventional sealants.
What Makes It Stand Out: The kit’s exclusive ceramic UV protector chemically bonds with headlight resin, creating a durable 18-month shield that won’t leave sticky residue. Unlike gel-based protectants, excess material wipes away cleanly after curing. The thoughtful inclusion of masking tape, multiple sanding grits (P2000 and P3000), and protective gloves demonstrates attention to detail often missing in budget kits.
Value for Money: At $14.99, this kit offers exceptional value. The ceramic coating alone justifies the price, typically commanding premiums in automotive care. With enough materials for complete restoration of two headlights plus protective accessories, it undercuts many competitors while delivering superior protection technology.
Strengths and Weaknesses: Strengths include the advanced ceramic protection, comprehensive accessory package, dual-grit sanding system, and clear step-by-step instructions. The chemical bonding provides superior UV resistance. Weaknesses involve the lesser-known brand name, which may concern some buyers, and the manual sanding requirement that demands patience. The multi-step process has a steeper learning curve than wipe-on solutions.
Bottom Line: This kit delivers premium ceramic protection at a budget price point. For those willing to invest manual effort, it provides professional results that rival kits costing twice as much.
9. WAZNFYV Headlight Restoration Kit, Automotive Headlight Cleaner Oxidized and Yellowed Head Light Restoring Kit for All Vehicle Types (400, Grams)

Overview: The WAZNFYV Headlight Restoration Kit offers a straightforward solution for reviving oxidized headlights across all vehicle types. This 400-gram kit emphasizes simplicity with its three-step application process, targeting DIY enthusiasts who want quick results without complex procedures. The formula claims to remove discoloration while adding a protective layer against future oxidation.
What Makes It Stand Out: The generous 400-gram quantity provides ample product for multiple applications, making it economical for fleet maintenance or repeated use. Its universal compatibility across cars, trucks, and SUVs simplifies purchasing decisions. The spray-wipe-dry process eliminates intimidating sanding, appealing to users seeking minimal effort.
Value for Money: At $16.99, the price is competitive, especially considering the larger volume. However, value depends heavily on effectiveness and durability—both somewhat ambiguous in the product description. Without specified protection duration or sanding capability, severely yellowed headlights may not achieve satisfactory results, potentially requiring professional intervention.
Strengths and Weaknesses: Strengths include large product volume, universal vehicle compatibility, simple application, and inclusion of protective layer. The kit suits maintenance applications well. Weaknesses include vague protection claims, lack of mechanical abrasion for heavy oxidation, and absence of brand recognition. The chemical-only approach may provide only surface-level improvement.
Bottom Line: Best suited for preventative maintenance and mild restoration, this kit works for budget-conscious users with lightly fogged headlights. For severe oxidation, choose a sanding-based system for lasting results.
10. Meguiar’s Two Step Headlight Restoration Kit, Headlight Cleaner Restores Clear Car Plastic and Protects from Re-Oxidation, Includes Headlight Coating and Cleaning Solution - 4 Count (1 Pack)

Overview: Meguiar’s Two Step Headlight Restoration Kit simplifies headlight renewal by eliminating sanding entirely. This streamlined approach uses an oxidation-removing cleaning solution with abrasive pads, followed by a protective coating that guards against re-oxidation for up to 12 months. It targets users who want professional brand reliability without intensive labor.
What Makes It Stand Out: The true two-step process represents the simplest legitimate restoration method available. By removing sanding, it reduces error risk and application time dramatically. The included abrasive pads provide controlled abrasion without power tools, while the coating solution offers year-long protection from a trusted name in automotive care.
Value for Money: At $21.93, this kit commands a premium for convenience. While cheaper than professional services, it costs more than many DIY kits. The trade-off is time savings and reduced complexity. For mildly to moderately oxidized headlights, it delivers excellent value. Severely damaged lenses may require more aggressive treatment, limiting its cost-effectiveness.
Strengths and Weaknesses: Strengths include the trusted Meguiar’s brand, foolproof two-step process, elimination of sanding risks, and 12-month protection guarantee. The kit is exceptionally beginner-friendly. Weaknesses include shorter protection duration than premium kits, potential ineffectiveness on heavy oxidation, and higher price point for the included materials. The coating may not bond as durably as ceramic alternatives.
Bottom Line: Perfect for beginners or those seeking the easiest possible restoration process. Meguiar’s Two Step kit delivers reliable results on moderately foggy headlights with minimal effort and maximum simplicity.
Why Headlight Restoration Matters More Than You Think
Cloudy headlights aren’t just an eyesore—they’re a critical safety issue that affects your ability to see and be seen on the road. Modern polycarbonate headlight lenses are coated with a UV-resistant layer that degrades over time, exposing the plastic to oxidation and environmental damage. When this happens, light scatter increases dramatically, meaning your bulbs might be working perfectly but the photons never reach the road where you need them.
Beyond safety, there’s the financial and aesthetic impact. Yellowed headlights can reduce your vehicle’s resale value by making it appear neglected and aged. Many states now include headlight clarity in their safety inspection criteria, meaning severely oxidized lenses could actually cause you to fail inspection. The good news? A proper manual restoration doesn’t just clean the surface—it rebuilds the protective layer, essentially giving your headlights a new lease on life.
The Science Behind Foggy Headlights
Understanding what you’re actually fighting is crucial to winning the battle. Headlight lenses are made from polycarbonate, an incredibly tough plastic that’s naturally susceptible to UV degradation. Manufacturers apply a thin protective hardcoat during production, but after 3-5 years of sun exposure, this coating breaks down, creating microscopic cracks and pits in the lens surface.
These imperfections trap moisture, road grime, and chemicals, accelerating the oxidation process. The yellowing you see isn’t just dirt—it’s the actual plastic polymer breaking down and changing at a molecular level. This is why simple cleaning products fail; you’re not dealing with surface contamination but actual material degradation. Manual sanding works by physically removing this damaged layer and creating a smooth surface for new protection.
How Manual Sanding Kits Work: The Mechanical Advantage
Manual sanding restoration operates on a brilliantly simple principle: progressive abrasion. Unlike chemical cleaners that attempt to dissolve oxidation (and rarely succeed), sanding physically removes the damaged plastic layer by layer. Think of it like woodworking—you start with coarse grit to remove material quickly, then progressively finer grits to eliminate scratches from the previous step.
The process creates a uniform, smooth surface that restores optical clarity. When done correctly, you’re not just polishing the lens; you’re essentially resurfacing it. The key advantage of manual sanding is temperature control—drill-based systems can generate enough friction heat to melt the polycarbonate, creating more damage. Your hands provide constant feedback, letting you feel when the surface is smooth enough to progress to the next grit.
Key Components Every Quality Kit Should Include
A comprehensive manual sanding kit is more than just sandpaper in a box. The essential components separate effective kits from disappointing ones. First, you need multiple sandpaper grits—typically ranging from 400 to 3000 grit—provided in wet/dry configurations. The best kits include foam sanding blocks that conform to the curved lens surface, preventing flat spots and uneven removal.
Polishing compound is the next critical element, preferably a two-stage system with a cutting compound and a finishing polish. UV sealant is non-negotiable; without it, your hard work will disappear within months. Look for kits with applicator pads, microfiber cloths, and protective tape to mask off paint. Some premium options include lens cleaning solution and detailed instruction booklets with actual photos, not just diagrams.
Sandpaper Grit Progression Explained
The secret to professional results lies in following the proper grit sequence. Skipping grits is the most common mistake that leaves visible scratches. Start with 400-600 grit wet/dry paper to remove heavy oxidation and deep pits. This coarse step does the heavy lifting but leaves a visibly scratched surface.
Next, 800-1000 grit begins the refinement process, removing the 600-grit scratches. Follow with 1500-2000 grit to further smooth the surface. The critical step many DIYers miss is the ultra-fine 2500-3000 grit finish, which creates a surface smooth enough for polishing. Each progression should be done wet, which lubricates the paper, prevents clogging, and keeps dust from scratching the lens. The jump between grits should never be more than double; jumping from 600 to 2000 grit will leave deep scratches impossible to polish out.
Matching Sandpaper to Headlight Damage Level
Not all oxidation is created equal, and your sanding strategy should match the damage. For lightly hazy lenses with minimal yellowing, you can often start with 1500-2000 grit, skipping the aggressive coarse papers. This preserves more of the original lens material and reduces work time.
Moderately oxidized headlights with visible yellowing and surface roughness require starting at 800-1000 grit. Heavily damaged lenses—those that are deeply yellowed, pitted, or have clear coat peeling—need the full aggressive treatment starting at 400-600 grit. The key is honest assessment; starting too fine on heavy damage just wastes time, while starting too coarse on light damage removes unnecessary material. Quality kits provide guidance on grit selection based on condition photos.
The Critical Role of UV Sealant
Here’s where many DIY restorations fail: the UV sealant. After sanding away the damaged layer, you’ve also removed whatever remaining factory UV protection existed. The raw polycarbonate is now naked and will re-oxidize faster than before, often within weeks, if not properly sealed.
A quality UV sealant isn’t just clear coat spray paint. It’s a specifically formulated, optically clear polymer that bonds to polycarbonate and contains UV inhibitors. The application process is just as important as the product itself—multiple thin layers, proper curing time between coats, and absolutely no contamination. Look for kits with wipe-on sealants that cure with UV light exposure; these typically last 1-2 years versus months for spray versions. The best sealants are solvent-based, not water-based, as they create a harder, more durable finish.
Polish vs. Compound: Understanding Abrasive Hierarchy
Many kits blur the line between polishing compound and cutting compound, but they’re distinctly different tools. Cutting compounds contain larger abrasive particles designed to remove the fine scratches left by 2000-3000 grit sandpaper. They’re more aggressive and create a haze that must be removed.
Polishing compounds use finer abrasives to refine the surface to optical clarity, creating that final glass-like finish. Some kits include a single “polish” that attempts to do both jobs, but two-stage systems yield superior results. The application method matters too—foam pads for cutting, microfiber for polishing. The best kits specify which pad to use with each product, preventing cross-contamination that could reintroduce scratches.
Manual vs. Machine: Why Hand Sanding Wins for Most DIYers
While drill-attachment kits promise speed, they deliver risk. Polycarbonate melts at relatively low temperatures, and a spinning pad can generate enough heat in seconds to create permanent swirls or dips in the lens surface. Manual sanding eliminates this risk entirely—you simply cannot generate damaging heat by hand.
Control is the other major advantage. Headlight lenses are complex 3D shapes with varying curves. A stiff drill pad can’t conform to these contours, leaving low spots untouched and high spots over-sanded. Your hand, backed by a foam block, naturally follows the lens geometry. Manual sanding also forces you to work methodically, inspecting your progress at each stage. This mindfulness prevents the rushed, sloppy work that ruins restorations. For the average car owner, manual kits produce more consistent, safer results.
Features That Separate Good Kits from Great Ones
When evaluating kits, look beyond the component list to the quality indicators. Pre-cut sandpaper sheets sized for headlights save time and reduce waste. Color-coded grit labels prevent confusion during the multi-step process. Foam backing pads with different densities for different grits show attention to detail.
The sealant’s application method reveals kit quality. Brush-on or wipe-on sealants with applicator pads offer better control than aerosol sprays. Kits including surface prep solution that removes silicone and wax residue demonstrate professional-grade thinking. Perhaps most telling is the inclusion of post-restoration care instructions and maintenance products. Great kits view restoration as a long-term process, not a one-time fix.
Avoiding Costly Restoration Mistakes
The path to cloudy headlight restoration is littered with preventable errors. Using sandpaper dry is perhaps the most damaging mistake—it clogs instantly, creates deep scratches, and generates plastic dust that re-scratches the surface. Always sand wet with plenty of water.
Another critical error is insufficient sanding time at each grit. If you can still see scratches from the previous grit, you’re not ready to move on. Patience is your most valuable tool. Rushing the sealant application is equally disastrous—applying it to a surface that isn’t perfectly clean or failing to let it cure properly compromises the entire restoration. Many DIYers also forget to protect adjacent paint with masking tape, leading to sandpaper scratches on their car’s finish.
The Complete Manual Sanding Process Breakdown
Let’s walk through the ideal workflow. Start by thoroughly cleaning the headlight with soap and water, then use rubbing alcohol to remove wax and oils. Mask off the surrounding paint with quality automotive tape. Begin wet sanding with your coarsest grit, using a foam block and keeping the surface flooded. Work in straight, overlapping strokes, not circles.
After each grit, rinse and dry the lens to inspect for uniform appearance. You should see a consistent haze with no glossy spots—these indicate untouched areas. Progress through each grit, spending 3-5 minutes per stage on each headlight. Once you’ve finished 3000 grit, the lens should look uniformly dull but smooth. Apply cutting compound with a foam pad using moderate pressure, then follow with finishing polish and a microfiber cloth. Finally, apply UV sealant in 3-4 thin layers, allowing flash time between coats.
Evaluating Your Headlight’s Condition Before Starting
Proper assessment prevents improper technique. In bright sunlight, inspect your headlights for color—yellowing indicates UV damage depth, while whitish haze suggests surface oxidation. Run your fingernail across the lens; if it catches in pits, you’ve got deep damage requiring aggressive sanding.
Check for clear coat peeling, which appears as flaky, scale-like layers. This must be completely removed before polishing. Also examine for internal moisture—if condensation appears inside the lens, no amount of external restoration will fix it, and you need lens replacement. Take photos before starting; they’ll help you track progress and identify missed spots during sanding. This diagnostic step takes five minutes but saves hours of rework.
Expert Techniques for Showroom-Quality Results
Professionals rely on several tricks that kits rarely mention. Sand in multiple directions—horizontal strokes for one grit, vertical for the next—to ensure even removal and reveal low spots. Use a bright LED work light held at a low angle to highlight remaining scratches; this raking light technique reveals imperfections invisible under normal lighting.
For the final polish, use a microfiber cloth wrapped around a foam block to maintain even pressure. Some pros add a drop of distilled water to their final polish to create a slurry that yields an even finer finish. When applying UV sealant, work in a dust-free environment and use tack cloth between coats. The most important pro tip: if you’re not tired of sanding yet, you haven’t sanded enough. The polish stage should feel almost unnecessary because the surface is already so smooth.
Long-Term Maintenance Strategies
A restoration is only as good as its maintenance. Even the best UV sealant degrades over time. Wash your headlights regularly with car shampoo, never household cleaners that strip protection. Apply a spray-on UV sealant every three months as a booster—think of it as sunscreen for your headlights.
Consider applying paint protection film (PPF) after restoration for ultimate longevity. Park in shade whenever possible, and if you garage your vehicle, use UV-blocking window film on garage windows. Some enthusiasts apply a carnauba wax layer over the UV sealant for extra protection, though this requires periodic reapplication. Document your restoration date; set a calendar reminder to inspect sealant integrity annually. Catching degradation early allows for quick touch-ups rather than full re-restoration.
Cost vs. Value: Are Manual Sanding Kits Worth It?
Let’s crunch the numbers. A quality manual sanding kit costs $15-30, while professional restoration runs $75-150 per vehicle. Replacement headlight assemblies? Anywhere from $200 to over $1000 each for modern LED units. The math is compelling, but the real value lies in skill acquisition.
Once you own a kit, you can restore multiple vehicles, making the per-use cost negligible. More importantly, you develop an eye for paint protection and surface preparation skills transferable to other automotive detailing tasks. The time investment is real—expect 1-2 hours for your first restoration, 45 minutes once you’re experienced. Compare that to scheduling, driving to, and waiting at a shop. For car care enthusiasts, the satisfaction of DIY restoration adds intangible value that transcends pure dollars.
Frequently Asked Questions
How long does a manual sanding restoration typically last?
With proper application of a quality UV sealant, you can expect 1-2 years of clarity before noticeable degradation begins. Environmental factors like intense sun exposure, road salt, and automatic car washes with harsh chemicals can reduce this to 6-12 months. The key is the sealant quality and your maintenance routine.
Can I use regular sandpaper from the hardware store instead of a kit?
While possible, it’s not recommended. Automotive headlight sandpaper uses specific abrasive types and backing materials designed for polycarbonate. Hardware store paper often breaks down too quickly, clogs easily, and may contain contaminants that scratch. Kits provide the exact grit sequence needed and pre-cut sizes that save time and prevent errors.
What happens if I skip the UV sealant step?
Your headlights will re-oxidize, often worse than before, within 4-8 weeks. The sanding process removes all remaining factory UV protection, leaving raw polycarbonate extremely vulnerable. Some DIYers try using car wax or clear spray paint as substitutes, but these fail quickly and can yellow themselves. UV sealant is the single most important component.
Is it possible to damage my headlights by sanding too much?
Yes, but it requires significant over-sanding. Polycarbonate lenses are surprisingly thick, and you’re only removing a few thousandths of an inch. The real risk is creating uneven surfaces or sanding through any protective bezel coating at the edges. Using a foam block and following the curvature prevents most damage. When in doubt, sand less and check more frequently.
Why do my headlights still look hazy after polishing?
This indicates either insufficient sanding at your final grit (usually 3000) or polishing compound residue that hasn’t been fully removed. Try re-polishing with a clean microfiber cloth and a drop of water. If haze persists, you likely need to return to 2000 or 2500 grit and re-sand until the surface feels perfectly smooth to the touch.
Can I restore headlights in cold weather?
Temperature matters more than you think. UV sealants require minimum curing temperatures, typically 50-60°F. Cold plastic is also more brittle and can crack under sanding pressure. Ideally, work in a garage between 65-75°F. If you must work in cooler conditions, use a heat gun on low setting to gently warm the lens before and after sealant application.
How do I know when to stop sanding and move to the next grit?
The surface should appear uniformly dull with no glossy spots reflecting light. Run your fingers over it; you should feel consistent texture with no rough patches. When you wipe it dry, look at it from a low angle with a bright light—any remaining deep scratches will be obvious. When in doubt, sand another minute. It’s impossible to over-sand at a given grit, but easy to under-sand.
What’s the difference between wet sanding and dry sanding for headlights?
Wet sanding is mandatory for headlights. Water acts as a lubricant, preventing sandpaper from clogging with plastic debris. Clogged paper creates deep, uneven scratches. Water also keeps the lens cool and carries away particles that would otherwise re-scratch the surface. Dry sanding generates plastic dust that’s hazardous to breathe and creates inferior results.
Can I use these kits on colored or tinted headlights?
Proceed with extreme caution. The sanding process will remove any surface tint or coating, potentially creating a patchy appearance. For factory-tinted lenses (common on some European cars), you’re likely removing the tint itself. Aftermarket tinted lights often have the color in a topcoat that will disappear. Test in a small, inconspicuous area first or consult a professional.
How do I maintain my headlights after restoration without redoing the whole process?
Prevention is key. Wash headlights weekly with pH-neutral car shampoo. Every three months, apply a spray-on UV sealant booster. Consider a ceramic coating designed for plastics for longer protection. Avoid parking in direct sun, and never use abrasive cleaners or brushes on the lenses. At the first sign of haze returning, a quick polish with finishing compound can restore clarity before deep sanding becomes necessary again.