That sinking feeling when you notice fine scratches spiderwebbing across your windshield is something every car enthusiast knows. Whether they’re from worn wiper blades, road debris, or improper cleaning techniques, these light scratches do more than just annoy—they create glare, reduce visibility, and make your otherwise pristine vehicle look tired. The good news? Most light scratches haven’t penetrated the glass deeply enough to require replacement, and the right glass polish can restore crystal-clear clarity without breaking the bank.
But here’s where it gets tricky: not all glass polishes are created equal, and choosing the wrong one can turn a minor blemish into a permanent eyesore. The automotive glass care market is flooded with options promising miraculous results, yet many deliver disappointing outcomes or require techniques that can damage your glass further. Understanding what separates an effective, safe glass polish from the rest is crucial for any car owner who takes pride in their ride.
Top 10 Glass Polish For Light Scratches
Detailed Product Reviews
1. Cerium Oxide Glass Polishing Kit - Remove Scratches, Water Spots & Restore Clarity | Windshield Scratch Remover with Polish & Sealant | Complete DIY Kit
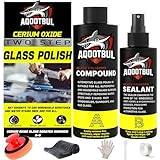
Overview: This comprehensive DIY kit promises professional-grade glass restoration without requiring power tools. Designed for automotive and household glass, it targets scratches, water spots, and wiper marks using a cerium oxide compound paired with a protective sealant. The kit includes everything needed for a complete restoration job.
What Makes It Stand Out: The all-in-one approach distinguishes this kit from competitors. Unlike polish-only products, it bundles a manual polishing tool, protective sealant, microfiber cloth, gloves, scraper, and protective tape alongside the cerium oxide compound. The three-step process (Clean, Polish, Seal) simplifies what can be an intimidating task for beginners, while the hydrophobic sealant claims six months of protection against future damage.
Value for Money: At $25.99, this kit offers solid value for those starting from scratch. Purchasing cerium oxide polish, sealant, and application tools separately would easily exceed this price. The inclusion of protective accessories adds convenience and safety, making it cost-effective for occasional users who don’t own polishing equipment.
Strengths and Weaknesses: Strengths include the complete package design, beginner-friendly manual application, and protective sealant that extends results. The manual polisher provides excellent control without risking heat damage. Weaknesses involve slower progress compared to power tools, limited effectiveness on deep scratches, and the potential need for elbow grease on severe etching.
Bottom Line: Perfect for DIY enthusiasts seeking a turnkey solution for minor to moderate glass imperfections. The comprehensive nature eliminates guesswork, though those with extensive damage should consider power tool alternatives.
2. Cerium Oxide Glass Polishing Kit – Multifunctional Light Scratch Remover & Oil Film/Stain Cleaner for Windscreen and Glass Repair. Effectively Removes Oil Films, Stubborn Stains

Overview: This budget-friendly cerium oxide kit focuses on removing oil films, water spots, and light scratches from automotive and household glass. The pH-neutral, non-abrasive formula promises safe application across all glass types without risking etching or clouding.
What Makes It Stand Out: The formula’s emphasis on oil film and environmental contaminant removal addresses a common issue many polishes overlook. Its gentle yet effective approach suits DIY users wary of damaging their glass. The high-purity cerium oxide composition ensures professional results without requiring specialized equipment.
Value for Money: At $14.90, this is the most affordable option, but the low price reflects that it’s polish-only. Users must supply their own application pads, cloths, and potentially a polisher for best results. For those with minor issues who already own microfiber cloths, it’s economical. However, first-time buyers might spend more acquiring necessary accessories.
Strengths and Weaknesses: Strengths include the safe pH-neutral formula, versatility across glass surfaces, and excellent price point for the compound quality. It’s particularly effective on oil films and water spots. Weaknesses are the lack of included tools, limited effectiveness on deeper scratches, and potentially slower results without machine application.
Bottom Line: An excellent entry-level choice for tackling light surface imperfections and oil films. Best suited for users comfortable sourcing their own application tools or those with only minor blemishes to address.
3. CARPRO Glass Polishing Pad - Polish Glass Scratches Etching, Correct and Clean Damaged Windshield & Window Glass - 5" (1 Pack)

Overview: This specialized glass polishing pad from CARPRO is engineered for moderate to severely damaged automotive glass. Constructed from high-strength rayon fibers, it’s designed to work specifically with glass polishing compounds like CARPRO’s CeriGlass to correct scratches and etching.
What Makes It Stand Out: The professional-grade construction uses Lenzing rayon fibers calibrated for glass cutting at 1600kpa hardness, ensuring even abrasion without excessive heat buildup. Its 5-1/8" diameter with hook/loop backing integrates seamlessly with standard dual-action or rotary polishers, offering stability and precision that generic pads cannot match.
Value for Money: At $9.97 for a single pad, this represents a moderate investment for serious detailers. However, it’s not a standalone solution—you’ll need a separate cerium oxide compound ($15-30) and a polisher ($50-200+). For professionals or enthusiasts who already own equipment, the price is reasonable for a durable, purpose-built tool.
Strengths and Weaknesses: Strengths include exceptional durability, optimized cutting action for glass, minimal heat generation, and professional-grade results on severe damage. The specialized design prevents pad deformation. Weaknesses are that it’s only one component of a larger system, requires significant additional investment, and may be overkill for minor scratches.
Bottom Line: A must-have for experienced detailers seeking professional glass correction results. Not recommended for beginners due to the required additional equipment investment, but unbeatable for those with the tools to utilize it properly.
4. 3D Glass Polish – Cerium Oxide Glass Scratch Remover for Car Windows – Restores Clarity & Removes Wiper Marks, Swirls, Water Spots - 16oz

Overview: This professional-grade cerium oxide polish from 3D Products offers a substantial 16-ounce quantity for comprehensive glass restoration. Formulated for automotive enthusiasts and professionals, it targets wiper marks, water spots, fine scratches, and swirl marks on all vehicle glass surfaces.
What Makes It Stand Out: The extended open time formulation provides exceptional workability, allowing users to polish larger sections without the product drying prematurely. This feature, combined with its optimization for rotary polishers and felt pads, delivers serious correction power. It also serves as an ideal prep step for ceramic coatings, removing imperfections that would interfere with bonding.
Value for Money: At $32.99 ($2.06 per ounce), this represents a premium investment. The large volume suits frequent users or professionals tackling multiple vehicles. For occasional DIYers, the quantity may be excessive. Compared to smaller kits, the per-ounce cost is reasonable for professional-grade material, but the total outlay is significant when adding required pads and tools.
Strengths and Weaknesses: Strengths include professional-level performance, excellent workability, large quantity for multiple projects, and dual function as a coating prep. The formula cuts efficiently without excessive dust. Weaknesses are the high upfront cost, requirement for a rotary polisher and felt pads, and potential waste for one-time users.
Bottom Line: Ideal for serious enthusiasts and professionals who regularly perform glass correction. The performance justifies the price for frequent use, but casual users should consider smaller, more complete kits.
5. Glass Polish (3’’) Glass Scratch Removal Kit for use with a Drill on All Glass Surfaces

Overview: This drill-activated glass polishing kit bridges the gap between manual and professional machine polishing. Designed for DIY users who own a standard electric drill, it promises three times faster results than hand polishing while tackling scratches, scuffs, graffiti damage, and acid etching across all glass types.
What Makes It Stand Out: The 3-inch backing plate system converts your existing drill into a capable glass polishing tool, eliminating the need for expensive dedicated polishers. The kit includes everything needed for drill-based application, making it uniquely positioned for homeowners and car enthusiasts who want power tool efficiency without major equipment investment.
Value for Money: At $39.97, this is the most expensive kit, but potentially the best value if you already own a drill. It includes the drill attachment and presumably polishing compounds and pads (though specifics aren’t detailed). Compared to purchasing a dedicated glass polisher ($100+), it’s economical for moderate use. However, the price is steep if it only includes the attachment.
Strengths and Weaknesses: Strengths include leveraging drill power for faster results, versatility across glass types, ability to handle severe damage, and professional-speed correction. The guided system reduces error. Weaknesses are the highest price point, dependency on drill ownership, potential for user error with power tools, and possible vibration issues compared to dedicated polishers.
Bottom Line: Excellent choice for drill owners wanting professional speed without buying dedicated equipment. The comprehensive approach justifies the premium price for those with moderate to severe damage, but verify kit contents before purchasing.
6. Glass Polish 1.7oz (50ml) GP-PRO Glass Polishing Compound for Professional Polishing of All Glass Surfaces - 2.3 microns

Overview: The GP-PRO Glass Polishing Compound is a professional-grade cerium oxide formula designed for the final polishing stage of glass restoration. This 1.7-ounce tube targets imperfections like hairline scratches, sanding marks, and surface stains on all glass types, including tempered and laminated surfaces. With a fine 2.3-micron particle size, it delivers precision results for discerning users seeking optical clarity.
What Makes It Stand Out: Unlike all-purpose polishes, this compound is specifically engineered for glass using optimized cerium oxides. It works as the crucial final step in multi-stage scratch removal, creating optical clarity that generic products can’t match. The professional-grade formulation is ready-to-use straight from the tube, eliminating messy mixing while delivering results trusted by glass restoration specialists who demand perfection.
Value for Money: At $11.95 for 1.7 ounces ($7.07 per fluid ounce), this isn’t the cheapest option, but it’s substantially more affordable than professional glass replacement. For minor windshield restoration or removing stubborn water spots, it pays for itself with one successful application. Compared to DIY methods using household abrasives, this specialized compound reduces risk of further damage and distortion.
Strengths and Weaknesses: Strengths include professional-quality results, versatility across all glass surfaces, and precise 2.3-micron formulation. It effectively removes fine imperfections without creating optical distortion. Weaknesses are the small quantity limiting large projects, and it requires prior sanding stages for deep scratches—not a standalone solution. The learning curve may challenge complete beginners unfamiliar with glass polishing techniques.
Bottom Line: Perfect for automotive enthusiasts and homeowners tackling minor glass imperfections. If you’re committed to a proper multi-stage restoration process, this compound delivers professional clarity that justifies its premium price. For casual users with single scratches, consider simpler alternatives.
7. NOVUS-PK1-2 | Plastic Clean & Shine #1, Fine Scratch Remover #2, Heavy Scratch Remover #3 and Polish Mates Pack | 2 Ounce Bottles
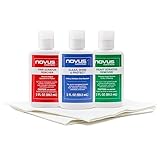
Overview: The NOVUS-PK1-2 kit provides a complete three-step solution for plastic restoration, particularly effective for headlights. This comprehensive package includes 2-ounce bottles of #1 Clean & Shine, #2 Fine Scratch Remover, and #3 Heavy Scratch Remover, plus essential application tools. The “Clear in Five” system promises fast, professional results without expensive professional services.
What Makes It Stand Out: This kit includes everything needed for restoration: not just polishes, but a 3-inch foam buffing pad, drill attachment, 1,000-grit sanding disk, and disposable towels. The trusted NOVUS formula has served the plastics industry since 1972, offering proven effectiveness. The integrated approach eliminates guesswork, providing both mechanical and chemical restoration components in one convenient package.
Value for Money: At $12.99, this kit delivers exceptional value compared to $100+ professional headlight restoration services. The included tools alone justify the price, making it accessible for DIYers. While the 2-ounce bottles seem small, they’re sufficient for multiple headlight sets or various plastic surfaces around vehicles and homes, making it economical for periodic use.
Strengths and Weaknesses: Strengths include the all-inclusive design, trusted brand heritage, fast results, and protective finish that extends clarity. The drill attachment significantly reduces manual effort. Weaknesses are limited polish quantity for large-scale projects, and the one-size-fits-all approach may not suit every plastic type. Users need a power drill for optimal results, adding a requirement.
Bottom Line: An outstanding choice for anyone restoring faded headlights or plastic surfaces. The complete toolset and proven NOVUS formulas make this kit a cost-effective, user-friendly solution that delivers lasting professional results with minimal investment and effort.
8. Chemical Guys VSS One-Step Scratch and Swirl Remover - Compound and Polish for Restoring Gloss to Paint, Car Scratch Remover, Works on Cars, Trucks, SUVs, Motorcycles, RVs & More - 16 oz

Overview: Chemical Guys VSS One-Step Scratch and Swirl Remover streamlines paint correction by combining compound and polish in a single 16-ounce bottle. Designed for light to moderate defects, this versatile formula works on clear coats, single-stage, and ceramic finishes across cars, trucks, motorcycles, and RVs. It promises professional results without multi-stage complexity for time-conscious users.
What Makes It Stand Out: The true one-step capability sets VSS apart—cutting quickly while finishing to a high gloss without additional polishing. Its body shop-safe, silicone-free formula is safe for fresh paint and touch-up work. Whether applied by hand or machine polisher, it adapts to user skill level while delivering consistent results, making professional-grade correction accessible to enthusiasts.
Value for Money: At $14.29 for 16 ounces, VSS offers excellent cost-per-ounce value. It eliminates buying separate compounds and polishes, saving both money and storage space. Compared to professional detailing services costing hundreds, this bottle handles multiple vehicles. The time saved in single-step application further increases its value proposition for busy DIYers.
Strengths and Weaknesses: Strengths include impressive time efficiency, large quantity, versatile application methods, and safe formulation for all paint types. It effectively removes swirls and light scratches with minimal dust. Weaknesses include limited effectiveness on deep scratches or severe oxidation, and beginners may experience residue if overworked. It requires careful pad selection for optimal results.
Bottom Line: Ideal for enthusiasts seeking efficient paint correction without a full product arsenal. VSS delivers on its one-step promise for light to moderate defects, offering professional results with minimal investment. For severe damage, pair with heavier cutting compounds for a complete system.
9. NOVUS-PK1-2 | Plastic Clean & Shine #1, Fine Scratch Remover #2, Heavy Scratch Remover #3 and Polish Mates Pack | 2 Ounce Bottles
Overview: The NOVUS Complete Plastic Care Kit offers a three-stage restoration system for acrylic and plastic surfaces. This package includes 2-ounce bottles of #1 Plastic Polish, #2 Fine Scratch Remover, and #3 Heavy Scratch Remover, plus disposable Polish Mates towels. Marketed as an environmentally conscious solution, it emphasizes extending plastic life rather than replacement, appealing to sustainability-minded users.
What Makes It Stand Out: NOVUS leverages its 50-year plastics industry heritage with a scientifically tiered approach. Each formula serves a specific purpose—cleaning, fine scratch removal, or heavy abrasion repair. The environmental sustainability angle is compelling, positioning restoration as waste reduction. The system handles everything from protective shields to automotive plastics with professional-grade chemistry.
Value for Money: Priced at $13.59, the kit costs slightly more than some alternatives but delivers specialized formulas for different damage levels. The per-ounce rate is higher than bulk options, but the targeted approach prevents waste. For preserving expensive acrylic items or vehicle plastics, it offers significant savings over replacement while reducing environmental impact and landfill waste.
Strengths and Weaknesses: Strengths include the proven three-step system, versatility across plastic types, antifog and antistatic properties in #1 polish, and commitment to sustainability. The formulas work synergistically for comprehensive restoration. Weaknesses are the lack of application tools, small bottle sizes limiting large projects, and higher cost per ounce compared to all-in-one products.
Bottom Line: A premium choice for those prioritizing plastic preservation and environmental responsibility. The NOVUS system delivers exceptional results on acrylic surfaces, making it worth the investment for maintaining valued possessions. For casual users, simpler kits may suffice.
10. NOVUS-PK2-2 | Plastic Clean & Shine #1, Fine Scratch Remover #2 and Polish Mates Pack | 2 Ounce Bottles

Overview: The NOVUS-PK2-2 kit provides a compact two-step solution for maintaining plastic surfaces. This portable package includes 2-ounce bottles of #1 Plastic Clean & Shine and #2 Fine Scratch Remover, plus Polish Mates towels. Designed for on-the-go use, it fits easily in glove compartments, saddle bags, or tool cases for immediate plastic care wherever needed.
What Makes It Stand Out: Its compact portability distinguishes this kit from larger systems. The #1 polish offers antifog, antistatic, and dust-repellent properties—features rarely found in basic cleaners. This makes it ideal for motorcycle windshields, aircraft windows, and automotive plastics exposed to varied conditions. The glove-compartment-friendly size ensures protection is always accessible during travel.
Value for Money: At $9.90, this is the most affordable NOVUS kit, offering essential maintenance capabilities without heavy scratch removal tools. For routine cleaning and minor scratch prevention, it provides excellent value. The cost per count is reasonable for a premium brand, though serious restorers may need the #3 Heavy Scratch Remover separately for deeper damage.
Strengths and Weaknesses: Strengths include exceptional portability, advanced #1 polish properties, trusted NOVUS quality, and perfect sizing for motorcycles and aviation. It’s ideal for preventive maintenance and quick touch-ups. Weaknesses are the absence of heavy scratch removal capability, limiting its restoration potential. The small bottles require frequent replacement with regular use, and it lacks application tools beyond towels.
Bottom Line: Perfect for enthusiasts needing portable plastic maintenance. Motorcyclists, pilots, and car owners will appreciate its compact design and advanced protective properties. For comprehensive restoration, pair with the #3 polish. As a maintenance kit, it’s unbeatable for convenience and quality.
Understanding Light Scratches on Automotive Glass
Before diving into polish selection, you need to understand exactly what you’re dealing with. Automotive glass isn’t like the delicate surface of your paint—it’s much harder and more resilient, but still vulnerable to specific types of damage.
What Causes Light Scratches on Car Windows?
Light scratches typically occur from everyday encounters. Sand and dust particles trapped between your wiper blades and the glass act like sandpaper with every swipe. Road grit kicked up by other vehicles can create micro-abrasions. Even enthusiastic cleaning with dirty cloths or harsh brushes leaves behind fine lines. In the car care world, we call these “wiper scratches” or “wash scratches,” and they’re characterized by their shallow depth—usually affecting only the topmost layer of the glass surface.
How to Distinguish Light vs. Deep Scratches
The fingernail test remains the gold standard for car owners. Run your fingernail across the scratch; if it catches, you’re likely dealing with a deep scratch that may require professional intervention. If your nail glides over without catching, you’ve got light scratches that quality glass polish can handle. Light scratches appear as hazy lines that become especially visible when the sun hits at certain angles or when oncoming headlights beam through them at night.
Why Glass Polish Matters for Car Care
Many car owners mistakenly treat glass polish as an afterthought in their detailing arsenal, but it’s actually a specialized tool that addresses unique challenges automotive glass presents.
The Science Behind Glass Polishing
Quality glass polishes employ micro-abrasives—tiny particles that are harder than glass but small enough to gently level the surface. Unlike paint correction compounds that work on relatively soft clear coats, glass polishes must contend with surfaces measuring 6-7 on the Mohs hardness scale. The best formulations use cerium oxide, aluminum oxide, or specially engineered silicon carbide particles that gradually wear down the high points of scratches until the surface becomes uniform again.
Benefits Beyond Scratch Removal
Beyond eliminating those annoying lines, proper glass polishing restores optical clarity that enhances driving safety. It removes water spots, mineral deposits, and the microscopic pitting that causes wiper chatter. Polished glass also repels water more effectively and responds better to hydrophobic coatings. For show car owners, it eliminates the haze that detracts from an otherwise flawless detailing job.
Key Features to Look for in a Quality Glass Polish
When evaluating glass polishes for your car care routine, several characteristics separate professional-grade products from consumer disappointments.
Abrasive Level and Grit Rating
For light scratches, you want a polish with fine abrasives—typically equivalent to 1500-3000 grit. Anything coarser risks creating more noticeable hazing. Look for products labeled specifically for “light scratch removal” or “final finishing.” Some advanced polishes feature diminishing abrasives that break down into smaller particles as you work, allowing the same product to perform both cutting and finishing duties.
Chemical Composition and Safety
The polish should be ammonia-free and safe for all automotive glass, including tinted windows. Many modern vehicles feature UV-reflective coatings or embedded antenna elements in the glass—harsh chemicals can damage these. Water-based formulas are generally safer than solvent-heavy alternatives and produce less odor during application. Always check for compatibility with window tints; the wrong chemical can cause bubbling or discoloration.
Ease of Application
The best polishes for DIY car enthusiasts offer reasonable working times without drying too quickly or staying tacky. They should wipe off cleanly without leaving stubborn residues that require additional cleaning. Look for products that perform well in typical garage temperatures—extremes can affect how the polish breaks down and levels.
Versatility Across Glass Types
Your vehicle likely has several different glass surfaces: laminated windshield glass, tempered side windows, and possibly a rear window with defroster lines. A quality polish should work safely across all these surfaces without risking damage to embedded electronics or heating elements. Some premium formulations even work on polycarbonate headlights, adding value to your purchase.
Drying Time and Residue
Premium glass polishes remain workable for 3-5 minutes before starting to set, giving you adequate time to work the product without rushing. They should dust minimally and wipe away with a clean microfiber towel, leaving no white powdery residue in cracks or crevices. Products that require extensive cleanup defeat the purpose of simplifying your car care routine.
Different Types of Glass Polishes
Understanding the various formulations helps you match the product to your skill level and equipment.
Cream Polishes
Cream polishes offer the longest working time and are most forgiving for beginners. Their thick consistency prevents slinging during machine application and stays where you place it. They typically contain higher concentrations of lubricating oils, which help the abrasives glide smoothly across the glass surface. For car owners who prefer hand polishing, cream formulations provide the best control.
Powder Compounds
Professional detailers often prefer powder compounds that mix with water to create custom consistencies. These offer the most aggressive cutting power for deeper scratches but require experience to use correctly. For light scratches, powders are generally overkill unless you’re comfortable with multi-stage polishing. They also demand careful measurement and mixing—too much water reduces effectiveness, while too little creates excessive heat.
Liquid Formulations
Liquid polishes represent the middle ground—easier to apply than powders but more aggressive than creams. They work exceptionally well with machine polishers and spread thinly, making them economical. However, they dry faster and can be prone to dripping on vertical surfaces like side windows. For large flat areas like windshields, liquids offer efficient coverage.
Hybrid Solutions
Some modern car care manufacturers offer hybrid products that combine glass polish with protective sealants. While convenient, these often compromise on both functions. For best results with light scratches, stick with a dedicated polish first, then apply a separate protectant. Think of it as the same principle you follow with paint—compound, then polish, then protect.
Application Methods That Make a Difference
Your technique dramatically influences results, regardless of polish quality.
Hand Application Techniques
For light scratches, hand polishing can be surprisingly effective when done correctly. Apply firm, overlapping pressure using a foam applicator pad. Work in small sections—about 2x2 feet—and use straight-line motions rather than circular patterns to avoid creating swirl marks. Keep the surface lubricated; if the polish starts to dry, mist lightly with water rather than adding more product.
Machine Polishing for Better Results
A random orbital polisher with a glass-specific pad transforms the process. The mechanical action ensures more uniform abrasive distribution and prevents arm fatigue during extended sessions. Set your polisher to low speeds (1200-1800 RPM) to avoid generating excessive heat, which can warp glass or damage window seals. Always keep the pad flat against the surface and move slowly—about one inch per second.
Dual-Action vs. Rotary Considerations
For car owners investing in a polisher, dual-action (DA) machines offer the safest learning curve. Their oscillating pattern prevents concentrated heat buildup and reduces the risk of holograms. Rotary polishers cut faster but demand greater skill; a moment’s inattention can burn through glass coatings or create uneven surfaces. For light scratch removal, a DA polisher with a glass polishing pad is the ideal compromise between speed and safety.
Essential Tools and Accessories
The right accessories elevate your glass polishing game from amateur to professional results.
Choosing the Right Applicator Pads
Glass polishing requires firmer pads than paint correction. Look for dense foam or felt pads specifically designed for glass work. These maintain pressure against the hard surface and distribute abrasives evenly. Avoid soft, plush pads—they absorb too much product and lack the necessary firmness to work the polish effectively. For hand application, use a firm, flat foam block rather than a wrapped towel.
Microfiber Towels: Your Best Friend
Not all microfiber is created equal for glass work. Use high-quality, edgeless towels with a minimum 300 GSM (grams per square meter) and a 70/30 polyester-to-polyamide blend. These grab and hold polish residue without scratching. Always use a fresh towel for final wipe-down; reusing towels with embedded particles guarantees new scratches. Keep separate towels for glass polishing—never cross-contaminate with paint or wheel towels.
Protective Equipment
Even water-based polishes create fine dust during breakdown. Wear a quality respirator mask and safety glasses, especially during machine polishing. Nitrile gloves protect your skin from prolonged abrasive contact and prevent oils from your hands transferring to the glass. If working on a windshield interior, protect your dashboard with a dedicated cover—polish dust is incredibly fine and difficult to remove from porous surfaces.
Step-by-Step Guide to Polishing Light Scratches
Preparation determines 80% of your success in car care tasks.
Start by thoroughly cleaning the glass with a dedicated automotive glass cleaner and a clay bar treatment. This removes bonded contaminants that would interfere with polishing. Tape off surrounding paint and trim with automotive-grade painter’s tape—polish will stain black trim permanently. Work in a shaded area; direct sunlight causes premature drying.
Apply a quarter-sized amount of polish to your pad and spread it across the section before starting your machine or hand pressure. Work the product until it becomes nearly transparent—this indicates the abrasives have broken down. Wipe away residue with a clean microfiber, then inspect under LED light. Repeat if scratches remain visible. Never apply fresh polish over residue; always wipe clean between passes.
Common Mistakes to Avoid
The most frequent error is using too much product. Excess polish creates a thick layer that prevents abrasives from contacting the glass surface effectively. Another critical mistake is insufficient cleaning beforehand—dragging dirt across glass while polishing creates deeper damage. Many car owners also polish too aggressively, generating heat that can crack glass or melt surrounding seals. Remember: glass polishing is about patience, not pressure.
Avoid polishing in extreme temperatures. Cold glass causes polishes to skim over without cutting, while hot glass makes them dry instantly. Ideal conditions are 60-75°F with moderate humidity. Finally, never rush the final wipe-down. Hasty removal leaves behind polish residue that bakes onto the glass in sunlight, requiring a complete redo.
Maintaining Your Glass After Polishing
Your work shouldn’t end when the scratches disappear. Proper maintenance preserves your results and prevents recurrence.
Protective Coatings and Sealants
After polishing, apply a glass-specific sealant or ceramic coating. These products fill the microscopic pores you’ve just opened in the glass, creating a slick surface that repels water and resists future scratching. They also make cleaning easier—dirt and contaminants have less to grab onto. Reapply every 3-6 months depending on your climate and driving conditions.
Regular Cleaning Practices
Adopt a two-bucket method for glass cleaning, just as you would for paint. Use one bucket for your cleaning solution and another for rinsing your wash mitt. This prevents reintroducing dirt that causes scratches. Always lift wiper blades away from the glass before washing, and clean the blades themselves with isopropyl alcohol weekly. Replace wiper blades every six months—stiff, cracked blades are the number one cause of new scratches.
When to Seek Professional Help
If you’ve attempted two polishing sessions without satisfactory improvement, the scratches may be deeper than initially assessed. Professionals have access to more aggressive compounds and specialized equipment like glass-specific rotary tools with water-fed systems. They can also determine if the damage is actually in the glass or in a surface coating that requires different treatment.
Seek immediate professional evaluation for scratches in the driver’s line of sight. DIY attempts that create optical distortion can compromise safety and may be illegal in some jurisdictions. Also, any scratch that’s penetrated the outer layer of laminated windshields requires expert assessment, as it may have compromised the structural integrity.
Environmental Considerations
Modern car care involves environmental responsibility. Water-based polishes are preferable to solvent-based formulas, which release volatile organic compounds (VOCs) into your garage and the atmosphere. Look for biodegradable options that won’t harm local waterways if residue washes into storm drains.
Collect used polish residue rather than hosing it into the environment. Many automotive recycling centers accept contaminated shop towels and polish waste. Consider using a water catchment system when rinsing—glass polish particles, though microscopic, can accumulate in soil over time.
Cost vs. Value: Making Smart Choices
The most expensive glass polish isn’t always the best for your situation. A $50 professional-grade product that requires a $200 polisher to use effectively offers poor value if you’re only touching up a few scratches. Conversely, a $10 budget polish that takes five applications to achieve marginal results wastes time and effort.
Calculate value based on coverage area and required applications. A quality polish that removes light scratches in one pass at $30 offers better value than a $15 product needing three applications. Factor in your time and the cost of accessories. For occasional use, a mid-range cream polish compatible with hand or machine application provides the best balance of performance, ease of use, and cost-effectiveness.
Frequently Asked Questions
Can I use metal polish or toothpaste as a budget alternative for glass scratches?
While these household items contain mild abrasives, they lack the specific hardness and particle size control needed for automotive glass. Metal polish often contains oils that smear and are difficult to remove, while toothpaste can leave permanent hazing. Dedicated glass polishes are engineered for the specific hardness of automotive glass and include lubricants that prevent further damage.
How often should I polish my car’s glass?
Polish only when scratches become visible and affect clarity. Over-polishing removes microscopic layers of glass unnecessarily. For most drivers, glass polishing every 12-18 months is sufficient. Regular maintenance with proper cleaning and protective coatings minimizes the need for frequent polishing.
Will polishing remove my window tint?
Quality glass polishes are safe for factory tints integrated into the glass. However, aftermarket window films applied to the interior surface can be damaged if polish seeps under edges during exterior work. Always tape off film edges and work carefully around seals. Polish residue on tint can usually be cleaned with ammonia-free glass cleaner if addressed immediately.
Can I polish the inside of my windshield?
Yes, but with extra caution. Interior glass accumulates different contaminants—oils from dashboard off-gassing, nicotine residue, and film from HVAC systems. Clean thoroughly first, and work in smaller sections to prevent polish dust from settling on interior surfaces. Use minimal product and keep a vacuum nearby to capture dust as you work.
What speed should I use on my dual-action polisher for glass?
Stay between 3,000-4,500 OPM (orbits per minute) on a DA polisher. This provides adequate cutting power without generating excessive heat. Start at the lower end and increase only if progress is too slow. Higher speeds create heat that can damage window seals and cause the polish to dry prematurely.
Is it normal to see more scratches after the first polishing pass?
Yes, this is common. Polishing removes the hazy, oxidized layer that can hide underlying micro-scratches. After your first pass, wipe thoroughly and inspect under good lighting. What you’re seeing is the true condition of the glass. A second, finer polishing pass with a finishing polish will typically remove these newly revealed light scratches.
Can I polish glass in cold weather?
Temperatures below 50°F make polishing difficult. The glass stays cold, preventing proper polish breakdown, and condensation can interfere with the process. If you must work in cool conditions, use a space heater to warm the glass surface to at least 60°F before starting. Never pour hot water on cold glass to warm it—the thermal shock can cause cracking.
How do I know when the polish has broken down enough?
The polish will transition from opaque to nearly transparent and feel smoother as you work. You’ll notice reduced resistance and the pad will glide more easily. This typically takes 2-4 minutes of consistent work. Wipe a small test area—if scratches are reduced but the glass looks hazy, the polish needs more working time.
Will polishing fix wiper blade chatter?
Often, yes. Wiper chatter frequently results from microscopic pitting and contamination on the glass surface that polish removes. After polishing, thoroughly clean your wiper blades with isopropyl alcohol and replace them if they’re older than six months. The combination of smooth glass and fresh blades usually eliminates chatter.
Can I use the same polish on my headlights?
Only if the product specifically states it’s safe for polycarbonate. Automotive glass is silicon dioxide-based, while headlights are polycarbonate plastic. Many glass polishes are too aggressive for headlights and can cause yellowing or clouding. Some modern formulations work on both, but always verify compatibility before application to avoid costly headlight restoration or replacement.